Thingiverse

Simple 5mm spacer by scr3wballl
by Thingiverse
Last crawled date: 3 years ago
IMPORTANT NOTE: If you use PLA (like most new people do with printing), use your slicer program to increase the size of this spacer to 102% before printing. With ABS it should be very close depending on the steps and tolerance of your printer. Check it with a caliper, 4.9 to 5.1 should be fine.
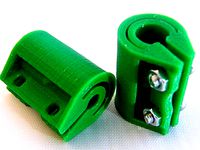
Those with a new Prusa kit or Prusa clone kit setup many times find that once their Z axis raises up 10mm or more, the motors seem to start "skipping" or one side refuses to rise up properly. One common cause of this is the threaded rod being pushed into the spring blocks too far (the other being the two sides not level with the printer itself). Both the motor shaft and the threaded rod should only go into the spring block at most 6mm. Since most people are able to do very small prints up to 6-10mm before the Z axis starts binding, this is a VERY simple 5mm spacer, with an 8mm hole in the middle (meaning it can be used with either 5mm or 8mm shafts).
Then once it prints, turn off power to your printer, loosen one side, slide this spacer over the motor shaft the height of the spacer (5mm), and using a very fine pointed sharpie marker, mark the other side. Slide the spring block onto it to that point and tighten down. Then do the same with the threaded rod. go to the other side and repeat until all 4 are spaced into the spring block the same amount.
Then make sure to re-level your Z axis with the printer (not the table it sits on), turn the power back on and adjust the Z stop and bed level height since this likely changed.
Similar models
thingiverse
free
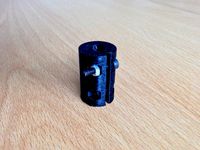
5mm to 8mm Z axis shaft coupler by mrice
...ible shaft couplers on z axis rods, for 5mm motor shafts and 8mm threaded rods. use two m3x10mm screws and nuts to tighten down.
thingiverse
free

Sunhokey upper Z axis blocks w bearing by jvince
...ed the z threaded rods with longer ones, but the stock shafts should reach if you raise/adjust the motor to threaded rod coupler.
thingiverse
free

Z Rod Coupler: 4.5mm flat motor shaft to 5mm threaded rod by swapsCAPS
...th a 4.5mm flat sided shaft to a 5mm threaded rod.
use m3 10mm hex bolts together with m3 lock nuts to screw the pieces together.
thingiverse
free

Prusa i3 Z-axis Coupler by rj_168
...od and stepper motor
5mm to 5mm coupler
3mm bolts used
try not to over tighten or it may split
has worked very well on my printer
thingiverse
free

Prusa I3 Hephestos improved Z axis bracket for 22mm bearing size and with 5mm threaded rod adapter to 8mm by TomasDLV
...ring.
it also include and adapter for the threaded rod of 5mm to 8mm.
i recomend to print with infill 100% if you are using pla.
thingiverse
free
Simple Z axis Couplers by FablabMoebius
...tl.
[update 03/09/15] : fixed the screw axis closer to the body for a stronger grip on motor shaft & acme rod (all versions).
thingiverse
free

Z-coupler for 5/16" threaded rod by DirtySteve
... 2 pieces per motor and assemble with m3 screws and nuts. i made these to eliminate z-wobble on my prusa-mendel variant printer.
thingiverse
free

Prusa i3 Wood frame z-rod bearing holder by gggkkk
...se
this is a simple z-axis rod holder for a 625 bearing. it works on the wood frame.
z-rod: 5mm
bearing: 625
z-axis shaft: 8mm
thingiverse
free

Prusa i3 trapezoid thread Z-axis mod by pansono
... nut and the leveling screw.
i completely got rid of my z-wobbling problem this way.
keep in mind to adobt your printer firmware.
thingiverse
free

Yet Another Prusa Mendel Z Coupling by nophead
... some angular movement if the rod is not straight. see http://hydraraptor.blogspot.com/2011/06/yet-another-prusa-z-coupling.html.
Scr3Wballl
thingiverse
free

Tablet or phone mount by scr3wballl
...tablet or phone mount by scr3wballl
thingiverse
simple tablet mount
thingiverse
free

Calibration - 100mm for 3 axis by scr3wballl
...on - 100mm for 3 axis by scr3wballl
thingiverse
just a simple 100mm length on all 3 axis, can be used to calibrate your e-steps.
thingiverse
free

Simple church by scr3wballl
... (150mm) tall. i printed it without a raft and no supports with black pla, although i did use a brim skirt to help with adhesion.
thingiverse
free

GeekPro camera mount by scr3wballl
... sharing for all here. all the gopro2 variations also cover up the mic and/or speaker holes for the geekpro and s5000 variations.
thingiverse
free

Deck lid remix with fan screw holes by scr3wballl
... for the fan... so i made some, designed to fit a standard 80mm pc case fan (72mm hole distance). otherwise model is all original
thingiverse
free

Y belt mount by scr3wballl
...e fine) and nuts to mount to the carriage. on the clamp style, the nut fits really tight so may need pliers to force it in there.
thingiverse
free

sunhokey MKS lid remix w/ fan by scr3wballl
...o includes a 3mm thick version since the original at 1mm is too thin to properly support an 80mm fan when box is mounted upright.
thingiverse
free

Simple HT Radio Stand by scr3wballl
...or uv-82 with the 3800mah extended battery). should also work well with taller handheld cb radios (like the radio shack 21-1679).
Spacer
thingiverse
free

Spacers
...cers
diametre_inter=1.9; // diameter of hole of spacers for screw always add 0.4mm
//example for 3mm diameter 1.5 + 0.4mm = 1.9mm
thingiverse
free

Spacer by grafis
...spacer by grafis
thingiverse
spacer
thingiverse
free

spacer by airsoftedward
...spacer by airsoftedward
thingiverse
spacer
thingiverse
free

Spacer by jrwolfe
...spacer by jrwolfe
thingiverse
spacer
thingiverse
free

Sign spacer
...sign spacer
thingiverse
sign spacer
thingiverse
free

Spacer by error404robotics_2336
...spacer by error404robotics_2336
thingiverse
a small spacer
thingiverse
free

monitor spacer
...monitor spacer
thingiverse
spacer for monitor rod
thingiverse
free

Spring spacer
...spring spacer
thingiverse
spacer to add spring tension
thingiverse
free

Spacer by franz2108
...spacer by franz2108
thingiverse
spacer by franz [created on 3dtin]
thingiverse
free

Plastic Spacer
...plastic spacer
thingiverse
plastic bushing/spacer for paper shredder.
5Mm
thingiverse
free

5mm to 5mm Connector by szczepko
...to 5mm connector by szczepko
thingiverse
it presents a designed 5mm by 5mm connector
length 30mm
4 2mm holes for locking screws.
thingiverse
free

Coupler 5mm to 5mm for Stepper motor by mrAkuaku
... to 5mm for stepper motor by mrakuaku
thingiverse
this is a small coupler i made. it uses 3m nuts and bolts and fits 5mm to 5mm.
thingiverse
free

5mm spacer by boutrous
...5mm spacer by boutrous
thingiverse
5mm spacer
thingiverse
free

circle 5mm by jovack669
...circle 5mm by jovack669
thingiverse
it's lots of circles going up in 5mm from 5mm to 50mm sizes.
thingiverse
free

Shelf supports 5mm
...shelf supports 5mm
thingiverse
shelf supports 5mm
thingiverse
free

Parametric Shaft Coupling,5mm/6mm converted to a 5mm by Okatake
...verted to a 5mm by okatake
thingiverse
it is the coupling to convert to the shaft axis of a shaft stepper motors 5mm to 5mm/6mm.
thingiverse
free

2020 5mm by Tazzi911
...2020 5mm by tazzi911
thingiverse
abdeckung für 2020 5mm profil
thingiverse
free

Knob 5mm by Innovativeuser
...knob 5mm by innovativeuser
thingiverse
round knob for furniture with a 5mm hole
thingiverse
free

Hex Key 5mm
...hex key 5mm
thingiverse
hex key. 5mm
based on my drumkey.
thingiverse
free

BB 5mm by elit33
...bb 5mm by elit33
thingiverse
5mm bb/pellet
(use supports for 5)
Simple
thingiverse
free

Simple Box / Boîte simple by Falkos
...simple box / boîte simple by falkos
thingiverse
simple box
thingiverse
free

Simple Diamond
...simple diamond
thingiverse
simple diamond.
thingiverse
free

Simple Bookend
...simple bookend
thingiverse
a simple bookend
thingiverse
free

Simple Cross
...simple cross
thingiverse
simple cross
thingiverse
free

Vase simple
...vase simple
thingiverse
vase simple
thingiverse
free
Simple Lance
...simple lance
thingiverse
simple lance
thingiverse
free

Escafandra simple. Simple scuba. by Unseulmot
...ot
thingiverse
modelo simple de una escafandra para imprimir de una pieza.
simple model of a diving suit for one-piece printing.
thingiverse
free

Simple Balisong
...simple balisong
thingiverse
simple design of a balisong.
thingiverse
free

Simple Bowl
...simple bowl
thingiverse
just a simple bowl
thingiverse
free

Simple Keychains
...simple keychains
thingiverse
simple keychain design