Thingiverse

Simchair MK III I2C twin throttle collective by hc625ma
by Thingiverse
Last crawled date: 3 years, 1 month ago
IMPORTANT! PLEASE USE LATEST FILES FROM GITHUB:
https://github.com/hc625ma/simchair_models/tree/master/Components/Peripherals/Twin%20collective
Visit http://hc625ma.org for latest news and manuals!
DESCRIPTION BELOW WILL BE UPDATED SOON
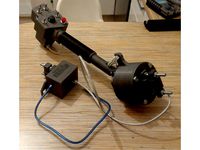
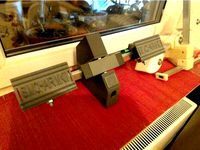
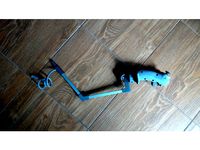
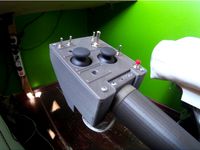
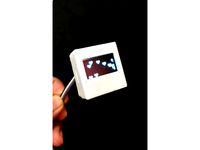
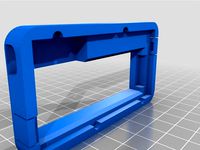
This is an open source "Bell 412 style" dual throttle collective lever, intended to be used with Simchair MKIII, or as a separate PC joystick. It has a switch panel mount, as the panel is currently in development, you can use the decorative cover for now. Throttles turn 200 degrees like in a real 412. This is not intended to be a scale version of the 412 collective lever, but it is "412 themed" and looks kinda similar to the real one. Because of 200 degrees turn, (as standard potentiometers have 300 degrees turn), you will either need a step up voltage converter to power its potentiometers or a calibration in windows game controller properties.
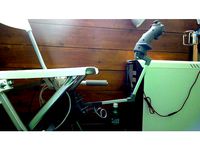
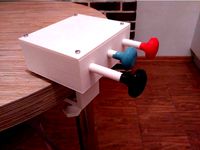
As usual, IKEA GUNDE chair mount is included.
This lever is especially useful when flying X-Trident AB 412 in X-Plane 11.
Parts list:
M8x75mm screws 4pcs
M3 50-20 mm screws (all sizes with a 5mm step)
M3 regular and nyloc nuts
M4x80mm screws 2pcs
M4 nyloc nuts 2pcs
608zz bearings 2pcs
SS495A hall effect sensor 2pcs (https://goo.gl/1mxfRz)
10KOhm LINEAR potentiometer with SHORT HANDLE, AROUND 8MM 2pcs
(https://goo.gl/vbi1Zh)
6x6x4mm square magnet * 1pcs
wires
RJ-45 connector, ethernet cable
OPTIONAL: aluminum square pipe 10x10mm
OPTIONAL: step-up voltage converter (MT3608, for example): https://goo.gl/pQdAwK
OPTIONAL: Arduino UNO with atmega 16u2: https://goo.gl/Pmok1L
OPTIONAL: Arduino UNO proto shield: https://goo.gl/1meUh4
OPTIONAL: RJ45 sockets https://goo.gl/HnH48X
OPTIONAL: IKEA GUNDE chair
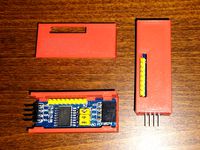
You can plug this lever into your favorite joystick controller. If you don't have one, no worries, the software for Arduino UNO is included. Note that you will need an original Arduino UNO or its exact clone with atmega16u2 onboard.
P.S. An assembly video (below) is not that good but should give you the general idea of how to build it.
How to use the voltage converter:
WARNING, IF YOU DON'T KNOW WHAT YOU ARE DOING, USE SOFTWARE CALIBRATION INSTEAD, YOU CAN DAMAGE YOUR HARDWARE!
Power up the converter and adjust its output to 5 volts.
Connect potentiometers to converter's OUTPUT, SS495A to its INPUT (!).
Turn throttle grips so that voltage between signal legs of potentiometers and ground would be zero.
Turn throttle grips to the other side, check voltage between signal legs and ground, should be around 3v. Adjust to 5.
Connect the lever to the controller and plug it into PC. Check that grips travel range corresponds full axes travel range in game controller properties window.
Fly!
How to use UnoJoy software:
Upload the "simchair.ino" sketch to your Arduino with an Arduino IDE.
Install Atmel FLIP.
Turn your Arduino into DFU mode.
Your board should come up as an atmega16u2.
Run "Turn into a joystick.bat"
Replug your board and it will show up as a joystick.
Note that ALL analog inputs MUST be either connected to potentiometers or grounded.
Ethernet cable connections:
White-orange: +5v
Orange: Ground
White-Green: Collective axis
Blue: Throttle 1 axis
White-Blue: Throttle 2 axis
Use the T-568B standard wire order for all your connections (see picture below).
Keep in mind, that if you only need one throttle grip and do not need the collective head switch panel, you can use a simpler, single engine, 300 degrees, version: https://www.thingiverse.com/thing:2630031.
https://github.com/hc625ma/simchair_models/tree/master/Components/Peripherals/Twin%20collective
Visit http://hc625ma.org for latest news and manuals!
DESCRIPTION BELOW WILL BE UPDATED SOON
This is an open source "Bell 412 style" dual throttle collective lever, intended to be used with Simchair MKIII, or as a separate PC joystick. It has a switch panel mount, as the panel is currently in development, you can use the decorative cover for now. Throttles turn 200 degrees like in a real 412. This is not intended to be a scale version of the 412 collective lever, but it is "412 themed" and looks kinda similar to the real one. Because of 200 degrees turn, (as standard potentiometers have 300 degrees turn), you will either need a step up voltage converter to power its potentiometers or a calibration in windows game controller properties.
As usual, IKEA GUNDE chair mount is included.
This lever is especially useful when flying X-Trident AB 412 in X-Plane 11.
Parts list:
M8x75mm screws 4pcs
M3 50-20 mm screws (all sizes with a 5mm step)
M3 regular and nyloc nuts
M4x80mm screws 2pcs
M4 nyloc nuts 2pcs
608zz bearings 2pcs
SS495A hall effect sensor 2pcs (https://goo.gl/1mxfRz)
10KOhm LINEAR potentiometer with SHORT HANDLE, AROUND 8MM 2pcs
(https://goo.gl/vbi1Zh)
6x6x4mm square magnet * 1pcs
wires
RJ-45 connector, ethernet cable
OPTIONAL: aluminum square pipe 10x10mm
OPTIONAL: step-up voltage converter (MT3608, for example): https://goo.gl/pQdAwK
OPTIONAL: Arduino UNO with atmega 16u2: https://goo.gl/Pmok1L
OPTIONAL: Arduino UNO proto shield: https://goo.gl/1meUh4
OPTIONAL: RJ45 sockets https://goo.gl/HnH48X
OPTIONAL: IKEA GUNDE chair
You can plug this lever into your favorite joystick controller. If you don't have one, no worries, the software for Arduino UNO is included. Note that you will need an original Arduino UNO or its exact clone with atmega16u2 onboard.
P.S. An assembly video (below) is not that good but should give you the general idea of how to build it.
How to use the voltage converter:
WARNING, IF YOU DON'T KNOW WHAT YOU ARE DOING, USE SOFTWARE CALIBRATION INSTEAD, YOU CAN DAMAGE YOUR HARDWARE!
Power up the converter and adjust its output to 5 volts.
Connect potentiometers to converter's OUTPUT, SS495A to its INPUT (!).
Turn throttle grips so that voltage between signal legs of potentiometers and ground would be zero.
Turn throttle grips to the other side, check voltage between signal legs and ground, should be around 3v. Adjust to 5.
Connect the lever to the controller and plug it into PC. Check that grips travel range corresponds full axes travel range in game controller properties window.
Fly!
How to use UnoJoy software:
Upload the "simchair.ino" sketch to your Arduino with an Arduino IDE.
Install Atmel FLIP.
Turn your Arduino into DFU mode.
Your board should come up as an atmega16u2.
Run "Turn into a joystick.bat"
Replug your board and it will show up as a joystick.
Note that ALL analog inputs MUST be either connected to potentiometers or grounded.
Ethernet cable connections:
White-orange: +5v
Orange: Ground
White-Green: Collective axis
Blue: Throttle 1 axis
White-Blue: Throttle 2 axis
Use the T-568B standard wire order for all your connections (see picture below).
Keep in mind, that if you only need one throttle grip and do not need the collective head switch panel, you can use a simpler, single engine, 300 degrees, version: https://www.thingiverse.com/thing:2630031.
Similar models
thingiverse
free

Simchair mk III simple collective (OUTDATED) by hc625ma
... with a filtered 10-bit resolution!
---- update 23.05.2018
collective assembly manual added!http://hc625ma.org/simple-collective/
thingiverse
free

Simchair MKIII basic 6 axis controller (outdated) by hc625ma
...date 19.05.2018
a better design is available which is a major improvement. check it out:https://www.thingiverse.com/thing:2919692
thingiverse
free
Simchair MKIII I2C single engine collective lever by hc625ma
...please re-download i2c_connector_cover.stl
uh-1 collective head development snapshot is available at my site: http://hc625ma.org/
thingiverse
free
Simchair MKIII anti-torque pedals by hc625ma
...nd ethernet socket pin 2
addr - sda (bus address 0x4a)
a0 - ss495a signal
scl - ethernet socket pin 3
sda - ethernet socket pin 4
cults
free

Throttle / Pedal
...es.
i tried to explain everything in the pictures but if you have any questions feel free to ask :-)
printed in pet-g res 0.2mm
thingiverse
free
Simchair MKIII cyclic gimbal v2 I2C by hc625ma
...cyclic gimbal for the simchair mkiii. it is quite similar to v1 (https://www.thingiverse.com/thing:2795753) except for added mechanical calibration capability...
thingiverse
free

Simchair MKIII IKEA GUNDE chair frame parts by hc625ma
... make it more comfortable (yet still compact!). it should also fix the problem with a weak plastic back breaking after some time.
thingiverse
free

Yoke And Throttle Controls for Flight Simulator Using Arduino by dvilardi
...r and reset pins)
mdf wood base and screws
wires (tip: use old ethernet cables)
(optional) pov analog joystick module and buttons
thingiverse
free

3D Scanner Rotary Surface (w/ speed control) by AndreCarvalho
...sideration that adjustments may be needed. any faulty piece or some improvement that you may require, please notify me.
thanks :d
thingiverse
free

Simchair MKIII I2C controller by hc625ma
...quently, please use the latest.
you can always find it in the simchair_i2c repo on github:https://github.com/hc625ma/simchair_i2c
Simchair
thingiverse
free
Simchair MKIII I2C controller by hc625ma
...quently, please use the latest.
you can always find it in the simchair_i2c repo on github:https://github.com/hc625ma/simchair_i2c
thingiverse
free
Simchair MKIII anti-torque pedals by hc625ma
...nd ethernet socket pin 2
addr - sda (bus address 0x4a)
a0 - ss495a signal
scl - ethernet socket pin 3
sda - ethernet socket pin 4
thingiverse
free
Simchair MKIII cessna 182 engine & prop controls by hc625ma
...
sda to socket pin 4 (blue wire on the plug)
flash the ino file to the board and get 3 10 bit axes for your single-prop ga plane!
thingiverse
free
Simchair MKIII IKEA GUNDE chair frame parts by hc625ma
... make it more comfortable (yet still compact!). it should also fix the problem with a weak plastic back breaking after some time.
thingiverse
free
Simchair MKIII I2C B8 flight stick by hc625ma
... liking, cut the aluminum pipe accordingly, then route an ethernet cable through the pipe and crimp it as a usual ethernet cable.
thingiverse
free
Simchair MKIII cyclic gimbal v2 I2C by hc625ma
...19692)
1 x ads1115 16 bit adc
check out an assembly manual at http://hc625ma.org/cyclic-gimbal/ , more interesting stuff to come!
thingiverse
free
Simchair MKIII I2C AB412-style collective head by hc625ma
...or twin-throttle version)
1x tj8-8p8 ethernet socket
you will find more info on my site:http://hc625ma.org/ab412-collective-head/
thingiverse
free
Simchair MKIII basic 6 axis controller (outdated) by hc625ma
...date 19.05.2018
a better design is available which is a major improvement. check it out:https://www.thingiverse.com/thing:2919692
thingiverse
free

SimChair mkII (outdated, use MKIII version instead) by hc625ma
...e collective with switch panel mount: https://www.thingiverse.com/thing:2747131
pedals: https://www.thingiverse.com/thing:2802115
thingiverse
free
Simchair MKIII I2C single engine collective lever by hc625ma
...please re-download i2c_connector_cover.stl
uh-1 collective head development snapshot is available at my site: http://hc625ma.org/
Hc625Ma
thingiverse
free

Modified direct drive extruder by hc625ma
...er files included). the original model is not mine, the idler was re-created from stl files. 623zz bearing is used for the idler.
thingiverse
free
Simchair MKIII I2C controller by hc625ma
...quently, please use the latest.
you can always find it in the simchair_i2c repo on github:https://github.com/hc625ma/simchair_i2c
thingiverse
free
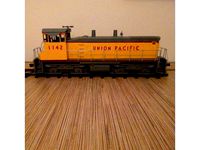
1:32 OpenRailway EMD SW1500 Union Pacific No. 1142 stencils by hc625ma
...ingiverse.com/thing:916416) union pacific no. 1142 stencils, print with 0.1mm layer and use painters tape to fix it on the model!
thingiverse
free
Simchair MKIII IKEA GUNDE chair frame parts by hc625ma
... make it more comfortable (yet still compact!). it should also fix the problem with a weak plastic back breaking after some time.
thingiverse
free

Rc scaler printable trailer ball link by hc625ma
...ook of your truck.
the trailer on the pic is this one:
https://www.thingiverse.com/thing:3543490
and it's awesome! have fun!
thingiverse
free

Xbox 360 gamepad stick extenders, 10,20 and 30mm by hc625ma
...t sims, i'd still recommend trying the simchair (https://www.thingiverse.com/thing:1578566). source files are also included.
thingiverse
free
Simchair MKIII I2C B8 flight stick by hc625ma
... liking, cut the aluminum pipe accordingly, then route an ethernet cable through the pipe and crimp it as a usual ethernet cable.
thingiverse
free
Simchair MKIII anti-torque pedals by hc625ma
...nd ethernet socket pin 2
addr - sda (bus address 0x4a)
a0 - ss495a signal
scl - ethernet socket pin 3
sda - ethernet socket pin 4
thingiverse
free

Y tricopter v5 by hc625ma
...за соединительная м4, http://www.bolt.ru/catalog/mebelnaya_furnitura/styazhki_bolty_vinty/gilza_soedinitelnaya_gajka.html?limit=0
thingiverse
free
Simchair MKIII I2C single engine collective lever by hc625ma
...please re-download i2c_connector_cover.stl
uh-1 collective head development snapshot is available at my site: http://hc625ma.org/
I2C
thingiverse
free

I2C for LCD
...i2c for lcd
thingiverse
i2c for lcd.
3dfindit
free

EA_T123X-I2C
...ea_t123x-i2c
3dfind.it
catalog: kicad
thingiverse
free

I2C Terminal by smily77
... provide asimple input / output possibility.
it's just a housing for a 2 line lcd 05 i2c display and 12 tactile switches 6610
thingiverse
free
i2c box by robermorales
...i2c box by robermorales
thingiverse
box
thingiverse
free

Pixhawk I2C display by silentjet
...pixhawk i2c display by silentjet
thingiverse
this is a model of now a days bundled with pixhawk 1 an i2c display.
thingiverse
free

I2C LCD Stand by brandongarner96
...i2c lcd stand by brandongarner96
thingiverse
my version of i2c lcd stand for arduino. works fine.
thingiverse
free
SSD1306 I2C OLED 128x64 by linzaw
...ssd1306 i2c oled 128x64 by linzaw
thingiverse
ssd1360 i2c oled 128x64
thingiverse
free
fischertechnik PCF8574 I2C housing
...iverse
a housing for the (waveshare) pcf8574 i2c i/o board, stackable and with a fischertechnik compatible groove at the bottom.
thingiverse
free
Grove LCD I2C Case by Saint_Charles
...grove lcd i2c case by saint_charles
thingiverse
boitier pour lcd i2c de type grove.
thingiverse
free

1.2in I2C Backpack Holder by zcsaale
...pack holder by zcsaale
thingiverse
small holder for the 1.2" i2c backpack from adafruithttp://www.adafruit.com/products/902
Throttle
turbosquid
$69

throttle-max
... available on turbo squid, the world's leading provider of digital 3d models for visualization, films, television, and games.
turbosquid
$69

throttle-dxf
... available on turbo squid, the world's leading provider of digital 3d models for visualization, films, television, and games.
turbosquid
$10

Hand throttle
... available on turbo squid, the world's leading provider of digital 3d models for visualization, films, television, and games.
3d_export
$50

B747 Throttle Quadrant 3D Model
...t
b747 boeing throttle quadrant aircraft parts fly speed reverser thrust 747
b747 throttle quadrant 3d model gokay 83915 3dexport
turbosquid
free

Wakeboard - throttle bar 2line
... available on turbo squid, the world's leading provider of digital 3d models for visualization, films, television, and games.
turbosquid
free

Wakeboard - throttle bar 2line
... available on turbo squid, the world's leading provider of digital 3d models for visualization, films, television, and games.
3d_export
$50

Boeing B737800 Throttle Quadrant 3D Model
...7-800 b737 aircraft throttle quadrant fly speed plane acceleration
boeing b737800 throttle quadrant 3d model gokay 83755 3dexport
3d_export
$39

Brake lever and Throttle hand 3D Model
...e bike pocket clutch accelerator start button animated animation
brake lever and throttle hand 3d model cesar_vonc 11974 3dexport
turbosquid
free

Wakeboard - throttle bar 2 line obj
... available on turbo squid, the world's leading provider of digital 3d models for visualization, films, television, and games.
3d_export
$17

Throttle grip for fighter jet
...next-generation-stealth-fighter-jet-366893.htm<br>feel free to contact me for any questions or suggestions.<br>enjoy!
Mk
3d_export
$5
scorpion mk
...scorpion mk
3dexport
scorpion mk .zpr,stl,obj,stl,
turbosquid
$6

MK 11
...turbosquid
royalty free 3d model mk 11 for download as blend on turbosquid: 3d models for games, architecture, videos. (1223895)
3d_export
$5

Qubeley MK-II
...qubeley mk-ii
3dexport
3d lowpoly type qubeley mk-ii
turbosquid
$3

MK killer
...lty free 3d model mk killer for download as fbx, obj, and 3ds on turbosquid: 3d models for games, architecture, videos. (1638698)
turbosquid
$25

Valentine Mk
... available on turbo squid, the world's leading provider of digital 3d models for visualization, films, television, and games.
turbosquid
$10

Mk-16
... available on turbo squid, the world's leading provider of digital 3d models for visualization, films, television, and games.
turbosquid
$7
Mk-16
... available on turbo squid, the world's leading provider of digital 3d models for visualization, films, television, and games.
turbosquid
free

mk-2
... available on turbo squid, the world's leading provider of digital 3d models for visualization, films, television, and games.
3d_export
$25

Merkava MK 1 3D Model
... 1 3d model
3dexport
merkava mk-1 tank low-poly model maya mk1 mk mk-2 mk-3 israel army
merkava mk 1 3d model rom64 5311 3dexport
3ddd
$1
мясорубка Panasonic MK G1800P
...мясорубка panasonic mk g1800p
3ddd
мясорубка , panasonic
мясорубка panasonic mk g1800p
Iii
3d_export
$17

JetRanger III
...jetranger iii
3dexport
jetranger iii
3ddd
$1
Jarron III
...jarron iii
3ddd
jarron iii
decorative glass vase
cg_studio
$139
Panzer III - PzKpfw III - Ausf.G3d model
....3ds .c4d .lwo .obj - panzer iii - pzkpfw iii - ausf.g 3d model, royalty free license available, instant download after purchase.
cg_studio
$139
StuG III - Sturmgeschutz III - Ausf.D3d model
....c4d .lwo .obj - stug iii - sturmgeschutz iii - ausf.d 3d model, royalty free license available, instant download after purchase.
3ddd
free

Velashape III
... syneron , candela
velashape iii — аппарат для лечения целлюлита
3d_ocean
$8
Inoplanet III
...inoplanet iii
3docean
3ds arman3dg games inoplanet low max poly trees
inoplanet iii
design_connected
$16
Richard III
...richard iii
designconnected
baleri italia richard iii armchairs computer generated 3d model. designed by philippe starck.
3d_export
$199

cinderella iii
...cinderella iii
3dexport
3d_export
$119

lara iii
...lara iii
3dexport
3ddd
$1

Towel Collection III
...towel collection iii
3ddd
полотенце
towel collection iii
Twin
3ddd
free

Twin
...twin
3ddd
twin , flaminia
flaminia
twin column + twin set
diameter - 42 cm
h 85 cm
3ddd
$1

Twin Column
...twin column
3ddd
twin column
twin column
3ddd
$1

Woo Twins
...woo twins
3ddd
тумба , woo twins
прикроватная тумба из серии woo twins
3ddd
$1

Wunderlicht / TWINS
...wunderlicht / twins
3ddd
wunderlicht
wunderlicht twins
3ddd
$1

Twin shelves
...twin shelves
3ddd
twin
twin shelves. полки-близнецы от чилийских дизайнеров и русского математика
копия в 3ds
3ddd
$1

Elica / Twin
...elica / twin
3ddd
elica , вытяжка
вытяжка "twin" от "elica"
design_connected
$16

SAAR twin
...saar twin
designconnected
piet boon saar twin computer generated 3d model. designed by boon, piet.
design_connected
$11

Loft twin
...loft twin
designconnected
jieldé loft twin computer generated 3d model. designed by domecq, jean-louis.
turbosquid
$100

Twin turtle
...osquid
royalty free 3d model twin turtle for download as max on turbosquid: 3d models for games, architecture, videos. (1234762)
turbosquid
$24

Solitare twins
...uid
royalty free 3d model solitare twins for download as 3dm on turbosquid: 3d models for games, architecture, videos. (1548252)
Collective
3ddd
$1
GIORGIO COLLECTION
...giorgio collection
3ddd
giorgio collection
giorgio collection
turbosquid
$99

Florence collections - furniture collection
... available on turbo squid, the world's leading provider of digital 3d models for visualization, films, television, and games.
3ddd
$1

Jumbo Collection
...jumbo collection
3ddd
jumbo collection
диван jumbo collection
3ddd
$1

Jumbo collection
...jumbo collection
3ddd
jumbo collection
кресло jumbo collection
3ddd
free
Florence Collections
...florence collections
3ddd
florence collections , кресло
florence collections
3ddd
$1
Giorgio Collection
...и тумбочки giorgio collection , giorgio collection
кровать и тумбочки giorgio collection
3ddd
$1

Jumbo collection
...jumbo collection
3ddd
jumbo collection , капитоне
кресло jumbo collection
3ddd
$1
Giorgio Collection
...giorgio collection
3ddd
giorgio collection
производитель giorgio collection италия
3ddd
$1
Giorgio collection
...giorgio collection
3ddd
giorgio collection , круглый
giorgio collection table
3ddd
$1
Florence Collection
...florence collection
3ddd
florence collection
florence collection, текстуры есть