Thingiverse
Sim Racing Hand Brake by SlapFish
by Thingiverse
Last crawled date: 3 years ago
I designed this as a handbrake for racing sims where you only need momentary braking without a ratcheting mechanism, like drifting. You can probably use this for a lot of other functions since it's just a simple switch. My favorite examples (off the top of my head):
Arm to deploy parachutes or other single-use functions
Rocket boost lever
A lever for your evil henchmen
Cookie dispenser
Vegetable dispenser
The arm will rotate about 45 degrees before it hits the switch. Since I am in the US, and it's easy and cheap to find inch sized fasteners, the arm's shaft is a 1/4" threaded rod. All other fasteners were designed as metric fitment. I did include a couple extra versions of shaft pieces to help use a metric threaded rod. Here is a list of the parts and what you can use instead:
Arm frame - this is the base for everything, and is common for all parts
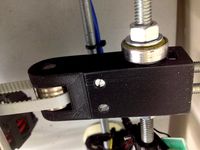
Bearing Pivot - three provided, all use the same bearing, but there are three versions with the appropriate hole and square nut cutout for your threaded rod of choice. Make sure you print the flat side down. Note that the bearing will press in from the side that faces up when printed flat side down. There is a little lip to stop the bearing once it's pressed in.
Knob - just a simple grip knob, again three versions for your threaded rod (this is a good simple part to get your feet wet in design if you want to make it your own - it has no impact on the performance besides how it feels in your hand). A locking nut fits in the top, and I used a washer and nut to jam against the bottom to keep it from wanting to spin.
Spring block - only two of these, since the 1/4" and M6 are able to both use the same one. This slides down the rod to hold a bolt for the springs which go on either side.
Switch spacer - make sure you print 2! common for all parts. Just some simple spacers to locate your switch appropriately.
The hardware you'll need:
qty. 1 of M8, M6, or 1/4" threaded rod - I used a 6.5" / ~165mm length, but feel free to use one longer or shorter for personal preference
qty. 2 of M8, M6, or 1/4" regular hex nuts - These go on the arm shaft, and are to jam against the spring block and knob and keep them from wobbling or walking around.
qty. 1 of M8, M6, or 1/4" locking nut - I prefer this on the top of the knob to help keep it from loosening and James Hunt Japan 1976'ing you.
qty. 1 of M8, M6, or 1/4" square nut - This goes in the rectangle cutout in the pivot. The sizes are 13mm, 10mm, and 7/16", respective to the given shaft size. There is a bit of tolerance built into this to make it a tight fit with respect to the slight shrinkage that happens in 3D printing. Be prepared to use clamps to squeeze the nut into place. Mine was able to just push in with my thumb.
qty. 2 of coil springs - I found two in a pack of random springs I got at Home Depot, they have the ends bent so that the last couple coils make for loops you can put bolts through. Mine measure roughly 33mm center-to-center of those end loops. You should have some freedom to use a lot of different springs here, as long as they fit.
qty. 2 of M5 x 25mm bolts, w/ locking nuts and washers - These hold the springs in place. I used locking nuts so I didn't have to fully cinch the springs down (allows them to pivot), but the bolt won't loosen over time.
qty. 2 of M3 x 30 mm bolts w/ locking nuts - These hold the switch down, with the two spacers sandwiched between the switch and frame upright
qty. 1 of momentary microswitch - Make sure you can use 3mm bolts through it, and make sure it fits. I used switch # V-153-1V25 that I had on hand, but I gave the frame long slots for the mounting bolts to allow some freedom. You can also print more spacers to stack up and space the switch you use if it's narrower than 10 mm.
qty. 1 of M8 x 30 bolt w/ washer and locking nut - For mounting the bearing to the frame and acting as the axle. Put the washer on the nut side on the back, so that it doesn't interfere with the bearing, and also to spread the load on the plastic better
qty. 1 of 608-2RS (or equivalent size) ball bearing - Pretty self explanatory. Another press fit, so keep the clamps out. A nut or washer works well to push it down against the little stop built in
qty. 2 of screws to fasten to your surface - I'm leaving this one open ended for requirements since it will have to be tailored to your surface. I am using American #8 wood screws, but any flat head (bugle shaped) machine screw would also work if you want to bolt it down instead. IMPORTANT: because of how the layers print, make sure you drill the holes to allow your screw to push through by hand. If you don't, the layers can easily split at the screw, and you'll have to wait for a new frame to print. Ask me how I know.
a small cabinet bumper - this fits on the pad behind the spring block on the frame. Keeps the noise and damage down.
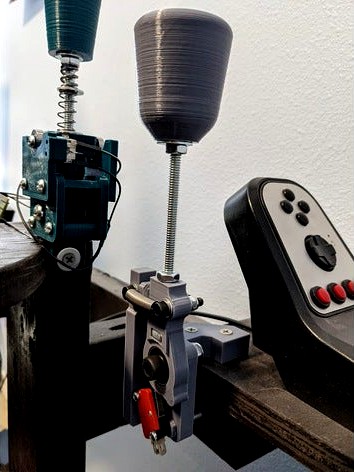
I think assembly is pretty straight forward, just use the reference image. You're on your own for wiring and making it work with your computer. There are guides on the internet that would do a much better job than I. Your choice of Teensy or Arduino or similar should work great.
The green sequential shifter in the photos is this one by bardocz: https://www.thingiverse.com/thing:4078775
Good luck, and happy racing/parachuting/blasting/evil/cookies/gross veggies!
Arm to deploy parachutes or other single-use functions
Rocket boost lever
A lever for your evil henchmen
Cookie dispenser
Vegetable dispenser
The arm will rotate about 45 degrees before it hits the switch. Since I am in the US, and it's easy and cheap to find inch sized fasteners, the arm's shaft is a 1/4" threaded rod. All other fasteners were designed as metric fitment. I did include a couple extra versions of shaft pieces to help use a metric threaded rod. Here is a list of the parts and what you can use instead:
Arm frame - this is the base for everything, and is common for all parts
Bearing Pivot - three provided, all use the same bearing, but there are three versions with the appropriate hole and square nut cutout for your threaded rod of choice. Make sure you print the flat side down. Note that the bearing will press in from the side that faces up when printed flat side down. There is a little lip to stop the bearing once it's pressed in.
Knob - just a simple grip knob, again three versions for your threaded rod (this is a good simple part to get your feet wet in design if you want to make it your own - it has no impact on the performance besides how it feels in your hand). A locking nut fits in the top, and I used a washer and nut to jam against the bottom to keep it from wanting to spin.
Spring block - only two of these, since the 1/4" and M6 are able to both use the same one. This slides down the rod to hold a bolt for the springs which go on either side.
Switch spacer - make sure you print 2! common for all parts. Just some simple spacers to locate your switch appropriately.
The hardware you'll need:
qty. 1 of M8, M6, or 1/4" threaded rod - I used a 6.5" / ~165mm length, but feel free to use one longer or shorter for personal preference
qty. 2 of M8, M6, or 1/4" regular hex nuts - These go on the arm shaft, and are to jam against the spring block and knob and keep them from wobbling or walking around.
qty. 1 of M8, M6, or 1/4" locking nut - I prefer this on the top of the knob to help keep it from loosening and James Hunt Japan 1976'ing you.
qty. 1 of M8, M6, or 1/4" square nut - This goes in the rectangle cutout in the pivot. The sizes are 13mm, 10mm, and 7/16", respective to the given shaft size. There is a bit of tolerance built into this to make it a tight fit with respect to the slight shrinkage that happens in 3D printing. Be prepared to use clamps to squeeze the nut into place. Mine was able to just push in with my thumb.
qty. 2 of coil springs - I found two in a pack of random springs I got at Home Depot, they have the ends bent so that the last couple coils make for loops you can put bolts through. Mine measure roughly 33mm center-to-center of those end loops. You should have some freedom to use a lot of different springs here, as long as they fit.
qty. 2 of M5 x 25mm bolts, w/ locking nuts and washers - These hold the springs in place. I used locking nuts so I didn't have to fully cinch the springs down (allows them to pivot), but the bolt won't loosen over time.
qty. 2 of M3 x 30 mm bolts w/ locking nuts - These hold the switch down, with the two spacers sandwiched between the switch and frame upright
qty. 1 of momentary microswitch - Make sure you can use 3mm bolts through it, and make sure it fits. I used switch # V-153-1V25 that I had on hand, but I gave the frame long slots for the mounting bolts to allow some freedom. You can also print more spacers to stack up and space the switch you use if it's narrower than 10 mm.
qty. 1 of M8 x 30 bolt w/ washer and locking nut - For mounting the bearing to the frame and acting as the axle. Put the washer on the nut side on the back, so that it doesn't interfere with the bearing, and also to spread the load on the plastic better
qty. 1 of 608-2RS (or equivalent size) ball bearing - Pretty self explanatory. Another press fit, so keep the clamps out. A nut or washer works well to push it down against the little stop built in
qty. 2 of screws to fasten to your surface - I'm leaving this one open ended for requirements since it will have to be tailored to your surface. I am using American #8 wood screws, but any flat head (bugle shaped) machine screw would also work if you want to bolt it down instead. IMPORTANT: because of how the layers print, make sure you drill the holes to allow your screw to push through by hand. If you don't, the layers can easily split at the screw, and you'll have to wait for a new frame to print. Ask me how I know.
a small cabinet bumper - this fits on the pad behind the spring block on the frame. Keeps the noise and damage down.
I think assembly is pretty straight forward, just use the reference image. You're on your own for wiring and making it work with your computer. There are guides on the internet that would do a much better job than I. Your choice of Teensy or Arduino or similar should work great.
The green sequential shifter in the photos is this one by bardocz: https://www.thingiverse.com/thing:4078775
Good luck, and happy racing/parachuting/blasting/evil/cookies/gross veggies!
Similar models
thingiverse
free

M8 bolts, nuts, threaded rods, standoffs, spacers and washer by Hersheljr
... standoffs in case i need them later.
i printed them with 0.2 layer height, they aren't loose or tight and works quite well.
thingiverse
free

Top strengthening bracket for @Geeetech i3 ProW - using the two M8 threaded rods by redangel1984
...ies needed:
2x - 608zz bearing
2x - m8x300mm threaded rod
4x - m8 spring washer (optional)
4x - m8 lock nut
4x - m8 normal hexnut
thingiverse
free

Knife sharpening jig by yoleb
...e a fitting spring if you have one.
i use a mercedes benz spare part # 442 993 51 01 this should be easy go get and cost about 1€
thingiverse
free

Anet A8 Top Frame Brace by FredGenius
...nd nuts if you can't get hold of m8 in your area.
this goes well with my z sync mod:https://www.thingiverse.com/thing:2350350
thingiverse
free
Belt Tensioner - Idle Pulley for Prusa Mendel I2 by Chris918
... old 608 bearing idler on the frame's threaded rod. it is acting as a washer on one side between the nut and the tensioner ;)
3dwarehouse
free

1/2' bolt with washers and threaded nut
...hreaded nut
3dwarehouse
1/2' bolt (with threads) with washers and threaded nut. #12 #bolt #flat #lock #nut #threaded #washer
thingiverse
free
CR-10 S5 Frame Stiffener by visualtrek
...the endcaps that came with the printer on the upper & lower extrusions,
or the 3d printed frame stiffener parts won't fit
thingiverse
free

Mini Drill press for PCB by Newtonn2
...to cut the rods).
-screw drivers or allen keys. (depending on the head of the bolts you have).
get in touch if you need any help.
3dwarehouse
free

Bolt M8 dynamic: hexagon, cylindrical or countersunk with (lock) nut and (spring)washer
...ff this model and make a solid of it. you can make a solid with tools/solid-tools/union the centreline wil be delete in the solid
3dwarehouse
free

Bolt M6 dynamic: hexagon, cylindrical or countersunk with (lock)nut and (spring)washers
...ff this model and make a solid of it. you can make a solid with tools/solid-tools/union the centreline wil be delete in the solid
Sim
turbosquid
$6

sim
...osquid
royalty free 3d model sim for download as 3dm and max on turbosquid: 3d models for games, architecture, videos. (1669193)
turbosquid
$39

Sim Card
... available on turbo squid, the world's leading provider of digital 3d models for visualization, films, television, and games.
turbosquid
free

SIM Card
... available on turbo squid, the world's leading provider of digital 3d models for visualization, films, television, and games.
design_connected
$16
Deck SIM, PIM
...deck sim, pim
designconnected
de padova deck sim, pim computer generated 3d model. designed by nichetto, luca.
turbosquid
$7

smart phone and sim
...free 3d model smart phone and sim for download as 3dm and max on turbosquid: 3d models for games, architecture, videos. (1669641)
turbosquid
$35

Grameenphone Sim Card
... grameenphone sim card for download as max, fbx, obj, and 3ds on turbosquid: 3d models for games, architecture, videos. (1527884)
turbosquid
$3

Flow Leather Chair and Sim
...lty free 3d model flow leather chair and sim for download as on turbosquid: 3d models for games, architecture, videos. (1510088)
turbosquid
$19

Nokia 107 Dual SIM
... available on turbo squid, the world's leading provider of digital 3d models for visualization, films, television, and games.
turbosquid
$15

Nokia 225 Dual Sim
... available on turbo squid, the world's leading provider of digital 3d models for visualization, films, television, and games.
turbosquid
$12

Nokia 130 Dual SIM
... available on turbo squid, the world's leading provider of digital 3d models for visualization, films, television, and games.
Brake
3d_export
$5
brake
...brake
3dexport
brake disk
turbosquid
$2
Brake
... free 3d model brake for download as blend, fbx, obj, and stl on turbosquid: 3d models for games, architecture, videos. (1600351)
turbosquid
$19

Brakes
... available on turbo squid, the world's leading provider of digital 3d models for visualization, films, television, and games.
turbosquid
$9

brake
... available on turbo squid, the world's leading provider of digital 3d models for visualization, films, television, and games.
turbosquid
$7
Brake
... available on turbo squid, the world's leading provider of digital 3d models for visualization, films, television, and games.
turbosquid
free

brake
... available on turbo squid, the world's leading provider of digital 3d models for visualization, films, television, and games.
3d_export
$5

muzzle brake
...muzzle brake
3dexport
muzzle brake for large-caliber. not a real sample.
3d_export
$22

Brakes 3D Model
...brakes 3d model
3dexport
brakes disc support ventilated caliper brake disk wheel
brakes 3d model bayazoff 30362 3dexport
3d_export
$15
Brakes 3D Model
...brakes 3d model
3dexport
brake disk support caliper
brakes 3d model mackandco 33574 3dexport
3d_export
$10

brake-disc-brembo
...brake-disc-brembo
3dexport
brake-disc-brembo
Racing
3ddd
$1
race
...race
3ddd
мотоцикл
race
turbosquid
$15
Racing
...d
royalty free 3d model racing for download as obj and blend on turbosquid: 3d models for games, architecture, videos. (1474846)
3d_export
$5

racing car
...racing car
3dexport
racing car
3d_export
$5
racing helmet
...racing helmet
3dexport
helmet 3d model for motocross or racing cars
3d_export
$5

racing car
...racing car
3dexport
low poly classical racing car model
3d_ocean
$29

racing car
...cing car rim seat speed sport sport car tyre
detailed 3d model of racing car. all materials are included. model is ready for use.
3d_ocean
$29

racing car
... rim seat speed spoiler sport sport car tire
detailed 3d model of racing car. all materials are included. model is ready for use.
3d_ocean
$15

Race Car
...race car
3docean
a very detailed and realistic 3d model of a race car, which was created with polygons.
3ddd
$1
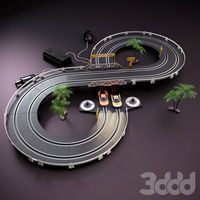
Turbo Racing
... машинка
игрушечная гоночная дорога "turbo racing". почувствуй себя настоящим гонщиком.
3d_export
$100

start race motocross
...start race motocross
3dexport
start race motocross
Hand
3d_export
$8
hand
...hand
3dexport
fantasy hand
3d_export
$5

hand
...hand
3dexport
male hand
3d_export
$5
hand
...hand
3dexport
realistic male hand
3d_export
$5

hand
...hand
3dexport
hand with nails and structure
archibase_planet
free

Hand
...hand
archibase planet
hand
hand n190111 - 3d model (*.gsm+*.3ds) for interior 3d visualization.
3ddd
$1

Hand
...hand
3ddd
hand
модель руки будды
3d_export
$5

hand
...hand
3dexport
it is my wrist of hand and this is on 3d sculpt
3d_export
$5
hand
...hand
3dexport
realistic male hand obj file
3d_export
$7

hand-006 rigged hand
...hand-006 rigged hand
3dexport
rigged right hand 3d model additional textures for pbr rendering included
3d_ocean
$6

Hand
...
this 3d models of the hands, made in 3ds max, has textures(.jpg), materials(.mat), rigged, the models in .max, fbx, obj format.