Thingiverse

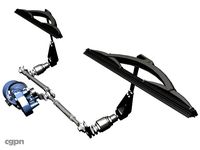
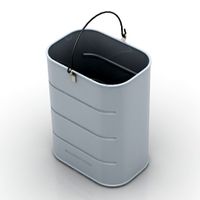
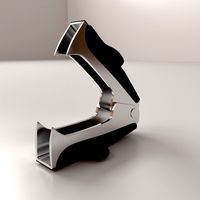
Silicone Wiper - Purge Bucket with removable tray (Artist-D) by yydoctt
by Thingiverse
Last crawled date: 2 years, 11 months ago
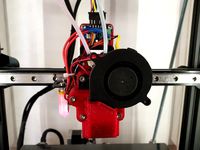
My previous brushed buckets have been working well for me, but I still find that fundamentally plastic likes to stick to the bristles when wiping. It hasn't caused any issues or failures but I tend to print quite big production parts with support material so a failure would cost a lot of time.
With that in mind I redesigned the purge buckets to use Silicone sheet to wipe instead.
Design Changes (from metal bristles):
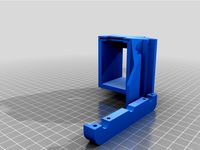
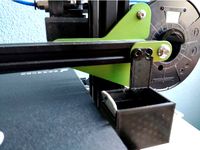
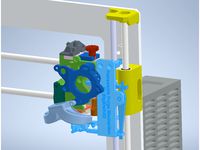
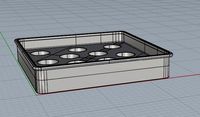
Removable tray - now the whole tray can be removed, this allows you to easily empty it or allows you to completely remove it (ideal for a really long print that you won't be there to monitor).
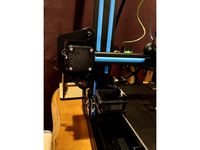
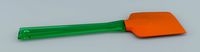
Silicone Wiper - this is a very small plastic part that you pull silicone sheet of approx. 1.5mm thick through. It's a very small piece as it is only there to make contact with the nozzle. This is the part you may want to adjust to align with your nozzle.
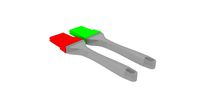
Wiper zones - My current purge routine is to purge 3mm of filament and then wipe back and forth over the wiper. I have the single wiper away from the edge of the bucket (in zone 3) as this catches any ooze on the way into the purge bucket and collects it, which is something the previous metal brush couldn't do.
Wiper zones - I also envision trying multiple wipers, perhaps multiple materials, and seeing if wiping reliability can be improved, or multiple wipers could simply provide additional redundancy.
Printing:
Small amount of support needed on Silicone_Main_Body_001
Wipers need to be a tight fit in their slots so make any scaling adjustments needed on Silicone_Leaf_001
Assembly:
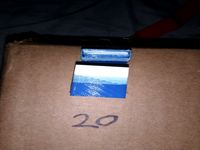
I cut a strip of silicone that is longer than needed and cut that down to an arrow (point). I thread the point through and pull through the silicone and then trim off the arrow.
In use:
Make sure your purge script or the parking location is not on a wiper, it only needs to run over the wiper on the way back to the print area so there is no need for the parking location to be close.
From playing with these wipers and previous designs, my key takeaway is that the bigger the purge the less chance that the whole purge can be dragged from the bucket on a wipe. I have my purge to just 3mm and will likely double it to use as a safety factor.
This is my ideamaker script, I have a similar one for PrusaSlicer, I am running a custom setup so the wiping locations will need to be amended if you use this script: Also this would need to be used in 'Full Control' mode
;Switch
G91 ; Relative Mode
G0 Z2 F1200 ; Move Z up 2mm
G90 ; Absolute Mode
[if {new_extruder}=1] G1 X-45 F{travel_xy_speed} ; Park Old Tool
[if {new_extruder}=0] G1 X365 F{travel_xy_speed} ; Part Old Tool
;;;;#1 Purge then Wipe ;;;;;
[if {new_extruder}=0] T0 ; Switch Tool
[if {new_extruder}=1] T1 ; Switch Tool
G92 E0 ; Reset Extruder
[if {new_extruder}=0] G1 E{extruder_switch_retraction_amount1} F120 ; Unretract
[if {new_extruder}=0] G1 E3 F120 ; Purge 3mm
[if {new_extruder}=0] G1 X-15 F{travel_xy_speed}
[if {new_extruder}=0] G1 X-45 F{travel_xy_speed}
[if {new_extruder}=0] G1 X-15 F{travel_xy_speed}
[if {new_extruder}=0] G1 X-45 F{travel_xy_speed}
[if {new_extruder}=1] G1 E{extruder_switch_retraction_amount1} F120 ; Unretract
[if {new_extruder}=1] G1 E3 F120 ; Purge 3mm
[if {new_extruder}=1] G1 X325 F{travel_xy_speed}
[if {new_extruder}=1] G1 X350 F{travel_xy_speed}
[if {new_extruder}=1] G1 X325 F{travel_xy_speed}
[if {new_extruder}=1] G1 X350 F{travel_xy_speed}
G92 E0 ; Reset Extruder
G1 E-{extruder_switch_retraction_amount1} F{extruder_switch_retraction_speed2} ; Retract Filament before going to print area
With that in mind I redesigned the purge buckets to use Silicone sheet to wipe instead.
Design Changes (from metal bristles):
Removable tray - now the whole tray can be removed, this allows you to easily empty it or allows you to completely remove it (ideal for a really long print that you won't be there to monitor).
Silicone Wiper - this is a very small plastic part that you pull silicone sheet of approx. 1.5mm thick through. It's a very small piece as it is only there to make contact with the nozzle. This is the part you may want to adjust to align with your nozzle.
Wiper zones - My current purge routine is to purge 3mm of filament and then wipe back and forth over the wiper. I have the single wiper away from the edge of the bucket (in zone 3) as this catches any ooze on the way into the purge bucket and collects it, which is something the previous metal brush couldn't do.
Wiper zones - I also envision trying multiple wipers, perhaps multiple materials, and seeing if wiping reliability can be improved, or multiple wipers could simply provide additional redundancy.
Printing:
Small amount of support needed on Silicone_Main_Body_001
Wipers need to be a tight fit in their slots so make any scaling adjustments needed on Silicone_Leaf_001
Assembly:
I cut a strip of silicone that is longer than needed and cut that down to an arrow (point). I thread the point through and pull through the silicone and then trim off the arrow.
In use:
Make sure your purge script or the parking location is not on a wiper, it only needs to run over the wiper on the way back to the print area so there is no need for the parking location to be close.
From playing with these wipers and previous designs, my key takeaway is that the bigger the purge the less chance that the whole purge can be dragged from the bucket on a wipe. I have my purge to just 3mm and will likely double it to use as a safety factor.
This is my ideamaker script, I have a similar one for PrusaSlicer, I am running a custom setup so the wiping locations will need to be amended if you use this script: Also this would need to be used in 'Full Control' mode
;Switch
G91 ; Relative Mode
G0 Z2 F1200 ; Move Z up 2mm
G90 ; Absolute Mode
[if {new_extruder}=1] G1 X-45 F{travel_xy_speed} ; Park Old Tool
[if {new_extruder}=0] G1 X365 F{travel_xy_speed} ; Part Old Tool
;;;;#1 Purge then Wipe ;;;;;
[if {new_extruder}=0] T0 ; Switch Tool
[if {new_extruder}=1] T1 ; Switch Tool
G92 E0 ; Reset Extruder
[if {new_extruder}=0] G1 E{extruder_switch_retraction_amount1} F120 ; Unretract
[if {new_extruder}=0] G1 E3 F120 ; Purge 3mm
[if {new_extruder}=0] G1 X-15 F{travel_xy_speed}
[if {new_extruder}=0] G1 X-45 F{travel_xy_speed}
[if {new_extruder}=0] G1 X-15 F{travel_xy_speed}
[if {new_extruder}=0] G1 X-45 F{travel_xy_speed}
[if {new_extruder}=1] G1 E{extruder_switch_retraction_amount1} F120 ; Unretract
[if {new_extruder}=1] G1 E3 F120 ; Purge 3mm
[if {new_extruder}=1] G1 X325 F{travel_xy_speed}
[if {new_extruder}=1] G1 X350 F{travel_xy_speed}
[if {new_extruder}=1] G1 X325 F{travel_xy_speed}
[if {new_extruder}=1] G1 X350 F{travel_xy_speed}
G92 E0 ; Reset Extruder
G1 E-{extruder_switch_retraction_amount1} F{extruder_switch_retraction_speed2} ; Retract Filament before going to print area
Similar models
thingiverse
free
Geeetech A10t Purge Bucket with removable bucket by 123TaDa
...ipe
g0 x0 f2000 ; return
m211 s1 ; turn on soft stops once more
g1 e-0.5 ; try to prevent pips
g92 e0
; start extruder script end
thingiverse
free

A10M A20M Purge extension (Aibecy hotend) by deakbannok
...91 ; switch from absolute positioning to relative positioning
g1 z-0.4 f800 ;
g90 ; return to absolute
g1 e6.5 f3600.0 ;
g92 e0 ;
thingiverse
free
SVO2 Purge Bucket and GCODE by RedSquirrelHobbies
... positioning on
g1 z-1 f1000 ; lower nozzle by 1mm
g90 ; absolute positioning on
m400 ; wait for finish
thingiverse
free

Bukito Purge box
...ing code for use with purge box
g28 ;home
g1 z.1 f6000 ;move the platform down .1mm
;prime the extruder
g92 e0
g1 f200 e10
g92 e0
thingiverse
free
A20M A10M BigMac MKII 5015 Blower
...
g1 e70 f3000
g92 e0
g1 e30 f200
g92 e0
g4 s3
g0 f10000
; end extruder 2
g92 e0
g1 e-5 f6000
g1 x-10.5 f8000
g1 e-70 f3000
g92 e0
thingiverse
free

Purge Bucket for A10M (cleaned up) by carterlewellyn
... e0 ;reset extruder positioning
g1 e-2 f5000 ;retract filament to resting spot
g92 e0 ;reset extruder positioning
i hope it helps
thingiverse
free
Custom start Gcode by monopriceman
... a priming/wiping line to the rear)
g0 z3
g0 y0
g0 z0
g1 x-1;(move a little closer to the print area)
g1 e15 f250;(small retract)
thingiverse
free

Geeetech i3 Pro B extruder wiper by Damien68
...0 ;zero the extruded length
g1 f200 e3 ;extrude 3mm of feed stock
g92 e0 ;zero the extruded length again
g1 f9000
m117 printing ;
thingiverse
free

Silicone Wipe Bucket for Tenlog Hictop - Modified by mrmikejackson
...that have farther offset.
i am using this as wiper for dual switching extruder upgrade: https://www.thingiverse.com/thing:4606909
thingiverse
free
nozzle cleaning bin by Calo_pc
...
g1 e125 f3000 ;extrude the new selected filament to the nozzle
g92 e0;
g1 e4 f180;
g92 e0;
//g1 e-3 f3600 ; retract the filament
Yydoctt
thingiverse
free

MKS H43 Screen and Mount by yydoctt
...and dual idex. there is no time-frame for that but will hopefully get the parts than i use the most finished in a few weeks time.
thingiverse
free

JGMaker Artist-D Adjustable Purge Buckets by yydoctt
...icer).
hardware:
uses the stock thumb screw
uses the stock brush
m4 inserts
m4 screws (pretty much any size, i used m4x10 button)
thingiverse
free

JGMaker Artist-D - Hemera / Matrix Extruder by yydoctt
...of when assembling currently
this is currently uploaded as a .3mf, when i'm happy with the release i will split it into stls.
thingiverse
free

JG Maker Artist-D Matrix / Hemera by yydoctt
...inimal supports on some parts.
i'll also be uploading my purge bucket redesign.
**uploaded step for those who want to modify.
Purge
3d_export
$20

yoda
...of the few jedi to survive the great jedi purge<br>features:<br>high quality polygon model - correctly scaled accurate representation of...
3dfindit
free

IAQ-PURGE
...iaq-purge
3dfind.it
catalog: nuaire
thingiverse
free

Purge Bucket by Gavster29
...purge bucket by gavster29
thingiverse
replacement purge bucket, to use with cheap brushes from amazon
thingiverse
free

Nereus Purge Bucket
...nereus purge bucket
thingiverse
it's all in the name: this is a purge bucket for dual extrusion adapted to tevo nereus.
thingiverse
free

Bac pour Purge A20M
...bac pour purge a20m
thingiverse
bac pour purge a20m
thingiverse
free
Purge Calibration Cube
...urge calibration cube
thingiverse
just a simple cube to calibrate how much material you need to purge in between filament swaps.
thingiverse
free
Skelestruder -> Retractable Purge Mechanism
... of these 3 parts:
purge - mount_right.stl
purge - bracket.stl
purge - action.stl
then assemble as standard.
thanks! =dbigbrain3d
thingiverse
free

Purge Pan by bsbmx
...nce inside the 'bowl', but its purpose is just to collect purged and wasted plastic, so it doesn't need to be pretty.
thingiverse
free

Purge Bucket Anet by horus2678
...purge bucket anet by horus2678
thingiverse
allow to purge anet printer in a bucket instead drawing lines
thingiverse
free

Mosquito hotend -> RETRACTABLE PURGE MECHANISM
... of these 3 parts:
purge - mount_right.stl
purge - bracket.stl
purge - action.stl
then assemble as standard.
thanks! =dbigbrain3d
Wiper
turbosquid
$60

wipers
... available on turbo squid, the world's leading provider of digital 3d models for visualization, films, television, and games.
turbosquid
$9

Wiper
... available on turbo squid, the world's leading provider of digital 3d models for visualization, films, television, and games.
3d_export
$5

Wipers 3D Model
...wipers 3d model
3dexport
wipers 3d model zarko 72473 3dexport
3d_export
$10

Floor Wiper 3D Model
...floor wiper 3d model
3dexport
wiper
floor wiper 3d model ankush2211 52516 3dexport
turbosquid
$6

3D car Wiper
... available on turbo squid, the world's leading provider of digital 3d models for visualization, films, television, and games.
3d_export
$5
Volvo XC90 Rear Wiper Mechanism
...volvo xc90 rear wiper mechanism
3dexport
gear gear for volvo xc90 rear wiper
cg_studio
$5

Wipers Alca for car3d model
...d model
cgstudio
.3ds .max .obj - wipers alca for car 3d model, royalty free license available, instant download after purchase.
turbosquid
$35

Front Windscreen Wiper Set
... available on turbo squid, the world's leading provider of digital 3d models for visualization, films, television, and games.
cg_studio
$45
Wiper with transmission and drive unit3d model
...c4d .lwo .obj - wiper with transmission and drive unit 3d model, royalty free license available, instant download after purchase.
3d_export
$8

rear window wiper drive gear land rover freelander and fordfusion
...per drive gear land rover freelander and fordfusion
3dexport
rear window wiper drive gear land rover freelander and ford_fusion.
Bucket
archibase_planet
free

Bucket
...bucket
archibase planet
pail bucket tub
bucket - 3d model for interior 3d visualization.
3d_ocean
$5

Bucket
...bucket
3docean
bucket cleaning galvanized gavanised stainless steel zinc zinc coated
a galvanized bucket
turbosquid
free
Bucket bucket With Water
... available on turbo squid, the world's leading provider of digital 3d models for visualization, films, television, and games.
archibase_planet
free
Bucket
...bucket
archibase planet
bucket pail
bucket n250308 - 3d model (*.gsm+*.3ds) for interior 3d visualization.
archibase_planet
free
Bucket
...bucket
archibase planet
tub bucket pail
bucket - 3d model (*.gsm+*.3ds) for interior 3d visualization.
archibase_planet
free
Bucket
...bucket
archibase planet
bucket pail bin
bucket n280612 - 3d model (*.gsm+*.3ds) for interior 3d visualization.
archibase_planet
free
Bucket
...bucket
archibase planet
pail bucket tub
bucket 2 - 3d model (*.gsm+*.3ds) for interior 3d visualization.
archibase_planet
free

Bucket
...bucket
archibase planet
fire fighting equipment dip-bucket
bucket - 3d model (*.gsm+*.3ds) for interior 3d visualization.
3d_export
$5
bucket
...bucket
3dexport
scratched galvanized bucket. fbx, obj, blend, and testura formats
3ddd
$1
Wooden bucket
...wooden bucket
3ddd
wooden bucket , ведро
wooden bucket
Silicone
3d_export
$5
cake molds silicone
...cake molds silicone
3dexport
silicone cake molds
turbosquid
$19

Bunny Silicone
...ree 3d model bunny silicone for download as max, fbx, and obj on turbosquid: 3d models for games, architecture, videos. (1672014)
turbosquid
free
silicone spatula
... available on turbo squid, the world's leading provider of digital 3d models for visualization, films, television, and games.
turbosquid
$5
Container Silicon
...for download as ma, max, obj, fbx, prj, unitypackage, and upk on turbosquid: 3d models for games, architecture, videos. (1415212)
turbosquid
$1
Silicone Oil Brush
...
royalty free 3d model silicone oil brush for download as max on turbosquid: 3d models for games, architecture, videos. (1700355)
cg_studio
$35
silicon gun3d model
...cgstudio
industrial slicon gun tool
.lwo - silicon gun 3d model, royalty free license available, instant download after purchase.
turbosquid
free

Acetic Silicon Sealant
... available on turbo squid, the world's leading provider of digital 3d models for visualization, films, television, and games.
turbosquid
$19

Silicone Cute Modern Lamp
...l silicone cute modern lamp for download as max, obj, and fbx on turbosquid: 3d models for games, architecture, videos. (1161149)
3ddd
$1

Silicon Power Ultima II I-Series
... usb , флешка
флеш накопитель silicon power ultima ii i-series.
turbosquid
$12
Pendant lamp shade silicone mold
...nt lamp shade silicone mold for download as max, max, and obj on turbosquid: 3d models for games, architecture, videos. (1610347)
Tray
archibase_planet
free

Tray
...tray
archibase planet
tray salver tea-tray
tray 1 n210312 - 3d model (*.gsm+*.3ds) for interior 3d visualization.
archibase_planet
free

Tray
...tray
archibase planet
tray salver tea-tray
tray 2 n210312 - 3d model (*.gsm+*.3ds) for interior 3d visualization.
3d_export
$8

tray
...tray
3dexport
design of tray
archibase_planet
free

Tray
...tray
archibase planet
tray salver stand
tray - 3d model (*.gsm+*.3ds) for interior 3d visualization.
archibase_planet
free

Tray
...tray
archibase planet
tray salver
tray n050408 - 3d model (*.gsm+*.3ds) for interior 3d visualization.
archibase_planet
free

Tray
...tray
archibase planet
tray salver kitchen ware
tray - 3d model (*.gsm+*.3ds) for interior 3d visualization.
archibase_planet
free

Tray
...tray
archibase planet
tray salver
tray 2 n050408 - 3d model (*.gsm+*.3ds) for interior 3d visualization.
archibase_planet
free

Tray
...tray
archibase planet
tray salver kitchen ware
tray n241211 - 3d model (*.3ds) for interior 3d visualization.
archibase_planet
free

Tray
...tray
archibase planet
tray salver office ware
tray n160808 - 3d model (*.gsm+*.3ds) for interior 3d visualization.
archibase_planet
free

Tray
...tray
archibase planet
donuts donuts tray donut food
tray donuts n190614 - 3d model (*.gsm+*.3ds) for interior 3d visualization.
Artist
3d_export
$5
artiste azul mix artiste verde mix
...artiste azul mix artiste verde mix
3dexport
artiste azul mix<br>artiste verde mix
3d_export
$19

Taekwondo Kangaroo martial artist boxer artist
... kangaroo martial artist boxer artist
3dexport
1.taekwondo kangaroo martial artist, boxer artist 2.files include 3dmax fbx obj
design_connected
$11

Artist 40
...artist 40
designconnected
nordlux artist 40 computer generated 3d model. designed by bønnelycke mdd.
turbosquid
$15

Artistic fridge
...id
royalty free 3d model artistic fridge for download as max on turbosquid: 3d models for games, architecture, videos. (1258122)
turbosquid
$10

Artistic Lamp
...squid
royalty free 3d model artistic lamp for download as ma on turbosquid: 3d models for games, architecture, videos. (1218028)
3d_export
$5

Artist room
...artist room
3dexport
https://www.dock4all.com/
turbosquid
$10

Artistic Shield
...model artistic shield for download as c4d, ma, blend, and fbx on turbosquid: 3d models for games, architecture, videos. (1685359)
3d_export
$7

set dekor artist
...set dekor artist
3dexport
set dekor artist
3d_ocean
$5

Artist Easel
...k like the are still wet from the paint! this can be used to show your portfolio of 2d works in a 3d environment. in the readm...
turbosquid
$35

Artist Palette
... available on turbo squid, the world's leading provider of digital 3d models for visualization, films, television, and games.
Removable
turbosquid
$15

Staple Remover
... available on turbo squid, the world's leading provider of digital 3d models for visualization, films, television, and games.
turbosquid
$10

Staple Remover
... available on turbo squid, the world's leading provider of digital 3d models for visualization, films, television, and games.
turbosquid
$1

Staple Remover
... available on turbo squid, the world's leading provider of digital 3d models for visualization, films, television, and games.
3d_export
$25

Staple Remover 3D Model
...remover office supplies pull desk paper remove workplace school work desktop vray
staple remover 3d model plutonius 7699 3dexport
turbosquid
$28
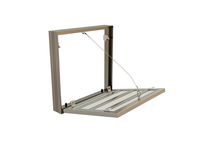
Removable Wall Hatch
... 3d model removable wall hatch for download as , fbx, and obj on turbosquid: 3d models for games, architecture, videos. (1670326)
3d_export
$15
Staple Remover 3D Model
... desktop paper accessories household tool desk workplace instrument equipment pull
staple remover 3d model firdz3d 90012 3dexport
3ddd
free
Missed Maps Remover
...
3ddd
missed maps remover
скрипт находит потерянные карты в файле и позволяет удалить их или открыть в окне редактора материалов.
turbosquid
$29

Eye remover
...bosquid
royalty free 3d model eyeremover for download as 3dm on turbosquid: 3d models for games, architecture, videos. (1695439)
3ddd
$1

Remove Note Track
...аем скрипт чтобы удалить нулевые треки,которые грузят систему при сохранении и файл начинает сохраняться снова нормально и быстро
3d_export
$6

Gas dust removal bag filter
...gas dust removal bag filter
3dexport
gas dust removal, bag filter