Thingiverse
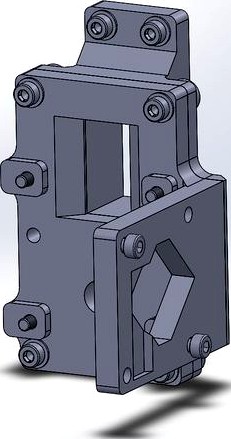
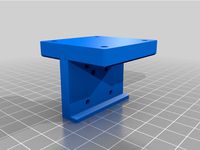
Sidewinder X1 V4 Hemera Mount by Nyles
by Thingiverse
Last crawled date: 3 years, 3 months ago
Hemera mount for a Sidewinder X1 - there's a specific assembly order.
Uses Pem inserts into the plastic in 8 locations (see *pems pic):
PemLabel00 is from a batch I bought years back.
Use a 4mm drill to clean out where the Pem goes, about 1-2mm deep.
Use a straight soldering iron to gently sink the Pem into the
plastic until it's flush.
Use a long 3mm screw to make sure the Pem is straight. Use the
soldering iron to adjust things.
Clean out the plastic from the path for the screw.
00, 01, 02: Using M3-12mm socket head screws with washers (double on the
bottom screw), attach the bottom section to the carriage.
motors: Note the surfaces that will mate to the Hemera.
03, 04: Mount the Hemera per the instructions.
05, 06: Mount the top assembly to the base.
07: Mount the PCB to the top. NOTE I've noticed that the heater
connector on the PCB gets badly munched when you're not careful
doing the disconnect. Found that it's best to pull the PCB straight
away from the heater in order to minimize internal mangling of
the connector.
Note that if you're using the original PCB it'll be very close to the
bed, and the ribbon cable will be angled down to the point that it rubs
against the drive belt when the carriage is near the right side of the
bed.
Similar models
thingiverse
free

Sidewinder X1 - Fulament Hemera Mount (Remix)
...our hemera for maintenance without needing to remove your carriage wheels.
right now i only have a model for the bltouch version.
thingiverse
free

Sidewinder X1 Hemera Mount & PCB Relocation
...ect length scew a pain in the ass.
also these designs are done in onshape so you can find the design files in their shared files.
thingiverse
free

E3D Hemera Ender 3 Mount (no extra screws) by fanonymous
...belt.
pla is fine for heat resistance, if doubt use petg, abs, pc...etc.
offsets nozzle x: -15, y: -10, z: -0.7(adjust bed a bit)
thingiverse
free

Sidewinder X1 FFC Riser - Customizable ribbon cable height fix and strain relief for E3D Hemera, the stock extruder and others
...an e3d hemera extruder assembly (using the recommended or similar printed mount). this has not been tested - please...
thingiverse
free

Sidewinder X1 - adapter extruder pcb
...thermistor,
bcs the cables are to short for normal use
use the two original screws for the adapter,
and two m3 screws for the pcb
thingiverse
free

E3D Hemera mount for Sidewinder X1
...arillery sidewinder x1. fan duct has not been tested yet. a new revision is likely.
all parts should be printed with no supports.
thingiverse
free

Bightreetech TFT 35 V3.0 Case/ No HOLES/ for Artillery Sidewinder X1 & Genius by cataclism
...to where the mainboard is mounted (at least with the skr 1.3, idk about the layout of other boards)."
here the
source file.
thingiverse
free

Support Touch Mi for SW X1 with Hemera / Matrix extruder by hostalerye
... add a touch mi to a sidewinder x1 with a hemera or matrix extruder.
i used this mount: https://www.thingiverse.com/thing:4143992
thingiverse
free

Artillery Sidewinder X1 hemera / hermes / Matrix mount with BLtouch and cable guide. by Voxel3D_Netherlands
... to the board.
that way it looks clean, and you don't risk your wires catching on some prints or melting on the heater block.
thingiverse
free

Best hemera mount (artillery sidewinder)
... ones and put spacers on the two top wheels.
myminifactorys: uses too much material, weird pcb mounting doesn't use stock fan
Nyles
thingiverse
free

Toothbrush Stand by Nyles
...toothbrush stand by nyles
thingiverse
simple toothbrush stand, no support should be needed.
thingiverse
free

Resin Comb by Nyles
...
thingiverse
printed this on my fortus 250mc - it's good for straining the resin on my form 1+. might be good for hair too.
thingiverse
free

Jump Rope Handle by Nyles
...jump rope handle by nyles
thingiverse
i didn't like my wife's jump rope, so i made my own.
thingiverse
free

Power Cap for Mini Cooper vehicles by Nyles
... cap for mini cooper vehicles by nyles
thingiverse
we lost the power outlet (cigarette lighter plug) on our mini, so i made one.
thingiverse
free

Calibration block for GT2 belt by Nyles
...see if a printer can do the required precision to mate up a gt2 belt profile. it's a snug fit, designed for a 6mm wide belt.
thingiverse
free

Delta Plate Calibration Thing by Nyles
...level my delta printer bed - this widget helps me get that important first layer right without burning through too much filament.
thingiverse
free

2002 Audi TT Navigation System Knob by Nyles
...2002 audi tt navigation system knob by nyles
thingiverse
i got tired of the stock nav knob breaking in my tt, so i made one.
thingiverse
free

2020 Rail Brackets by Nyles
...gle.
fanbracket00 is designed for a 60x10.5mm fan.
the rest of the brackets are for cable ways, and holding a dessicase securely.
thingiverse
free

X1 Drag Chain by Nyles
...a tie-wrap, and each link gets a tie-wrap.
double sided sticky foam tape in section where the mounting hole for chainstrain00
is.
thingiverse
free

Garden LED Ball by Nyles
...e stem solid.
thread the wire for the led through the stem.
insert the stem into the ball.
use rtv silicone to seal it.
enjoy. :)
Hemera
3ddd
$1

Hemera
...d
круглое , напольные
зеркало hemera;
designer:grace feyock
dimensions:46 w x 46 h x 1 d
3ddd
$1

Cофа (MOS)
...cофа (mos) 3ddd угловой hemera l-shape sofa. смоделена по реальным...
3d_sky
free

PROFI Hemera
...profi hemera
3dsky
hemera mirror;
designer: grace feyock
dimensions: 46 w x 46 h x 1 d
thingiverse
free

E3D Hemera Model
...e3d hemera model
thingiverse
official mounting cad for designing your own custom mounts for the e3d hemera.
thingiverse
free

Hemera Troodon mount by vonsy
...hemera troodon mount by vonsy
thingiverse
hemera support for troodon
thingiverse
free

BLTouch Mount for Hemera
...bltouch mount for hemera
thingiverse
attach to hemera heat sink body with 3m vhb tape flush to the top edge.
thingiverse
free

X5S MGN12 Hemera by Festivejelly
... mounting solution for the e3d hemera on a mgn12 rail.
assemble and screw the hemera into the mount before putting onto the rail.
thingiverse
free

Hemera Mount for 2020 (2040)
...hemera mount for 2020 (2040)
thingiverse
2020 mount for the e3d hemera (hermes)
thingiverse
free
MGN12 Toprail mount for Hemera
...mgn12 toprail mount for hemera
thingiverse
hemera mount for mgn12 rails on top like the am8
thingiverse
free

E3D Hemera Blower Duct
...e3d hemera blower duct
thingiverse
blower duct & mount. fits e3d hemera extruder
Sidewinder
turbosquid
$20
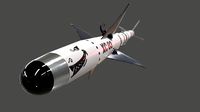
Missile sidewinder
...
royalty free 3d model missile sidewinder for download as obj on turbosquid: 3d models for games, architecture, videos. (1407825)
turbosquid
$10

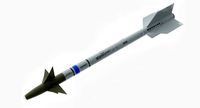
Aim 9 Sidewinder
...del aim 9 sidewinder for download as blend, stl, obj, and fbx on turbosquid: 3d models for games, architecture, videos. (1639038)
turbosquid
$3

AIM_9B Sidewinder Missle
... available on turbo squid, the world's leading provider of digital 3d models for visualization, films, television, and games.
turbosquid
free

Sidewinder Submachine Gun
... available on turbo squid, the world's leading provider of digital 3d models for visualization, films, television, and games.
turbosquid
free
AIM-9 Sidewinder
... available on turbo squid, the world's leading provider of digital 3d models for visualization, films, television, and games.
turbosquid
$3

AIM-9L-M SIDEWINDER
...royalty free 3d model aim-9l-m sidewinder for download as fbx on turbosquid: 3d models for games, architecture, videos. (1638522)
3d_export
$10
sidewinder missile
... height, rough, and metal.<br>https://stgbooks.blogspot.com/<br>please note: this may, or may not 3d print. untested.
humster3d
$75

3D model of Vetex Sidewinder ATX 3000 Forklift 2011
... vetex sidewinder atx 3000 forklift 2011 in various file formats. all our 3d models were created maximally close to the original.
cg_studio
$30
aim-9 missle3d model
...aim-9 missle3d model cgstudio military aim-9 aim sidewinder missle air usaf f-15 f-16 f-14 f-117 amraam bomb...
cg_studio
$29
Matra R550 Magic 23d model
...cgstudio matra r550 r.550 magic 2 ii missile air sidewinder jet military aircraft force navy europe .3ds .lwo .max...
X1
design_connected
$11

X1
...x1
designconnected
dränert x1 chairs computer generated 3d model. designed by oswald mathias ungers.
3ddd
$1

Leica X1
...leica x1
3ddd
leica , фотоаппарат
leica x1 profi
turbosquid
$15

sofa x1
...turbosquid
royalty free 3d model sofa x1 for download as max on turbosquid: 3d models for games, architecture, videos. (1283096)
3ddd
$1

Francis Francis X1
...francis francis x1
3ddd
кофемашина
кофемашина francis francis x1
3d_export
$5

X1 3D Model
...x1 3d model
3dexport
x1
x1 3d model download .c4d .max .obj .fbx .ma .lwo .3ds .3dm .stl gorgsalvatore 106035 3dexport
turbosquid
$55

Nokia X1
... available on turbo squid, the world's leading provider of digital 3d models for visualization, films, television, and games.
turbosquid
$13

Nokia X1
... available on turbo squid, the world's leading provider of digital 3d models for visualization, films, television, and games.
turbosquid
$1
X1 Airplane
... available on turbo squid, the world's leading provider of digital 3d models for visualization, films, television, and games.
3d_export
$55

Nokia X1 3D Model
...nokia x1 3d model
3dexport
nokia x1 phone smartphone mobile
nokia x1 3d model fedia 45159 3dexport
3ddd
$1

Wood x1
...wood x1
3ddd
размер 1024-1024 бесшовная 8-)
V4
design_connected
$16

V4 vases
...v4 vases
designconnected
sy design v4 vases computer generated 3d model. designed by song, seung-yong.
turbosquid
$20
Door v4
...yalty free 3d model door v4 for download as max, max, and obj on turbosquid: 3d models for games, architecture, videos. (1523140)
turbosquid
$5

Hand v4
...yalty free 3d model hand v4 for download as ztl, obj, and stl on turbosquid: 3d models for games, architecture, videos. (1567431)
turbosquid
$9
silencer v4
...3d model silencer v4 for download as blend, dae, fbx, and obj on turbosquid: 3d models for games, architecture, videos. (1711410)
turbosquid
$90

V4 Engine
... available on turbo squid, the world's leading provider of digital 3d models for visualization, films, television, and games.
turbosquid
$35

Payphone v4
... available on turbo squid, the world's leading provider of digital 3d models for visualization, films, television, and games.
turbosquid
$28

HAZRO V4
... available on turbo squid, the world's leading provider of digital 3d models for visualization, films, television, and games.
turbosquid
$15

Carousel v4
... available on turbo squid, the world's leading provider of digital 3d models for visualization, films, television, and games.
turbosquid
$1

PokBall V4
... available on turbo squid, the world's leading provider of digital 3d models for visualization, films, television, and games.
3ddd
free

фонтан V4
...фонтан v4
3ddd
фонтан
фонтан, fantan, fontan
Mount
3d_export
free

mounting bracket
...mounting plate is the portion of a hinge that attaches to the wood. mounting plates can be used indoors, cabinetry and furniture.
turbosquid
$2

MOUNTING
... available on turbo squid, the world's leading provider of digital 3d models for visualization, films, television, and games.
turbosquid
free

Mounts
... available on turbo squid, the world's leading provider of digital 3d models for visualization, films, television, and games.
turbosquid
free

Mount Fuji
...fuji
turbosquid
free 3d model mount fuji for download as obj on turbosquid: 3d models for games, architecture, videos. (1579977)
3d_export
$5

Headphone mount LR
...headphone mount lr
3dexport
headphone mount l+r
turbosquid
$39

Mount rainier
...quid
royalty free 3d model mount rainier for download as fbx on turbosquid: 3d models for games, architecture, videos. (1492586)
turbosquid
$5

pipe mounting
...quid
royalty free 3d model pipe mounting for download as obj on turbosquid: 3d models for games, architecture, videos. (1293744)
turbosquid
$3

Mounting Tires
...uid
royalty free 3d model mounting tires for download as fbx on turbosquid: 3d models for games, architecture, videos. (1708511)
3d_export
$5

Magnetic GoPro Mount
...pro mount
3dexport
cool magnetic mount for gopro. allows you to mount the camera on flat metal surfaces and get exclusive shots.
turbosquid
$5

Stone Mount
...ty free 3d model stone mount for download as ma, obj, and fbx on turbosquid: 3d models for games, architecture, videos. (1370306)