Thingiverse
Set Up Gauges (5-pc.) Holder - Free Standing & Hanging by SteveJohnsen
by Thingiverse
Last crawled date: 3 years, 3 months ago
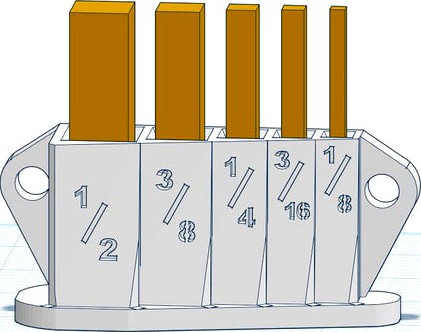
These four object files are holders for 5 Pc. Set Up Gauges (a.k.a. height gages, measuring blocks, etc.), with the following standard sizes: 1/8", 3/16", 1/4", 3/8" & 1/2". The holders are free standing and peg board compatible (3" spacing on the peg board hooks). There are four object files because there are four variations of essentially the same holder:
"Original": the original design with more embellishments, and which is more sturdy, but uses more filament to 3-D print. Some of the photos show this version with the inset lettering filled with yellow paint to aid visibility.
"Original - No Lettering": same as above, but with no inset/embossed fractions lettering -- in case you don't want the lettering.
"Lite": The original design, but with fewer geometric embellishments, thinner hanging tabs and base, and larger, same font size, in-line lettering for the fractions. This version uses less filament and prints faster.
"Extra Lite": Thinner walls, hanging tabs and base than the Lite version, which uses even less filament and prints faster. The lettering passes all the way through the front wall/face, making openings that allow the reflection of the gauges to shine through.
Refer to the included photos for a better idea of the differences. There are photos of all of the versions 3-D printed, except for the Orig. - No Lettering (because I didn't print this version).
In case you don't read the Print Settings & Post Printing instructions....
Regardless of which version you print, I encourage you to print it standing up/vertical, AND to print at a finer resolution (.16mm or finer). This will make for a much better looking print. I tried printing at .2mm and with the object oriented on its back/horizontally. It didn't look good and it was a huge pain to remove the supports that filled each gauge cavity, especially the smaller openings. There will be some supports. Carefully clean out the supports in the lettering and those will look much better and be easier to read. Also, print with a brim or whatever build plate adhesion technique you find successful to reduce the warping/curling up of the base. It is likely that even with good build plate adhesion, the base will still bow up a bit on the ends.
If you have access to a table saw and a straight wood strip/board, you can still achieve a flat base that is square to the back by mounting the holder with its top flush with the straight side of the board. Make sure that it is secure (I used two screws, making sure that as I tightened them the holder remained flush with the board). On the table saw (or another equivalent) trim the warping out of the base on the bottom. The top of the holder and the straight side of the board run against the saw's fence which makes the saw blade cut the warped bottom parallel to the straight top. I included a photo of this jig after I made a cut. I wound up trimming all of the holders in the photos (because I like them to sit flat on a bench top).
Similar models
thingiverse
free

ER20 collet holder mm/fractional/decimal lettering 15 pcs by hudstr
...e to make it contrast. you can print with as little infill and walls as you want, but it might break if you drop it or something.
thingiverse
free

Customizable Radius Gauge - Inch Fractional by clough42
...o/28wxxx8
when you click on these links and make a purchase, it can result in commissions from amazon that help support my work.
thingiverse
free

Pinup Business Card Dispenser by Flashsolutions
...ake the white letters.
notice: v4 had misplaced text... was not touching case. i have corrected it and uploaded the correction.
thingiverse
free

"DINE" Letters by 3DExtruded
... will add a photo once they are hung, of the actual letters -- but i have included a render of the letters in this thing for now.
thingiverse
free

Fast and easy Snowboard holder! by 2Fast4U
... "snowboard halter schmal" and plug the "boardhalter" in.
hang up you're board and post it her.
have fun.
thingiverse
free

Building block: Key holder letter I by TeamM
...s on board of popular building block manufacturer.
picture 3 shows example of letter m.
whole alphabet is uploaded on my profile.
thingiverse
free

Heat Bed Warping Calibration Print by onurzaim
... 360. after several runs i could print a 15x15 print without problem after this print and using 2x2 (or post-it) to fix the warp.
thingiverse
free

Calendar Holder
...nging option. "2020" plate you can make your own. i print it on cr10 and ender3, for ender 3 turn it 45 deg. in slicer.
thingiverse
free

Brochure Holder
... photos to see the good detailed photos.
if you use this, please post up your makes. i'd love to see what everyone else does!
thingiverse
free

Modular Bird Feeder v2 by steinsintx
...rom a coat hanger. bend the top into a hook. bend the bottom 90 degrees to hang the feeder
edit3/17:updated top and added picture
Stevejohnsen
thingiverse
free

Hamster Headstone by SteveJohnsen
...imilar design for their pet. oh, and yes, we do actually have a little area in our garden for burying our little pet hamsters. :)
thingiverse
free

Ryobi BS90108300 - Angle Adj. Knob Replacement by SteveJohnsen
...r, and most importantly, it works. the original replacement part can't be found anymore. the ryobi part number is bs90108300.
thingiverse
free

Hanging Soap Tray by SteveJohnsen
...64741
print with the object laying flat on its back on the print bed. see the included photo. the .stl file is oriented this way.
thingiverse
free

Settlers of Catan Number Marker Box by SteveJohnsen
...use the first model worked with my printer. if your printer is dialed in and accurate, try the model with the tighter tolerances.
thingiverse
free

Hanging Compact Soap Tray by SteveJohnsen
...n updated design from the original posted object. this design helps the soap bar to dry better and not stick as much to the tray.
thingiverse
free

One Wheel Freestyle Finger Board - Fidget Toy by SteveJohnsen
...hem that way. be sure to print the axles in their normal orientation for added strength. print the wheel/tire laying on its side.
thingiverse
free

Towel Wall Hook with Faceplate by SteveJohnsen
...hing that would hide the paint blemishes. so, i copied the original parts and made the hook a little more beefy, for strength. :)
thingiverse
free

Concave Corner Stencil Template - Metric & Imperial Versions by SteveJohnsen
...t; 69g
5 mm - 100 mm 31g
5 mm - 150 mm 59g
for round/convex corner stencils, see: https://www.thingiverse.com/thing:4785209
thingiverse
free

Antique Candle Lantern or Sconce, Hanging, for L.E.D. Votive Candle by SteveJohnsen
... roof & hanging ring). there is no need to print the fake candle; i just threw that in for fun (it isn't very realistic).
thingiverse
free

Hinge Pin Caps for Photographic Sweep Stand by SteveJohnsen
...le. an equal quantity of mirror image caps are provided in case one side of the print is better than the other from your printer.
Gauges
thingiverse
free

Radial Gauge (Fillet Gauge)
...rounded corners. see wikipedia for more information about radius gauges be aware that the accuracy is dependent on your...
thingiverse
free

gauge holder
...gauge holder
thingiverse
gauge holder - flsun cube
thingiverse
free

Gauge by thuibregtse
...gauge by thuibregtse
thingiverse
gauge using es3001 servo
thingiverse
free

Ear Gauges
...ear gauges
thingiverse
ear gauges for everyone that likes to get there stretch on
thingiverse
free

feeler gauge
...feeler gauge thingiverse a feeler gauges holder to replace a set that was...
thingiverse
free

Step Gauge by afkidwe
...step gauge by afkidwe
thingiverse
step gauge
thingiverse
free

Router gauge by titie3325
...router gauge by titie3325
thingiverse
this is a router gauge
thingiverse
free

? drill gauge by lennyjoseph
...? drill gauge by lennyjoseph
thingiverse
drill gauge
thingiverse
free

Raptor Gauge by LandtreePrints
...raptor gauge by landtreeprints
thingiverse
don't forget to scale for the correct gauge size. this is about a 15.5mm gauge.
thingiverse
free

Spin Gauge by LandtreePrints
...spin gauge by landtreeprints
thingiverse
don't forget to scale for the correct gauge size. this is about a 15.5mm gauge.
Pc
thingiverse
free

pc by gruzdev_f
...pc by gruzdev_f
thingiverse
pc
thingiverse
free

pc by DoESLiverpool
...pc by doesliverpool
thingiverse
pc
thingiverse
free

Old Pc
...old pc
thingiverse
this is a pc monitor straight from the 1980s!
thingiverse
free

pc holder
...pc holder
thingiverse
pc holder for 10 inches laptop
thingiverse
free

PC Headset Holder // Soporte Auriculares PC
...pc headset holder // soporte auriculares pc
thingiverse
compatible with fan 120mm.
thingiverse
free

PC processor by vasilebv
...pc processor by vasilebv
thingiverse
pc processor.
thingiverse
free

PC MSS 2019
...pc mss 2019
thingiverse
hm, pc pendant
thingiverse
free

PC Holder Laura
...pc holder laura
thingiverse
pc holder laura m
thingiverse
free

Support PC
...support pc
thingiverse
no summary
thingiverse
free

Pc by holakhace
...pc by holakhace
thingiverse
hi
Hanging
thingiverse
free

Hanged
...hanged
thingiverse
a hanged.
you can support me on https://www.patreon.com/schlossbauer if you like my work.
thingiverse
free

Hanging hook
...hanging hook
thingiverse
bathroom hanging hook
thingiverse
free

hanging by cerapersa
...hanging by cerapersa
thingiverse
hanging towel radiator
thingiverse
free

for hanging by yoyoek1
...for hanging by yoyoek1
thingiverse
i use it for hanging a backpack.
thingiverse
free

Hanging Basket
...hanging basket
thingiverse
made a thing that could be attached to some rope to hang something with it.
thingiverse
free

hanging bracket by DBosch
...hanging bracket by dbosch
thingiverse
hanging bracket
thingiverse
free

Hanging bridge by BlackConcept
...hanging bridge by blackconcept
thingiverse
a model of a hanging bridge
thingiverse
free

Hanging hook by jzprice1
...hanging hook by jzprice1
thingiverse
hook to hang things with
thingiverse
free

Hang glider by Kachalot
...hang glider by kachalot
thingiverse
a little hang-glider
thingiverse
free

hanging scale by Yoctopuce
...you can find more infromation on this hanging scale in our blog:https://www.yoctopuce.com/en/article/implementing-a-hanging-scale
Free
thingiverse
free

free by adrianeE
...free by adrianee
thingiverse
for free shit
thingiverse
free

jbl free
...jbl free
thingiverse
i didn't print or tried it.
i made it for fun and for unlucky people that broke thier jbl free case.
thingiverse
free

free vases by vingaut
...free vases by vingaut
thingiverse
beautiful vases for free !
thingiverse
free

free ball by Sparks2015
...free ball by sparks2015
thingiverse
free moving ball inside object
thingiverse
free

Break free by Cyillious
...break free by cyillious
thingiverse
creature sculpt
proud and broke free
chris babb
renderality.com
thingiverse
free

Free Julian Assange
...free julian assange
thingiverse
free julian assange!!!
why don`t we have a 3d model of him?
thingiverse
free

Free Hong Kong
...free hong kong
thingiverse
this is a simple plate that i made that displays "free hong kong", to show my support.
thingiverse
free

Free Runner by techbrarian
...r by techbrarian
thingiverse
an original design for a free running logo designed by a 7th grader from the island school, ps/188.
thingiverse
free

Free D by Auravendill
...it, use it and be happy. it is also completely useless and took seconds to create.
in case anyone gets curious: r/free_d_printing
thingiverse
free

Free Hong Kong
...free hong kong
thingiverse
be water
5
thingiverse
free

5 X 5 CUP by TWard891
...5 x 5 cup by tward891
thingiverse
just my design 5 inch x 5 inch cup. super simple
thingiverse
free

Tri-Ominos gamepiece 5-5-5 by daveboschma
... i filled with correction fluid to make them white.
printed upside down, with raft to make it not curl up on the sharp corners...
thingiverse
free

2"5 or 3"5 to 5"25 adapter by Claymore
...ndard specifications.
the source file is an openscad file avalaible on github
in order to execute it you need these prerequisited
thingiverse
free

5
... the chonkster_yt mystery started on the place where its ending. congratulations. you will find me at roblox: 958 578 774 224 000
thingiverse
free
![[5]cycloparaphenylene](/t/4912483.jpg)
[5]cycloparaphenylene
...[5]cycloparaphenylene
thingiverse
this model is a licorice representation of the molecule [5]cycloparaphenylene.
thingiverse
free
Ender-5
...ngiverse
3d model of ender-5.
attention: there are some changes in later versions on ender-5, so use this 3d model with caution.
thingiverse
free

Werkzeugleiste 5 / Toolbar 5 by CBiker
...werkzeugleiste 5 / toolbar 5 by cbiker
thingiverse
werkzeughalter fuer kugelschreiber und marker.
thingiverse
free

5 + 5 Cart holder for GBA and DS by Adrien5567
...5 + 5 cart holder for gba and ds by adrien5567
thingiverse
5 + 5 cart holder for gba and ds
thingiverse
free

Mookie 5 Session 5 mount by MykoB
...ount by mykob
thingiverse
session 5 mount for my frame mookie 5. mount width is 21mm. mount can be set to 20, 30 and 40 degrees.
thingiverse
free

ventilador doble ender 3, 5, 5 pro, 5 plus by johnkiu
...ventilador doble ender 3, 5, 5 pro, 5 plus by johnkiu
thingiverse
https://www.thingiverse.com/thing:4441076
Standing
thingiverse
free

Stand-stand by Fank86
... all your troubles go away, .1mm at a time!
and no, i did not make this in 15 seconds to poke fun at all the stands on this site.
thingiverse
free

stand
...stand
thingiverse
a stand
thingiverse
free

A stand
...a stand
thingiverse
a stand.
thingiverse
free

Stand
...stand
thingiverse
this is a stand, nothing more !
thingiverse
free

stand
...stand
thingiverse
this is a stand that you can put things on
thingiverse
free

Headset stand with phone stand
...dset stand that doubles as a phone stand, the phone also can be charged while on the stand.
leave a comment if you have feedback
thingiverse
free

hairdryer stand and Curling iron stand
...hairdryer stand and curling iron stand
thingiverse
hairdryer stand and curling iron stand
thingiverse
free

Inbus Stand / Inbuskey Stand
...workshop.
this inbuskeys fitts perfectly in that stand:
8 ; 6 ; 5 ; 4 ; 3 ; 2,5 ; 2
enjoy your print :)
comment below if it works
thingiverse
free

Stand by cmaines
...stand by cmaines
thingiverse
stand
thingiverse
free

stand by Syzguru11
...stand by syzguru11
thingiverse
stand
Set
thingiverse
free

Chess set
...chess set
thingiverse
chess set
thingiverse
free

Setting Logo by
...setting logo by
thingiverse
setting logo
thingiverse
free

beads set
...
thingiverse
beads set
a set of 12 different beads with geometric shapes
measures approximately 20mm in diameter with a 5mm hole
thingiverse
free

Set of 10º increment set squares by jamiebunce
...as angles from 10º - 90º in 10º increments. the circles that are there for rigidity are also 20mm, 30mm, 50mm and 60mm diameters.
thingiverse
free

Weapons Chess Set #Chess Set by timkauer
... with tinkercad. edit it online https://tinkercad.com/things/51jr8ce4jax
weapons chess set for tinkercad chess set contest #chess
thingiverse
free

SET DE SOUS VERRE (COASTER SET) by buzz2217
...set de sous verre (coaster set) by buzz2217
thingiverse
set de sous-verre avec différents motifs
thingiverse
free

Train set by Matthewkaye
...train set by matthewkaye
thingiverse
this is a train set.
thingiverse
free

Chess Set by danielferal
...chess set by danielferal
thingiverse
chess set
thingiverse
free

Box set by Witawat
...box set by witawat
thingiverse
box set
thingiverse
free

coffe set by Acchiapo
...coffe set by acchiapo
thingiverse
coffe set
Holder
thingiverse
free

Stubby holder holder
...der
thingiverse
bottom on the holder is sized for a can or bottle. top of the holder is sized for one in a cooler/stubby holder.
thingiverse
free

Soap holder holder
...soap holder holder
thingiverse
it's a holder to hold the famous soap holder.
thingiverse
free

bottle holder Jar holder can holder
...bottle holder jar holder can holder
thingiverse
hole diameter 38.6mm
thingiverse
free

Spool holder holder by vemotion
...spool holder holder by vemotion
thingiverse
pipe holder (16mm diameter)
thingiverse
free

smartphone holder with usb cable holder and key holder
...other of invention
this is my first creation basically smartphone holder with usb cable holder and key holder
i hope you like it
thingiverse
free

Holder of plate holders by budvar
...t; ;) holder for 5 pieces of modular plate holders from dave o https://www.prusaprinters.org/en/prints/15367-modular-plate-holder
thingiverse
free

Pen Holder/card holder by Pinky561
...pen holder/card holder by pinky561
thingiverse
a pen holder/card holder in one.
thingiverse
free

Toilet paper holder with phone holder
...toilet paper holder with phone holder
thingiverse
toilet paper holder with phone holder
thingiverse
free

Radio equipment holder and microphone holder
...radio equipment holder and microphone holder
thingiverse
radio equipment holder and microphone holder
thingiverse
free

Popsicle Holder Holder by billiamthesecond
...popsicle holder holder by billiamthesecond
thingiverse
keep popsicle holders upright so that they can be set down