Thingiverse

Servo Mount - Automatic Blast Gate 4"/100mm by sennah91
by Thingiverse
Last crawled date: 4 years, 5 months ago
In order to automate my dust extraction system, I designed automated blast gates based on standard metal blast gates and R/C servos.
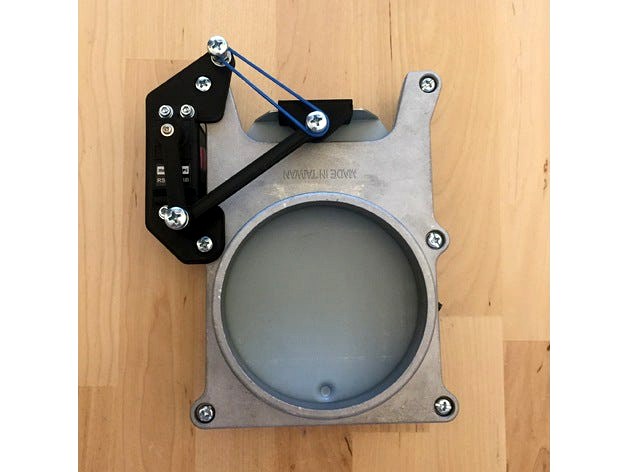
The servo mount attaches to the existing screw holes of the frame. Simply replace the existing screws by longer M4 20mm ones. The carriage mount is fixed to the lip of the carriage by a friction fit. The small arm is fixed to the grooved servo shaft via form and friction fit, as it is slightly undersized and the grooves of the metal shaft press into the plastic. As my servo shaft has an internal thread, I additonally secured the small arm via the small screw, which is normally used to mount the crossed horn onto the shaft. In terms of the servo, I used a standard sized version (no mini or micro!), as it provides sufficient torque to move the carriage. Check via the picture above, if your servo fits into the cutout. I provided two versions of the servo mount, so you can choose on which side of the blast gate you would like to mount it.
Why the rubber band?
A negative side effect caused by mounting position of the servo is a transverse force, which pushes the carriage sidewards against the frame and thereby causes friction and occasional blockings. I applied some grease to the edges of the carriage, which helped a lot. Beyond that I added a simple rubber band to generate a counterforce and prevents blockings. I mounted the rubber band three months ago and until now could not observe any wear out. However, in the long term it might be more benefitial to replace it by a proper metal spring. If you have other ideas, let me know!
4"/100mm Blast Gate / Absperrschieber:https://www.holz-metall.info/shop1/artikel8019.htm#tech
Servo (Its torque of 35Ncm is a little on the weak side, get stronger ones if you can!)https://www.conrad.de/de/modelcraft-standard-servo-rs2-mgbb-analog-servo-getriebe-material-metall-stecksystem-jr-205111.html
Update 30/01/2018
I added an alternative servo connector, which fits onto a traditional servo cross. I experienced that the orignal servo connector printed in PLA could not handle the torque transfered by the servo gear and wore out.
