Thingiverse
Serious business Bear MK2, MK2.5, MK3 y-axis replacement by zbrozek
by Thingiverse
Last crawled date: 3 years ago
Background
I wanted a stiffer, more-awesome Y axis for my Bear printer. So I replaced everything on the axis except for the motor mount. That's heavy-handed for a lot of folks, so I expect most people will go half-way on this project.
Half-way
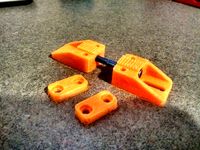
You replace the idler, belt holder, and motor holder, but in return you get:
Moves the belt tension path to be parallel to the carriage.
Provides a tensioner.
Provides an end-stop that doesn't involve bashing the bearings into the frame.
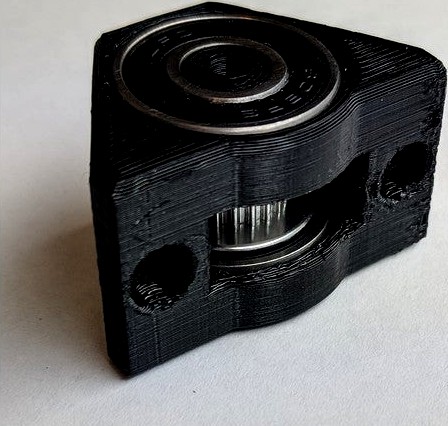
A 20T idler with 608 bearings for extreme durability and longevity.
Nice alignment marks to make it easy to line up the idler with the carriage.
Shaft support for the motor.
All-the-way
You also replace the bearings, the bearing holders, and the carriage. But by design you get:
Higher resonant frequency for the bed.
Greatly increased rotational stiffness.
Improved bearing life.
Reduced likelihood of Y axis binding.
And by assembly process you get:
Excellent orthogonality between XZ plane and XY plane
Excellent orthogonality between X axis motion and Y axis motion.
Stuff
Tools to go half-way
Set of hex drivers.
Small flathead screwdriver
Supplies to go half-way
(3) M3x0.5 25 mm socket cap screws
(1) M3x0.5 square nut
(1) 625 bearing
(2) M3x0.5 nylock nuts
(2) M5x0.8 8 mm button head screw
(2) 608 bearings
(1) 20T idler with 8mm bore or E3D idler
Additional tools to go all-the-way
15 mm H7 reamer
arbor press
surface plate
height gauge
ultrasonic cleaner
mill or lathe
drill
laser cutter
Additional supplies to go all-the-way
(2) 8 mm h7 0.05 Ra 330 mm rods
(1) carriage plate (mine wasn't flat on arrival; I'm looking for better alternatives)
(4) Misumi LMU-N8 (80 Celsius ambient) or LMUF-N8 (110 Celsius ambient) bearings
(1) Simple Green degreaser
(1) lubricant resistant to higher temperatures
(1) brass shim stock
Lots of M3 screws and nuts. If you're going all the way you probably already have tons.
Instructions
Half-way
Print parts (I suggest 3 perimeters, 20% gyroid infill):
slide (note flavor for E3D idler!)
shaft
mount
belt holder
motor holder
Remove your existing Y-axis idler, belt holder, and motor holder
Attach the new belt holder body to your carriage.
Press two nylock into the slots on the tensioner mount.
Loosely attach the tensioner mount to the frame.
Slide the bed until the belt holder and tensioner mount touch.
Align the guide lines and tighten the tensioner mount to the frame.
Press out the sacrificial bearings from the 20T pulley.
Press the 8 mm shaft through 608-pulley-608.
Press the bearing assembly into the slide.
Pass the belt through the slide.
Insert a thin-or-regular square nut into the belt capture block.
Hold the belt to a block and shove it into the belt holder. Do the same on the other end.
Drive a screw through the belt holder to capture both blocks. Tighten completely.
Press a 625 bearing into the motor holder.
Align the guide lines and tighten the motor holder to the frame.
Mount the motor and run the belt around the pulley.
Tension the belt by inserting the slide into the mount, then tightening the screws.
All-the-way
In addition to the half-way print, also print:
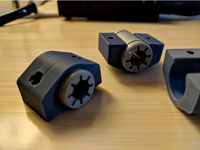
(2) bearing holders w/ bearing spacers
Laser cut:
(2) rod alignment tools in something like acrylic or delrin
(1) openbuilds drill template in paper or card stock
Ream the bearing holder holes up to 15 mm h7.
Press in a bearing, the spacer, and another bearing for each holder.
Drill the remaining plate holes. I used a 3.5 mm bit so that there was some adjustment slop.
Loosely attach the bearing holders to the plate.
Slide the rods through the bearing holders.
Attach your rods to some 1-2-3 blocks on your surface plate, using your rod spacer guides to ensure the correct center-to-center pitch. See photo above. The end stop is a convenience but not required.
Tighten the screws for the bearing holders. Your rods are now coplanar and parallel.
Loosen the right pair of rod holders and install the rods into the rod holders. Leave the carriage aside.
Reinstall the rod spacers to make sure the rod holders are parallel.
Lower the X axis until it's as low as it will go.
Use the height gauge and surface plate to ensure your X rods are parallel to the plate. Adjust manually.
Use the height gauge to check the height of each end of each rod, then shim the rod holders until they are all at the same height. You've just made XY perfectly flat.
Clamp a machinist's square to the X rods and touching one Y rod.
Loosen the back rod holders and nudge them until the Y rods are perpendicular to the X rods. Tighten the rod holders. Your Y motion is now perpendicular to X motion.
Remove the rod spacers and reinstall the carriage.
Install the belt holder onto the carriage.
Loosely attach the bed to the carriage. Don't forget the spacers.
Use your machinist's square to align the bed front-back silkscreen lines to the X axis. Tighten the bed screws.
Perform the remaining half-way steps. Note that my carriage offsets the belt holder from the center of the bed to avoid double-purposing the screws, so you'll need to adjust your motor mount.
Update your maximum Z height to 209 mm and reflash the firmware.
All done!
Updates
2018-09-28
New files are up. You can build it now. Half-way is pretty easy. Going all the way is not.
2018-09-29
Improved the BOM and wrote instructions.
2018-10-06
Updated the files for some livability tweaks and to recover some Z-axis height.
2018-10-14
Added belt holder files for folks going halfway to use with the MK2/MK2.5 and MK3 beds. Note that a halfway build requires a shorter-in-Z belt holder because the carriage isn't moved upwards.
2018-11-03
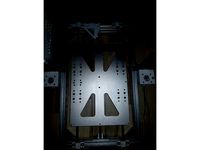
Changed out the shaft for a solid cylinder. I bent my hollow w/ hole shaft. Print that puppy solid. I also added a motor holder that supports the motor shaft with a 625 bearing. Added a plate view screenshot.
2018-11-17
Updated the Y motor holder to get more clearance to the belt holder. I didn't notice that it caused a loss of Y axis travel. Thanks flobler for testing and providing feedback!
2018-11-25
Updated Y idler mount for MK3 bear users that doesn't limit Y travel.
2018-12-31
Updated idler mounts with clearer filenames and fixed and issue where they would sit slightly proud of the extrusion if you had a rigid plastic. Added motocoder's E3D-specific slide component and updated the documentation to match. Still need to add his photos; Thingiverse is rendering them upside-down.
2019-01-01
Uploaded fresh source and added some printability features to the motor mount.
2019-02-21
Updated the E3D idler slide.
I wanted a stiffer, more-awesome Y axis for my Bear printer. So I replaced everything on the axis except for the motor mount. That's heavy-handed for a lot of folks, so I expect most people will go half-way on this project.
Half-way
You replace the idler, belt holder, and motor holder, but in return you get:
Moves the belt tension path to be parallel to the carriage.
Provides a tensioner.
Provides an end-stop that doesn't involve bashing the bearings into the frame.
A 20T idler with 608 bearings for extreme durability and longevity.
Nice alignment marks to make it easy to line up the idler with the carriage.
Shaft support for the motor.
All-the-way
You also replace the bearings, the bearing holders, and the carriage. But by design you get:
Higher resonant frequency for the bed.
Greatly increased rotational stiffness.
Improved bearing life.
Reduced likelihood of Y axis binding.
And by assembly process you get:
Excellent orthogonality between XZ plane and XY plane
Excellent orthogonality between X axis motion and Y axis motion.
Stuff
Tools to go half-way
Set of hex drivers.
Small flathead screwdriver
Supplies to go half-way
(3) M3x0.5 25 mm socket cap screws
(1) M3x0.5 square nut
(1) 625 bearing
(2) M3x0.5 nylock nuts
(2) M5x0.8 8 mm button head screw
(2) 608 bearings
(1) 20T idler with 8mm bore or E3D idler
Additional tools to go all-the-way
15 mm H7 reamer
arbor press
surface plate
height gauge
ultrasonic cleaner
mill or lathe
drill
laser cutter
Additional supplies to go all-the-way
(2) 8 mm h7 0.05 Ra 330 mm rods
(1) carriage plate (mine wasn't flat on arrival; I'm looking for better alternatives)
(4) Misumi LMU-N8 (80 Celsius ambient) or LMUF-N8 (110 Celsius ambient) bearings
(1) Simple Green degreaser
(1) lubricant resistant to higher temperatures
(1) brass shim stock
Lots of M3 screws and nuts. If you're going all the way you probably already have tons.
Instructions
Half-way
Print parts (I suggest 3 perimeters, 20% gyroid infill):
slide (note flavor for E3D idler!)
shaft
mount
belt holder
motor holder
Remove your existing Y-axis idler, belt holder, and motor holder
Attach the new belt holder body to your carriage.
Press two nylock into the slots on the tensioner mount.
Loosely attach the tensioner mount to the frame.
Slide the bed until the belt holder and tensioner mount touch.
Align the guide lines and tighten the tensioner mount to the frame.
Press out the sacrificial bearings from the 20T pulley.
Press the 8 mm shaft through 608-pulley-608.
Press the bearing assembly into the slide.
Pass the belt through the slide.
Insert a thin-or-regular square nut into the belt capture block.
Hold the belt to a block and shove it into the belt holder. Do the same on the other end.
Drive a screw through the belt holder to capture both blocks. Tighten completely.
Press a 625 bearing into the motor holder.
Align the guide lines and tighten the motor holder to the frame.
Mount the motor and run the belt around the pulley.
Tension the belt by inserting the slide into the mount, then tightening the screws.
All-the-way
In addition to the half-way print, also print:
(2) bearing holders w/ bearing spacers
Laser cut:
(2) rod alignment tools in something like acrylic or delrin
(1) openbuilds drill template in paper or card stock
Ream the bearing holder holes up to 15 mm h7.
Press in a bearing, the spacer, and another bearing for each holder.
Drill the remaining plate holes. I used a 3.5 mm bit so that there was some adjustment slop.
Loosely attach the bearing holders to the plate.
Slide the rods through the bearing holders.
Attach your rods to some 1-2-3 blocks on your surface plate, using your rod spacer guides to ensure the correct center-to-center pitch. See photo above. The end stop is a convenience but not required.
Tighten the screws for the bearing holders. Your rods are now coplanar and parallel.
Loosen the right pair of rod holders and install the rods into the rod holders. Leave the carriage aside.
Reinstall the rod spacers to make sure the rod holders are parallel.
Lower the X axis until it's as low as it will go.
Use the height gauge and surface plate to ensure your X rods are parallel to the plate. Adjust manually.
Use the height gauge to check the height of each end of each rod, then shim the rod holders until they are all at the same height. You've just made XY perfectly flat.
Clamp a machinist's square to the X rods and touching one Y rod.
Loosen the back rod holders and nudge them until the Y rods are perpendicular to the X rods. Tighten the rod holders. Your Y motion is now perpendicular to X motion.
Remove the rod spacers and reinstall the carriage.
Install the belt holder onto the carriage.
Loosely attach the bed to the carriage. Don't forget the spacers.
Use your machinist's square to align the bed front-back silkscreen lines to the X axis. Tighten the bed screws.
Perform the remaining half-way steps. Note that my carriage offsets the belt holder from the center of the bed to avoid double-purposing the screws, so you'll need to adjust your motor mount.
Update your maximum Z height to 209 mm and reflash the firmware.
All done!
Updates
2018-09-28
New files are up. You can build it now. Half-way is pretty easy. Going all the way is not.
2018-09-29
Improved the BOM and wrote instructions.
2018-10-06
Updated the files for some livability tweaks and to recover some Z-axis height.
2018-10-14
Added belt holder files for folks going halfway to use with the MK2/MK2.5 and MK3 beds. Note that a halfway build requires a shorter-in-Z belt holder because the carriage isn't moved upwards.
2018-11-03
Changed out the shaft for a solid cylinder. I bent my hollow w/ hole shaft. Print that puppy solid. I also added a motor holder that supports the motor shaft with a 625 bearing. Added a plate view screenshot.
2018-11-17
Updated the Y motor holder to get more clearance to the belt holder. I didn't notice that it caused a loss of Y axis travel. Thanks flobler for testing and providing feedback!
2018-11-25
Updated Y idler mount for MK3 bear users that doesn't limit Y travel.
2018-12-31
Updated idler mounts with clearer filenames and fixed and issue where they would sit slightly proud of the extrusion if you had a rigid plastic. Added motocoder's E3D-specific slide component and updated the documentation to match. Still need to add his photos; Thingiverse is rendering them upside-down.
2019-01-01
Uploaded fresh source and added some printability features to the motor mount.
2019-02-21
Updated the E3D idler slide.
Similar models
thingiverse
free
AM8 - 200x300 buildplate - 350mm Z height by bipsen
...h additional material added for better strength (i saw some like these somewhere - but cannot remember if it was on thingiverse).
thingiverse
free

Y-belt holder and tensioner for MK3 and Bear MK2, MK2.5, and MK3 by zbrozek
...i added the sight-line to the stock mk3 flavor mount. new solidworks source is up. it's now the 2019 version. happy holidays!
thingiverse
free

Motormount for Y-Axis - 10mm threaded rods by benzed78
...e of the motor is not moving away, if you tension the belt
27.10.2015:
i modified the design, a bit, so it looks nicer for me. ;)
thingiverse
free

Y-axis JIG for set belt
... 8 mm rods as a stop, then you move the x axis to the jig position and tighten the belt. try to press carriages of x axis to jig.
thingiverse
free
Prusa i3 Updated Y Carriage by Terrapinmfg
...dated bed plate as well.
there is a stp file of the assembly as well as the .stl files for the printed parts and the bed plate.
thingiverse
free

Prusa i3 MK2 X-Idler Tensioner by Jasenk
... kit came with extras that i used.
the pully slide (x-end-idler-front-tensioner) fits one way. if it's tight flip it around.
3dwarehouse
free

3D Printed CNC Router Belt Holders
...tension the belts on the y axis. this enabled me to invert the y-axis carriage to get better access to the motor screws and belt.
thingiverse
free

Hevo corexy system
...the disc.
source:https://cad.onshape.com/documents/fe7ef93aeb21687c26dace27/w/ac0cc948d4102d237be16f5c/e/cda881af6fa70062f4562796
thingiverse
free

Better Y axis for flsun cube with belt tensioner by MichaelLamb
...at will loosen over time causing headaches... unfortunately that does not correct crooked 8mm rods that came with the printer...
thingiverse
free

FoldaRap ?Custom ?Y-axis by Okatake
...ngiverse
y belt idler bearing 603zz use.
y motor mount with increased wall thickness.
y carriage with the y end stop protrusion.
Zbrozek
thingiverse
free

Hole sizer generator by zbrozek
...hole sizer generator by zbrozek
thingiverse
generates grids of holes for testing fit.
thingiverse
free

Thinkpad T400 disk caddy by zbrozek
...eets for dimensions) i now understand why lenovo flipped the disk over in the t410 - disk thickness isn't strictly specified.
thingiverse
free

Captured (blind) bearing holder by zbrozek
... only the outer race, making it possible to properly pre-load the bearing.
i'm using this with a cone hub for a spool holder.
thingiverse
free

Double sided fitting mount for PTFE tubing passthrough by zbrozek
...
my enclosure is built with acrylic walls. i used some automotive plastic adhesion promotor and i glued the fittings to the wall.
thingiverse
free

Prusa MK42 heated bed insulation cutout by zbrozek
...am with a razor blade.
this is a template that i printed on a laser cutter to produce clearance holes for the mounting standoffs.
thingiverse
free

Spannerhands SSS spool holder window for laser cutting by zbrozek
...ure to help create a rough surface for gluing.
2 mm acrylic cut on a glowforge.
engrave 1000 @ 20% 1 pass
cut 210 @ full 1 pass
thingiverse
free

Hairdryer to space heater conversion by zbrozek
...f you don't want to buy or install (soldering iron) heat-set inserts, you could resize the holes and use self-tapping screws.
thingiverse
free
Prusa heated bed bearing clamp by zbrozek
... but i use the igus ones.
folks with original frames (i'm on bear) will need some heat-set inserts to avoid clearance issues.
thingiverse
free

3-way square tube corner by zbrozek
...ck the tubes to the corner. the source solidworks file is attached, so you're empowered to change dimensions or add features.
thingiverse
free

Microsoft Surface Pro 4 (SP4) pen holder by zbrozek
...'s simple. it holds the pen pretty securely. i used a 0.1 mm thick acrylic double sided tape to attach the tabs to my tablet.
Serious
3d_export
$5

Serious panda 3D Model
...serious panda 3d model
3dexport
animals panda bear
serious panda 3d model somakun 101188 3dexport
turbosquid
$20

Serious kid in winter jacket 0808
...inter jacket 0808 for download as max, fbx, stl, wrl, and obj on turbosquid: 3d models for games, architecture, videos. (1709359)
3d_export
$5

Lightsaber 3D Model
...lightsaber 3d model 3dexport lightsaber blade lightsaber 3d model serious 23812...
3d_export
$5

Minigun 3D Model
...model 3dexport minigun guns weapons gun minigun 3d model serious 25497...
3ddd
$1

Lion head
...african big five game animals, a trophy that every serious hunter...
3ddd
$1

African Buffalo
...african big five game animals, a trophy that every serious hunter...
3d_export
$11

Ural 4320
...ural 4320 3dexport hi, it's my first serious 3d model. i spent a lot of effort and...
3d_ocean
$5

Robot bodyguard
...bodyguard 3docean character robot robot warrior this funny and serious at the same time the robot will keep your...
3d_ocean
$19

Set of Men 6 in 1
...game head human man model mustache natural realistic representative serious textured unwrap set of men 6 in 1. what’s...
3d_ocean
$15

Male Celebrity Bust
...happy high poly hollywood human male pose sculpt sculpt serious sexy star [3rd place winner] this is my entry...
Mk2
turbosquid
$4

Mk2
...
royalty free 3d model mk2 for download as max, obj, and fbx on turbosquid: 3d models for games, architecture, videos. (1305687)
turbosquid
$9
Mk2 Grenade
...osquid
royalty free 3d model mk2 grenade for download as fbx on turbosquid: 3d models for games, architecture, videos. (1175401)
turbosquid
$4

Mk2 Grenade
...quid
royalty free 3d model mk2 grenade for download as blend on turbosquid: 3d models for games, architecture, videos. (1228888)
turbosquid
$2

mk2 Grenade
...osquid
royalty free 3d model mk2 grenade for download as fbx on turbosquid: 3d models for games, architecture, videos. (1329079)
turbosquid
$2

GRENADE MK2
...osquid
royalty free 3d model grenade mk2 for download as fbx on turbosquid: 3d models for games, architecture, videos. (1202615)
turbosquid
$2

Grenade Mk2
...osquid
royalty free 3d model grenade mk2 for download as max on turbosquid: 3d models for games, architecture, videos. (1658201)
turbosquid
$75

Lanchester Mk2
...alty free 3d model lanchester mk2 for download as 3ds and max on turbosquid: 3d models for games, architecture, videos. (1497085)
turbosquid
$10

MK2 helmet
...
royalty free 3d model mk2 helmet for download as max and obj on turbosquid: 3d models for games, architecture, videos. (1371428)
turbosquid
$10

Grenade MK2
...royalty free 3d model grenade mk2 for download as max and fbx on turbosquid: 3d models for games, architecture, videos. (1146970)
turbosquid
free

MK2 Grenade
...
free 3d model mk2 grenade for download as png, obj, and fbx on turbosquid: 3d models for games, architecture, videos. (1225336)
Mk3
turbosquid
$50

cention mk3
...ty free 3d model cention mk3 for download as ma, obj, and fbx on turbosquid: 3d models for games, architecture, videos. (1454148)
turbosquid
$129

MK3 Tank
... available on turbo squid, the world's leading provider of digital 3d models for visualization, films, television, and games.
turbosquid
$100

Toyota Supra MK3
... available on turbo squid, the world's leading provider of digital 3d models for visualization, films, television, and games.
turbosquid
$44

cention mk3 low poly
...d model cention mk3 low poly for download as ma, obj, and fbx on turbosquid: 3d models for games, architecture, videos. (1454666)
turbosquid
$30

Challenger I Mk3 Falcon
... available on turbo squid, the world's leading provider of digital 3d models for visualization, films, television, and games.
turbosquid
$10

American Frag hand grenade MK3
...free 3d model american frag hand grenade mk3 for download as on turbosquid: 3d models for games, architecture, videos. (1393624)
turbosquid
$20

Mk3 US Navy Combat Knife
...ty free 3d model mk3 us navy combat knife for download as fbx on turbosquid: 3d models for games, architecture, videos. (1172791)
3d_export
$29

Ford Fiesta MK3 Modified 3D Model
...7 tumerfx mtumer mehmet t?mer 1993 1995 1996 wrc special modifed modifiye
ford fiesta mk3 modified 3d model mtumer 30698 3dexport
3d_export
$99

Toyota Supra Mk3 19861993 3D Model
...ort fast coupe japan 1986 1987 1988 1989 1990 1991 1992 1993 tuning turbo
toyota supra mk3 19861993 3d model squir 62530 3dexport
turbosquid
$5

Timothy Oulton Mars Chair MK3
...on mars chair mk3 for download as 3ds, max, obj, fbx, and dae on turbosquid: 3d models for games, architecture, videos. (1209782)
Business
turbosquid
$95

business
... available on turbo squid, the world's leading provider of digital 3d models for visualization, films, television, and games.
3d_ocean
$9

Business Figures
...r female figures human male man people tie woman
set of 8 posed business figures made in cinema 4d files included: .c4d .3ds .obj
3d_export
$7

business center
...business center
3dexport
3d_export
$8

business men and women
...business men and women
3dexport
business men and women
3d_ocean
$5
Business Card Box
...business card box
3docean
business card card interior office
business card and box, include psd card design
turbosquid
$99

Business man !
...uid
royalty free 3d model business man ! for download as max on turbosquid: 3d models for games, architecture, videos. (1335056)
turbosquid
$15

business office
...id
royalty free 3d model business office for download as max on turbosquid: 3d models for games, architecture, videos. (1259620)
turbosquid
$4

Business Center
...id
royalty free 3d model business center for download as max on turbosquid: 3d models for games, architecture, videos. (1438607)
turbosquid
free

Business Card
...quid
free 3d model business card display for download as obj on turbosquid: 3d models for games, architecture, videos. (1249110)
3d_export
$10

business men and women
...ss men and women
3dexport
modern characters_ many people_ office figures_ business people_ business people_ men and women_ crowd
Axis
3ddd
$1

Мария Axis
...
3ddd
кухня , классическая , axis
модель кухни.
3d_export
$22

Axis robot 6-axis robotic arm
...ing parts drawings, standard parts purchased parts list, can be produced directly according to the drawings, welcome to download!
3ddd
free

Versatile Axis
...ddd
nexus , плитка
http://bvtileandstone.com/ceramic-porcelain/versatile-axis/
3d_export
$19

robot 2 axis
...robot 2 axis
3dexport
robot 2 axis
turbosquid
$40

Axis R5F
... available on turbo squid, the world's leading provider of digital 3d models for visualization, films, television, and games.
turbosquid
$40

Axis S5F
... available on turbo squid, the world's leading provider of digital 3d models for visualization, films, television, and games.
turbosquid
$30

Axis Athlon
... available on turbo squid, the world's leading provider of digital 3d models for visualization, films, television, and games.
turbosquid
$10

Linear Axis
... available on turbo squid, the world's leading provider of digital 3d models for visualization, films, television, and games.
3d_export
$15

drawing axis
...drawing axis
3dexport
simple rendering of the scene file
3ddd
$1

versatile axis ARC
...versatile axis arc
3ddd
versatile , плитка
versatile axis arc red dot design award
Bear
3d_export
$6
Bear
...bear
3dexport
bear
3d_export
$5
bearing
...bearing
3dexport
bearing
3d_export
$12
bear
...bear
3dexport
bear for 3d printing toy
3d_ocean
$9
Bearing
...ne ball ballbea bearing bearings engine hard industrial machine mechanic metal part piece plastic ring screw sphere steel
bearing
archibase_planet
free

Bear
...bear
archibase planet
statuette bear picturesque element
bear - 3d model (*.gsm+*.3ds) for interior 3d visualization.
3d_export
$5

bear
...bear
3dexport
bear have a stl.,3dm files
archibase_planet
free

Bear
...bear
archibase planet
bear animals omnivorous animal
bear angry n250907- 3d model (*.gsm+*.3ds) for interior 3d visualization.
archibase_planet
free

Bear
...bear
archibase planet
bear animals omnivorous animal
bear easy n250907 - 3d model (*.gsm+*.3ds) for interior 3d visualization.
3ddd
$1

Teddy bear
...teddy bear
3ddd
teddy bear , медведь
teddy bear :)
3d_ocean
$12
Bear
... formats. created with 3d max 9.0. this file is very useful for learning & rigging. it can be used for any professional work.
Replacement
3d_export
$12

replaceable bristle
...replaceable bristle
3dexport
this is 3d printable replaceable bristle toothbrush.
3d_export
$34
Knee Replacement
...h meets the lower leg. ... during a total knee replacement, the end of the femur bone is removed and replaced with a metal shell.
3d_export
$44
Hip Replacement
...omponents. the damaged femoral head is removed and replaced with a metal stem that is placed into the hollow center of the femur.
turbosquid
$59

Hip replacement
...el hip replacement for download as ma, c4d, lwo, lxo, and obj on turbosquid: 3d models for games, architecture, videos. (1520195)
turbosquid
$10

Module replacment station
...alty free 3d model module replacment station for download as on turbosquid: 3d models for games, architecture, videos. (1271271)
3d_export
$8
tool replacement gearbox
...tool replacement gearbox
3dexport
eccentric lifting mechanism, you can process according to available drawings.
turbosquid
$7

Globe Oil Atomizer Replacement Housing
... oil atomizer replacement housing for download as ige and stl on turbosquid: 3d models for games, architecture, videos. (1253839)
turbosquid
free

SLICE Ceramic Scapel (Replaceable Blade)
... (replaceable blade) for download as obj, fbx, blend, and dae on turbosquid: 3d models for games, architecture, videos. (1363525)
3d_export
$19
Knee Replacement Implant
...ntimeter<br>__________________________<br>poly count :<br>polygon count - 217440<br>vertex count - 108776
turbosquid
$19

(Project) Bad odor filtering sytem with support rail and pulley that assure a comfortable gel filter element replacement.
... available on turbo squid, the world's leading provider of digital 3d models for visualization, films, television, and games.
Y
turbosquid
$1

Tetera y Galletas y Caf
... available on turbo squid, the world's leading provider of digital 3d models for visualization, films, television, and games.
3ddd
$1

Смеситель Y-CON
...смеситель y-con
3ddd
смеситель , y-con
смеситель y-con
3ddd
$1

Y-Chair
...y-chair
3ddd
tom dixon
y-chair designed by tom dixon,
3ds max + obj, corona
3ddd
$1

Y Chair compilation
....net/products/us/y-chair-sled-base
y chair swivel basehttp://www.tomdixon.net/products/us/y-chair-swivel-base
turbosquid
$190

Y-8
...y-8
turbosquid
royalty free 3d model y-8 for download as max on turbosquid: 3d models for games, architecture, videos. (1658891)
turbosquid
$7

Bench Y
...turbosquid
royalty free 3d model bench y for download as obj on turbosquid: 3d models for games, architecture, videos. (1488746)
turbosquid
$15

bonePile Y
...oyalty free 3d model bonepile y for download as blend and obj on turbosquid: 3d models for games, architecture, videos. (1546374)
turbosquid
$7

Y for Yarn
...d
royalty free 3d model y for yarn model for download as max on turbosquid: 3d models for games, architecture, videos. (1699732)
turbosquid
$2

FONT Y
...quid
royalty free 3d model font y for download as ma and obj on turbosquid: 3d models for games, architecture, videos. (1549457)
3ddd
$1

WOOD-y
...wood-y
3ddd
wooden guy
5
turbosquid
$6

Rock 5-5
...urbosquid
royalty free 3d model rock 5-5 for download as obj on turbosquid: 3d models for games, architecture, videos. (1639063)
3d_export
$5

hinge 5
...hinge 5
3dexport
hinge 5
turbosquid
$10

A-5
... available on turbo squid, the world's leading provider of digital 3d models for visualization, films, television, and games.
turbosquid
$2

A-5
... available on turbo squid, the world's leading provider of digital 3d models for visualization, films, television, and games.
turbosquid
$12

Calligraphic Digit 5 Number 5
...hic digit 5 number 5 for download as max, obj, fbx, and blend on turbosquid: 3d models for games, architecture, videos. (1389333)
3ddd
$1

5 роз
...5 роз
3ddd
5 роз в стеклянной вазе
design_connected
$11

iPhone 5
...iphone 5
designconnected
apple iphone 5 computer generated 3d model.
3ddd
$1

Lola 5
...lola 5
3ddd
miniforms
lola 5 miniforms 300*65*134
3ddd
$1

Nexus 5
...dd
nexus , phone , телефон
google nexus 5 phone
3d_ocean
$15

iPhone 5
...iphone 5
3docean
3d 4d apple cinema iphone model modeling phone screen texture
iphone 5 3d model and texture realistic iphone 5.