Thingiverse
Semi Ducted Micro Frame (Beecheese Frame V3)(cam mount integrated) by Noctaro
by Thingiverse
Last crawled date: 3 years ago
This is a remix of my beecheeseframe based on stylesuxx´s awesome cheeseframe.
Print it with 90-100% infill. You can print it pretty fast with still good results.
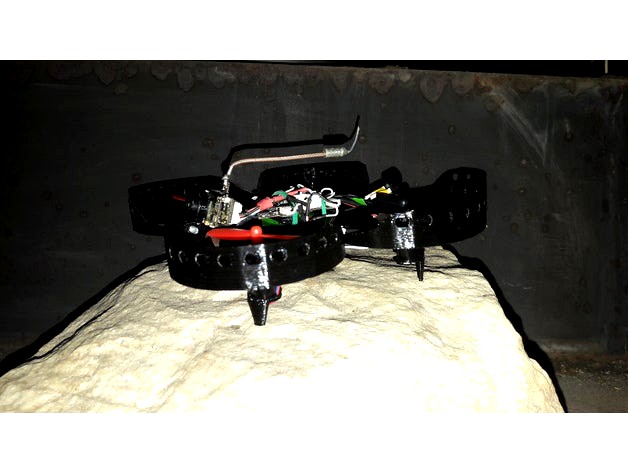
It will fit 8520 motors and 55mm props. The ducts are reduced to save weight and resized to fit bigger propeller. In version 3 the ducts are a bit bigger, as V2 had problems with props hitting the ducts from time to time. I think the 55mm props improve flight performance and flight duration alot, compared to the 50mm version. I got around 6 Minutes on 700mah 1s. It anyhow doesnt feel that agile, but i think it has more power to compensate hard moves.
The cam mount fits an M3 screw. If you dont overtighten it, you won´t need a nut.
j4y4r had the great idea to integrate the tx03 mount of stylesuxx onto my frame. I liked the idea, but wanted a adjustable mount. So i added it to this version. If you already have some frames. There is also a version of the mount for upgrading an existing frame.
Stylesuxx and j4y4r gave me some very good feedback, so i coould improve the frame.
Thanks! :)
What changed since V2?
I did some reinforcment at weak points.
Booms improved
FC section has increased stability
Cam mount connection added
Cam Clip added
Duct holes made a bit smaller -> more rigidity
Motor mounts improved -> less fileing
maybe some other things i cant remember :D
Update: Added landing gear.
It can take some hits and is easy to fix using superglue if something went wrong ;)
You may use my cam mount on your already printed frames.https://www.thingiverse.com/thing:2480571
Awesome flightcontroller firmware:
Betaflight 3.1.6 Omnibushttps://github.com/betaflight/betaflight
(Open Source)
Do not forget to break in your motors. (Around 1 lipo pack at min throttle, best way to do is on motors tab in betaflight configurator)
Specs:
Lenght: 120mm
Width: 139mm
Weight: 12.0 grams
Build video: (Frame V1 but same hardware as in V3) (english subtitles)https://youtu.be/LPq8Mr7HCQQ
Flight VIdeo:https://www.youtube.com/watch?v=RkQ6DNjz5fQ
Print timelapse: (V3 without cam mount)https://www.youtube.com/watch?v=NgbL9x8zeWc
Components:
(Links to banggood.com)
Flight control board:
"Omnibus F3 with OSD and RX" (Flysky/FrSky/DSM compatible versions available)(Versions sold after 04/2017 should have failsave feature)https://goo.gl/iPsMra
Brushed motors "Racestar 8520"https://goo.gl/8DxBGM
Propeller 2 blade 55mm (Watch out, there are some flyaway props around. Cant recommend the cheap ones)https://goo.gl/CuWGpk
FPV cam/transmitter combo - TX03 (great image quality for its size, very leightweight)https://goo.gl/aqRcHs
1S 600mah 50C Battery With Charger (higher C rate means more power for your quad)https://goo.gl/nd89mN
5V active Buzzer (take it, if you dont want to search your quad for hours and hours.)https://goo.gl/ud4U5G
Further you need:
Transmitter of your choice. I use the Flysky I6 with SBUS modhttps://goo.gl/GwRqK4
FPV goggle of your choice. I use the Kylin Vision with Eachine DVR modhttps://goo.gl/1OyqmI
Connectors you will need: (Links to banggood.com)
4x JST SH 1.0 - 2 Pin - pigtails or connectors for the motors ->https://goo.gl/72d5is
1x JST SH 1.0 - 4 Pin - pigtails or connectors for the fpv camera -> https://goo.gl/r3Vn92
Print it with 90-100% infill. You can print it pretty fast with still good results.
It will fit 8520 motors and 55mm props. The ducts are reduced to save weight and resized to fit bigger propeller. In version 3 the ducts are a bit bigger, as V2 had problems with props hitting the ducts from time to time. I think the 55mm props improve flight performance and flight duration alot, compared to the 50mm version. I got around 6 Minutes on 700mah 1s. It anyhow doesnt feel that agile, but i think it has more power to compensate hard moves.
The cam mount fits an M3 screw. If you dont overtighten it, you won´t need a nut.
j4y4r had the great idea to integrate the tx03 mount of stylesuxx onto my frame. I liked the idea, but wanted a adjustable mount. So i added it to this version. If you already have some frames. There is also a version of the mount for upgrading an existing frame.
Stylesuxx and j4y4r gave me some very good feedback, so i coould improve the frame.
Thanks! :)
What changed since V2?
I did some reinforcment at weak points.
Booms improved
FC section has increased stability
Cam mount connection added
Cam Clip added
Duct holes made a bit smaller -> more rigidity
Motor mounts improved -> less fileing
maybe some other things i cant remember :D
Update: Added landing gear.
It can take some hits and is easy to fix using superglue if something went wrong ;)
You may use my cam mount on your already printed frames.https://www.thingiverse.com/thing:2480571
Awesome flightcontroller firmware:
Betaflight 3.1.6 Omnibushttps://github.com/betaflight/betaflight
(Open Source)
Do not forget to break in your motors. (Around 1 lipo pack at min throttle, best way to do is on motors tab in betaflight configurator)
Specs:
Lenght: 120mm
Width: 139mm
Weight: 12.0 grams
Build video: (Frame V1 but same hardware as in V3) (english subtitles)https://youtu.be/LPq8Mr7HCQQ
Flight VIdeo:https://www.youtube.com/watch?v=RkQ6DNjz5fQ
Print timelapse: (V3 without cam mount)https://www.youtube.com/watch?v=NgbL9x8zeWc
Components:
(Links to banggood.com)
Flight control board:
"Omnibus F3 with OSD and RX" (Flysky/FrSky/DSM compatible versions available)(Versions sold after 04/2017 should have failsave feature)https://goo.gl/iPsMra
Brushed motors "Racestar 8520"https://goo.gl/8DxBGM
Propeller 2 blade 55mm (Watch out, there are some flyaway props around. Cant recommend the cheap ones)https://goo.gl/CuWGpk
FPV cam/transmitter combo - TX03 (great image quality for its size, very leightweight)https://goo.gl/aqRcHs
1S 600mah 50C Battery With Charger (higher C rate means more power for your quad)https://goo.gl/nd89mN
5V active Buzzer (take it, if you dont want to search your quad for hours and hours.)https://goo.gl/ud4U5G
Further you need:
Transmitter of your choice. I use the Flysky I6 with SBUS modhttps://goo.gl/GwRqK4
FPV goggle of your choice. I use the Kylin Vision with Eachine DVR modhttps://goo.gl/1OyqmI
Connectors you will need: (Links to banggood.com)
4x JST SH 1.0 - 2 Pin - pigtails or connectors for the motors ->https://goo.gl/72d5is
1x JST SH 1.0 - 4 Pin - pigtails or connectors for the fpv camera -> https://goo.gl/r3Vn92
Similar models
thingiverse
free

Semi Ducted Micro Frame (Beecheese Frame V2) by Noctaro
...nter brand:
printrbot
printer:
printrbot plus
rafts:
no
supports:
no
resolution:
0.2
infill:
100%
more from 3d printing
view more
thingiverse
free

Micro FPV Racer 8520 brushed motors by cncmodel
...ttps://goo.gl/kkymxv
aio camera: https://goo.gl/8jvvpf
triblades propellers: https://goo.gl/x9l6fi
lipo 1s: https://goo.gl/p124hn
thingiverse
free

Micro FPV Racer 8520 brushed motors ver 2 by cncmodel
...ttps://goo.gl/kkymxv
aio camera: https://goo.gl/8jvvpf
triblades propellers: https://goo.gl/x9l6fi
lipo 1s: https://goo.gl/p124hn
thingiverse
free

micro fpv drone 8520 90mm by v-cu
...battery, flysky fs-a8s receiver
to put the motors preheat the plastic with hot air and put it in
edit
i added v2 stronger version
thingiverse
free

Tiny Racer FPV drone by thral666
... 8520 coreless motors.
i use eachine tx03 fpv camera.
all parts from banggood.com
i use more battery, 220mah, 300mah and 600mah.
thingiverse
free

120mm Micro FPV Racer 8520 brushed motors by cncmodel
...eohttps://youtu.be/v71vvzw4qy4
the model in the video is the first version. after the video i made some improvements on stl files
thingiverse
free

Beecheese v2 with TX03 mount and hooks by j4y4r
...tu.be/ctlbxvnmj2yhttps://youtu.be/c81zvkanxoqhttps://youtu.be/8nfvvchzxx8https://youtu.be/8wjfpvnzbtahttps://youtu.be/uangjqtyvko
thingiverse
free

FPV mini Quadcopter by Jagus
...o-dron-8520-cw and ccw
fpv otg : https://abc-rc.pl/mini-odbiornik-fpv-telefon-uvc-video-downlink-android
weight 65g
petg printing
thingiverse
free

Semi Ducted Micro Frame (Beecheese Frame) by Noctaro
...v=lvvpgyhq9pw
print settings
printer brand:
printrbot
printer:
printrbot plus
rafts:
no
supports:
no
resolution:
0.2
infill:
100%
thingiverse
free

QX95 FRAME Reinforced by Welbior
...tps://goo.gl/sd6vk4
eachine tiny led strip board qx95l : https://goo.gl/nmx15w
eachine lipo 1s 25c 750mah : https://goo.gl/khmhaz
Beecheese
thingiverse
free
Beecheese v2 with TX03 mount and hooks by j4y4r
...tu.be/ctlbxvnmj2yhttps://youtu.be/c81zvkanxoqhttps://youtu.be/8nfvvchzxx8https://youtu.be/8wjfpvnzbtahttps://youtu.be/uangjqtyvko
thingiverse
free
Semi Ducted Micro Frame (Beecheese Frame) by Noctaro
...v=lvvpgyhq9pw
print settings
printer brand:
printrbot
printer:
printrbot plus
rafts:
no
supports:
no
resolution:
0.2
infill:
100%
thingiverse
free
Semi Ducted Micro Frame (Beecheese Frame V2) by Noctaro
...nter brand:
printrbot
printer:
printrbot plus
rafts:
no
supports:
no
resolution:
0.2
infill:
100%
more from 3d printing
view more
thingiverse
free

Micro quadrocopter frame - semiducted - Beecheese frame V4 by Noctaro
...com/watch?v=7xddh7lywdw
firmware
awesome flightcontroller firmware:
betaflight 3.2.4 https://github.com/betaflight/ (open source)
thingiverse
free

Brushless beecheese frame (Semi ducted micro brushless frame) by Noctaro
...12x m3 screw
i recommend metal screws for the first time using the screw holes. afterwards you may use abs or anything like that.
Noctaro
thingiverse
free

Ducted big tube key by Noctaro
...a similar thing and sized it so that it is big enough to fit for all the tubes i got in my kitchen :)
and of course it got ducts.
thingiverse
free

Adjustable TX03 FPV camera mount by Noctaro
...mm per layer
no supports needed
update:
added a better curve for the clip, so it wont break if you squeeze it around your camera.
thingiverse
free

Airslicer windmill V1 by Noctaro
...wer - no power measures yet
rubberband as belt for driving the motor
3.3 volt rgb led
https://www.youtube.com/watch?v=mn8x9cie0dq
thingiverse
free

Semi Ducted Finger Protector (just a simple ring) by Noctaro
...cator.
pla
2mm rafts, first layer at very slow speed.
100% infill
around 10 minutes.
leave a make, or a comment if you like it :)
thingiverse
free

Cycle desk camera tripod stand by Noctaro
...ings, to be able to tighten the screw a bit better.
added model for a tpu antislide mount - @stylesuxx thanks for the feedback :)
thingiverse
free
Beecheese v2 with TX03 mount and hooks by j4y4r
...way i wanted it. all credit to stylesuxx and noctaro update: i moved the cam mount 1.5mm in front,...
thingiverse
free
Semi Ducted Micro Frame (Beecheese Frame) by Noctaro
...v=lvvpgyhq9pw
print settings
printer brand:
printrbot
printer:
printrbot plus
rafts:
no
supports:
no
resolution:
0.2
infill:
100%
thingiverse
free
Semi Ducted Micro Frame (Beecheese Frame V2) by Noctaro
...nter brand:
printrbot
printer:
printrbot plus
rafts:
no
supports:
no
resolution:
0.2
infill:
100%
more from 3d printing
view more
thingiverse
free
Micro quadrocopter frame - semiducted - Beecheese frame V4 by Noctaro
...com/watch?v=7xddh7lywdw
firmware
awesome flightcontroller firmware:
betaflight 3.2.4 https://github.com/betaflight/ (open source)
thingiverse
free
Brushless beecheese frame (Semi ducted micro brushless frame) by Noctaro
...12x m3 screw
i recommend metal screws for the first time using the screw holes. afterwards you may use abs or anything like that.
Semi
thingiverse
free

semi by atteberry36
...semi by atteberry36
thingiverse
its a semi....
thingiverse
free

Semi by 98linn
...semi by 98linn
thingiverse
this is a semi that i based off of my dads
thingiverse
free

Semi Truck by DMANJONES
...semi truck by dmanjones
thingiverse
this is a semi truck toy that i made in my class.
thingiverse
free

co2 semi by papasmurf76
...co2 semi by papasmurf76
thingiverse
this is an 8 in long 4 in tall 300gram co2 semi
thingiverse
free

Semi Truck by zack_holes
...semi truck by zack_holes
thingiverse
a semi truck and trailer i designed on inventor, work perfectly with eachother.
thingiverse
free

Semi Circle Tray by smatster
...semi circle tray by smatster
thingiverse
a medium size semi circle tray
thingiverse
free

Bracelet - semi flexible by Alajaz
...bracelet - semi flexible by alajaz
thingiverse
semi flexible bracelet - pla/nylon
thingiverse
free

semi spade rudder
...semi spade rudder
thingiverse
a rudder
thingiverse
free

toy semi by andy12345
...toy semi by andy12345
thingiverse
simi toy
thingiverse
free

Jelcz truck semi-trailer
...jelcz truck semi-trailer
thingiverse
it is a simple recreation of the semi-trailer of a polish truck under the name of jelcz.
Integrated
thingiverse
free

Integrating Sphere by Canary
...rduino code:https://github.com/cnry/integrating-sphere
circuit:https://upverter.com/canary/e8dc7b97dd5d9624/integrating-sphere/
thingiverse
free

Integrated circuit by vasilebv
...integrated circuit by vasilebv
thingiverse
integrated circuit
thingiverse
free

Integral Earrings by EvanF
...integral earrings are the height of math nerd fashion. print two and attach to earring hooks, or print one for use on a necklace!
thingiverse
free

Bell with integral clapper by MakeALot
...bell with integral clapper by makealot
thingiverse
bell with integral clapper - print in one piece.
thingiverse
free

integrated circuit2 by mazen3000
...integrated circuit2 by mazen3000
thingiverse
designed with tinker cad software
thingiverse
free

Integral Bearing Lib by rustedrobot
...gral bearing lib by rustedrobot
thingiverse
a very simple lib to generate a shape to cut integral bearings out of another object
thingiverse
free

integrated circuit by mazen3000
...integrated circuit by mazen3000
thingiverse
it was designed by me in tinker cad software
thingiverse
free

Integrated Gate Carabiner by ObeyQuietKoala
...uietkoala
thingiverse
integrated gate carabiner. gate and locking mechanism are included in a single part. it's pretty neat.
thingiverse
free

Foregrip integration to Lynx pump by Jonthrow
...foregrip integration to lynx pump by jonthrow thingiverse integrated an angled foregrip into the lynx...
thingiverse
free

MendelMax 1.5 with integrated electronics by srepmub
...x 1.5 with integrated electronics by srepmub
thingiverse
a heightened mendelmax 1.5, with integrated floorboard and electronics.
V3
thingiverse
free

Watch v3 by Rasmusskoeld
...watch v3 by rasmusskoeld
thingiverse
watch v3
thingiverse
free

v3 Panel by SpencerR87
...v3 panel by spencerr87
thingiverse
v3 panel
thingiverse
free

Box v3 by robinmorris
...box v3 by robinmorris
thingiverse
box. v3.
thingiverse
free

Minion v3 by bjarkemape
...minion v3 by bjarkemape
thingiverse
minion v3
thingiverse
free

HappyBrush V3 Wallmount
...happybrush v3 wallmount
thingiverse
wallmount for happybrush v3
thingiverse
free

NodeMCU v3 Case
...nodemcu v3 case
thingiverse
its a nodemcu v3 case
thingiverse
free

Jet engine V3
...jet engine v3
thingiverse
jet engine v3 re
thingiverse
free

PLA guider V3
...pla guider v3
thingiverse
updated pla guider v3
thingiverse
free

Pedestal v3 by DanTech
...pedestal v3 by dantech
thingiverse
pedestal v3 - two variants
thingiverse
free

v3 street
...v3 street
thingiverse
for joe
Cam
thingiverse
free

cam by Mobin2020
...cam by mobin2020
thingiverse
cam...
thingiverse
free

cam by DylanNapier
...cam by dylannapier
thingiverse
a cam
thingiverse
free

cam by StoneG1
...cam by stoneg1
thingiverse
cam
thingiverse
free

not cam by dolpindive
...not cam by dolpindive
thingiverse
this is totally not my name cam
thingiverse
free

ESP32 Cam wireless battery cam by stevenpryor
...esp32 cam wireless battery cam by stevenpryor
thingiverse
a simple camera box with lid for the esp32 cam..
thingiverse
free

cam by Munchie12
...cam by munchie12
thingiverse
cam for robot
max 2.95 in
min .5 in
thingiverse
free

PI3 Cam Lower Cam Centered by dstasiak
...pi3 cam lower cam centered by dstasiak
thingiverse
i've changed the cam mount to be centered on the a8
thingiverse
free

GoPro Mount Cam to Cam adapter
... sides)
i used https://www.thingiverse.com/thing:3936576 as basic connector, and then i've just duplicated and fusionated it.
thingiverse
free

snail cam by Mobin2020
...snail cam by mobin2020
thingiverse
cam...
thingiverse
free

snail cam by Farhanj1
...snail cam by farhanj1
thingiverse
snail cam
Ducted
thingiverse
free

NACA Duct to 3inch Hose for duct & brakes
... & brakes
thingiverse
naca duct to 3inch hose for duct & brakes
as seen here:https://www.youtube.com/watch?v=nrv6kayzwkw
thingiverse
free

Donut duct
...donut duct
thingiverse
after breaking the original ducts, i developed my own, stronger
thingiverse
free

Duct-to-duct Adapter (4-inch to 6-inch)
...ry: 97.0 mm
outer diameter for 6inch duct entry: 156.0 mm
inner diameter for 6inch duct entry: 153.0 mm
enjoy printing!
curiousor
thingiverse
free

Fan Duct by JacobMakes
...fan duct by jacobmakes
thingiverse
a fan duct
thingiverse
free

Fan Duct by CodyG
...fan duct by codyg
thingiverse
fan duct
thingiverse
free

Fan Duct by CodyG
...fan duct by codyg
thingiverse
fan duct
thingiverse
free

5015 fan duct
...5015 fan duct
thingiverse
5015 fan duct
thingiverse
free

Duct Vortex V1
...duct vortex v1
thingiverse
duct vortex v1
thingiverse
free

ducted fan by LorenzjP
...ducted fan by lorenzjp
thingiverse
ducted fan assembly
thingiverse
free

Cable duct by prokazzza
...cable duct by prokazzza
thingiverse
cable duct for wire routing.
Micro
thingiverse
free

micro bezel
...micro bezel
thingiverse
micro bezel
thingiverse
free

Micro T
...micro t
thingiverse
micro t
thingiverse
free

Decal Station for Micro Set Micro Sol
...ro set micro sol
thingiverse
a holder for brushes and pippets for applying decals using micro set and micro sol decal solutions.
thingiverse
free

Dquad Micro Obsession micro axii mount by dquadusa
...dquad micro obsession micro axii mount by dquadusa
thingiverse
micro axii mount for the micro obsession
thingiverse
free

Micro box for arduino micro by jagdfx
... by jagdfx
thingiverse
boite pour arduino micro minimaliste . prévu pour être fixés sur vos projet facilement avec des vis m3 .
thingiverse
free

Micro wave lock / Verrou micro onde by zetif
...micro wave lock / verrou micro onde by zetif
thingiverse
verrou porte micro onde
thingiverse
free

Micro-Balisong by makerjeff
...eed to be a dangerous hoodlum at the micro-level? nothing says micro-badass like a press-fit micro-balisong ( butterfly knife )!
thingiverse
free

micro lattice by The_LAB
...micro lattice by the_lab
thingiverse
micro lattice
thingiverse
free

qadrocopter micro by omegapraim
...qadrocopter micro by omegapraim
thingiverse
qadrocopter micro
thingiverse
free

micro race drone
...micro race drone
thingiverse
micro race drone
Frame
thingiverse
free

Sunglasses Frame
...sunglasses frame
thingiverse
sunglasses frame for broken frames.
thingiverse
free

Frame by reulew
...frame by reulew
thingiverse
frame
thingiverse
free

frame by mmireles
...frame by mmireles
thingiverse
frame
thingiverse
free

formwork frames
...formwork frames
thingiverse
model frame
thingiverse
free

Frame Stand for 15x10 picture frame by sorteds
...frame stand for 15x10 picture frame by sorteds
thingiverse
just an easy frame stand for a 15x10 picture frame
thingiverse
free

Frame Depot Picture Frame Hook by madpilot
...ws the picture frame to sit perfectly flush with the wall.
requires 2 x 1.2mm diameter bullet head nail to insert in to the wall.
thingiverse
free

Frame by Portalsg
...frame by portalsg
thingiverse
to create the bicycle frame of carbon fiber
thingiverse
free

frame for a plane
...frame for a plane
thingiverse
frame form a 1920s stile race plane
thingiverse
free

Framed D12
...framed d12
thingiverse
a d12 modeled by a sphere encased in a dodecahedron frame.
thingiverse
free

Picture frame
...picture frame
thingiverse
a fun picture frame for a 4 by 6 inch photo
Mount
thingiverse
free

Pen Mount on BLTouch mount by jetspot
...pen mount on bltouch mount by jetspot
thingiverse
pen mount on bltouch mount
thingiverse
free

RAM Mount, Mount by seanmclean
...ram mount, mount by seanmclean
thingiverse
bridging plate to attach ram mount to yamaha 242, for chartplotter placement.
thingiverse
free

Mount for mount for Garmin GPS by GNOBLIN
...you can use this mount for prevent rotation simple mount around hendelbars.
d handelbar 31.8mm
use m3 screw and din 16903 plug.
thingiverse
free

Permanent mount for Modular Mounting System by WIR14
...permanent mount for modular mounting system by wir14
thingiverse
permanent mount for modular mounting system.
thingiverse
free

Gopro Mount and antenna mount by SuperYoyo
...gopro mount and antenna mount by superyoyo
thingiverse
cut the carbon platform to pass the gopro mount and enjoy !
thingiverse
free

Hexagon Mount for 50mm Mount (Sparkcube) by Draman
...for 50mm mount (sparkcube) by draman
thingiverse
hexagon mount remix from skimmys hotend-mount for sparkcube or other 50mm-mount
thingiverse
free

mount by gixster
...mount by gixster
thingiverse
custom mount
thingiverse
free

Mount by Matrxi999
...mount by matrxi999
thingiverse
shelf mount
thingiverse
free

Motor mount
...motor mount
thingiverse
motor mount
thingiverse
free

GoPro Mount
...gopro mount
thingiverse
gopro mount