Thingiverse
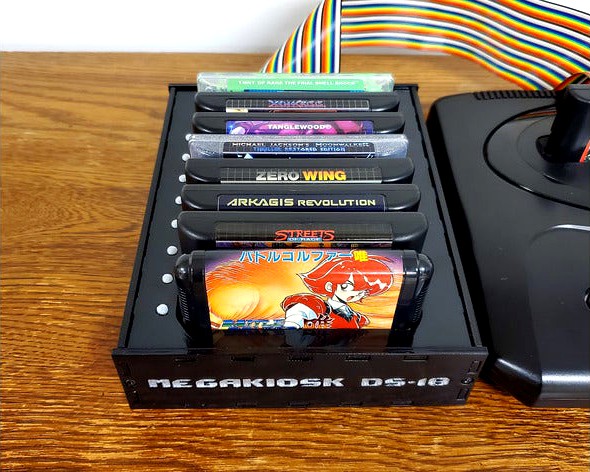
Sega MegaKiosk DS-18 Case by billybob884
by Thingiverse
Last crawled date: 3 years ago
Here's a case for the MegaKiosk DS-18 (by Will Gentry, for sale here: https://willsconsolemodifications.co.uk/megakiosk.php )
Fits cartridges of all regions! (US/PAL & JP)
The DS-18 is a modern reproduction of the DS-16 (a jukebox-style cartridge switcher used in store kiosks, but never publicly sold at retail). The game can be selected either by a manual game-toggle button in "manual mode", or via an adjustable timer when set to "demo mode", which cycles through games in intervals from 1 to 30 minutes.
This design features a 7-way selector switch to replace the dip switches for the demo-mode timer setting, as well as a manual game change button. The parts I used can be found here:https://www.digikey.com/en/products/detail/c-k/RM107772BCB/6052017https://www.digikey.com/en/products/detail/e-switch/RP3502ARED/280448
You'll also need:
Transparent filament (for the LED posts)
x4 M314 screws for the case (M312 also acceptable)
x20 M310 screws for the PCB (M312 may work, but may be too high and contact the cartridges) -- For the PCB mount, since the screws don't actually connect to the cartridge connectors, you don't need to put a screw in every hole; I just put one on each alternating side of the connectors (using a total of 8 + 4 for the PCB corners)
Optional: I recommend adding adhesive rubber feet to the bottom
I used 20% infill for all pieces
For the LED posts, DON'T use supports.
One unfortunate thing I've found is the selector switch tends to have a crooked actuator; I bought a few and they're inconsistently crooked, as far as 10 degrees, but they were the only 7-way selector switch I could find (at this size/for reasonable price), so I've included a couple models for the dial with varying tilt in the actuator shaft (depending on your selector's tilt).
To attach the selector switch, you'll connect the one input to any pin on the top of the dip switch bank (towards the back of the board) since they're all tied together), then 6 of the output pins to the "bottom" of the dip switch bank (towards the front of the board), each connection here is for the timer duration noted on the board. The 7th output leave unconnected, this will be the "manual mode" option (where the player selects the game by pressing the button).
The manual game select button can be attached to the "external button" pads provided for us on the board.
Similar models
grabcad
free

Selector switch mode
...selector switch mode
grabcad
for animation mode select
grabcad
free

Smart foot/manual switch
...cm height. the size like ordinary switch.
warning! in safety reasons for hoigh voltage wires connection use sonoff usermonual.
grabcad
free

Timer 24h with selector
...timer 24h with selector
grabcad
timer 24h with manual selector
grabcad
free

Audio channel selector💥
...parate buttons to turn on each channel.
project: https://www.mediafire.com/file/n49qkqxxpi11jxw/channel_switcht_attiny24.zip/file
thingiverse
free

P90 microswitch selector by Nyctalop
...glue it to the support.
i used this switch : https://fr.aliexpress.com/item/32699535981.html?spm=a2g0s.9042311.0.0.1d086c37uu2fvz
grabcad
free

DIP Switch
...dip switch
grabcad
pcb mount dip switch
thingiverse
free

ST4 case for telescope tracker by raptor_demon
...cf18jt10k0ct-nd/2022766
3mm led: https://www.digikey.com/product-detail/en/broadcom-limited/hlmp-4700-c0002/516-2483-2-nd/1234840
thingiverse
free

Kitchen Timer by MegaCadler
...uit only for switching off standby crurent.
source code and schematics available on githubhttps://github.com/fra4prg/kitchentimer
grabcad
free

DIP Switch
...dip switch
grabcad
pcb switch dip package 0.1 inch pitch
thingiverse
free

DIP switch model by kdtop3
...is a model of a 6 pin dip switch, similar to this: //https://www.ebay.com/itm/10-pcs-7x7mm-tactile-tact-push-button-self-locking-6-pin-switch-dip-pcb-mount-us/192281396509 it is not a working switch,...

Sega
turbosquid
$5

Sega Dreamcast
... available on turbo squid, the world's leading provider of digital 3d models for visualization, films, television, and games.
cg_studio
$79

Sega Megadrive3d model
...sega megadrive3d model
cgstudio
.max - sega megadrive 3d model, royalty free license available, instant download after purchase.
cg_studio
$79

Sega Saturn3d model
...sega saturn3d model
cgstudio
.max - sega saturn 3d model, royalty free license available, instant download after purchase.
cg_studio
$43
Sega Dreamcast3d model
...sega dreamcast3d model
cgstudio
.max - sega dreamcast 3d model, royalty free license available, instant download after purchase.
3ddd
$1

Sega Mega Drive 16-bit
...sega mega drive 16-bit
3ddd
sega , игровая приставка
sega mega drive 16-bit
3d_export
$79

Sega Saturn 3D Model
...vintage old retro photorealistic toy computer people play nostalgia classic cartridge
sega saturn 3d model fabelar 29760 3dexport
3d_export
$79

Sega Megadrive 3D Model
...tage old retro photorealistic toy computer people play nostalgia classic cartridge
sega megadrive 3d model fabelar 29423 3dexport
3d_export
$47

Sega Dreamcast 3D Model
...alistic toy computer people play nostalgia classic cartridge gaming video game pal
sega dreamcast 3d model fabelar 62969 3dexport
cg_studio
$79

Sega Master System3d model
... nostalgia classic cartridge
.max - sega master system 3d model, royalty free license available, instant download after purchase.
3d_export
$10

Sega game console
...sega game console
3dexport
rar arhive 3dmax2019 fbx obj material texture
Ds
3ddd
$1

DS-277
...ds-277
3ddd
desede
ds-277
3ddd
$1

DS-47_Sofas
...ds-47_sofas
3ddd
desede
ds-47_sofas
3ddd
$1

DS-3_Sofas
...ds-3_sofas
3ddd
desede
ds-3_sofas from desede
design_connected
$27

DS-152
...ds-152
designconnected
de sede ds-152 computer generated 3d model.
design_connected
$9

DS 9045
...ds 9045
designconnected
de sede ds 9045 computer generated 3d model. designed by bestenheider, philippe.
design_connected
$16

DS 315
...ds 315
designconnected
de sede ds 315 armchairs computer generated 3d model. designed by philippe bestenheider.
design_connected
$20

DS 166
...ds 166
designconnected
de sede ds 166 armchairs computer generated 3d model. designed by hugo de ruiter.
design_connected
$18

DS-9090
...ds-9090
designconnected
de sede ds-9090 computer generated 3d model. designed by de sede design-team.
3ddd
$1

DS-278-chair
...ds-278-chair
3ddd
desede
ds-278-chair
design_connected
$20

DS-220
...ds-220
designconnected
de sede ds 220 armchairs computer generated 3d model. designed by de sede design-team.
18
3ddd
$1

Remains / Sorenson 18 Lantern HL2617 18
... remains , светильник
remains - sorenson 18 lantern hl2617 18
3d_export
$6

rocks 18
...rocks 18
3dexport
rocks 3d model 18
3ddd
$1

Bed 18
...bed 18
3ddd
постельное белье
bed 18
3d_export
$6

tap-18
...tap-18
3dexport
3d_export
$17

F-18 Performance
...f-18 performance
3dexport
f-18 performance
3ddd
$1

Curtains 18
...curtains 18
3ddd
curtains 18 (3 models)
polys: 543000
other models:http://3ddd.ru/users/brast/models
3ddd
$1

ALBA p160-18
...alba p160-18
3ddd
alba
alba p160-18
turbosquid
$40

cottage 18
...bosquid
royalty free 3d model cottage 18 for download as max on turbosquid: 3d models for games, architecture, videos. (1377004)
turbosquid
$10

building 18
...osquid
royalty free 3d model building 18 for download as max on turbosquid: 3d models for games, architecture, videos. (1362221)
turbosquid
$7

Rock 18
...turbosquid
royalty free 3d model rock 18 for download as obj on turbosquid: 3d models for games, architecture, videos. (1486413)
Case
3d_export
$1

case
...case
3dexport
case
archibase_planet
free

Case
...case
archibase planet
showcase show-case glass case
glass-case + cakes - 3d model for interior 3d visualization.
archibase_planet
free

Case
...case
archibase planet
showcase show-case glass case
glass-case for chips - 3d model for interior 3d visualization.
archibase_planet
free

Case
...case
archibase planet
case shelving drawer
case - 3d model for interior 3d visualization.
archibase_planet
free

Case
...case
archibase planet
case rack locker
case - 3d model for interior 3d visualization.
archibase_planet
free

Case
...case
archibase planet
case drawer kitchen furniture
case - 3d model for interior 3d visualization.
archibase_planet
free

Case
...case
archibase planet
case cupboard shelving
glass case - 3d model for interior 3d visualization.
archibase_planet
free

Case
...case
archibase planet
case handbag suitcase
case - 3d model (*.gsm+*.3ds) for interior 3d visualization.
archibase_planet
free

Case
...case
archibase planet
case suitcase
case 5 - 3d model (*.gsm+*.3ds) for interior 3d visualization.
archibase_planet
free

Case
...case
archibase planet
locker case dresser
case - 3d model (*.gsm+*.3ds) for interior 3d visualization.