Thingiverse

Seckit SK-GO Afterburner Hotend Adaptation by SaintDuriel
by Thingiverse
Last crawled date: 3 years, 4 months ago
Seckit SK-GO2
Voron 2.4 Afterburner Hotend Adaptation
If you're looking for 100% forward compatibility with the Voron Afterburner hotend, you may want to look elsewhere.
Words
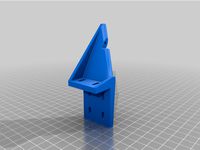
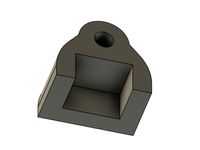
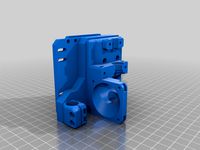
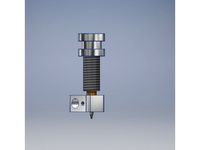
This is a simple modification to the VORON Afterburner Hotend Extruder Backplate to mount on to a Seckit SK-GO^2 Printer. I'm not going to rewrite their clear and short documentation, but I will be including my notes where we start to stray away.
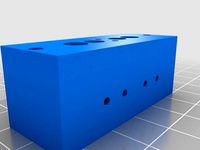
I extended the Extruder Backplate down enough so that you can install some threaded inserts where the hotend component would lock into the Afterburner's mounting system. This is also reused for a simple BLTouch mount that's directly behind the nozzle.
Unless you have access to a large array of any size M3 Bolts, prepare to cut/grind a bunch to some reasonably specific lengths. Some of the bolts go in the opposite direction as originally designed, and others are shorter/longer.
What Parts to Print
You should only need one of each component I've included in this thing. I remixed this from their step files which don't match their released beta STL's. I believe that I grabbed their latest alpha modifications to the hot end, but there's no guarantee of forward compatibility. So you will need to print everything from this thing, and I don't recommend trying to mix and match parts from their github.
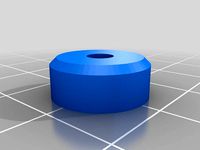
NOTE: If you don't want to print the 24.6 mm spacers, print the BLTouch mount small stl instead. I have a slightly oversized pancake stepper, so I needed to add a little bit of extra space between the X Carriage Plates from the SK-GO.
Print Settings
Per the Voron Documentation you should print with
4 Walls
4-5 Top/Bottom Layers
40% Infill
Extrusion Width 0.4mm (Forced)
Infill Pattern: Gyroid, Honeycomb, Triangle or Cubic
Nuts n' Bolts
Assorted M3 Bolts between 8mm-40~mm (40~mm will be for cutting down to various lengths, could use 45mm as well)
32mm M3 for Extruder Front Cover
M3 Threaded Inserts
BMG for Parts
Tools
Soldering Iron
Screwdriver
Voron Documentation
https://www.dropbox.com/s/v30qvah09l466er/Voron%20Afterburner%20Manual.pdf
You can ignore anything before Page 24
Page 25 - No need to install the long, or short threaded insert into Extruder Cover that faces towards the extruder backplate
DO install the two short threaded inserts that face outward toward the Cooling Fan
Page 28 - Put an M3 Washer as a spacer between the Guidler and the Extruder CoverI believe they are missing a step, but you need an M3 bolt to anchor the guilder and you do install the threaded insert into the Extruder Backplate, so put that in when you install the Extruder Cover
Install two 32mm M3 Bolts through the top two holes of the Extruder Cover
The Extruder Backplate, Extruder Cover, and Guilder should all be installed at this point
Page 30 - You're going to have to get the whole cooling assembly installed kind of in one go. You're only going to use the bottom two holes to mount this onto the Extruder Front Cover.
Z Probe Offsets
BLTouch Mount: Is around -2.715mmBLTouch Mount Small: Is around -4.075mm
Voron 2.4 Afterburner Hotend Adaptation
If you're looking for 100% forward compatibility with the Voron Afterburner hotend, you may want to look elsewhere.
Words
This is a simple modification to the VORON Afterburner Hotend Extruder Backplate to mount on to a Seckit SK-GO^2 Printer. I'm not going to rewrite their clear and short documentation, but I will be including my notes where we start to stray away.
I extended the Extruder Backplate down enough so that you can install some threaded inserts where the hotend component would lock into the Afterburner's mounting system. This is also reused for a simple BLTouch mount that's directly behind the nozzle.
Unless you have access to a large array of any size M3 Bolts, prepare to cut/grind a bunch to some reasonably specific lengths. Some of the bolts go in the opposite direction as originally designed, and others are shorter/longer.
What Parts to Print
You should only need one of each component I've included in this thing. I remixed this from their step files which don't match their released beta STL's. I believe that I grabbed their latest alpha modifications to the hot end, but there's no guarantee of forward compatibility. So you will need to print everything from this thing, and I don't recommend trying to mix and match parts from their github.
NOTE: If you don't want to print the 24.6 mm spacers, print the BLTouch mount small stl instead. I have a slightly oversized pancake stepper, so I needed to add a little bit of extra space between the X Carriage Plates from the SK-GO.
Print Settings
Per the Voron Documentation you should print with
4 Walls
4-5 Top/Bottom Layers
40% Infill
Extrusion Width 0.4mm (Forced)
Infill Pattern: Gyroid, Honeycomb, Triangle or Cubic
Nuts n' Bolts
Assorted M3 Bolts between 8mm-40~mm (40~mm will be for cutting down to various lengths, could use 45mm as well)
32mm M3 for Extruder Front Cover
M3 Threaded Inserts
BMG for Parts
Tools
Soldering Iron
Screwdriver
Voron Documentation
https://www.dropbox.com/s/v30qvah09l466er/Voron%20Afterburner%20Manual.pdf
You can ignore anything before Page 24
Page 25 - No need to install the long, or short threaded insert into Extruder Cover that faces towards the extruder backplate
DO install the two short threaded inserts that face outward toward the Cooling Fan
Page 28 - Put an M3 Washer as a spacer between the Guidler and the Extruder CoverI believe they are missing a step, but you need an M3 bolt to anchor the guilder and you do install the threaded insert into the Extruder Backplate, so put that in when you install the Extruder Cover
Install two 32mm M3 Bolts through the top two holes of the Extruder Cover
The Extruder Backplate, Extruder Cover, and Guilder should all be installed at this point
Page 30 - You're going to have to get the whole cooling assembly installed kind of in one go. You're only going to use the bottom two holes to mount this onto the Extruder Front Cover.
Z Probe Offsets
BLTouch Mount: Is around -2.715mmBLTouch Mount Small: Is around -4.075mm
Similar models
thingiverse
free

Voron 2.4, Orbiter1.5 Mount by madsgadeberg
...extruder mount for the voron afterburner.
print settings same as other voron parts.
bolts: 4pcs m3x20 and regular m3 heat inserts
thingiverse
free

D-bot Voron Afterburner mount by ParadoxX3D
...model does not support the proximity sensor used with the afterburner (pl-08n) unfortunately.
will be updating soon with pictures
thingiverse
free

BLTouch Adapter by 6squarefeet
...difference would be problematic.
the height is calibrated for e3d v5 clone hotend, you might need to insert some washers for v6.
thingiverse
free

Voron V2.4 Afterburner READY TO FIT INTO Creality Ender3&Clones And PRUSA I3&Clones by Frame75
...dded mount to use the same bolt than the connector cover
-connector cover modded added, extended to cover the whole wires better.
thingiverse
free

BL touch/3d Touch autolevel for Voron Afterburner 2.4V by Frame75
...4 applied into the carrier
updated!!! better fit for using the same connector cover m3 bolt
-added the extended connector cover.
thingiverse
free
Seckit SK-GO Camera holder by Marcelofs13
...-go camera holder by marcelofs13
thingiverse
for mounting the camera you need to print the screw mount that your camera supports
thingiverse
free

E3D J-Head V6 Simple Hotend Mount for Anet ET4 ET4+ ET4 Pro ET4X by gruch4
...urbine with 4x m3 bolts, 4x m3 inserts and printed duct (note that duct is designed for e3d volcano and it needs lots of updates)
thingiverse
free

BLTouch Mount Hypercube Evolution Rs Voron E3D by Doc_cabtronic
...
melt in two m3 threaded inserts.
bltouch can be height adjusted
use this bltouch mount:https://www.thingiverse.com/thing:4740161
thingiverse
free
SecKit SK-Go linear rail end stop
...eed to print 4 of these which use the existing screw holes for position a rail setup.
designed to fit m3 screw 16mm+ and m3 nut.
thingiverse
free

SecKit SK-GO Dual 5015 Blower Fan Duct for Creality MK8 Hotend by Alphaelectric
...
the pipes have been lengthened to allow the installation of a crealiy mk8 hotend on this printer.
see pictures for installation.
Seckit
thingiverse
free

SecKit Go Cable Manager
...seckit go cable manager
thingiverse
skr 1.3 cable management for the seckit go.
thingiverse
free

Seckit SKGo2 Foot by stevenvo
...seckit skgo2 foot by stevenvo
thingiverse
printed foot that makes the base higher for customized z stepper placement.
thingiverse
free

SecKit Z Watch by Dude2475
...an color it with a pen.
the pointer: needs support
have fun with it :-)
youtube video:https://www.youtube.com/watch?v=jh0skkztefc
thingiverse
free

Seckit SkGo2 stepper support by L33dpl
...k and simple design.
step included, feel free to edit.
compatible with mount/tensioner:https://www.thingiverse.com/thing:4659141
thingiverse
free

SecKit Sk-Go2 Powercord connector box by tlex
...ctor box by tlex
thingiverse
power cord cover with the seckit logo.
printed with 0.6mm nozzle.
uses 2 t-nut to attach the frame.
thingiverse
free

Seckit Go Raspberry Pi Mount
...s for any raspberry pi case with mount screws at 68mm x 98mm. you can either press fit m3 nuts on the mount or screw in m3 bolts.
thingiverse
free

Seckit SkGo2 Z End stop by stevenvo
...seckit skgo2 z end stop by stevenvo
thingiverse
z end stop for alignment of bed
thingiverse
free

SecKit SK GO 350 Railcover by Dude2475
...es are for the left side - just mirror it in your slicer for the right side.
feel free to modify - the fusion360 file is included
thingiverse
free

Seckit Sk-Go2 Benoît Bed Bracket by sanblangar
...seckit sk-go2 benoît bed bracket by sanblangar
thingiverse
brackets for sk-go2 bed
thingiverse
free
Seckit SK-GO Camera holder by Marcelofs13
...-go camera holder by marcelofs13
thingiverse
for mounting the camera you need to print the screw mount that your camera supports
Afterburner
3d_export
$60

myasishchev m-50
...e two inner engines were located under the wing and the two outer on the wingtips of its shoulder-mounted, truncated delta wings.
3d_export
$38

Jet Plane Explosion 3D Model
...losion fireball afterburn aircraft fire special effect environment fx
jet plane explosion 3d model rahman.najafian 87888 3dexport
3d_export
free

Tu-222 bechovka concept stealth bomber
...version with wheels and 2 flying versions with trails, afterburner pilot and armament. model has bump map, roughness map...
3d_export
$5

Mig-29 fulcrum jet fighter lowpoly
...version with wheels and 2 flying versions with trails, afterburner pilot and armament. model has bump map, roughness map...
3d_export
$5

I-20 Firehawk lowpoly concept jet fighter
...version with wheels and 2 flying versions with trails, afterburner pilot and armament. model has bump map, roughness map...
3d_export
$5

I-19 ravenclaw stealth fighter jet
...version with wheels and 2 flying versions with trails, afterburner pilot and armament. model has bump map, roughness map...
3d_export
$6

MIG-41 PAK DP
...version with wheels and 2 flying versions with trails, afterburner pilot and armament.<br>model has bump map, roughness map and...
3d_export
$5

Skunk F-33 Lancer lowpoly concept jet fighter
...version with wheels and 2 flying versions with trails, afterburner pilot and armament. model has bump map, roughness map...
3d_export
$5

General Dynamics F-111 Aardvark jet fighter
...version with wheels and 2 flying versions with trails, afterburner pilot and armament. model has bump map, roughness map...
3d_export
$5

General Dynamics F-34 Lynx concept fighter
...version with wheels and 2 flying versions with trails, afterburner pilot and armament.<br>model has bump map, roughness map and...
Sk
3d_export
$5
rifle sks
...rifle sks
3dexport
rifle sks simonov
turbosquid
$13

sks
... available on turbo squid, the world's leading provider of digital 3d models for visualization, films, television, and games.
turbosquid
$5

SK CAR
...
turbosquid
royalty free 3d model sk car for download as fbx on turbosquid: 3d models for games, architecture, videos. (1320169)
3ddd
free

Braun sk 2
...braun sk 2
3ddd
braun , радиоприемник.
легендарный braun sk 2.
turbosquid
$15

SK Kitchen
... available on turbo squid, the world's leading provider of digital 3d models for visualization, films, television, and games.
3d_export
$5
lowpoly sks
...lowpoly sks
3dexport
contact me if you need cheap lowpoly models
turbosquid
$26

SK-16 Kit
... free 3d model sk-16 kit(1) for download as max, obj, and fbx on turbosquid: 3d models for games, architecture, videos. (1281106)
humster3d
$75

3D model of SKS 45
...ter3d
buy a detailed 3d model of sks 45 in various file formats. all our 3d models were created maximally close to the original.
3ddd
$1

Дверь межкомнатная sk-001d
...ная sk-001d
3ddd
дверь
дверь межкомнатная sk-001d
дизайн от ооо "ск-студия"
сайт студии:http://1sk-studio.ru/
turbosquid
$2

Computer Desk SK-22
...el computer desk sk-22 for download as 3ds, max, obj, and fbx on turbosquid: 3d models for games, architecture, videos. (1190666)
Hotend
thingiverse
free
hotend by fablab_lueneburg
...hotend by fablab_lueneburg
thingiverse
hotend model
thingiverse
free
Hotend for Graber
...hotend for graber
thingiverse
hotend complement pastes for graber printerhttps://youtu.be/0koxhnsuhdy
thingiverse
free
Hotend adapter by antaviana
...hotend adapter by antaviana
thingiverse
hotend adapter
thingiverse
free
hotend fan by mming1106
...hotend fan by mming1106
thingiverse
hotend fan
thingiverse
free

Hotend schema by ione
...hotend schema by ione
thingiverse
hotend project schema
thingiverse
free
Fabtotum XY Hotend holder for E3D Hotend
...s with integrated supports.
more for the project you can see here: https://kf-designs.com/2019/09/07/fabtotum-printer-conversion/
thingiverse
free
HotEnd Stand by onepointdiy
...tend, when you make your new hotend or repair your j-head or mg-plus hotend.
the hole of 16mm, please adjust using a reamer, etc.
thingiverse
free

fast magnetic hotend changer for Chimera Hotend by Draman
...chimera hotend !
and new basis (the hole from original is to small)
it is a remix form skimmy's fast magnetic hotend changer
thingiverse
free

Hotend Fan Adapter for MicroSwiss All Metal Hotend by jo_schi_man
...
thingiverse
little change for the hotend fan adapter to hold the microswiss all metal hotend (slightly longer and sharp edges).
thingiverse
free
Merlin Hotend by Alejanson
...merlin hotend by alejanson
thingiverse
this is a 1:1 drawing of the classic merlin hotend.
Adaptation
3d_export
$10
Adapter 3D Model
...adapter 3d model
3dexport
adapter
adapter 3d model mur 20260 3dexport
archive3d
free
Adapter socket 3D Model
...dapter socket adapter
adapter socket n090211 - 3d model (*.3ds) for interior 3d visualization.
turbosquid
$400

cell adaptation
...
royalty free 3d model cell adaptation for download as blend on turbosquid: 3d models for games, architecture, videos. (1701655)
archive3d
free
Adapter 3D Model
...ups pc equipment
adapter extron n180813 - 3d model (*.gsm+*.3ds) for interior 3d visualization.
turbosquid
$5
usb adapter
...royalty free 3d model usb adapter for download as ige and stl on turbosquid: 3d models for games, architecture, videos. (1582234)
turbosquid
$15
Power adapter
...free 3d model power adapter for download as max, obj, and fbx on turbosquid: 3d models for games, architecture, videos. (1510024)
turbosquid
$8
USB adapter
...e 3d model usb adapter for download as max, fbx, obj, and dwg on turbosquid: 3d models for games, architecture, videos. (1713542)
turbosquid
$30

adapter.3ds
... available on turbo squid, the world's leading provider of digital 3d models for visualization, films, television, and games.
turbosquid
$15
Nokia Adapter
... available on turbo squid, the world's leading provider of digital 3d models for visualization, films, television, and games.
turbosquid
$15
Universal adapter
... available on turbo squid, the world's leading provider of digital 3d models for visualization, films, television, and games.
Go
turbosquid
$3

Going Merry Go
...e 3d model going merry go for download as blend, fbx, and obj on turbosquid: 3d models for games, architecture, videos. (1669967)
3ddd
$1
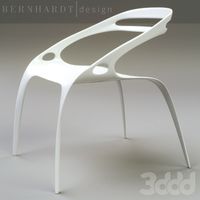
GO chair
...go chair
3ddd
go , bernhardt design
stacking chair,
design_connected
$18

Go Chair
...go chair
designconnected
danerka go chair computer generated 3d model. designed by lovegrove, ross.
3ddd
$1

GO IN barista
...ta
3ddd
barista , барный
стул барный go in barista
h112cm, d51cm, w42cm, seatheight 81cm
turbosquid
$40

Pixelbook GO
... free 3d model pixelbook go for download as obj, c4d, and fbx on turbosquid: 3d models for games, architecture, videos. (1473349)
turbosquid
$10
Go boy
...royalty free 3d model go boy for download as ma, obj, and fbx on turbosquid: 3d models for games, architecture, videos. (1292463)
turbosquid
$5

JBL GO
...alty free 3d model jbl go for download as obj, fbx, and blend on turbosquid: 3d models for games, architecture, videos. (1501036)
turbosquid
$1
Go-kart
... free 3d model go-kart for download as jpg, 3ds, obj, and md3 on turbosquid: 3d models for games, architecture, videos. (1501040)
turbosquid
$40
Go Cart.c4d
... available on turbo squid, the world's leading provider of digital 3d models for visualization, films, television, and games.
turbosquid
$35

Go kart
...e 3d model go kart for download as ma, max, obj, c4d, and fbx on turbosquid: 3d models for games, architecture, videos. (1388925)