Thingiverse

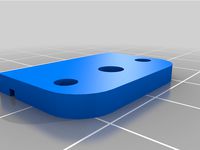
Satsana 5015 BLTouch Mount by pmosbach
by Thingiverse
Last crawled date: 3 years, 4 months ago
Offsets
X offset: 53
Y offset: -3
Z offset: measure yourself as it will be dependent on how high you have your Satsana 5015, but it was -4.5 for me.
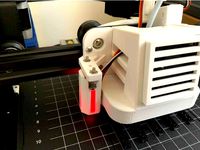
Background
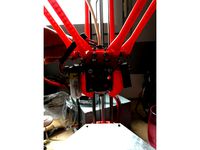
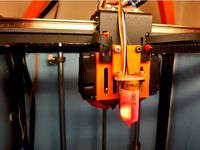
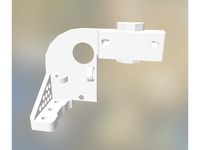
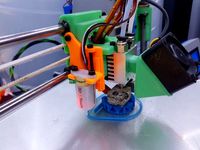
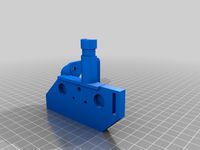
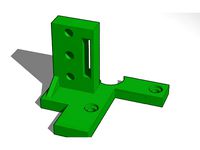
This BLTouch mount will friction fit into the existing Satsana 5015 duct without removing it from the carriage plate. The part itself is a very quick print.
I am a big fan of the original Satsana, but when the 5015 version was released, I was drawn to the better access to the top of the hotend, the opportunity to upgrade part cooling to a 5015, the adjustability, and the air baffle.
Around the same time, I bought a BLTouch and wanted to mount it. My BLTouch did not come with a steel mount, so I printed the remix with the built-in mount (4548894). Unfortunately, the mount interfered with both my X-axis endstop and the associated cover, so ended up switching back to the original Satsana 5015. At this point, I had already run the all the wiring, so I wondered if I could design something to fit the existing duct.
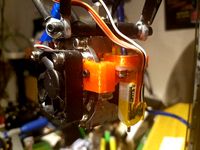
After working with the model, I figured I would try and design something to friction fit the existing duct and take advantage of the clever cable routing. The first two versions held the BLTouch perpendicular to the carriage plate, but I wasn't happy with how close it was to the 5015 intake and I wanted to see how much closer I could get the BLTouch to the nozzle to minimize the offsets. Version 3 rotated the mount 90 degrees and moved it in towards the nozzle. While this was successful it resulted in colliding with the outer case of the 5015 so cutouts and additional bracing were added. After further testing, I discovered the back of the mount could rub on the X-axis belt tensioner bolts so the back of the mount portion of the clip was raised, requiring supports.
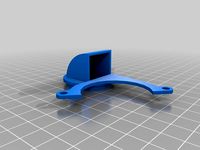
Directions
You do not need to remove your Satsana 5015 from the carriage plate in order to fit or remove the clip.
Screw the BLTouch to the mount
Plug in the wires to the BLTouch
Zip tie the wires to the mount
Clip your existing cable management zip tie
Run the BLTouch wires through the existing slot for the 5015 wires
Add the BLTouch wires to the existing wiring bundle and zip tie the bundle
Slide the clip in behind the duct and fit it flush with the back of the rest of the duct. The wedge inside the wiring channel should not need to touch the zip tie around the wiring bundle.
X offset: 53
Y offset: -3
Z offset: measure yourself as it will be dependent on how high you have your Satsana 5015, but it was -4.5 for me.
Background
This BLTouch mount will friction fit into the existing Satsana 5015 duct without removing it from the carriage plate. The part itself is a very quick print.
I am a big fan of the original Satsana, but when the 5015 version was released, I was drawn to the better access to the top of the hotend, the opportunity to upgrade part cooling to a 5015, the adjustability, and the air baffle.
Around the same time, I bought a BLTouch and wanted to mount it. My BLTouch did not come with a steel mount, so I printed the remix with the built-in mount (4548894). Unfortunately, the mount interfered with both my X-axis endstop and the associated cover, so ended up switching back to the original Satsana 5015. At this point, I had already run the all the wiring, so I wondered if I could design something to fit the existing duct.
After working with the model, I figured I would try and design something to friction fit the existing duct and take advantage of the clever cable routing. The first two versions held the BLTouch perpendicular to the carriage plate, but I wasn't happy with how close it was to the 5015 intake and I wanted to see how much closer I could get the BLTouch to the nozzle to minimize the offsets. Version 3 rotated the mount 90 degrees and moved it in towards the nozzle. While this was successful it resulted in colliding with the outer case of the 5015 so cutouts and additional bracing were added. After further testing, I discovered the back of the mount could rub on the X-axis belt tensioner bolts so the back of the mount portion of the clip was raised, requiring supports.
Directions
You do not need to remove your Satsana 5015 from the carriage plate in order to fit or remove the clip.
Screw the BLTouch to the mount
Plug in the wires to the BLTouch
Zip tie the wires to the mount
Clip your existing cable management zip tie
Run the BLTouch wires through the existing slot for the 5015 wires
Add the BLTouch wires to the existing wiring bundle and zip tie the bundle
Slide the clip in behind the duct and fit it flush with the back of the rest of the duct. The wedge inside the wiring channel should not need to touch the zip tie around the wiring bundle.
Similar models
thingiverse
free

Satsana 5015 Fan Duct for Creality Ender 3 v2 with BLTouch Metal Mount by FalseAlarm
...se of the original bltouch metal mount, this design does not require a bracket print, or changing of offset settings for bltouch.
thingiverse
free

Satsana ender 3 5015 fan duct with bltouch mount by Neilprice
...atsana ender 3 5015 fan duct with bltouch mount by neilprice
thingiverse
just an all in one 5015 satsana v80 remix with bltouch
thingiverse
free

Satsana 5015 Fan Duct With BLTouch by ofek256
...o add a bltouch mount. does not require supports when printing from the right direction. renders and cad were done in fusion 360.
thingiverse
free

Satsana Ender 3 V2 4010 & 5015 Fan Duct with BLTouch by Jargogler
...roken).
mine preserves the roundness of the left side duct and avoids x carriage wheel disassembly.
bltouch offsets are x-46 y-8.
thingiverse
free

Satsana 5015 Fan Duct with BLTouch w/X-Stop by gnvdude
...modified
the 5015 fan can be mounted with two m4x22 screws.
the offsets for the z probe are (mm) x-48 y-12 z1.65 (starting point)
thingiverse
free

New 5015 Satsana Duct With integrated BLTouch Mount for Ender 3 V2 by zshtx
...ngiverse.com/thing:4528533
bltouch mount taken and modified from this thing by jargoglerhttps://www.thingiverse.com/thing:4637453
thingiverse
free

5015 Satsana Duct With integrated BLTouch Mount for Ender 3 V2 by zshtx
...ngiverse.com/thing:4528533
bltouch mount taken and modified from this thing by jargoglerhttps://www.thingiverse.com/thing:4637453
thingiverse
free

Satsana 5015 Fan Duct for Ender 3/CR-10 Remix with BLTouch by NachoRoto
...nt the bltouch. the offset is x58 y-9. if you enjoy this remix make donations to the og designer so he keeps up the great work.
thingiverse
free
BLTouch mount for Satsana Duct by giahuy2201
... my satsana duct, so i designed this extension to mount my bltouch.
i used a spare m3 bolt from the stock fan shroud to mount it.
thingiverse
free

Satsana 5015 Ender 3 for Phaetus BMS with EZABL Mount by DirtClodimus
...e carriage down on the bed and use supports only under the bottom side of the ezabl mount.
the nozzle probe offset is (-58, -13).
Pmosbach
thingiverse
free

Easythreed X1/X2/X3/X4 Filament Guide by pmosbach
...x3 yet. since installing the filament guide, i haven't had any issues with filament path. overall, i am pretty happy with it.
thingiverse
free

Easythreed X1/X2/X3/X4 1kg Spool Holder by pmosbach
...ter. if someone wants to remix this to break it up into pieces that can be printed on the x1/x2/x3/x4, i will happily link to it.
thingiverse
free

5mm Higher Satsana 5015 BLTouch Mount by TheCreepy31
...thingiverse a modified version of the bltouch mount from pmosbach which works really nice that you can find here...
Satsana
thingiverse
free

Satsana dual 4020 by tikaroo
...satsana dual 4020 by tikaroo
thingiverse
a satsana fang remixed to use dual 4020 fans.
thingiverse
free

Satsana Ender 5 remix by zanzattoo
...satsana ender 5 remix by zanzattoo
thingiverse
a remix of satsana for ender 5
thingiverse
free

Satsana cable cap for Aquila by mamengineer
...satsana cable cap for aquila by mamengineer
thingiverse
cable cap for satsana remix for aquila printer.
thingiverse
free

Satsana ABL 18mm adaptor by ammaryasir
...satsana abl 18mm adaptor by ammaryasir
thingiverse
abl probe clip adaptor designed for satsana duct
thingiverse
free

Satsana fan gril by Deveau1
...
thingiverse
this is a simple fan grill i made to compliment satsana ender 3 fan duct.
https://www.thingiverse.com/thing:4369859
thingiverse
free

Aquila Hotend Mount Chain for Satsana by JeremyLawliet
...aquila hotend mount chain for satsana by jeremylawliet
thingiverse
chain mount for hotend with satsana
thingiverse
free

Satsana Fan grill by vikram31
...mixed from: https://www.thingiverse.com/thing:4377484
added holes to use the screws to attach the grill to the satsana fan duct.,
thingiverse
free

satsana DDBMG (bondtech) by hadriiiiiii1
...satsana ddbmg (bondtech) by hadriiiiiii1
thingiverse
print this wit this presets:
thingiverse
free

Satsana Ender 5015 remix by ammaryasir
...se
satsana 5015 remix.. , optimized for less time printing and filament used
source :
https://www.thingiverse.com/thing:4528533
thingiverse
free

Satsana e3d v6 clone mount for Aquila by c2nsored
...emix to use satsana on aquila equipped with e3d v6 clone.
original satsana mount link : https://www.thingiverse.com/thing:4369859
5015
3ddd
$1

Скамья RUGIANO - COPERTINA BRONZA, 5015/130GL
...a bronza, 5015/130gl
3ddd
rugiano , скамья
скамья rugiano - copertina bronza, 5015/130gl
3d_export
$15

3d hair style for girl v94
...: 4811 - edges : 9836 - faces : 5015 - tris : 9642 - uvs : 5364 file...
thingiverse
free

5015 fan duct
...5015 fan duct
thingiverse
5015 fan duct
thingiverse
free

5015 Fan Guard
...5015 fan guard
thingiverse
5015 fan guard
3dfindit
free

294-5015
...294-5015
3dfind.it
catalog: wago
thingiverse
free
40MM to 5015 Adapter by 360alaska
...by 360alaska
thingiverse
this will adapt a 5015 fan to a 40mm fan mount. the 5015 fan mounts at a right angle and rotates fully.
thingiverse
free
Chiron 5015 blower by DK_Davis
...chiron 5015 blower by dk_davis
thingiverse
anycubic chiron 5015 blower
thingiverse
free

single 5015 to 50mnm by Kyledavis417
...single 5015 to 50mnm by kyledavis417
thingiverse
single 5015 to 50mm for tevo controller box
thingiverse
free
Cetus 3D 5015 Duct
...cetus 3d 5015 duct
thingiverse
twisted 5015 fan duct for cetus 3d mk2
thingiverse
free

Dual 5015 to 50mm by Kyledavis417
...dual 5015 to 50mm by kyledavis417
thingiverse
dual 5015 fan adapter for tevo tornado controller box
Bltouch
thingiverse
free
Support bltouch by TonyJ
...support bltouch by tonyj
thingiverse
support bltouch
thingiverse
free
BLTOUCH for MICRON3DP by lamerhouse
...bltouch for micron3dp by lamerhouse
thingiverse
bltouch for micron3dp
thingiverse
free
SapphirePro mount for Bltouch
...sapphirepro mount for bltouch
thingiverse
sapphirepro mount for bltouch
thingiverse
free
ender6 BLtouch by chimaer
...ender6 bltouch by chimaer
thingiverse
ender6 bltouch
this is an external bracket
thingiverse
free
BLTouch KP3s by 1devilman1
...bltouch kp3s by 1devilman1
thingiverse
bltouch mount for kingroon kp3s
thingiverse
free
Bltouch support adjustable
...bltouch support adjustable
thingiverse
adjustable support for bltouch, p3steel.
thingiverse
free
BMG NEREUS BLTOUCH
...bmg nereus bltouch
thingiverse
petg
m3 screws and nuts for the bltouch
thingiverse
free

BLTouch Bracket by tidh666
...bltouch bracket by tidh666
thingiverse
serves to attach the bltouch sensor to the extruders
thingiverse
free
bltouch mount by wars
...bltouch mount by wars
thingiverse
reinforced bracket for bltouch cooperates with high_clearance_cr10_oem_fang_mod
thingiverse
free

BLTouch Holder by Jonthan06
...bltouch holder by jonthan06
thingiverse
support bltouch pour wanhao d12
Mount
3d_export
free

mounting bracket
...mounting plate is the portion of a hinge that attaches to the wood. mounting plates can be used indoors, cabinetry and furniture.
turbosquid
$2

MOUNTING
... available on turbo squid, the world's leading provider of digital 3d models for visualization, films, television, and games.
turbosquid
free

Mounts
... available on turbo squid, the world's leading provider of digital 3d models for visualization, films, television, and games.
turbosquid
free

Mount Fuji
...fuji
turbosquid
free 3d model mount fuji for download as obj on turbosquid: 3d models for games, architecture, videos. (1579977)
3d_export
$5

Headphone mount LR
...headphone mount lr
3dexport
headphone mount l+r
turbosquid
$39

Mount rainier
...quid
royalty free 3d model mount rainier for download as fbx on turbosquid: 3d models for games, architecture, videos. (1492586)
turbosquid
$5

pipe mounting
...quid
royalty free 3d model pipe mounting for download as obj on turbosquid: 3d models for games, architecture, videos. (1293744)
turbosquid
$3

Mounting Tires
...uid
royalty free 3d model mounting tires for download as fbx on turbosquid: 3d models for games, architecture, videos. (1708511)
3d_export
$5

Magnetic GoPro Mount
...pro mount
3dexport
cool magnetic mount for gopro. allows you to mount the camera on flat metal surfaces and get exclusive shots.
turbosquid
$5

Stone Mount
...ty free 3d model stone mount for download as ma, obj, and fbx on turbosquid: 3d models for games, architecture, videos. (1370306)