Thingiverse

Sapphire Pro - Optical Z Endstop Conversion by petrzmax
by Thingiverse
Last crawled date: 3 years, 3 months ago
If You enjoyed this project and You want to say "Thank You" please consider supporting me by sending a tip on thingiverse or my PayPal here.
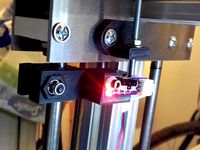
I had some problems with homing Z Axis. After a few prints my perfectly leveled bed was homing in different position and ideal first layer was wasted. It was difficult to have exactly the same first layer every time. My glass for printing was almost ideally flat, so I don't need to use Bltouch or some similar probe. Also while using Z offset and positive Z offset value Z axis has not much space - Z endstop will be squished etc.
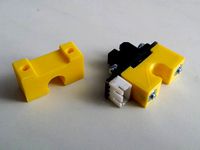
The way to go is using optical endstop. I have used this one:
https://bit.ly/3aiVJ4E
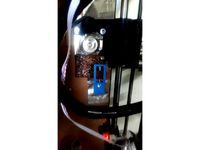
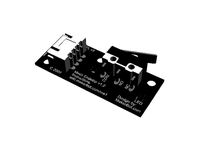
I have drilled 3 mm hole in original endstop holder and screwed endstop using 3 mm screw and 3D printed washer (You can use standard washer). Cables that came with endstop will fit in original endstop socket, but You will need to switch wires in the socket - probably signal wire with Vcc wire. I'm not sure at the moment, I will write it here when I will be looking in to the printer again. Just keep it in mind. It will not break Your endstop or printer, it will just be not working and the green light will be glowing all the time. While it's connected properly it lights up only when endstop is triggered.
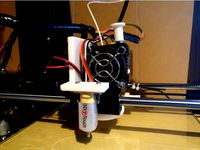
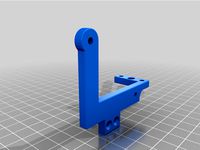
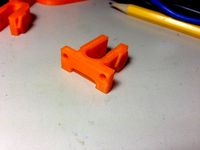
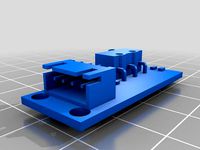
I have also designed part which will trigger new Endstop. Print it with PETG if You want to be able to put it on without taking Z rods out.
Also You will need to invert Z endstop logic in marlin.
Change:
#define Z_MIN_ENDSTOP_INVERTING
From true to false
You need to have also disabled Z min software endstop in order to use huge positive Z offset. Just comment out this line in config:
#define MIN_SOFTWARE_ENDSTOP_Z
Using optical Endstop will allow You to use large, positive Z offset.
This means that while homing Your nozzle will be at safe distance from the bed.
Sometimes some plastic may be sticked to Your nozzle which means collision with the bed and probably distracted homing.
Example Gcode for Z offset.
M206 Z1.2
This code will make Your bed go closer to the nozzle by 1.2 mm than Z endstop 0 point.
After this modification I'm always having exactly the same first layer.
I had a lot 3D printers with standard Z endstops, BLtouche's, inductive Z endstops and none of these gave me so perfect homing. I do really recommend it - You will be stunned with the results!
You can find my Marlin setup here:
https://github.com/petrzmax/Marlin
I had some problems with homing Z Axis. After a few prints my perfectly leveled bed was homing in different position and ideal first layer was wasted. It was difficult to have exactly the same first layer every time. My glass for printing was almost ideally flat, so I don't need to use Bltouch or some similar probe. Also while using Z offset and positive Z offset value Z axis has not much space - Z endstop will be squished etc.
The way to go is using optical endstop. I have used this one:
https://bit.ly/3aiVJ4E
I have drilled 3 mm hole in original endstop holder and screwed endstop using 3 mm screw and 3D printed washer (You can use standard washer). Cables that came with endstop will fit in original endstop socket, but You will need to switch wires in the socket - probably signal wire with Vcc wire. I'm not sure at the moment, I will write it here when I will be looking in to the printer again. Just keep it in mind. It will not break Your endstop or printer, it will just be not working and the green light will be glowing all the time. While it's connected properly it lights up only when endstop is triggered.
I have also designed part which will trigger new Endstop. Print it with PETG if You want to be able to put it on without taking Z rods out.
Also You will need to invert Z endstop logic in marlin.
Change:
#define Z_MIN_ENDSTOP_INVERTING
From true to false
You need to have also disabled Z min software endstop in order to use huge positive Z offset. Just comment out this line in config:
#define MIN_SOFTWARE_ENDSTOP_Z
Using optical Endstop will allow You to use large, positive Z offset.
This means that while homing Your nozzle will be at safe distance from the bed.
Sometimes some plastic may be sticked to Your nozzle which means collision with the bed and probably distracted homing.
Example Gcode for Z offset.
M206 Z1.2
This code will make Your bed go closer to the nozzle by 1.2 mm than Z endstop 0 point.
After this modification I'm always having exactly the same first layer.
I had a lot 3D printers with standard Z endstops, BLtouche's, inductive Z endstops and none of these gave me so perfect homing. I do really recommend it - You will be stunned with the results!
You can find my Marlin setup here:
https://github.com/petrzmax/Marlin
Similar models
thingiverse
free
Adjustable Z endstop Prusa I3 by Volkvanmyn25
...iverse
screw adjustable z endstop trigger to make fine tuning of the z home position. you need an optical endstop for this part.
thingiverse
free

Bastard bltouch adapter by trickius
...eft +right [of the nozzle]"
"#define y_probe_offset_from_extruder -18 // y offset: -front +behind [the nozzle]"
thingiverse
free

Alfawise BLTouch mount by abdesmok
...define y_probe_offset_from_extruder -5 // y offset: -front +behind [the nozzle]
z offset is approximately -1.5 mm (mine is -1.42)
thingiverse
free
Anet A6 BLTouch/3DTouch mount (front) by thvranken
...isplay or with command m851) and saved to the eeprom (using the display or with command m500), in my case, this was around -2 mm.
thingiverse
free

BLTouch Wanhao Duplicator i3 Mount by mibzzer15
...t setup correctly: http://web.archive.org/web/20170319023213/http://media.wix.com/ugd/f5a1c8_20aa9a75b70d46d3849140fb4d6b6e31.pdf
thingiverse
free

BLTouch Wanhao Duplicator i3 Mount V2.1 by mibzzer15
...t setup correctly: http://web.archive.org/web/20170319023213/http://media.wix.com/ugd/f5a1c8_20aa9a75b70d46d3849140fb4d6b6e31.pdf
thingiverse
free
3D/BL touch mount for Anet A6 by ithinuel
...ly 3 grid points on a linear bed levelling.
i am printing on a borosilicate glass bed, i don't know if more point are needed.
thingiverse
free

Anycubic i3 Mega BLtouch Mount by ajl959
... axis to allow the nozzle to dip just below the bed during regular homing before the z offset would work (end stops override it).
thingiverse
free

BlTouch Mount for CR10S by Skydesigne
... in this guide.
help
uncomment//g20/g21 inch mode support#define inch_mode_support
to avoid errors with serial-printing-software.
thingiverse
free

JGAurora A5 bltouch mount by heindaddel
...ft_probe_bed_position 11
define right_probe_bed_position 300
define front_probe_bed_position 0
define back_probe_bed_position 270
Petrzmax
thingiverse
free
M4 Nut Knob - ANET A6 by petrzmax
...se or my paypal here.
m4 nut knob - anet a6
designed for use with this custom x axis: https://www.thingiverse.com/thing:2106854
thingiverse
free
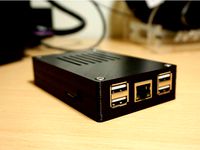
Orange Pi Plus 2 Case by petrzmax
...nge pi plus 2 case. you will need four m3x20 screws to fix it. they should easily thread into plastic. it's a tight fit case.
thingiverse
free
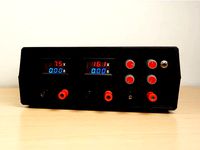
Z17 Housing parts for DIY Power Supply by petrzmax
...tip on thingiverse or my paypal here.
z17 housing parts for diy power supply
video: https://www.youtube.com/watch?v=kjklw6qgomi
thingiverse
free

Z Rod Top Stabilizer - ANET A6 by petrzmax
...part fixes the rods, so the printer is more stable. (especially rods) it can be used with bearings, but it's not recommended.
thingiverse
free

Hole To Another Universe from Life is Strange by petrzmax
...e. i have used double-sided tape to stick it to the wall. it's tricky to put it straight but after all the result is great ;)
thingiverse
free

VW Golf 4 Subwoofer Fit-Box Holder by petrzmax
... and screw it in as on the pictures and it will hold fit-box very well. there is no need for making holes in metal car chassis :)
thingiverse
free

Longer Top Spool Holder Beam - ANET A6 by petrzmax
...h lcd board cover: https://www.thingiverse.com/thing:2170152
and this top spool holder: https://www.thingiverse.com/thing:2009565
thingiverse
free

Velbon QB-6RL Quick Release Plate by petrzmax
...on the photos)
but don't worry! uploaded model is straight, so you can print it and made a few low cost quick release plates!
thingiverse
free
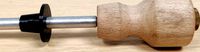
Black Powder Gun Barrel Rod Centerer by petrzmax
...the barrel surface. so this simple part is for centering the rod while cleaning the barrel :)
diameter of my pushing rod is 7 mm.
thingiverse
free
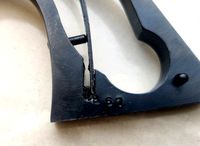
Uberti Remington 1858 Wolf Spring Adapter by petrzmax
...my case the spring was too far away from the hammer. so this part will set the spring a bit higher, and it will work just fine :)
Endstop
thingiverse
free
Endstop-holder for endstop v1.2 by albiuz
...endstop-holder for endstop v1.2 by albiuz
thingiverse
endstop-holder designed for mech endstop v1.2
thingiverse
free
Endstop by 3dboxpro
...endstop by 3dboxpro
thingiverse
endstop
thingiverse
free
Endstop by 1sPiRe
...endstop by 1spire
thingiverse
endstop model for conceptions
thingiverse
free

Endstop holder for Opto or Mechanical endstops by LulzBot
... endstops by lulzbot
thingiverse
these are the standard 1.0 prusa endstops with an added mounting hole for mechanical endstops.
thingiverse
free

Endstop Holder by onurhamdiuzun
...endstop holder by onurhamdiuzun
thingiverse
endstop holder for makerbot endstop and other endstops
thingiverse
free

Endstop Cover
...endstop cover
thingiverse
cover for endstop boards for makerbot design.
thingiverse
free
Endstop Mount for optical Endstops by Whitehawk2000
...whitehawk2000
thingiverse
use two 20mm m3 screws and nuts to screw the endstop onto the mount and just clip it onto the 8mm rod.
thingiverse
free

C-beam endstop mount for Makerbot type endstops
...c-beam endstop mount for makerbot type endstops
thingiverse
c-beam endstop mount for makerbot type endstop boards.
thingiverse
free

Endstop Mount for MakerBot Mecanical Endstop. by nka
...v-slots carriage.
endstop is screw with m3 (8mm) tapped hole and the endstop hold on the extrusion using a m5 (8mm) and t-nuts.
thingiverse
free
ENDSTOP 10mm by desert500
...endstop 10mm by desert500
thingiverse
endstop
Optical
design_connected
$9
Optic
...optic
designconnected
alessi optic computer generated 3d model. designed by colombo, joe.
3ddd
$1
обои OPTIC
...обои optic
3ddd
в архиве текстуры и фото обоев из коллекции optic.
archive3d
free
Optics 3D Model
...optics 3d model
archive3d
optics
optics - 3d model (*.gsm+*.3ds) for interior 3d visualization.
turbosquid
$49

optical eyewear
...id
royalty free 3d model optical eyewear for download as max on turbosquid: 3d models for games, architecture, videos. (1592243)
3d_ocean
$5

optical mouses
...al mouses
3docean
3d models computer electronics mouse
optical mouses 3d models. realistic mouse model. custom and unique design.
turbosquid
$10
Optic cross
...yalty free 3d model optic cross for download as sldas and ige on turbosquid: 3d models for games, architecture, videos. (1683403)
turbosquid
$7

OPTIC Mirror
... free 3d model optic mirror for download as max, obj, and fbx on turbosquid: 3d models for games, architecture, videos. (1223927)
turbosquid
free

Fiber optics
...d model fiber optics for download as 3ds, obj, fbx, and blend on turbosquid: 3d models for games, architecture, videos. (1211912)
turbosquid
$8

Mouse optical
...3d model mouse optical for download as 3ds, obj, c4d, and fbx on turbosquid: 3d models for games, architecture, videos. (1504476)
turbosquid
free

Optical puzzle
... optical puzzle for download as max, ige, fbx, stl, and sldas on turbosquid: 3d models for games, architecture, videos. (1405925)
Conversion
3ddd
$1

Conversation Seat
...шетка
the conversation seat made in englandhttp://www.squintlimited.com/products/the_conversation_seat/gold
+ max 2011
3d_export
$10

Converse 3D Model
...converse 3d model
3dexport
converse shoe pc unix mac
converse 3d model electropainter17075 38067 3dexport
turbosquid
$100

converse-shoe
...quid
royalty free 3d model converse-shoe for download as c4d on turbosquid: 3d models for games, architecture, videos. (1398427)
turbosquid
$10

Conversation Furniture
... available on turbo squid, the world's leading provider of digital 3d models for visualization, films, television, and games.
turbosquid
$7

Converse Allstars
... available on turbo squid, the world's leading provider of digital 3d models for visualization, films, television, and games.
design_connected
$16

Conversation Club Chair
...conversation club chair
designconnected
donghia conversation club chair chairs computer generated 3d model. designed by n/a.
design_connected
$27

Hemicycle Conversation Chair
...rsation chair
designconnected
ligne roset hemicycle conversation chair computer generated 3d model. designed by nigro, philippe.
3d_export
$24

Converse keds 3D Model
...converse keds 3d model
3dexport
converse all star ked shoe clothes sports
converse keds 3d model vermi1ion 26201 3dexport
3ddd
$1

Converse All-Star Shoes
...converse all-star shoes
3ddd
кеды , обувь
converse all-star shoes
design_connected
$18

CONVERSE Jack Purcell Sneakers
...converse jack purcell sneakers
designconnected
converse jack purcell sneakers computer generated 3d model.
Sapphire
turbosquid
$30

Sapphire
...alty free 3d model sapphire for download as obj, fbx, and dae on turbosquid: 3d models for games, architecture, videos. (1304434)
turbosquid
$9

Sapphire
... available on turbo squid, the world's leading provider of digital 3d models for visualization, films, television, and games.
3d_export
free

sapphire pro
...sapphire pro
3dexport
sapphire pro 3d printer head mask
turbosquid
$35

Sapphire ring
...quid
royalty free 3d model sapphire ring for download as 3dm on turbosquid: 3d models for games, architecture, videos. (1320838)
turbosquid
$22

Ring with sapphires
...royalty free 3d model ring with sapphires for download as 3dm on turbosquid: 3d models for games, architecture, videos. (1375607)
turbosquid
$20

sapphire ring
...quid
royalty free 3d model sapphire ring for download as 3dm on turbosquid: 3d models for games, architecture, videos. (1306560)
turbosquid
$3

Zora Sapphire
... free 3d model zora sapphire for download as ma, fbx, and obj on turbosquid: 3d models for games, architecture, videos. (1613795)
turbosquid
$50

sapphire ring
... available on turbo squid, the world's leading provider of digital 3d models for visualization, films, television, and games.
turbosquid
$8

Sapphire Lode
... available on turbo squid, the world's leading provider of digital 3d models for visualization, films, television, and games.
turbosquid
$5

Sapphire Gem
... available on turbo squid, the world's leading provider of digital 3d models for visualization, films, television, and games.
Z
3d_export
$5

nissan z
...nissan z
3dexport
nissan z
3ddd
$1

Vase Z
...vase z
3ddd
vase z
3ddd
$1

полотенцесушить Z
...полотенцесушить z
3ddd
полотенцесушитель
полотенцесушить z
design_connected
free

Z-Chair
...z-chair
designconnected
free 3d model of z-chair designed by karman, aleksei.
design_connected
$11

Z Lamp
...z lamp
designconnected
phillips z lamp computer generated 3d model. designed by kalff, louis.
3d_export
$5

Dragon balls z
...dragon balls z
3dexport
dragon ball z
turbosquid
$20

Fighter Z
...
turbosquid
royalty free 3d model fighter z for download as on turbosquid: 3d models for games, architecture, videos. (1292563)
turbosquid
$9

Pen Z
...pen z
turbosquid
free 3d model pen z for download as obj on turbosquid: 3d models for games, architecture, videos. (1686775)
turbosquid
free

z chair
...z chair
turbosquid
free 3d model z chair for download as max on turbosquid: 3d models for games, architecture, videos. (1410230)
turbosquid
$5

Letter Z
...urbosquid
royalty free 3d model letter z for download as max on turbosquid: 3d models for games, architecture, videos. (1408540)
Pro
turbosquid
$29

Pro
...ree 3d model mac pro for download as obj, c4d, fbx, and blend on turbosquid: 3d models for games, architecture, videos. (1505782)
3d_export
$5

iphone 13 pro max and pro
...3 pro max and 13 pro the model is made in four colors (graphite, gold, silver, and blue), all of which are attached in the files.
3d_export
free
sapphire pro
...sapphire pro
3dexport
sapphire pro 3d printer head mask
3d_export
$4

macbook pro
...macbook pro
3dexport
macbook pro 13" inch 2020 years model
3ddd
free

GentleLase Pro
... syneron , candela
gentlelase pro аппарат для лазерной эпиляции
turbosquid
$25

PRO frame
...rbosquid
royalty free 3d model pro frame for download as max on turbosquid: 3d models for games, architecture, videos. (1148329)
turbosquid
$5

Alien pro
...osquid
royalty free 3d model alien pro for download as blend on turbosquid: 3d models for games, architecture, videos. (1678446)
turbosquid
$5

iphone11 pro
...uid
royalty free 3d model iphone11 pro for download as blend on turbosquid: 3d models for games, architecture, videos. (1562707)
3ddd
$1

Mac Pro (appel)
...mac pro (appel)
3ddd
компьютер , apple
mac pro
3ddd
$1
Aviation PRO
... aviation
http://www.oligo.de/en/products/system-luminaires/prod/st-aviation-pro-1.html