Thingiverse
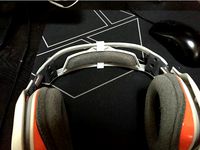
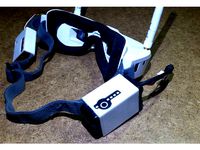
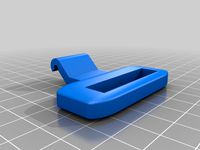
Samsung level on wireless headstrap by Gunsmith1990
by Thingiverse
Last crawled date: 3 years, 3 months ago
Printed on a ReprapGuru prusa i3 with a direct drive extruder and PLA filament. Models were sliced using Cura.
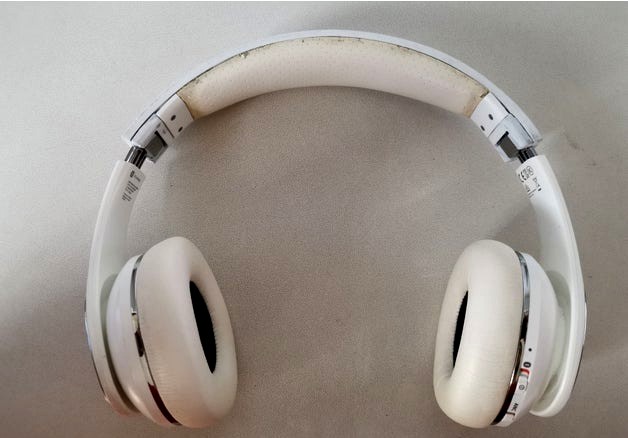
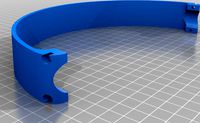
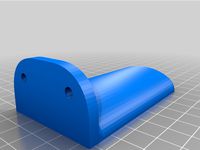
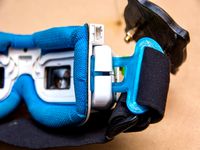
This replacement head strap uses the original earcups, axles, screws, plastic screw plates, and head strap padding of the headphones. The original headphones can be easily disassembled by removing the 4 torx screws in the head strap (the size is T5), removing the pin holders by sliding them upward, and pressing the pin holding the earcups out with a small screwdriver or similar. The padding is held onto the head strap with clips, a prying tool can be used to disengage the clips. Be careful to not damage the fake leather on the padding, as it tears and damages easily, especially if the headset is somewhat old.
IMPORTANT: These models are by no means perfect and requires some effort to fit correctly. The issues I encountered while doing the fix using these models are listed below:
The holes for the screws are too small and the standoffs have walls that are too thin. I drilled the holes out by hand with a 1.5mm drill (this cracked the standoffs). I reinforced the outsides of the 4 standoffs with a strong 2 component glue applied relatively generously around the outsides of the standoffs. This worked well and the screws from the original headset self-tap and holds the headset together nicely.
The clip in the middle of the printed head strap that holds the padding seems to be slightly too wide. A bit of work with a file solved the issue.
The "hook" part of the clips tend to break off since the force on them are aligned to the layer lines. A fine line of strong 2 component adhesive built up an acceptable and durable lip for the head strap padding to clip on to.
The head strap sides are modeled to be parallel, but the head strap padding and pin holders taper off towards the earcups on either side. The head strap was modelled to be parallel since it is easier to model and print. I added the taper by hand using a course file, using the pin holders as a reference for the desired strap width.
The space underneath the pins in the printed head strap is too small to fit the earcups properly. I used a sharp woodworking chisel and a file to make the recess into the strap. Recess this until the earcups can be easily assembled with the pins, and the earcups can be opened until the silver ear cup surfaces are parallel with the tops of the pin holders.
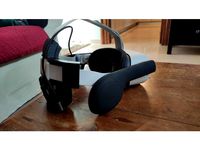
The head strap held the ear cups too close to each other to fit on my head. This was fixed by slowly heating the entire head band with a heat gun, bending it by hand to the desired form, and putting it in cold water while holding it in the desired position. This causes the head strap to keep the form that it was bent into. Do not try to heat the headband while the ear cups are attached for a test fit. You may deform the pin holes in the printed part, damage the cable of the headset that has to go through the headband, or get the earcups wet. You do not have to heat the plastic very much to get it into this malleable state. In my case I heated it up to the point where I started smelling the plastic melting, and the part was still comfortable to touch. Be careful not to burn yourself. I recommend doing this to a size only slightly smaller than the position of the earcups on your head, as PLA, especially at this thickness, is not very bendable.
When assembling the completed parts, make sure not to pinch the wire of the earcups between the headband padding and the printed head strap. Try to route the cable in the recess of the headband padding while assembling the headset.
Print Settings:
3 Walls
3 Top
3 Bottom
100 % infill
0.1 mm layer height
Headband printed flat on its side with a brim and tree supports.
Pin holders printed on a raft with line supports.
Finishing:
I used a file and some fine sandpaper to make sure all parts fit correctly and and are smooth to the touch. I applied XTC3D, an epoxy used to smooth 3d prints. I sanded the parts after the epoxy was dry to a smooth finish. I used a gloss white spray paint directly on the epoxy. I buffed out the remaining rough edges and surface defects revealed by the white paint using a felt wheel for a dremel tool. I then added several thin layers of the same gloss white spray paint and allowed the items to dry between each coat.
Enjoy !
This replacement head strap uses the original earcups, axles, screws, plastic screw plates, and head strap padding of the headphones. The original headphones can be easily disassembled by removing the 4 torx screws in the head strap (the size is T5), removing the pin holders by sliding them upward, and pressing the pin holding the earcups out with a small screwdriver or similar. The padding is held onto the head strap with clips, a prying tool can be used to disengage the clips. Be careful to not damage the fake leather on the padding, as it tears and damages easily, especially if the headset is somewhat old.
IMPORTANT: These models are by no means perfect and requires some effort to fit correctly. The issues I encountered while doing the fix using these models are listed below:
The holes for the screws are too small and the standoffs have walls that are too thin. I drilled the holes out by hand with a 1.5mm drill (this cracked the standoffs). I reinforced the outsides of the 4 standoffs with a strong 2 component glue applied relatively generously around the outsides of the standoffs. This worked well and the screws from the original headset self-tap and holds the headset together nicely.
The clip in the middle of the printed head strap that holds the padding seems to be slightly too wide. A bit of work with a file solved the issue.
The "hook" part of the clips tend to break off since the force on them are aligned to the layer lines. A fine line of strong 2 component adhesive built up an acceptable and durable lip for the head strap padding to clip on to.
The head strap sides are modeled to be parallel, but the head strap padding and pin holders taper off towards the earcups on either side. The head strap was modelled to be parallel since it is easier to model and print. I added the taper by hand using a course file, using the pin holders as a reference for the desired strap width.
The space underneath the pins in the printed head strap is too small to fit the earcups properly. I used a sharp woodworking chisel and a file to make the recess into the strap. Recess this until the earcups can be easily assembled with the pins, and the earcups can be opened until the silver ear cup surfaces are parallel with the tops of the pin holders.
The head strap held the ear cups too close to each other to fit on my head. This was fixed by slowly heating the entire head band with a heat gun, bending it by hand to the desired form, and putting it in cold water while holding it in the desired position. This causes the head strap to keep the form that it was bent into. Do not try to heat the headband while the ear cups are attached for a test fit. You may deform the pin holes in the printed part, damage the cable of the headset that has to go through the headband, or get the earcups wet. You do not have to heat the plastic very much to get it into this malleable state. In my case I heated it up to the point where I started smelling the plastic melting, and the part was still comfortable to touch. Be careful not to burn yourself. I recommend doing this to a size only slightly smaller than the position of the earcups on your head, as PLA, especially at this thickness, is not very bendable.
When assembling the completed parts, make sure not to pinch the wire of the earcups between the headband padding and the printed head strap. Try to route the cable in the recess of the headband padding while assembling the headset.
Print Settings:
3 Walls
3 Top
3 Bottom
100 % infill
0.1 mm layer height
Headband printed flat on its side with a brim and tree supports.
Pin holders printed on a raft with line supports.
Finishing:
I used a file and some fine sandpaper to make sure all parts fit correctly and and are smooth to the touch. I applied XTC3D, an epoxy used to smooth 3d prints. I sanded the parts after the epoxy was dry to a smooth finish. I used a gloss white spray paint directly on the epoxy. I buffed out the remaining rough edges and surface defects revealed by the white paint using a felt wheel for a dremel tool. I then added several thin layers of the same gloss white spray paint and allowed the items to dry between each coat.
Enjoy !
Similar models
thingiverse
free
Headphone Strap Add on by Can94
...ones while the band is relaxed)
glue or melt the paracord into the 5mm holes on top.
clip the strap to your headphones and enjoy.
thingiverse
free
Headband for Oculus Quest 2 & other VR headsets by thatdude902
...op of the head level, tighten top strap to desired length & close velcro. now work the headband down to the correct position.
thingiverse
free

Corsair Virtuoso Suspension Headband by yaikou
...the future:
simpler, easier to post-process design
add various widths of headband
modify design to use original metal earcup tabs
thingiverse
free
Razer Megalodon`s 7.1 Headset earcup supports by Nevsksar
...abric and just turn it a couple of times, the fabric will fit by itself.
2 files :
• left earcup support;
• right earcup support.
thingiverse
free
Astro A40 Headset repair clip by cacb
...e and there is no way to fix it with glue. instead i made a pair of clips that will hold the pad in place/prevent further damage.
thingiverse
free

Autodos cartridge holder by benzol
...ther side into the pin with some pliers. then you cn hand assemble the holder, lever and loch it in with the pin.
happy printing.
thingiverse
free
Autodos cartridge holder by benzol
...ther side into the pin with some pliers. then you cn hand assemble the holder, lever and loch it in with the pin.
happy printing.
thingiverse
free
Gamecom 780 Headband Reinforcement by AYGIT
...ead.
4x m3 screw and nut needed for assembly. you may also use 2x zip ties if you dont have screws but i don't recommend it.
thingiverse
free
Vive Pro Wall Hanger by GrodenVR
...he head-strap sits on the hanger.
the hanger has holes for two mounting screws. i used 1.25 inch #5 screws with drywall anchors.
thingiverse
free
EV100 Battery Holder by marcotheboy
...his design holds onto the strap much more securely.
to insert the strap into the slot, it helps to stretch it while inserting it.
Headstrap
thingiverse
free
Tattu 2500 LiPo Headstrap Holder for Orqa by tobstare
...tattu 2500 lipo headstrap holder for orqa by tobstare
thingiverse
tattu 2500 mah lipo headstrap holder for orqa headstrap.
thingiverse
free
GoPro headstrap mount by Lugge7
...gopro headstrap mount by lugge7
thingiverse
a thing
thingiverse
free
Oculus Quest headstrap slides
...ie through the end and threaded through. it would need to be attached to whatever for a mounting bracket for it to be of any use.
thingiverse
free
Fatshark 1.5in Headstrap adapter
...fatshark 1.5in headstrap adapter
thingiverse
adapter for fatshark goggle for 1.5in gopro head strap. print in tpu
thingiverse
free
Nitecore NU30 headstrap flip by tapka
...делил новый и распечатал.
отрезать два кусочка длиной ~7мм от канцелярской скрепки.
приклеить их в углубления на держателе ремня.
thingiverse
free

contour roam 2 headstrap mount + sliders by Bushwookie
...ount + sliders by bushwookie
thingiverse
headstrap mount for contour roam 2, just add 1" elastic straps. assembly required
thingiverse
free

Stealth headstrap holder for Lenovo Explorer WMR by JnBean
... feel free to ask for another size in the comments.
images of the headstrap on my head will follow as soon as the epoxy is dry :d
thingiverse
free
Battery headstrap oculus quest 2 by freshfish23
...2. to complete this you need some foam, hot glue and velcro ties. this model is only compatible with the anker powercore 10000mah
thingiverse
free
Oculus Quest Headstrap
...nt with supports!
you need:
2x m6x30 with a nut and 4 washers
2x m5x25 with a nut and 2 washers
2x r-28 o-rings
velcro cable ties
thingiverse
free
Oculus Quest Headstrap Buckle Vive DAS
...a nice big fat part for the strap so it won't break into pieces when handling the quest.
(i printed it on a dlp for strength)
Wireless
3d_export
$5
Wireless headphones
...wireless headphones
3dexport
wireless headphones
3ddd
$1
Wireless Panasonic
...wireless panasonic
3ddd
panasonic , телефон
wireless panasonic
turbosquid
$20
Wireless speaker
...quid
royalty free 3d model wireless speaker for download as on turbosquid: 3d models for games, architecture, videos. (1544331)
turbosquid
$30

wireless Lamp
...ty free 3d model wireless lamp :) for download as max and obj on turbosquid: 3d models for games, architecture, videos. (1268614)
turbosquid
free

Wireless Headphone
... model wireless headphone for download as blend, obj, and fbx on turbosquid: 3d models for games, architecture, videos. (1696529)
3ddd
$1
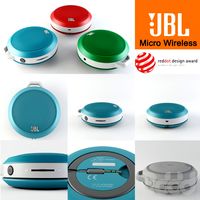
JBL Micro Wireless
... micro , колонка , плеер
jbl micro wireless
3ddd
free

Apple Wireless Keyboard
...apple wireless keyboard
3ddd
apple , клавиатура
mental ray, apple wireless keyboard
turbosquid
$36
Wireless Mouse
...model wireless mouse for download as blend, fbx, dae, and obj on turbosquid: 3d models for games, architecture, videos. (1711548)
turbosquid
$35

wireless headphone
...del wireless headphone for download as max, fbx, obj, and 3ds on turbosquid: 3d models for games, architecture, videos. (1522997)
turbosquid
$25
Wireless router
... model wireless router for download as max, fbx, obj, and 3ds on turbosquid: 3d models for games, architecture, videos. (1516966)
Samsung
3ddd
$1
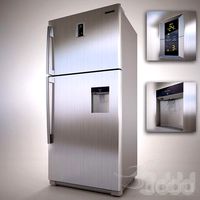
Samsung
...samsung
3ddd
samsung , холодильник
samsung
3ddd
$1
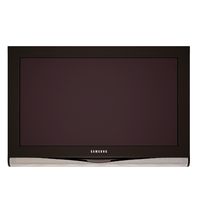
Samsung
...samsung
3ddd
samsung , телевизор
samsung
3ddd
$1

SAMSUNG
...samsung
3ddd
samsung , холодильник
samsung rs21hklmr
3ddd
free
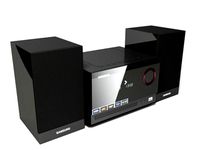
Samsung
...samsung
3ddd
samsung , музыкальный центр
samsung :-)
3ddd
$1
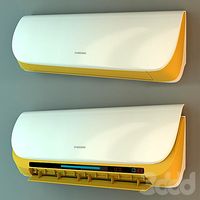
Samsung
...samsung
3ddd
samsung , кондиционер
настенный кондиционер samsung
3ddd
$1

Samsung
...samsung
3ddd
samsung , микроволновка
samsung
микроволновая печь
3ddd
free
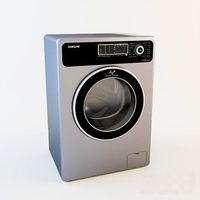
Samsung
...samsung
3ddd
samsung , стиральная машина
samsung, стиральная машина, геометрия
3ddd
$1

Samsung
...samsung
3ddd
samsung , монитор
монитор
3ddd
$1
Samsung
...samsung
3ddd
samsung , пылесос
пылесос
3ddd
$1

телефон samsung
...фон samsung , телефон , samsung
телефон samsung
Level
design_connected
$11

Levels
...levels
designconnected
one nordic levels computer generated 3d model. designed by form us with love.
design_connected
$7
Level
...level
designconnected
zanotta level shelves and storage computer generated 3d model. designed by arik levy.
turbosquid
$29
level
...ty free 3d model level for download as 3ds, obj, c4d, and fbx on turbosquid: 3d models for games, architecture, videos. (1272856)
turbosquid
$1
level
... available on turbo squid, the world's leading provider of digital 3d models for visualization, films, television, and games.
3d_export
$5

Mario level
...mario level
3dexport
mario level low quality for fun videos
3ddd
$1
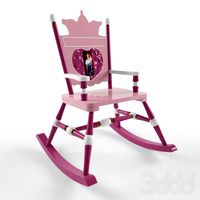
LEVELS OF DISCOVERY
...етская мебель "levels of discovery". rab10003 princess mini rocker
кресло-качалка (мини) "принцесса навсегда"
3d_export
$19

level design
...level design
3dexport
you can use this design (level design) in your own game.
turbosquid
$60

Desert level
...squid
royalty free 3d model desert level for download as fbx on turbosquid: 3d models for games, architecture, videos. (1208131)
turbosquid
$15
Transit Level
...quid
royalty free 3d model transit level for download as max on turbosquid: 3d models for games, architecture, videos. (1158112)
turbosquid
$14

Districts Level
...id
royalty free 3d model districts level for download as max on turbosquid: 3d models for games, architecture, videos. (1408410)