Thingiverse
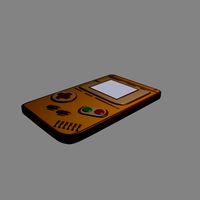
Samsung Galaxy Note 5 Custom Gaming Case (Like Xperia Play) by robman2122
by Thingiverse
Last crawled date: 2 years, 12 months ago
Update 5/10/2017: 3 Updates in a weeks time! I can hardly believe it! Anywho, update time. I scrapped all the old pictures and posted up to date photos of my latest tweaks. Since my last update, I've made the following changes:
Added a back cover to the bottom of the case
Added notched sections to the both main pieces of the bottom potion of the case to slot together
Added pressure clips on the bottom of the case to hold everything together without screws or glue, and allowing for easy disassembly if parts need to be replaced or serviced
Thinned the top portion of the case to make things smaller overall
Shortened the round rotation peg to accomodate for top case thinning
Cut out the controller face portion (to allow for cleaner and easier printing)
Created a slotted section to allow the controller face to be placed into the bottom case and secured with super glue
Rounded shoulder buttons for nicer feel
Rounded entire case for nicer feel
Added support pegs for easier securing of PCB boards on back of controller face
As always, if anyone has any suggestions or ideas, please feel free to contact me either by direct message or in the comments below!
Update 5/6/2017: For anyone who has been following this project, no your eyes are not fooling you, there is another new update within only a couple of days since the last one! I did some online window shopping to see what components might work for this project's controller portion. I had purchased a bunch of pieces awhile back, but have misplaced them. I also went the cheaper route and bought some less than desireable pieces from a chinese wholesaler that didn't quite fit the bill, so I will be purchasing all new pieces (once I save up the funds of course). In the meantime, I looked up all new pieces that I intend to purchase and made digital representations of them on the models so that I have a better idea of how things will fit together before printing anything. I have also made a few more modifications to the original case design. In the past when I printed the phone case portion, I never had much luck with the pieces that hung over the charging port, speaker or stylus, as well as the divider between the charging port and speaker/stylus, so I decided to remove them entirely. This should not affect the case's ability to hold the phone, as every time I printed it before, they ended up snapping off and the phone stayed just fine. I have also added a cone spacer to place under the D-Pad between it and the PCB board so that it will have a more fluid movement (similar to a traditional Nintendo D-Pad). In addition to this, I also added in a representation of a power toggle switch to turn the controller on/off at will so it will not drain the battery when not in use. At this time, I am planning on using an Adafruit bluetooth microcontroller and a battery from them as well. The other pieces, I will most likely still be purchasing from chinese wholesalers, but will be a little more strict with what I am purchasing, so that I end up with something of a high enough quality to work for what I need. Once I am closer to the end and have a confirmed working controller, I will post the list of parts/prices with links to where I purchased them from. In the meantime, if anyone has any questions/comments/suggestions, please feel free to leave them in the comments section below and I will do my best to respond to them in a timely fashion. As for future plans, I do also have a Samsung Galaxy S7 on hand to work with as well, but will not work on that until this one is finished. And if/when my Note 5 kicks the bucket, I will also be looking to replace that with another phone, but am undecided at this time, as I plan on keeping this one going until it no longer functions, but will most likely be designing a case for whichever phone replaces it.
Update 5/3/2017: I know... I know... I totally dropped the ball on this one... My printer was out of comission for quite some time and due to other things going on in life, I had given up on this project. But then I recently had the time and energy to get my printer back up and running. Today, whilst browsing the web, pining for a true successor to the Xperia Play, I had a thought. Maybe I was going about this project all wrong from the start. As much as I was trying to emulate the Xperia Play in style and functionality, the concept just wasn't jiving too well when it came to a 3D printed case. As I was reading through an forum of others pining for the Xperia Play, someone mentioned how Sony still holds the patent for the sliding gamepad design, and that's partially why no other company has really attempted such a phone (aside from the potential risk of investing in something that may not sell very well). Someone mentioned that they'd be happy with any gamephone as long as the gamepad wasn't visible when they didn't want it to be and then it hit me! What if I made it swivel around similar to the way the Sidekick worked? I went back to my old files and got to work, scrapping a lot of things and fixing up other areas that I didn't pay enough attention to when I first embarked on this journey. I whipped up a quick model of what I had in mind and took some screenshots. I do still have the old stuff as well, if anyone ever wanted to go down that road for any reason, but my focus will now be on the new revision. On the new model, there will a round peg that will be inserted through the top portion of the case and then fastened to the bottom portion from within by screws. I'll probably end up using some super glue on the bottom portion as well to ensure it doesn't drift after being placed. This should allow the bottom to swivel around into the desired shape for playability. I also extruded 2 bump strips on either side to allow friction to hold the phone in place, whether open or closed so that it doesn't immediately flip to the side. For the time being, I undid the rounded corners for easier design work. Once I have things a bit more finalized, I will be rounding things back out so it has a smoother and sleeker look and feel, and so that it will be more comfortable in the hands when playing. If anyone has any questions or ideas, I am all ears! Glad to be back working on this project once again!
Update 1/10/2016: Hello everyone who is following this project. I have made a few more modifications to the controller portion of the case. I now have the USB port lined up correctly with the opening on the case. This unfortunately caused me to have to extend the walls up on the bottom portion of the case, causing it to be thicker than I originally intended. I have also thinned out some of the screw posts on the bottom that extend up to the cover to hold everything together as they seemed to be just a touch too thick to fit through the circuit board for the controller. After I had a few tweaks done and everything assembled, I came across another problem. The original buttons from the Ipega controller fit through the holes I created just fine, however because they had little tabs on the backside that originally fit through slots on the original controller casing to keep their orientation, they began to get caught on each other and cause each other to stick in the down position until rotated back to a proper orientation. This for obvious reasons would not work for a controller, so I created a generic set of buttons without tabs to take their place. I did this because I am still unsure if I will ever want to reassemble the original controller for any reason and did not want to break the tabs off the buttons for this reason. So far from my testing, everything seems to work fine with this new set of buttons. Other tweaks simply involved some minor movement of things here and there to fit better when assembled. I am still considering different ideas for the slide mount to connect the bottom and top of the case. I will most likely be taking a small break from this project (only a week tops) as I am in the process of moving my printer and setting up a new workstation for everything.
Update 1/7/2016: I have completed a preliminary print of the bottom portion of the case and have fitted the controller circuit board inside. I have attached a picture of this to the thing page for all to see, however once everything was mounted I determined a few things that would need to be modified and began working on further tweaks. For one, I miscalculated the position of the USB charging port on the controller board, which ended up being recessed in by about 4mm. I also misjudged the height of this port as well and found that in the current state at that time that the USB port was flush with the lip of the top portion of the bottom piece of the case. I have since moved the entire controller mount assembly down by 4mm and raised walls of the case by 2mm and produced a new cutout for that USB port. In modifying this, I also tweaked the cover for the bottom case to match the new locations of all the screw posts and such. Back to the top portion of the bottom case, I widened the screw posts near the top (which do not interfere with the controller board at all) so that they are much thicker and less prone to snapping off when assembling the case. I have also widened the base of some of the other screw posts to also lessen the chance of snapping during assembly/use of the controller. To the sides of the controller mounting assembly, I have also added some solid support blocks that extend up to be flush with the inside of the lid to give the controller more overall rigidity when using, so that if gripping the controller more vigorously during play, you don't end up caving in the lid. In moving the entire assembly down on the design, I also moved the recessed region down with it to match, causing this region to actually cut away on the bottom of the case and end up being exposed a bit when the controller will be closed with the top case for the phone. After moving everything down, there was only a sliver left at the bottom of this portion and I felt it would only hinder play with the analog sticks and looked out of place as well. In addition to all this, I also widened the circular cutouts for the analog sticks as on the preliminary print, I noticed that I did not seem to have full range of motion with the sticks as they would hit the sides when fully extended. As for the overall design of this portion of the case, I have also decided to remove the slide portion and the friction nubs to be separate pieces that will be super glued into place as there was no feasibly way to get a quality print with them on the model already. I would either end up printing the case upside down (using a lot of support material) and have to do a lot of extra finishing work and sanding to the top to (hopefully) end up with something that was usable or print it right side up (again using a lot of support material) and risk the printer butchering the screw posts further than it already might (due to my printer's limitations). I know this may not result in the strongest bond for the slide, but I am looking into other alternatives as well (such as something along the lines of either rubber cement or JB Weld) to strengthen the link between the case and the slide. As always, if anyone has any ideas or suggestions, please feel free to leave them in the comments section or message me directly!
Update #2 1/1/2016: I have uploaded a couple pictures of the test fit of the controller board to what I have whipped up design wise for the inside of the case. Everything is fitting very well in my opinion. Now I just need to perfect the shoulder button area. In case I didn't mention this before, I have designed all of the screw posts and holes within the case to take advantage and use all of the screws from the Ipega controller since they are self taping and appropriately sized.
Update 1/1/2016: I have updated the pictures on this page to reflect my most current revision of the case. It now has all the holes in place for the Ipega controller I have selected to use. I am still making minor tweaks to the innards of the case as I go to try and fit everything as perfectly as possible. Once I get things lined up properly, I plan on putting some extra support scaffolding on the inside to help hold the circuit board in place a little better as well. Once I complete the fully 3D printed design, I will then begin working on the design that takes advantage of the Xperia Plays sliding bracket as well. Please keep in mind for anyone who may be interested in that version of the case when I make it, the bottom will not be detachable in the sense that the fully 3D printed version will be (it can be twisted and pulled off for when it will not be necessary to have a controller (meetings and whatnot).
As for the top portion of the case, not much has changed here, however I have removed the material that extended over top of where the volume keys were. I found that it was increasingly more and more difficult to insert/remove the phone as I dialed in the dimensions closer and closer to fit the phone more perfectly with this piece here. The last time I printed this portion of the case, i accidentally snapped this piece off, and it actually worked out to my benefit when it happened.
Once again, when I am happy with the design now that I have a controller picked out, I will update the new models for everyone to check out. In the mean time, keep checking for new updates! And leave any ideas or thoughts in the comments section!
Update 12/31/2015: Happy New Year Everyone! I apologize for the lapse in updates, but I have been busy at work tweaking my case design. I have finally selected a Bluetooth controller, and the winner is.... The Ipega PG-9017S (http://www.amazon.com/gp/product/B00BT71S4K?psc=1&redirect=true&ref_=oh_aui_detailpage_o00_s01)
This particular controller seemed to fit the bill for what I was looking for and so far has not disappointed me in the least bit. I have already roughed out the button holes for everything on the controller and have been slowly tweaking and reprinting test pieces to fit to the control board of the controller itself. Once I am happy with the design, I will be uploading it along with the rest of the pieces. I have also decided to separate the bottom portion of the case into two solid pieces rather than one with a thin door. This will help overall rigidity and allow for easier installation of the controller itself into the case. This design choice should also aid in printing since the original concept would come out sloppy on the inside from poor support material on my printer. I am still developing the case with a completely printable design (with the exception of the controller of course) but am also working on a secondary design that will take advantage of the original phone this case is designed on. It will use the actual slide bracket from an Xperia Play for its sliding mechanism, cutting down a bit on its footprint (hopefully!) and increasing its durability and reliability. And best of all, since it won't use those pesky ribbon cables that the Xperia Play used, it shouldn't ever need replacement! In the mean time, if anyone has any ideas, thoughts or comments, please let me know!
Update 12/14/2015: (This one is long!) I have updated the model to reflect a recent change I have implemented. The complete case has now been simplified down to 3 pieces (I have left the old revision of the top portion of the case since it functions as a standard case for the phone however). The top, the bottom and the door for the bottom. I have created a grooved passageway on the bottom of the top portion of the case and added a complimentary extension to the top of the bottom piece. I originally tried to have the grooved passageway extend all the way to the end of the case and created a plug that could be inserted and glued in place to keep the bottom portion of the case in place, however I noticed once the bottom was printed that it could be inserted into the groove diagonally and then twisted into place, allowing it to slide, so i walled the groove back off on the side, allowing for a stronger overall build and feel. I have also added a tensioned clip to the bottom portion to keep it in place in the open position so that the phone will not slide back down and pinch your fingers when using the game controls (once implemented). This clip simply needs to be depressed to allow the case to slide closed. Because of the new design, the controller can easily be twisted off of the top for times where you may not want/need the controls (such as meetings and the such) and overall, take the the thickness of the entire contraption down a bit. I plan to create a filler piece to go into the grooved area when the controller is not attached. I would think it best to print this piece with something flexible like ninjaflex so that it can be inserted snugly and removed without having to break anything off to reinsert the controller portion. I will be uploading pictures later today of my completed print (so far) to show how it all fits together. I am still researching controllers and this part may take some time before the final design is finished and ready to print. I have also toyed with the idea in my head a bit of building in one of those USB power banks into the bottom portion of the case ( a slim one so that it fits in there nicely with the controller pieces) although I think this idea may get scrapped in the end as I'd rather slim the case down at this point rather than beefing it up any more than I already have. Although, this case is thick when both pieces are assembled, I don't find it uncomfortable to hold at all. If anything, I personally like the thicker feel as it gives me something more to hold onto when using my phone. The overall thickness may present a problem when trying to carry in a pocket however. As always, I am open to suggestions/ideas for anything and everything related to this case. If you have something to say, please leave it in the comments or message me directly!
Side note: I have found that it is best to remove your S Pen before putting the phone into the case as the lip of the case can get caught on the edge of the stylus and bend/break the case/stylus.
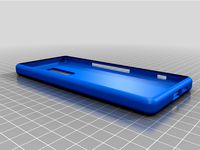
Update 12/8/2015: I have uploaded STL models of my current design. I have not printed this revision of top portion of the case yet, but will be doing so this evening. The only changes I have made from my last revision are that I have rounded the top corners of the case a bit more to contour the phone a bit more and I have lowered the hole in the back of the top case for the camera so that it does not interfere with the camera at all. In addition to that, I have made the corners of the bottom portion of the case match the corners on the top portion.
Included with these STL files is an example of what the bottom portion of the case might look like. The layout will be roughly the same, but spacing and shapes can/may/will differ when this project is complete.
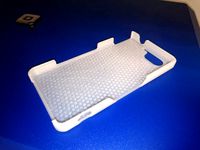
Update #2 12/8/2015: I have successfully printed the top portions most recent revision and was able to fit my Galaxy Note 5 snugly inside! I have posted pictures of the results. The moving of the camera hole was a success as the case now does not touch the camera lens assembly on the rear of the phone, and the corners of the top of the case have been rounded down to just the right size, holding the phone firmly in place once placed inside of the case. I have done some research and may be on to a replacement idea for the sliding brackets, but am still extremely open to ideas there if anyone has any feedback. At this point, it is upward and onward to the bottom portion (or maybe it's downward in that case?). I am still researching which controller may work best for this scenario. Everyone on the internet seems to like the idea of using a PS3 controller, however, I do not have my phone rooted, nor do I intend to do so anytime soon. I am looking for a solution that will work stock with anyone's phone that will fit in the case, so a standard bluetooth controller seems to be the way to go in my eyes, so again, if anyone has any ideas or suggestions, I am all ears. As a side note, the bottom portion of this case may get slimmer depending on the controller setup that gets used. I tried to keep everything open for anything/everything at the moment, but will try to further streamline the case as it gets developed so it uses less material in the end, but is still durable and strong.
This is a project that was born from a lack of a true gaming smart phone on the market.
Years ago I owned a Sony Ericsson Xperia Play. As any Xperia Play owner (former or current) can tell you, the phone is a unique take on a gaming smartphone, but it has its pitfalls. It was haphazardly released by Sony in an attempt to corner a niche market, and they never really gave it a fighting chance. It quickly tanked in the opinion of many around the world, but still holds a special place in the hearts of gamers. I still kick myself for ever selling my Xperia Play (both of them!).
We as a community have waited for many years for a true successor to the Xperia Play to be released, however, aside from a handful of Chinese "game player" devices that have the ability to make calls and receive text messages (although the quality of most of these devices make those features questionable at best), there has not been much in this department. Snail Games got me very excited with the announcement of their W3D phone, however it seems as if this phone will never be released as it has already been delayed once, and now as of this writing, they have pulled the product from Amazon.
So, with a phone that needs replacing, I've decided upon the Samsung Galaxy Note 5 (based on specs, reviews and first hand encounters with my wife's Note 5). Feeling let down about missing out on a phone with built in controls got me feeling nostalgic for the Xperia Play. Suddenly, it dawned on me that I own a 3D Printer! I could simply create my own case for the phone and make it in the style of the Xperia Play, disassembling a bluetooth controller and building it into the bottom portion of the case for easy access.
This is still very much a work in progress and at the moment. I am making design modifications to the case almost daily at this point, taking the top portion of the case out for a spin to work and noting anything that needs to be changed. I am also still in the research phase for which controller I may use for the bottom portion (hence the blank canvas that is the bottom at the moment). I have a few controllers in mind, but if anyone would like to make any recommendations, I am all ears.
I will try to keep the models updated as best as possible, but since many changes can occur in a short amount of time, there may be lapses in updates.
For anyone who would like to suggest a controller, here is my criteria:
Must have:
D-Pad
Dual Thumbsticks (nub style similar to the PSP, otherwise sticks will make the case too thick to feasibly work the way I am envisioning it)
4 Face buttons (A,B,Y,X)
At least a pair of shoulder buttons (L & R)
Bluetooth Connectivity for Android based phones
Slightly larger size than most Bluetooth controllers OR independent circuit boards for buttons and D-Pad/Analog sticks that can be rewired/branched apart from each other
Optional:
Dual shoulder buttons (L/R 1 & 2)
Start/Select Buttons
Home Button
Other additional buttons
An ON/OFF toggle switch for power (this is preferable, but not required as long as the device will time out and turn off on it's own from inactivity)
Cannot have:
Raised traditional Thumbsticks
Direct connection to phones via cable/connector
Locked down control compatibility (such as the iCade series controllers) (I will be primarily using this with emulators)
Other Plans for this project: Because the case will be entirely 3D printed (aside from the controller pieces on the inside) It will not have the tensioned slider like the Xperia Play has, so once I pick a controller and cut out the layout, I plan to have a tension tab that sticks up after the case is opened and can be depressed in order to close the case, giving it further rigidity when playing.
Also, once a controller has been picked, screw posts and holes will be added to the inside of the bottom portion/lid to allow for a secured door and further rigidity when playing.
Any and all suggestions are welcomed, but please remember, this is a work in progress and nowhere near finished in my opinion.
Added a back cover to the bottom of the case
Added notched sections to the both main pieces of the bottom potion of the case to slot together
Added pressure clips on the bottom of the case to hold everything together without screws or glue, and allowing for easy disassembly if parts need to be replaced or serviced
Thinned the top portion of the case to make things smaller overall
Shortened the round rotation peg to accomodate for top case thinning
Cut out the controller face portion (to allow for cleaner and easier printing)
Created a slotted section to allow the controller face to be placed into the bottom case and secured with super glue
Rounded shoulder buttons for nicer feel
Rounded entire case for nicer feel
Added support pegs for easier securing of PCB boards on back of controller face
As always, if anyone has any suggestions or ideas, please feel free to contact me either by direct message or in the comments below!
Update 5/6/2017: For anyone who has been following this project, no your eyes are not fooling you, there is another new update within only a couple of days since the last one! I did some online window shopping to see what components might work for this project's controller portion. I had purchased a bunch of pieces awhile back, but have misplaced them. I also went the cheaper route and bought some less than desireable pieces from a chinese wholesaler that didn't quite fit the bill, so I will be purchasing all new pieces (once I save up the funds of course). In the meantime, I looked up all new pieces that I intend to purchase and made digital representations of them on the models so that I have a better idea of how things will fit together before printing anything. I have also made a few more modifications to the original case design. In the past when I printed the phone case portion, I never had much luck with the pieces that hung over the charging port, speaker or stylus, as well as the divider between the charging port and speaker/stylus, so I decided to remove them entirely. This should not affect the case's ability to hold the phone, as every time I printed it before, they ended up snapping off and the phone stayed just fine. I have also added a cone spacer to place under the D-Pad between it and the PCB board so that it will have a more fluid movement (similar to a traditional Nintendo D-Pad). In addition to this, I also added in a representation of a power toggle switch to turn the controller on/off at will so it will not drain the battery when not in use. At this time, I am planning on using an Adafruit bluetooth microcontroller and a battery from them as well. The other pieces, I will most likely still be purchasing from chinese wholesalers, but will be a little more strict with what I am purchasing, so that I end up with something of a high enough quality to work for what I need. Once I am closer to the end and have a confirmed working controller, I will post the list of parts/prices with links to where I purchased them from. In the meantime, if anyone has any questions/comments/suggestions, please feel free to leave them in the comments section below and I will do my best to respond to them in a timely fashion. As for future plans, I do also have a Samsung Galaxy S7 on hand to work with as well, but will not work on that until this one is finished. And if/when my Note 5 kicks the bucket, I will also be looking to replace that with another phone, but am undecided at this time, as I plan on keeping this one going until it no longer functions, but will most likely be designing a case for whichever phone replaces it.
Update 5/3/2017: I know... I know... I totally dropped the ball on this one... My printer was out of comission for quite some time and due to other things going on in life, I had given up on this project. But then I recently had the time and energy to get my printer back up and running. Today, whilst browsing the web, pining for a true successor to the Xperia Play, I had a thought. Maybe I was going about this project all wrong from the start. As much as I was trying to emulate the Xperia Play in style and functionality, the concept just wasn't jiving too well when it came to a 3D printed case. As I was reading through an forum of others pining for the Xperia Play, someone mentioned how Sony still holds the patent for the sliding gamepad design, and that's partially why no other company has really attempted such a phone (aside from the potential risk of investing in something that may not sell very well). Someone mentioned that they'd be happy with any gamephone as long as the gamepad wasn't visible when they didn't want it to be and then it hit me! What if I made it swivel around similar to the way the Sidekick worked? I went back to my old files and got to work, scrapping a lot of things and fixing up other areas that I didn't pay enough attention to when I first embarked on this journey. I whipped up a quick model of what I had in mind and took some screenshots. I do still have the old stuff as well, if anyone ever wanted to go down that road for any reason, but my focus will now be on the new revision. On the new model, there will a round peg that will be inserted through the top portion of the case and then fastened to the bottom portion from within by screws. I'll probably end up using some super glue on the bottom portion as well to ensure it doesn't drift after being placed. This should allow the bottom to swivel around into the desired shape for playability. I also extruded 2 bump strips on either side to allow friction to hold the phone in place, whether open or closed so that it doesn't immediately flip to the side. For the time being, I undid the rounded corners for easier design work. Once I have things a bit more finalized, I will be rounding things back out so it has a smoother and sleeker look and feel, and so that it will be more comfortable in the hands when playing. If anyone has any questions or ideas, I am all ears! Glad to be back working on this project once again!
Update 1/10/2016: Hello everyone who is following this project. I have made a few more modifications to the controller portion of the case. I now have the USB port lined up correctly with the opening on the case. This unfortunately caused me to have to extend the walls up on the bottom portion of the case, causing it to be thicker than I originally intended. I have also thinned out some of the screw posts on the bottom that extend up to the cover to hold everything together as they seemed to be just a touch too thick to fit through the circuit board for the controller. After I had a few tweaks done and everything assembled, I came across another problem. The original buttons from the Ipega controller fit through the holes I created just fine, however because they had little tabs on the backside that originally fit through slots on the original controller casing to keep their orientation, they began to get caught on each other and cause each other to stick in the down position until rotated back to a proper orientation. This for obvious reasons would not work for a controller, so I created a generic set of buttons without tabs to take their place. I did this because I am still unsure if I will ever want to reassemble the original controller for any reason and did not want to break the tabs off the buttons for this reason. So far from my testing, everything seems to work fine with this new set of buttons. Other tweaks simply involved some minor movement of things here and there to fit better when assembled. I am still considering different ideas for the slide mount to connect the bottom and top of the case. I will most likely be taking a small break from this project (only a week tops) as I am in the process of moving my printer and setting up a new workstation for everything.
Update 1/7/2016: I have completed a preliminary print of the bottom portion of the case and have fitted the controller circuit board inside. I have attached a picture of this to the thing page for all to see, however once everything was mounted I determined a few things that would need to be modified and began working on further tweaks. For one, I miscalculated the position of the USB charging port on the controller board, which ended up being recessed in by about 4mm. I also misjudged the height of this port as well and found that in the current state at that time that the USB port was flush with the lip of the top portion of the bottom piece of the case. I have since moved the entire controller mount assembly down by 4mm and raised walls of the case by 2mm and produced a new cutout for that USB port. In modifying this, I also tweaked the cover for the bottom case to match the new locations of all the screw posts and such. Back to the top portion of the bottom case, I widened the screw posts near the top (which do not interfere with the controller board at all) so that they are much thicker and less prone to snapping off when assembling the case. I have also widened the base of some of the other screw posts to also lessen the chance of snapping during assembly/use of the controller. To the sides of the controller mounting assembly, I have also added some solid support blocks that extend up to be flush with the inside of the lid to give the controller more overall rigidity when using, so that if gripping the controller more vigorously during play, you don't end up caving in the lid. In moving the entire assembly down on the design, I also moved the recessed region down with it to match, causing this region to actually cut away on the bottom of the case and end up being exposed a bit when the controller will be closed with the top case for the phone. After moving everything down, there was only a sliver left at the bottom of this portion and I felt it would only hinder play with the analog sticks and looked out of place as well. In addition to all this, I also widened the circular cutouts for the analog sticks as on the preliminary print, I noticed that I did not seem to have full range of motion with the sticks as they would hit the sides when fully extended. As for the overall design of this portion of the case, I have also decided to remove the slide portion and the friction nubs to be separate pieces that will be super glued into place as there was no feasibly way to get a quality print with them on the model already. I would either end up printing the case upside down (using a lot of support material) and have to do a lot of extra finishing work and sanding to the top to (hopefully) end up with something that was usable or print it right side up (again using a lot of support material) and risk the printer butchering the screw posts further than it already might (due to my printer's limitations). I know this may not result in the strongest bond for the slide, but I am looking into other alternatives as well (such as something along the lines of either rubber cement or JB Weld) to strengthen the link between the case and the slide. As always, if anyone has any ideas or suggestions, please feel free to leave them in the comments section or message me directly!
Update #2 1/1/2016: I have uploaded a couple pictures of the test fit of the controller board to what I have whipped up design wise for the inside of the case. Everything is fitting very well in my opinion. Now I just need to perfect the shoulder button area. In case I didn't mention this before, I have designed all of the screw posts and holes within the case to take advantage and use all of the screws from the Ipega controller since they are self taping and appropriately sized.
Update 1/1/2016: I have updated the pictures on this page to reflect my most current revision of the case. It now has all the holes in place for the Ipega controller I have selected to use. I am still making minor tweaks to the innards of the case as I go to try and fit everything as perfectly as possible. Once I get things lined up properly, I plan on putting some extra support scaffolding on the inside to help hold the circuit board in place a little better as well. Once I complete the fully 3D printed design, I will then begin working on the design that takes advantage of the Xperia Plays sliding bracket as well. Please keep in mind for anyone who may be interested in that version of the case when I make it, the bottom will not be detachable in the sense that the fully 3D printed version will be (it can be twisted and pulled off for when it will not be necessary to have a controller (meetings and whatnot).
As for the top portion of the case, not much has changed here, however I have removed the material that extended over top of where the volume keys were. I found that it was increasingly more and more difficult to insert/remove the phone as I dialed in the dimensions closer and closer to fit the phone more perfectly with this piece here. The last time I printed this portion of the case, i accidentally snapped this piece off, and it actually worked out to my benefit when it happened.
Once again, when I am happy with the design now that I have a controller picked out, I will update the new models for everyone to check out. In the mean time, keep checking for new updates! And leave any ideas or thoughts in the comments section!
Update 12/31/2015: Happy New Year Everyone! I apologize for the lapse in updates, but I have been busy at work tweaking my case design. I have finally selected a Bluetooth controller, and the winner is.... The Ipega PG-9017S (http://www.amazon.com/gp/product/B00BT71S4K?psc=1&redirect=true&ref_=oh_aui_detailpage_o00_s01)
This particular controller seemed to fit the bill for what I was looking for and so far has not disappointed me in the least bit. I have already roughed out the button holes for everything on the controller and have been slowly tweaking and reprinting test pieces to fit to the control board of the controller itself. Once I am happy with the design, I will be uploading it along with the rest of the pieces. I have also decided to separate the bottom portion of the case into two solid pieces rather than one with a thin door. This will help overall rigidity and allow for easier installation of the controller itself into the case. This design choice should also aid in printing since the original concept would come out sloppy on the inside from poor support material on my printer. I am still developing the case with a completely printable design (with the exception of the controller of course) but am also working on a secondary design that will take advantage of the original phone this case is designed on. It will use the actual slide bracket from an Xperia Play for its sliding mechanism, cutting down a bit on its footprint (hopefully!) and increasing its durability and reliability. And best of all, since it won't use those pesky ribbon cables that the Xperia Play used, it shouldn't ever need replacement! In the mean time, if anyone has any ideas, thoughts or comments, please let me know!
Update 12/14/2015: (This one is long!) I have updated the model to reflect a recent change I have implemented. The complete case has now been simplified down to 3 pieces (I have left the old revision of the top portion of the case since it functions as a standard case for the phone however). The top, the bottom and the door for the bottom. I have created a grooved passageway on the bottom of the top portion of the case and added a complimentary extension to the top of the bottom piece. I originally tried to have the grooved passageway extend all the way to the end of the case and created a plug that could be inserted and glued in place to keep the bottom portion of the case in place, however I noticed once the bottom was printed that it could be inserted into the groove diagonally and then twisted into place, allowing it to slide, so i walled the groove back off on the side, allowing for a stronger overall build and feel. I have also added a tensioned clip to the bottom portion to keep it in place in the open position so that the phone will not slide back down and pinch your fingers when using the game controls (once implemented). This clip simply needs to be depressed to allow the case to slide closed. Because of the new design, the controller can easily be twisted off of the top for times where you may not want/need the controls (such as meetings and the such) and overall, take the the thickness of the entire contraption down a bit. I plan to create a filler piece to go into the grooved area when the controller is not attached. I would think it best to print this piece with something flexible like ninjaflex so that it can be inserted snugly and removed without having to break anything off to reinsert the controller portion. I will be uploading pictures later today of my completed print (so far) to show how it all fits together. I am still researching controllers and this part may take some time before the final design is finished and ready to print. I have also toyed with the idea in my head a bit of building in one of those USB power banks into the bottom portion of the case ( a slim one so that it fits in there nicely with the controller pieces) although I think this idea may get scrapped in the end as I'd rather slim the case down at this point rather than beefing it up any more than I already have. Although, this case is thick when both pieces are assembled, I don't find it uncomfortable to hold at all. If anything, I personally like the thicker feel as it gives me something more to hold onto when using my phone. The overall thickness may present a problem when trying to carry in a pocket however. As always, I am open to suggestions/ideas for anything and everything related to this case. If you have something to say, please leave it in the comments or message me directly!
Side note: I have found that it is best to remove your S Pen before putting the phone into the case as the lip of the case can get caught on the edge of the stylus and bend/break the case/stylus.
Update 12/8/2015: I have uploaded STL models of my current design. I have not printed this revision of top portion of the case yet, but will be doing so this evening. The only changes I have made from my last revision are that I have rounded the top corners of the case a bit more to contour the phone a bit more and I have lowered the hole in the back of the top case for the camera so that it does not interfere with the camera at all. In addition to that, I have made the corners of the bottom portion of the case match the corners on the top portion.
Included with these STL files is an example of what the bottom portion of the case might look like. The layout will be roughly the same, but spacing and shapes can/may/will differ when this project is complete.
Update #2 12/8/2015: I have successfully printed the top portions most recent revision and was able to fit my Galaxy Note 5 snugly inside! I have posted pictures of the results. The moving of the camera hole was a success as the case now does not touch the camera lens assembly on the rear of the phone, and the corners of the top of the case have been rounded down to just the right size, holding the phone firmly in place once placed inside of the case. I have done some research and may be on to a replacement idea for the sliding brackets, but am still extremely open to ideas there if anyone has any feedback. At this point, it is upward and onward to the bottom portion (or maybe it's downward in that case?). I am still researching which controller may work best for this scenario. Everyone on the internet seems to like the idea of using a PS3 controller, however, I do not have my phone rooted, nor do I intend to do so anytime soon. I am looking for a solution that will work stock with anyone's phone that will fit in the case, so a standard bluetooth controller seems to be the way to go in my eyes, so again, if anyone has any ideas or suggestions, I am all ears. As a side note, the bottom portion of this case may get slimmer depending on the controller setup that gets used. I tried to keep everything open for anything/everything at the moment, but will try to further streamline the case as it gets developed so it uses less material in the end, but is still durable and strong.
This is a project that was born from a lack of a true gaming smart phone on the market.
Years ago I owned a Sony Ericsson Xperia Play. As any Xperia Play owner (former or current) can tell you, the phone is a unique take on a gaming smartphone, but it has its pitfalls. It was haphazardly released by Sony in an attempt to corner a niche market, and they never really gave it a fighting chance. It quickly tanked in the opinion of many around the world, but still holds a special place in the hearts of gamers. I still kick myself for ever selling my Xperia Play (both of them!).
We as a community have waited for many years for a true successor to the Xperia Play to be released, however, aside from a handful of Chinese "game player" devices that have the ability to make calls and receive text messages (although the quality of most of these devices make those features questionable at best), there has not been much in this department. Snail Games got me very excited with the announcement of their W3D phone, however it seems as if this phone will never be released as it has already been delayed once, and now as of this writing, they have pulled the product from Amazon.
So, with a phone that needs replacing, I've decided upon the Samsung Galaxy Note 5 (based on specs, reviews and first hand encounters with my wife's Note 5). Feeling let down about missing out on a phone with built in controls got me feeling nostalgic for the Xperia Play. Suddenly, it dawned on me that I own a 3D Printer! I could simply create my own case for the phone and make it in the style of the Xperia Play, disassembling a bluetooth controller and building it into the bottom portion of the case for easy access.
This is still very much a work in progress and at the moment. I am making design modifications to the case almost daily at this point, taking the top portion of the case out for a spin to work and noting anything that needs to be changed. I am also still in the research phase for which controller I may use for the bottom portion (hence the blank canvas that is the bottom at the moment). I have a few controllers in mind, but if anyone would like to make any recommendations, I am all ears.
I will try to keep the models updated as best as possible, but since many changes can occur in a short amount of time, there may be lapses in updates.
For anyone who would like to suggest a controller, here is my criteria:
Must have:
D-Pad
Dual Thumbsticks (nub style similar to the PSP, otherwise sticks will make the case too thick to feasibly work the way I am envisioning it)
4 Face buttons (A,B,Y,X)
At least a pair of shoulder buttons (L & R)
Bluetooth Connectivity for Android based phones
Slightly larger size than most Bluetooth controllers OR independent circuit boards for buttons and D-Pad/Analog sticks that can be rewired/branched apart from each other
Optional:
Dual shoulder buttons (L/R 1 & 2)
Start/Select Buttons
Home Button
Other additional buttons
An ON/OFF toggle switch for power (this is preferable, but not required as long as the device will time out and turn off on it's own from inactivity)
Cannot have:
Raised traditional Thumbsticks
Direct connection to phones via cable/connector
Locked down control compatibility (such as the iCade series controllers) (I will be primarily using this with emulators)
Other Plans for this project: Because the case will be entirely 3D printed (aside from the controller pieces on the inside) It will not have the tensioned slider like the Xperia Play has, so once I pick a controller and cut out the layout, I plan to have a tension tab that sticks up after the case is opened and can be depressed in order to close the case, giving it further rigidity when playing.
Also, once a controller has been picked, screw posts and holes will be added to the inside of the bottom portion/lid to allow for a secured door and further rigidity when playing.
Any and all suggestions are welcomed, but please remember, this is a work in progress and nowhere near finished in my opinion.
Similar models
thingiverse
free
Galaxy s8+ Tripod/phone stand/charging dock (With case) by Junhobyun
...our own phone.
update:
stl: s8+ top 3.15 is for cases with width 3.15 inches
and s8+ top 3.04 is for cases with width 3.04 inches
cg_trader
free
Galaxy S3 Phone Case Trim
... it. i'm still working out the little kinks phone case galaxy s 3 3d printing miscellaneous phone case electronics phone case
thingiverse
free
Nexus 6P Case and slide out Gamepad by Playedalive
...rmally (for phones that would slide out and lock) but cant find any designs on the web that allow for something to be 3d printed.
grabcad
free

Galaxy S3 Phone Case, Trim
...om scratching when you drop the phone but still give it a flush and slim look to it.
i'm still working out the little kinks
thingiverse
free
Apache Camper (pop up) door turn button by jimmy2time
...ep the top door linked to the bottom door once the camper is up).
it is my first design and probably a little rough but it works.
thingiverse
free
Basic Case for Sony Xperia Z1 Compact by dquilon
...lanking it)... and the thin bridge over the camera shutter button.
ps: i wish my printer supported abs so i could test with it...
thingiverse
free
Sony Xperia One case by n30g30
...simple tpu phone case for the sony xperia one mobile phone. i used supports around the bottom bevel and in the port/ button holes
thingiverse
free
iphone 8 plus w bumper case motorcycle handlebar mount by Matt19888
...ding on your print settings. i was able to use mine off the print bed at 100.2% scale.the file for the new top piece is iphn8.stl
thingiverse
free
xperia z3 phone case with z3 in bottom by BJohnsto24
...se
simply added the z3 logo down the bottom of the case, added to give the phone a vibrant look when printed in a bright colour.
thingiverse
free
Flashforge Creator Pro and similar JTech Photonics Laser mount by discojon
...eplacement when i realized the laser didn't need to be centered. still a wip and unprinted. still working on the top plate.
Robman2122
thingiverse
free
Just The Tip - Tip Jar by robman2122
...just the tip - tip jar by robman2122
thingiverse
just a simple tip jar i created.
thingiverse
free

Vintage Walt Disney World Logo Coasters and Holder by robman2122
...as. it features the vintage disney world logo.
coaster holder should hold approx 6 coasters if everything is printed as uploaded.
thingiverse
free

Modified Corner Glass Clip by robman2122
... heating element) and using a glass plate that is ~0.25"+ thick as well (standard picture/window pane glass from lowe's)
thingiverse
free
Super Smash Bros Trophy 1st Place by robman2122
...bed or warping can occur if using abs!
the original model for this design can be found at http://www.thingiverse.com/thing:616249
Xperia
turbosquid
$5
SONY XPERIA
...royalty free 3d model sony xperia for download as obj and fbx on turbosquid: 3d models for games, architecture, videos. (1150816)
3d_ocean
$19
Sony Xperia Z1
...d in cinema 4d r14 and all materials,textures are included. high details modeling, textures animated xpresso lenses if you lik...
3ddd
$1
Sony xperia acro s
...sony xperia acro s
3ddd
телефон , sony xperia
телефон sony xperia acro s
3ddd
free
SONY XPERIA Z3
...sony xperia z3
3ddd
телефон
смартфон sony xperia z3, в четырех цветах.
turbosquid
$2
Sony Xperia
... available on turbo squid, the world's leading provider of digital 3d models for visualization, films, television, and games.
3d_export
$10
Xperia Arc 3D Model
...xperia arc 3d model
3dexport
xperia arc sony erricson
xperia arc 3d model angchon 31378 3dexport
3d_export
$15

Sony XPERIA 3D Model
...sony xperia 3d model
3dexport
cell phone sony xperia 3d model rhino
sony xperia 3d model nho03 66729 3dexport
3d_export
$30

SONY Xperia Tablet 3D Model
...ny xperia tablet 3d model
3dexport
sony xperia tablet android touchscreen
sony xperia tablet 3d model barbarosa222 58716 3dexport
turbosquid
$15
Sony Xperia ZL
...ree 3d model sony xperia zl for download as max, obj, and fbx on turbosquid: 3d models for games, architecture, videos. (1288416)
3d_export
$49
Sony Xperia Sola 3D Model
...sony xperia sola 3d model
3dexport
sony xperia sola 3d model by humster3d
sony xperia sola 3d model humster3d 57645 3dexport
Galaxy
design_connected
$11
Galaxy
...galaxy
designconnected
cattelan italia galaxy computer generated 3d model. designed by favaretto, oriano.
3ddd
free
Гостиная Galaxy
... tv , стенка
гостиная мебель-москва galaxy, компановка 3
3d_export
$20
galaxie 1963
...galaxie 1963
3dexport
galaxie 1963
turbosquid
$19

GALAXY
...y free 3d model galaxy for download as 3ds, max, obj, and fbx on turbosquid: 3d models for games, architecture, videos. (1369217)
turbosquid
$39

Galaxy
... available on turbo squid, the world's leading provider of digital 3d models for visualization, films, television, and games.
turbosquid
$25
Galaxy
... available on turbo squid, the world's leading provider of digital 3d models for visualization, films, television, and games.
turbosquid
free
galaxy
... available on turbo squid, the world's leading provider of digital 3d models for visualization, films, television, and games.
3ddd
$1
Galaxy S3
...galaxy s3
3ddd
samsung , телефон
samsung galaxy s iii
3ddd
free
Galaxy lampadario
...o
3ddd
voltolina
galaxy lampadario 6l
o 60 cm - h 85 cm
6 x g9 40whttp://www.voltolina.com/eng/prodotto.php?prid=galaxy
3ddd
$1
Sofia Galaxy
...sofia galaxy
3ddd
дверь , софья
дверь межкомнатная софья galaxy 73.90
цвет: гранат (73)
Samsung
3ddd
$1
Samsung
...samsung
3ddd
samsung , холодильник
samsung
3ddd
$1
Samsung
...samsung
3ddd
samsung , телевизор
samsung
3ddd
$1
SAMSUNG
...samsung
3ddd
samsung , холодильник
samsung rs21hklmr
3ddd
free
Samsung
...samsung
3ddd
samsung , музыкальный центр
samsung :-)
3ddd
$1
Samsung
...samsung
3ddd
samsung , кондиционер
настенный кондиционер samsung
3ddd
$1

Samsung
...samsung
3ddd
samsung , микроволновка
samsung
микроволновая печь
3ddd
free
Samsung
...samsung
3ddd
samsung , стиральная машина
samsung, стиральная машина, геометрия
3ddd
$1

Samsung
...samsung
3ddd
samsung , монитор
монитор
3ddd
$1
Samsung
...samsung
3ddd
samsung , пылесос
пылесос
3ddd
$1

телефон samsung
...фон samsung , телефон , samsung
телефон samsung
Play
3ddd
$1
play center
...play center
3ddd
площадка
play center
3ddd
free
Mecplast play
...mecplast play
3ddd
mecplast , play , кресло
archive3d
free
Play 3D Model
...ine playing machine game machine
play n210909 - 3d model (*.3ds) for interior 3d visualization.
archive3d
free

Play 3D Model
...ame-playing machine game machine
play 6 - 3d model (*.gsm+*.3ds) for interior 3d visualization.
3ddd
$1

Dedon play
...p://www.dedon.de/en/collections/detail/collection/play-with-dedon-143/sidechair-1146/play-64.html#armchair-2059/play-64
3d_export
$5
Kitchen knife for play
...kitchen knife for play
3dexport
kitchen knife for play
design_connected
$18
Lazy PLAI
...lazy plai
designconnected
b & b italia lazy plai lounge chairs computer generated 3d model. designed by patricia urquiola.
turbosquid
$1
playing cards
...quid
royalty free 3d model playing cards for download as max on turbosquid: 3d models for games, architecture, videos. (1614013)
3ddd
$1

пластилин Play-Doh
...пластилин play-doh
3ddd
пластилин
пластилин play-doh
archive3d
free

Play 3D Model
...l
archive3d
child's play toy
play n121009 - 3d model (*.3ds) for interior 3d visualization.
Note
design_connected
$11
Note
...note
designconnected
bonaldo note computer generated 3d model. designed by mazzer, mario.
turbosquid
$15

Notes
...yalty free 3d model notes for download as blend, fbx, and obj on turbosquid: 3d models for games, architecture, videos. (1617310)
3d_export
$5
bottle with a note
...bottle with a note
3dexport
bottle with a note in the style of a cube
design_connected
$11
Note Sideboard
...note sideboard
designconnected
bonaldo note sideboard computer generated 3d model. designed by mazzer, mario.
turbosquid
$1
Torus Note
...bosquid
royalty free 3d model torus note for download as max on turbosquid: 3d models for games, architecture, videos. (1553137)
turbosquid
$15
Note Pad
...ty free 3d model note model for download as obj, fbx, and 3ds on turbosquid: 3d models for games, architecture, videos. (1626383)
turbosquid
$20
Note 10
... free 3d model note 10 for download as 3ds, max, obj, and fbx on turbosquid: 3d models for games, architecture, videos. (1443896)
archive3d
free

Notes 3D Model
...del
archive3d
notes music
notes n190608 - 3d model (*.gsm+*.3ds) for interior 3d visualization.
turbosquid
$40

NOTE 3_online
... available on turbo squid, the world's leading provider of digital 3d models for visualization, films, television, and games.
turbosquid
$25
Death Note
... available on turbo squid, the world's leading provider of digital 3d models for visualization, films, television, and games.
Case
3d_export
$1

case
...case
3dexport
case
archibase_planet
free

Case
...case
archibase planet
showcase show-case glass case
glass-case + cakes - 3d model for interior 3d visualization.
archibase_planet
free

Case
...case
archibase planet
showcase show-case glass case
glass-case for chips - 3d model for interior 3d visualization.
archibase_planet
free

Case
...case
archibase planet
case shelving drawer
case - 3d model for interior 3d visualization.
archibase_planet
free

Case
...case
archibase planet
case rack locker
case - 3d model for interior 3d visualization.
archibase_planet
free

Case
...case
archibase planet
case drawer kitchen furniture
case - 3d model for interior 3d visualization.
archibase_planet
free

Case
...case
archibase planet
case cupboard shelving
glass case - 3d model for interior 3d visualization.
archibase_planet
free

Case
...case
archibase planet
case handbag suitcase
case - 3d model (*.gsm+*.3ds) for interior 3d visualization.
archibase_planet
free

Case
...case
archibase planet
case suitcase
case 5 - 3d model (*.gsm+*.3ds) for interior 3d visualization.
archibase_planet
free

Case
...case
archibase planet
locker case dresser
case - 3d model (*.gsm+*.3ds) for interior 3d visualization.
Custom
3ddd
free
Customized
...customized
3ddd
комод
customized, chest, cabinet
3d_export
$50
Custom motorcycle
...custom motorcycle
3dexport
custom motorcycle
3d_export
$21
Funko custom
...funko custom
3dexport
funko custom
turbosquid
$2

Customs
... available on turbo squid, the world's leading provider of digital 3d models for visualization, films, television, and games.
turbosquid
$2
Customs
... available on turbo squid, the world's leading provider of digital 3d models for visualization, films, television, and games.
turbosquid
$10
Custom Car
...turbosquid
royalty free 3d model custom car for download as on turbosquid: 3d models for games, architecture, videos. (1584212)
3d_export
$7
Custom glasses
...custom glasses
3dexport
3d custom glasses;<br>textured with non overlapping<br>rigged: yes
turbosquid
$80
Custom sportbike
...d
royalty free 3d model custom sportbike for download as fbx on turbosquid: 3d models for games, architecture, videos. (1313435)
turbosquid
$30
custom truck
...squid
royalty free 3d model custom truck for download as max on turbosquid: 3d models for games, architecture, videos. (1329357)
turbosquid
$10
custom alien
...squid
royalty free 3d model custom alien for download as fbx on turbosquid: 3d models for games, architecture, videos. (1244065)
5
3d_export
$5

hinge 5
...hinge 5
3dexport
hinge 5
turbosquid
$10

A-5
... available on turbo squid, the world's leading provider of digital 3d models for visualization, films, television, and games.
turbosquid
$2

A-5
... available on turbo squid, the world's leading provider of digital 3d models for visualization, films, television, and games.
turbosquid
$12

Calligraphic Digit 5 Number 5
...hic digit 5 number 5 for download as max, obj, fbx, and blend on turbosquid: 3d models for games, architecture, videos. (1389333)
3ddd
$1

5 роз
...5 роз
3ddd
5 роз в стеклянной вазе
design_connected
$11

iPhone 5
...iphone 5
designconnected
apple iphone 5 computer generated 3d model.
3ddd
$1

Lola 5
...lola 5
3ddd
miniforms
lola 5 miniforms 300*65*134
3ddd
$1

Nexus 5
...dd
nexus , phone , телефон
google nexus 5 phone
3d_ocean
$15

iPhone 5
...iphone 5
3docean
3d 4d apple cinema iphone model modeling phone screen texture
iphone 5 3d model and texture realistic iphone 5.
3d_ocean
$9
chanel 5
...chanel 5
3docean
books chanel
quality models perfum chanel 5 and books.
Gaming
3d_ocean
$4
Games
...games
3docean
3d games models real stick
3d, models, sports, games , trail
turbosquid
$5
Games
...s
turbosquid
royalty free 3d model games for download as skp on turbosquid: 3d models for games, architecture, videos. (1612115)
turbosquid
$25

Game
... available on turbo squid, the world's leading provider of digital 3d models for visualization, films, television, and games.
turbosquid
$10

Game
... available on turbo squid, the world's leading provider of digital 3d models for visualization, films, television, and games.
turbosquid
$5
Game
...bosquid
royalty free 3d model gameplay for download as blend on turbosquid: 3d models for games, architecture, videos. (1274934)
3d_ocean
$7

game place
...game place
3docean
children game game park game place kids play luna park play
for kids game place
3d_export
$14
game character
...game character 3dexport game character use for gaming ...
turbosquid
$20
Game Ready Car For Video Games
...e 3d model game ready car for video games for download as fbx on turbosquid: 3d models for games, architecture, videos. (1499375)
3d_ocean
$5
Game fence
...game fence
3docean
fence game
a high quality game ready fence.
3d_ocean
$16
Arcade Game
...arcade automate button coin computer console fun game gamer gaming joystick machine play side art video game detailed arcade...