Thingiverse
S8 RPI/LM2596 internal mount by Sparkss
by Thingiverse
Last crawled date: 2 years, 11 months ago
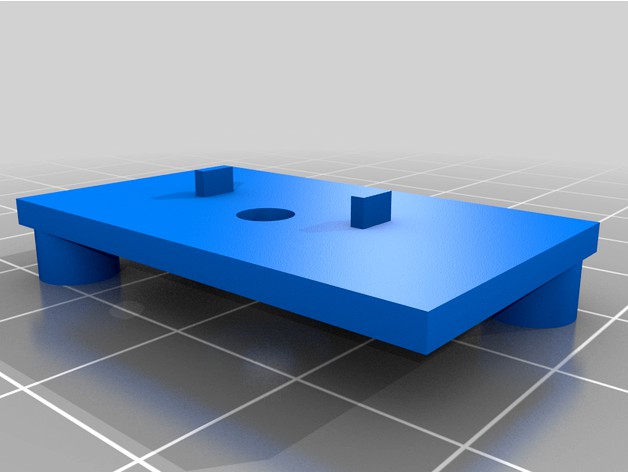
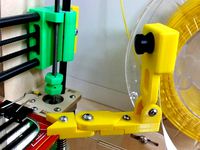
I wanted to mount an RPI in the S8 control box case and power it off of the printer's PSU. I created 2 mounts for this, the first being a mount for the step down converter the next for the RPI itself. I just route the USB cable out to connect it to the controller board USB port. I didn't look, but there may be a way on some boards to connect directly to header pins on the board, but I didn't go that deep. Maybe later.
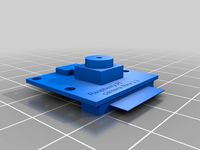
The step down (LM2596) mounts alingside the PSU. There is a notch that holds the orientation. I set it so that I could still adjust the voltage after I mounted it. Since there is little room and the lip of the frame blocks the bottom part I oriented it the way that you see in the picture.
I had it written down, but cannot find it now. If I recall the LM mount uses an M4 x 3mm screw (I used hex socket cap head screws) I believe anything from 2mm up to 6mm long can be used. The shortest I had was 6mm, so that was what I used and there appeared to be sufficient clearance inside of that end of the PSU. The screws to mount the LM2596 to the mount were (2) M3s. I used wood type thread screws, but regular machine screws should also work. Up to 5mm long should work no problem. I believe I used (2) M3 x 5mm.
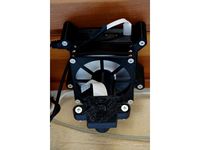
For the RPI mount, I used (2) M4 T-Nuts and M4 x 7mm screws, the mount bracet is thin enough that 6mm long screws should work too. To mount the RPI to the mount I used (4) M2 x 3mm wood thread screws.
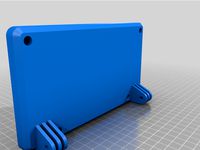
The RPI will not fit in the stock case, you need to use one like this KiNG case: https://www.thingiverse.com/thing:4776922
Although if you wanted you could still mount the LM and run a power line out to the RPI outside of the case and still power it off of the PSU. I did it this way for my CR6 SE.
I also used the activity and shutdown connections for the RPI, so that I could gracefully shut them down from the printer, before powering down the printer (without having to go to the computer to use Octoprint to shutdown the RPI, which of course you can still do)
Safe shutdownhttps://www.sensorsiot.org/raspberry-pi-tricks/
LED Power/Status Indicatorhttps://howchoo.com/g/ytzjyzy4m2e/build-a-simple-raspberry-pi-led-power-status-indicator
I also wired in a power switch for the LM, to be able to completely power down the RPI, so that I could reboot the printer multiple times without constantly powering up/down the RPI, like when updating and testing new firmware, for example.
As always I have included the OpenSCAD files for anyone that wants to modify to better fit their needs.
The step down (LM2596) mounts alingside the PSU. There is a notch that holds the orientation. I set it so that I could still adjust the voltage after I mounted it. Since there is little room and the lip of the frame blocks the bottom part I oriented it the way that you see in the picture.
I had it written down, but cannot find it now. If I recall the LM mount uses an M4 x 3mm screw (I used hex socket cap head screws) I believe anything from 2mm up to 6mm long can be used. The shortest I had was 6mm, so that was what I used and there appeared to be sufficient clearance inside of that end of the PSU. The screws to mount the LM2596 to the mount were (2) M3s. I used wood type thread screws, but regular machine screws should also work. Up to 5mm long should work no problem. I believe I used (2) M3 x 5mm.
For the RPI mount, I used (2) M4 T-Nuts and M4 x 7mm screws, the mount bracet is thin enough that 6mm long screws should work too. To mount the RPI to the mount I used (4) M2 x 3mm wood thread screws.
The RPI will not fit in the stock case, you need to use one like this KiNG case: https://www.thingiverse.com/thing:4776922
Although if you wanted you could still mount the LM and run a power line out to the RPI outside of the case and still power it off of the PSU. I did it this way for my CR6 SE.
I also used the activity and shutdown connections for the RPI, so that I could gracefully shut them down from the printer, before powering down the printer (without having to go to the computer to use Octoprint to shutdown the RPI, which of course you can still do)
Safe shutdownhttps://www.sensorsiot.org/raspberry-pi-tricks/
LED Power/Status Indicatorhttps://howchoo.com/g/ytzjyzy4m2e/build-a-simple-raspberry-pi-led-power-status-indicator
I also wired in a power switch for the LM, to be able to completely power down the RPI, so that I could reboot the printer multiple times without constantly powering up/down the RPI, like when updating and testing new firmware, for example.
As always I have included the OpenSCAD files for anyone that wants to modify to better fit their needs.
Similar models
thingiverse
free

SKR 1.4 Case with 80mm fan by frostin2k
...the mounting pads. for the fan you need m4 bolts with nuts or just use screws (6mm or longer).
edit:
use v4.
removed old designs.
thingiverse
free

Ender 5 PSU mount mod skr E3 Turbo by theatarian
...ant it, you can replace each bold with the original.
printing:
nothing special, no supports. it took about 10 mins on my ender 2.
thingiverse
free

RPi VESA mount by Brubacker
...aterial. the assembly requires some glue and should fit snug around the board.
the raspberry pi cutouts are based on this design.
thingiverse
free

LM 2596 Step Down Module with Case for Mini Kossel by kevinlo
...6 with voltmeter and current meterhttp://cgi.ebay.com/ws/ebayisapi.dll?viewitem&item=181436372912&sspagename=strk:mese:it
thingiverse
free

Google AIY Case by jslick_007
...eds to be connected to the rpi before you press fit the base using the cutouts in the main case and base for the cable to sit in.
thingiverse
free

AM8 12V 30A Power Supply Mount by Thorinair
...ggest using supports for the three psu screw holes.
as usual, i am including the blender source file in case you want to edit it.
thingiverse
free

LM2596 Mount
...ount.
uses two m2.5 x 4mm (or 3mm) screws to mount the module to the mount and two m4 x whatever length you need to hold it down.
thingiverse
free

LM2596 / LM2596S Buck Converter Case with 2020 Mount and Power Switch
...30
enjoy and please let me see your makes.
and of course take care when handling electronic equipment and no warranty whatsoever.
thingiverse
free

LM2596 Step-Down Regulator Mounting Board by TechMav
...mount the board with m3 x 3 screws. the corner holes are 2.5mm for threading, but you may want to adjust the hole size as needed.
thingiverse
free

HE3D K280 PSU Mount by DOTYARMS
...ed holes on the psu. make sure you use short fasteners on the psu so you don't run the bolts into the internals (bzzzzzzt!).
Sparkss
thingiverse
free

Creality CR-6 SE Cable AND PTFE Support (Remix) by Sparkss
...rt for the tube before it enters into the hot end. i have had it running for a couple of weeks now and it is working as expected.
thingiverse
free

S8 Bed Locks by Sparkss
...t over and used supports from the bed only. it was easy to clean off the supports and made for a pretty easy print overall. ymmv.
thingiverse
free

Custgomizable PCB Legs and Standoffs by Sparkss
...round for putting a screw head from underneath, or hexagonal, for inserting a hex nut.
feel free to remix and/or update as needed
thingiverse
free

Customizable PCB Legs and Standoffs by Sparkss
...screenshot i included. i also included a sample stl output and of course the scad file for anyone to use/update/modify as needed.
thingiverse
free

Customizable Wall Mount Cradle by Sparkss
...omizer menu option that was incorrectly labelled in my code. i also uploaded a screenshot of what a 4-hole mount would look like.
thingiverse
free

USB Charger Wall Mount Cradle by Sparkss
...h the only difference between v2 and v4 of this model. that and i slightly changed the vertical placement of the top screw holes.
thingiverse
free

Fully Customizable Case Fan Gril by Sparkss
... am about 30% of the way through printing my grill right now, printing it in clear pla. i will upload a picture when it finishes.
thingiverse
free

Odin-5 F3 Bed Locks by Sparkss
...s time i do not plan to alter/update it myself, but again, the source openscad file is included, so feel free to remix as needed.
thingiverse
free

Muzata LED Channel inserts by Sparkss
... looking at it you can tell the led side being the one with a lip on it. the side for the wire is just "straight/flat".
thingiverse
free

3D Touch v3.2 Cover by Sparkss
...s and to make those holes variable in size, from 1 up to 6 mm, although anything above 3 cannot guarantee to center 100% properly
Lm2596
thingiverse
free

lm2596s
...lm2596s
thingiverse
enjoy 3d priter~^^
thingiverse
free

LM2596S Case
...lm2596s case
thingiverse
lm2596s case with optional hold for ender 3 pro
thingiverse
free

LM2596 Aliexpress
...lm2596 aliexpress
thingiverse
lm2596 from aliexpress, a little bit different in size.
thingiverse
free

LM2596S Gehäuse by windischb
...lm2596s gehäuse by windischb
thingiverse
lm2596s gehäuse
thingiverse
free

LM2596 case by RCChris
...lm2596 case by rcchris
thingiverse
lm2596 raspberry pi
thingiverse
free
LM2596 case by Yeti1994
...lm2596 case by yeti1994
thingiverse
lm2596 case for elettronic applications
thingiverse
free

LM2596 holder by jscottb
...lm2596 holder by jscottb
thingiverse
lm2596 power supply breakout board mount.
thingiverse
free

LM2596 Case by oksaeger
...lm2596 case by oksaeger
thingiverse
case for lm2596 dc-dc buck converter.
thingiverse
free
LM2596 Mount
...ount.
uses two m2.5 x 4mm (or 3mm) screws to mount the module to the mount and two m4 x whatever length you need to hold it down.
thingiverse
free

LM2596 BOX by LordCarvalho
...lm2596 box by lordcarvalho
thingiverse
this is a remix from https://www.thingiverse.com/thing:2629075
fits lm2596 60*40
enjoy
S8
turbosquid
$5

Samsung S8 & S8+
...ree 3d model samsung s8 & s8+ for download as ige and stl on turbosquid: 3d models for games, architecture, videos. (1255318)
turbosquid
$49

Samsung Galaxy S8 and S8+ Plus
...axy s8 and s8 plus (2) for download as 3ds, max, obj, and fbx on turbosquid: 3d models for games, architecture, videos. (1142793)
3d_ocean
$65

Audi S8 2013
...production rigged s8
audi s8 2013 3d model for rendering and animation projects. high poly. excellent structure of model project.
turbosquid
$50

Audi S8
...yalty free 3d model audi s8 for download as 3ds, obj, and fbx on turbosquid: 3d models for games, architecture, videos. (1176575)
turbosquid
$69

Audi S8 2012
...squid
royalty free 3d model audi s8 2012 for download as max on turbosquid: 3d models for games, architecture, videos. (1340816)
turbosquid
$55

Samsung S8 Black
...d
royalty free 3d model samsung s8 black for download as upk on turbosquid: 3d models for games, architecture, videos. (1256809)
turbosquid
$25

Samsung Galaxy S8
...
royalty free 3d model samsung galaxy s8 for download as obj on turbosquid: 3d models for games, architecture, videos. (1144611)
turbosquid
$6

Samsung Galaxy S8
...d
royalty free 3d model samsung galaxy s8 for download as ma on turbosquid: 3d models for games, architecture, videos. (1161462)
3d_export
$15

S8 oriflame 3D Model
...s8 oriflame 3d model
3dexport
rhino nurbs manufacture
s8 oriflame 3d model doxxboloxx 66097 3dexport
3ddd
$1

La Murrina / Ouverture S8
...la murrina / ouverture s8
3ddd
la murrina
la murrina
люстра ouverture s8
диаметр 80 см, высота - 95 см.
Rpi
3d_export
$5
Rasberry PI 3D Model
...rasberry pi 3d model 3dexport rpi model electronics case gadget 3dprinting printing rasberry pi 3d...
thingiverse
free

rpi case by ekinghao
...rpi case by ekinghao
thingiverse
rpi case
thingiverse
free
Rpi Case by sgehman
...rpi case by sgehman
thingiverse
rpi case
thingiverse
free
RPI / RPI-WW Cam Holder by TobyTetzi123
...spberry-pi-rpi-wwcam/p/30037327
regards toby
edit:
4th. picture shows rpi-ww cam
5th. picture shows rpi cam
at the same position.
thingiverse
free

rpi by Jylehr
...rpi by jylehr
thingiverse
a rack
thingiverse
free
RPi Camera 5MP v1.3
...rpi camera 5mp v1.3
thingiverse
rpi camera 5mp v1.3
thingiverse
free
RPi Tower Stand by shri3k
...rpi tower stand by shri3k
thingiverse
a minimal tower mount for rpi.
tested with rpi4
thingiverse
free
RPi Fan Cam by Edd77
...rpi fan cam by edd77
thingiverse
rpi fan camhttps://www.thingiverse.com/thing:2835318
thingiverse
free
RPi screen back by audiofreak9
...rpi screen back by audiofreak9
thingiverse
from mcm electronics, this is a back for the rpi screen
thingiverse
free

KIS-RPI 234 (mount for rack) by legalized
...its for rpi 2, rpi 3, rpi 4
drill holes for fittings or modify the thing so it works for you.. this can also be used as a stand..
Internal
3ddd
$1

Quorum International
... international
3ddd
florence , quorum international
люстра quorum international florence
3d_export
$5

internal door
...internal door
3dexport
internal door
turbosquid
$40

international
... available on turbo squid, the world's leading provider of digital 3d models for visualization, films, television, and games.
3ddd
$1

Lamp International
...ernational
3ddd
lamp international
в файле содержится два светильника от lamp international - люстра арт. 2034/f9 и бра арт. 2026
3ddd
$1

VACCARI INTERNATIONAL
... овальное
производитель vaccari international
серия verona
длина 90, глубина 4,5, высота 70
3ddd
$1

Торшер / Lamp International
...торшер / lamp international
3ddd
lamp international
фабрика lamp international (италия).коллекция siena, арт.3452.
turbosquid
$99

International Soldier
...yalty free 3d model international soldier for download as max on turbosquid: 3d models for games, architecture, videos. (1556764)
turbosquid
$5

Internal door
...id
royalty free 3d model internal door for download as blend on turbosquid: 3d models for games, architecture, videos. (1691264)
3ddd
$1

International Italia 8100
...international italia 8100
3ddd
international italia
люстра lamp international italia 8100 с текстурами и материалами v-ray
turbosquid
$79

International Loadstar
...model international loadstar for download as ma, fbx, and obj on turbosquid: 3d models for games, architecture, videos. (1678922)
Mount
3d_export
free

mounting bracket
...mounting plate is the portion of a hinge that attaches to the wood. mounting plates can be used indoors, cabinetry and furniture.
turbosquid
$2

MOUNTING
... available on turbo squid, the world's leading provider of digital 3d models for visualization, films, television, and games.
turbosquid
free

Mounts
... available on turbo squid, the world's leading provider of digital 3d models for visualization, films, television, and games.
turbosquid
free

Mount Fuji
...fuji
turbosquid
free 3d model mount fuji for download as obj on turbosquid: 3d models for games, architecture, videos. (1579977)
3d_export
$5

Headphone mount LR
...headphone mount lr
3dexport
headphone mount l+r
turbosquid
$39

Mount rainier
...quid
royalty free 3d model mount rainier for download as fbx on turbosquid: 3d models for games, architecture, videos. (1492586)
turbosquid
$5

pipe mounting
...quid
royalty free 3d model pipe mounting for download as obj on turbosquid: 3d models for games, architecture, videos. (1293744)
turbosquid
$3

Mounting Tires
...uid
royalty free 3d model mounting tires for download as fbx on turbosquid: 3d models for games, architecture, videos. (1708511)
3d_export
$5

Magnetic GoPro Mount
...pro mount
3dexport
cool magnetic mount for gopro. allows you to mount the camera on flat metal surfaces and get exclusive shots.
turbosquid
$5

Stone Mount
...ty free 3d model stone mount for download as ma, obj, and fbx on turbosquid: 3d models for games, architecture, videos. (1370306)