Thingiverse
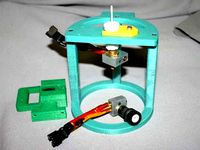
S3DP KORE Hotend by Syracuse3DPrinting
by Thingiverse
Last crawled date: 3 years, 4 months ago
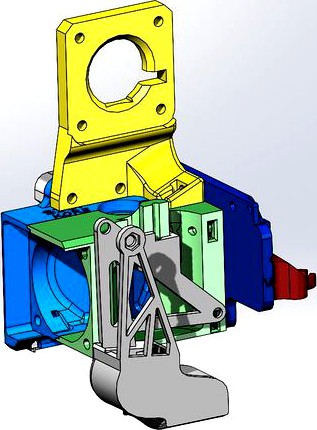
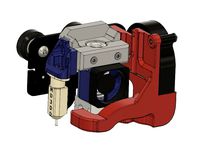
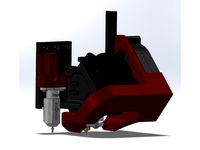
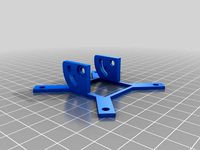
S3DP KORE V1 Beta
Simple, Robust, Universal, Expandable
Designed for High Heat Applications on Creality Printers
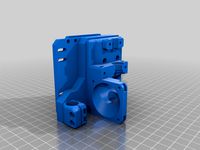
E3Dv6 Style Hotend Mount Version 1.0
www.Syracuse3DPrinting.com
Mounts for more printers coming soonNote this release is currently in testing
Compatible Printers:
Ender 3/Ender 3 Pro
CR10/CR10 V2*/CR10S
Ender 5/Ender 5 Pro/Ender 5 Plus(Pending Testing)
*Fully Plug 'n' Play with CR10-V2 OE Hotend and Fans
Compatible Hotends
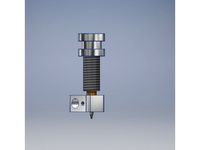
Fits most Cylindrical Heatsink "E3D" style hotends, including:
E3Dv6 - All Metal, Lite, or Clone
E3Dv6 - Volcano or Clone
CR10v2 OE Hotend (Mk10 Hybrid with E3Dv6 style heatsink)
Files & Contents:
S3DPKOREv1.0.stl
Rear Shell
Front Shell
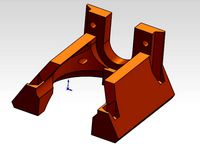
CR10-V2 Mount
Ender 3/5/CR10 Mount
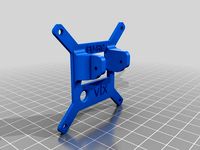
KOREABLv1.0.stl (Optional)
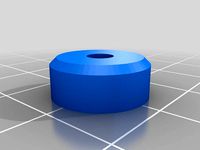
ABL Mounting Adapter Plate
BLTouch Adapter
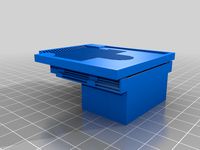
KOREPARTCOOLINGv1.0.stl
5015 Cooling Duct
5015 Fan Mount
KOREDRIVEv1.0.stl Beta(Optional - Requires KOREABL for use)
Direct Drive Adapter Plate
BUCKCONV MOUNT.stl
For use with S3DP Fan Control Module
Recommended Print Material: Polymax-PC
Hotend Temperature: 270C
Bed: 100-115C
Part Cooling Fan: Off
Support: None
Perimeters: 2
Top Solid Layers: 6
Bottom Solid Layers: 6
Layer Height: .15-.2
Infill: 65%+
Bed Adhesion: 5mm Brim + NANO Polymer Adhesive, Magigoo PC, or similar bed adhesive
Speed: Max 50mm/section
Alternate Print Materials: PETG, ABS, etc.
Some parts may be printed with PLA/PLA+, but note the tolerances of this piece were designed with engineering grade materials in mind.
Hardware:
The following represents the hardware needed for multiple configurations. You will likely not need all of the hardware listed.
You may need different sized hardware based on the equipment you're using, and also may be able to re-use factory hardware.
It is highly recommended to purchase a comprehensive kit of metric hex bolts, nuts, and washers.M2, M3, M4 Button Head Hex Screws: https://amzn.to/3iUR5x0M2, M3, M4, M5 Flat Head Hex Screws: https://amzn.to/3hTPbf1M3 Square Nuts: https://amzn.to/3mI8ADcM4 Square Nuts: https://amzn.to/33SY82S
[Note: Square nuts generally come in 2 thicknesses, this part is designed to use the thinner variant]
M3 Square Nuts (2mm Thickness): x13
M4 Square Nuts (2mm Thickness): x2
M3 Hex Nuts: x8
M3 x 16mm Flat Head Bolts: x8
M3 x 20mm Flat Head Bolts: x4
M3 x 16mm Button or Socket Head Bolts: x14
M4 x 30mm Flat, Button, or Socket Head Bolts: x2
M3 x 25mm Flathead Bolts: x3
M3 x 10mm Button or Socket Head Bolts: x2
Single Fan Cooling Mode: 1x 4010/4020 40mm Cooling Fan - 1x 5015 Part Cooling Fan
Install fans into appropriate locations on the S3DP mount and print your favorite cooling fan cover.
CR10-V2 Notes:
Existing fans, hardware, and fan cover can be re-used.
Dual Cooling Fan Mode (WITHOUT S3DP KORE Command Module):
Remove OE cooling fan
Install (2) 4010 or 4020 Cooling fans on either side of the mount as indicated (Fans should be similar specifications)
Fans should be installed in opposite directions (One push, One pull) to flow air over the hotend heatsink
Wire pans in parallel and connect to the factory fan wiring. For best results, use solder and heatshrink for connections.
Dual Cooling Fan Mode (WITH S3DP KORE Command Module):
Remove OE cooling fan
Cut connections to OE Fan close to fan and connect wires to corresponding location on S3DP Fan Control Module
Install (2) 4010 or 4020 Cooling fans on either side of the mount as indicated (Fans should be similar specification).
12V Noctua or similar fans can be used if a buck converter is fitted to the Control Module.
Fans should be installed in opposite directions (One push, One pull) to flow air over the hotend heatsink
Connect fans to the S3DP Fan Control Module using the supplied connectors. Verify polarity per instructions provided with the control module.
Part Cooling Fan:
Use OE or other 5015 Blower Fan installed per the diagram, and adjust height to match nozzle height.
When height is set, use M3x25mm Bolt inserted from the top of the slider mount to secure the location.
Assembly instructions
Remove factory hotend mount and hardware
Remove brim, and deburr part as necessary.
Use a small screwdriver or drill bit as needed to clear any stringing from bolt holes and nut recesses.
Insert M3 and M4 square nuts throughout parts as needed before assembly.
M3 nuts indicated by hexagonal holes may need to be heat-set depending on print results.
Hotend may be mounted into the assembly before OR after unit is mounted to the X-Gantry, but it is recommended to install the clamshell assembly in one piece for easier routing of wiring.
For CR10-V2 (Using CR10-V2 Mounting Bracket)
Use 3x M3x16 Socket or Button Head Bolts to secure the assembly to the X-Gantry using the factory mounting holes, from the rear.
Bolts should go through the mounting bracket and into the captured square nuts.
[Optional] Use an M3 x 10 Button/Socket head bolt to secure the top left ear to the captured M3 hex nut in the mounting bracket.
Make sure unit is level to bed before tightening.
For Ender 3/5/CR10 Style: (Using Ender 3 Mounting Bracket)
First mount the Ender3 mounting bracket to the X-gantry using M3 x 10 Flathead bolts into the factory heat-shield mounting locations.
Assembly should locate onto original hotend bosses, but no hardware is used here.
Use 2x M3 x 10 Button/Socket head bolt to secure the top ears to the captured M3 hex nuts in the mounting bracket.
Use 2x M3 x 10 Taper head bolts to secure the bottom of the mounting bracket to the captured M3 Square nuts in the back of the clamshell (From the rear)
ABL/BLTouch Installation
*Due to the low profile adjustable mounting system, it is highly recommended to print this part from an engineering grade material like PC
BLTouch Mounting Plate installs on the right side of the hot end, with or without secondary cooling fan.
For BLTouch, use 2x M3 nuts inserted into the top of the mount. Attach the BLTouch using 2x M3 x 10mm Button/Socket head bolts from the bottom.
Carefully slide the BLTouch adapter onto the mounting plate.
Move the slider until preset holes are aligned
"V" hole is for Volcano style hotend. Other hole is for standard hotend.
Secure the slide using a single M2 bolt or set screw once aligned.
If not using pre-set alignments, use a single M3x20mm bolt from the top to secure the slide anywhere along the range.
BLTouch Offsets: (Distance to Nozzle)
X-Axis: + 39.5mm
Y-Axis: - 37.2mm
For Direct Drive Installation: (Using Direct Drive Mounting Bracket)
This bracket re-uses the factory extruder and stepper motor to allow you to modify your printer for direct-drive extrusion.
You may opt to use an upgraded aluminum, or aluminum dual-gear extruder meant for an Ender 3/CR10 printer.
You may also opt to use a smaller pancake-style stepper motor
This bracket must be used in conjunction with the ABL Mounting bracket. (ABL is not necessary)
Place the bracket on the top of the completed assembly and secure using 3x M3 x 16 Button/Socket head bolts. 2 bolts to the top ears, and 1 to the ABL mounting bracket. Washers are recommended.
Use a small piece of bowden tubing to fill the gap between the fittings. The length of this may vary depending on extruder design.
Secure the extruder and stepper motor together onto the mounting plate using 4x M3 x 16 bolts. Longer bolts may be needed depending on extruder design.
Re-route or extend extruder wiring to the new extruder location.
Make appropriate adjustments in the printer firmware and slicer as needed for the change to direct drive.
The new assembly will be heavier with the extruder on the gantry. Acceleration and speeds should be de-rated to compensate.
Retraction should be adjusted for direct drive to <1mm, but this may need fine tuning.
If changing the extruder gear size, be sure to calibrate the extruder E-steps.
For additional support, visit the Thingiverse page at Syracuse3DPrinting, or www.Syracuse3DPrinting.com
All modifications are to be done at your own risk.
Simple, Robust, Universal, Expandable
Designed for High Heat Applications on Creality Printers
E3Dv6 Style Hotend Mount Version 1.0
www.Syracuse3DPrinting.com
Mounts for more printers coming soonNote this release is currently in testing
Compatible Printers:
Ender 3/Ender 3 Pro
CR10/CR10 V2*/CR10S
Ender 5/Ender 5 Pro/Ender 5 Plus(Pending Testing)
*Fully Plug 'n' Play with CR10-V2 OE Hotend and Fans
Compatible Hotends
Fits most Cylindrical Heatsink "E3D" style hotends, including:
E3Dv6 - All Metal, Lite, or Clone
E3Dv6 - Volcano or Clone
CR10v2 OE Hotend (Mk10 Hybrid with E3Dv6 style heatsink)
Files & Contents:
S3DPKOREv1.0.stl
Rear Shell
Front Shell
CR10-V2 Mount
Ender 3/5/CR10 Mount
KOREABLv1.0.stl (Optional)
ABL Mounting Adapter Plate
BLTouch Adapter
KOREPARTCOOLINGv1.0.stl
5015 Cooling Duct
5015 Fan Mount
KOREDRIVEv1.0.stl Beta(Optional - Requires KOREABL for use)
Direct Drive Adapter Plate
BUCKCONV MOUNT.stl
For use with S3DP Fan Control Module
Recommended Print Material: Polymax-PC
Hotend Temperature: 270C
Bed: 100-115C
Part Cooling Fan: Off
Support: None
Perimeters: 2
Top Solid Layers: 6
Bottom Solid Layers: 6
Layer Height: .15-.2
Infill: 65%+
Bed Adhesion: 5mm Brim + NANO Polymer Adhesive, Magigoo PC, or similar bed adhesive
Speed: Max 50mm/section
Alternate Print Materials: PETG, ABS, etc.
Some parts may be printed with PLA/PLA+, but note the tolerances of this piece were designed with engineering grade materials in mind.
Hardware:
The following represents the hardware needed for multiple configurations. You will likely not need all of the hardware listed.
You may need different sized hardware based on the equipment you're using, and also may be able to re-use factory hardware.
It is highly recommended to purchase a comprehensive kit of metric hex bolts, nuts, and washers.M2, M3, M4 Button Head Hex Screws: https://amzn.to/3iUR5x0M2, M3, M4, M5 Flat Head Hex Screws: https://amzn.to/3hTPbf1M3 Square Nuts: https://amzn.to/3mI8ADcM4 Square Nuts: https://amzn.to/33SY82S
[Note: Square nuts generally come in 2 thicknesses, this part is designed to use the thinner variant]
M3 Square Nuts (2mm Thickness): x13
M4 Square Nuts (2mm Thickness): x2
M3 Hex Nuts: x8
M3 x 16mm Flat Head Bolts: x8
M3 x 20mm Flat Head Bolts: x4
M3 x 16mm Button or Socket Head Bolts: x14
M4 x 30mm Flat, Button, or Socket Head Bolts: x2
M3 x 25mm Flathead Bolts: x3
M3 x 10mm Button or Socket Head Bolts: x2
Single Fan Cooling Mode: 1x 4010/4020 40mm Cooling Fan - 1x 5015 Part Cooling Fan
Install fans into appropriate locations on the S3DP mount and print your favorite cooling fan cover.
CR10-V2 Notes:
Existing fans, hardware, and fan cover can be re-used.
Dual Cooling Fan Mode (WITHOUT S3DP KORE Command Module):
Remove OE cooling fan
Install (2) 4010 or 4020 Cooling fans on either side of the mount as indicated (Fans should be similar specifications)
Fans should be installed in opposite directions (One push, One pull) to flow air over the hotend heatsink
Wire pans in parallel and connect to the factory fan wiring. For best results, use solder and heatshrink for connections.
Dual Cooling Fan Mode (WITH S3DP KORE Command Module):
Remove OE cooling fan
Cut connections to OE Fan close to fan and connect wires to corresponding location on S3DP Fan Control Module
Install (2) 4010 or 4020 Cooling fans on either side of the mount as indicated (Fans should be similar specification).
12V Noctua or similar fans can be used if a buck converter is fitted to the Control Module.
Fans should be installed in opposite directions (One push, One pull) to flow air over the hotend heatsink
Connect fans to the S3DP Fan Control Module using the supplied connectors. Verify polarity per instructions provided with the control module.
Part Cooling Fan:
Use OE or other 5015 Blower Fan installed per the diagram, and adjust height to match nozzle height.
When height is set, use M3x25mm Bolt inserted from the top of the slider mount to secure the location.
Assembly instructions
Remove factory hotend mount and hardware
Remove brim, and deburr part as necessary.
Use a small screwdriver or drill bit as needed to clear any stringing from bolt holes and nut recesses.
Insert M3 and M4 square nuts throughout parts as needed before assembly.
M3 nuts indicated by hexagonal holes may need to be heat-set depending on print results.
Hotend may be mounted into the assembly before OR after unit is mounted to the X-Gantry, but it is recommended to install the clamshell assembly in one piece for easier routing of wiring.
For CR10-V2 (Using CR10-V2 Mounting Bracket)
Use 3x M3x16 Socket or Button Head Bolts to secure the assembly to the X-Gantry using the factory mounting holes, from the rear.
Bolts should go through the mounting bracket and into the captured square nuts.
[Optional] Use an M3 x 10 Button/Socket head bolt to secure the top left ear to the captured M3 hex nut in the mounting bracket.
Make sure unit is level to bed before tightening.
For Ender 3/5/CR10 Style: (Using Ender 3 Mounting Bracket)
First mount the Ender3 mounting bracket to the X-gantry using M3 x 10 Flathead bolts into the factory heat-shield mounting locations.
Assembly should locate onto original hotend bosses, but no hardware is used here.
Use 2x M3 x 10 Button/Socket head bolt to secure the top ears to the captured M3 hex nuts in the mounting bracket.
Use 2x M3 x 10 Taper head bolts to secure the bottom of the mounting bracket to the captured M3 Square nuts in the back of the clamshell (From the rear)
ABL/BLTouch Installation
*Due to the low profile adjustable mounting system, it is highly recommended to print this part from an engineering grade material like PC
BLTouch Mounting Plate installs on the right side of the hot end, with or without secondary cooling fan.
For BLTouch, use 2x M3 nuts inserted into the top of the mount. Attach the BLTouch using 2x M3 x 10mm Button/Socket head bolts from the bottom.
Carefully slide the BLTouch adapter onto the mounting plate.
Move the slider until preset holes are aligned
"V" hole is for Volcano style hotend. Other hole is for standard hotend.
Secure the slide using a single M2 bolt or set screw once aligned.
If not using pre-set alignments, use a single M3x20mm bolt from the top to secure the slide anywhere along the range.
BLTouch Offsets: (Distance to Nozzle)
X-Axis: + 39.5mm
Y-Axis: - 37.2mm
For Direct Drive Installation: (Using Direct Drive Mounting Bracket)
This bracket re-uses the factory extruder and stepper motor to allow you to modify your printer for direct-drive extrusion.
You may opt to use an upgraded aluminum, or aluminum dual-gear extruder meant for an Ender 3/CR10 printer.
You may also opt to use a smaller pancake-style stepper motor
This bracket must be used in conjunction with the ABL Mounting bracket. (ABL is not necessary)
Place the bracket on the top of the completed assembly and secure using 3x M3 x 16 Button/Socket head bolts. 2 bolts to the top ears, and 1 to the ABL mounting bracket. Washers are recommended.
Use a small piece of bowden tubing to fill the gap between the fittings. The length of this may vary depending on extruder design.
Secure the extruder and stepper motor together onto the mounting plate using 4x M3 x 16 bolts. Longer bolts may be needed depending on extruder design.
Re-route or extend extruder wiring to the new extruder location.
Make appropriate adjustments in the printer firmware and slicer as needed for the change to direct drive.
The new assembly will be heavier with the extruder on the gantry. Acceleration and speeds should be de-rated to compensate.
Retraction should be adjusted for direct drive to <1mm, but this may need fine tuning.
If changing the extruder gear size, be sure to calibrate the extruder E-steps.
For additional support, visit the Thingiverse page at Syracuse3DPrinting, or www.Syracuse3DPrinting.com
All modifications are to be done at your own risk.
Similar models
thingiverse
free

Ender 5 Micro-Swiss Direct drive and DyzeEnd X mount by Luhrks
...ews and nuts for the part cooling fan, as well as the hotend clamp.
original fang here: https://www.thingiverse.com/thing:3091560
thingiverse
free
Creality CR10/ Ender2/ Ender3/ Ender5 V6 Hotend Mount and Part Cooling Duct
...be fine.
the underside of the duct should be positioned 1-2mm above the tip of the nozzle.
bltouch offsets are, x -34.6mm, y 0mm
thingiverse
free

ExoSlide Bowden E3d V6 and BLTouch Mount V1
... (to secure bltouch)
x4 m3x16mm socket head (40x10mm fan mounting)
x6 m3x12mm socket flat head (to secure cover and cooling duct)
thingiverse
free

Ender 3 Dual Extruder - Hotend 2 in 1 ( ZSYong BigTreeTech )
...riginal hotend
secure the bracket with cap e two 3x8 mm countersunk head screws.
install the 2in1 hotend with two 3x25 mm screws.
thingiverse
free

Creality Direct Drive Stock Extruder/ V6 Hotend with BLTouch
...x 15mm socket head screw
4off m3 x 12mm socket head screw
1off m3 x 20mm socket head screw
3off m3 x 25mm socket head screw
thingiverse
free
CR10 / Ender 3 NF-Crazy+ Hotend mount & Part Cooling by sportivo_jam
...is design: https://www.thingiverse.com/thing:3466809
you will need an m3 insert screw to fix the fan shroud to the hot-end mount.
thingiverse
free

Biqu H2 Mount CR10-S Pro v2 by Mike_N
... in pla except for the duct which was done with petg.
i used the fan duct from fhogphil https://www.thingiverse.com/thing:4789656
thingiverse
free

CR10 Max+BL - Nova Mount by jasonfjh23
...t was to place the nova nozzle at the same location as the stock creality nozzle.
bl touch offsets:
x: -41.65mm
y: -4.75mm
z: 2mm
thingiverse
free

Micro Swiss DD Adapter for Ender 3 Max with BLtouch by holmes4
...will need two additional m3 nuts and m3x6 (or longer) bolts. also, the probe offsets in marlin need to be changed. to x-53, y+11.
thingiverse
free

Direct Drive X Carriage Mount i3 BMG BLTouch by 3dsmitty
...sticks out.
overall the whole bracket is very sturdy. included is the freecad file if you would like to modify it to your liking.
Kore
turbosquid
free

Kore dressed in chiton and cape (epiblema)
... available on turbo squid, the world's leading provider of digital 3d models for visualization, films, television, and games.
thingiverse
free

Kore 5.5inch drone by TW1NSCR3W_fpv
...e 5.5inch drone by tw1nscr3w_fpv
thingiverse
this is a remake of the kore v2 5.5inch drone i attempted as requested by a friend.
thingiverse
free

KORE ESSENTIALS BELT HANGER by PewRican
...se
this is a modified version of the kore essentials hanger, it includes a hook for the velcro holder that comes with the belts.
thingiverse
free
FU-RC Kore frame hole plugs by snodgrass23
...ides and rear of the fu-rc kore frame. there is a blank plug and one with a slot for the power wires and holes for antenna tubes.
thingiverse
free
FU-RC Kore camera mount by prest0n1337
... i have not printed and checked the fit. so if you use this please let me know how it fit or make and post the correction thanks.
thingiverse
free

FURC Kore Micro Cam Mount by Frizzle101101
... i did this for the runcam eagle so i could mount it better and get an angle of 55-65 degrees. maybe you can rip as hard as i do!
thingiverse
free
FU-RC Kore Micro Camera Bracket by Sekker
...ro fpv camera with the fu-rc kore and k-hole frames. it also has a shelf designed to take a normal unify pro or a unify nano vtx.
thingiverse
free

Acropolis Kore 678 by CosmoWenman
...their expertise and for operating the equipment.
and thanks to autodesk’s reality capture division, who sponsored this project.
thingiverse
free

1/64 MISC Reliant Kore by Motocompo
...s. will see those benefits on later models. print the stl's and laser cut the pdf's! pdf's include qty correct parts.
thingiverse
free

Kore dressed in chiton and cape (epiblema) by smkmuseum
... 3d models go to: www.smk.dk/3d
if you produce new work with the model and want to share it with us, drop us a line at web@smk.dk
Hotend
thingiverse
free
hotend by fablab_lueneburg
...hotend by fablab_lueneburg
thingiverse
hotend model
thingiverse
free
Hotend for Graber
...hotend for graber
thingiverse
hotend complement pastes for graber printerhttps://youtu.be/0koxhnsuhdy
thingiverse
free
Hotend adapter by antaviana
...hotend adapter by antaviana
thingiverse
hotend adapter
thingiverse
free
hotend fan by mming1106
...hotend fan by mming1106
thingiverse
hotend fan
thingiverse
free

Hotend schema by ione
...hotend schema by ione
thingiverse
hotend project schema
thingiverse
free
Fabtotum XY Hotend holder for E3D Hotend
...s with integrated supports.
more for the project you can see here: https://kf-designs.com/2019/09/07/fabtotum-printer-conversion/
thingiverse
free
HotEnd Stand by onepointdiy
...tend, when you make your new hotend or repair your j-head or mg-plus hotend.
the hole of 16mm, please adjust using a reamer, etc.
thingiverse
free

fast magnetic hotend changer for Chimera Hotend by Draman
...chimera hotend !
and new basis (the hole from original is to small)
it is a remix form skimmy's fast magnetic hotend changer
thingiverse
free

Hotend Fan Adapter for MicroSwiss All Metal Hotend by jo_schi_man
...
thingiverse
little change for the hotend fan adapter to hold the microswiss all metal hotend (slightly longer and sharp edges).
thingiverse
free
Merlin Hotend by Alejanson
...merlin hotend by alejanson
thingiverse
this is a 1:1 drawing of the classic merlin hotend.