Thingiverse

Rostock Max V2 E3D V6 Ultimate layer fan shroud by HJ3D
by Thingiverse
Last crawled date: 3 years ago
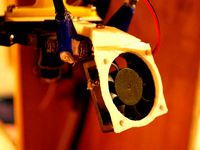
This cooling rig dramatically increased my print quality. I can now print overhangs over 45 degrees cleanly and consistently.
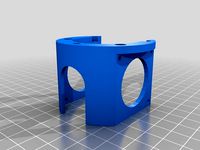
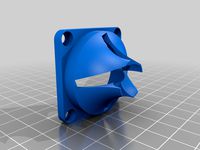
As you can see in the CFD simulation, the 3 air ducts channel the air exactly down the center. This maximizes the cooling of the printed section. This effect can clearly be felt on the actual printer.
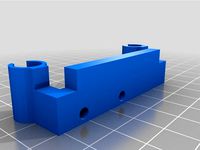
Installing the E3D V6 on the Rostock max is easy, but thanks to its compact design it's hard to fit a layer fan. I've tried about 10 different shroud designs, fans etcetera and found that either they didn't fit, or they would not blow in the right direction. Finally decided to design my own cooling rig.
I've edited the layerfan shroud design by dreyfusduke to fit the E3D V6 with the effector plate either inverted or normal. It cools the prints instantly, but when using 3 50x10 radial fans the fan speed setting should not exceed 70% or nozzle temperature will drop dramatically.
You can now easily tune the cooling to your needs. Either remove all fans for maximum print speed, use just one for medium overhangs, or use three for maximum cooling for the most complicated prints.
The original part by dreyfusduke can be found here:http://www.thingiverse.com/thing:614597
-- Update --
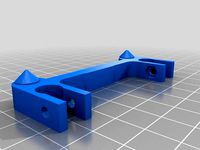
With the original Rostock V2 U-joints, these shrouds need some sanding/cutting to create enough clearance with the U-joints.
I now have the new SeeMeCNC ball-joint upgrade with the new effector plate, and these shrouds still work great with the new design!
As you can see in the CFD simulation, the 3 air ducts channel the air exactly down the center. This maximizes the cooling of the printed section. This effect can clearly be felt on the actual printer.
Installing the E3D V6 on the Rostock max is easy, but thanks to its compact design it's hard to fit a layer fan. I've tried about 10 different shroud designs, fans etcetera and found that either they didn't fit, or they would not blow in the right direction. Finally decided to design my own cooling rig.
I've edited the layerfan shroud design by dreyfusduke to fit the E3D V6 with the effector plate either inverted or normal. It cools the prints instantly, but when using 3 50x10 radial fans the fan speed setting should not exceed 70% or nozzle temperature will drop dramatically.
You can now easily tune the cooling to your needs. Either remove all fans for maximum print speed, use just one for medium overhangs, or use three for maximum cooling for the most complicated prints.
The original part by dreyfusduke can be found here:http://www.thingiverse.com/thing:614597
-- Update --
With the original Rostock V2 U-joints, these shrouds need some sanding/cutting to create enough clearance with the U-joints.
I now have the new SeeMeCNC ball-joint upgrade with the new effector plate, and these shrouds still work great with the new design!
Similar models
thingiverse
free

E3D v6 PEEK Shroud for Rostock Max v2 by thlycanthrope
...model to mount the e3d v6. however, i kept the existing metal stands instead of printing the new ones.http://repables.com/r/338/
thingiverse
free

Stock Rostock Max V2 Effector Platform - Fan Shroud Combo by gmodder1
...ate the stock, injection molded u-joint effector arms. the retainer clips also needed to be redone to not strike the fan shrouds.
thingiverse
free

Hot End Mount for E3D v6 on Rostock Max V2 by rspoering
...mount for the e3d and the flex3drive extruder. this will mount the e3d v6 and fan to the stock rostock max v2 effector platform.
thingiverse
free

Fan Shroud for HE280 Hot End by IdeaBeansNZ
...upgrades. i've designed them for my own rmv2 so i can get more localised cooling on the smaller prints with tricky overhangs.
thingiverse
free

Chimera Layer Fan Shroud by Cutlass
...d.
there is enough clearance for a dual volcano, cyclops, or dual v6 print head.
this shroud will fit the original layer fan.
thingiverse
free

Rostock Max V2 layer fan shroud for use with E3D and light ring by naarok
... the trick laser led light ring. this shroud has a low enough profile to fit nicely.
including the .scad file so others can play.
thingiverse
free

One piece, e3d v6 Kossel Effector for magnetic rod ends by MortarArt
...oling. i'd honestly love to tidy this one up and print it better, but this one works with some cleanup.
printed in solid abs.
thingiverse
free

Monoprice Mini E3D v6 fan shroud with Dii Cooler by chevyfried
...ww.thingiverse.com/thing:2345316). it isn't pretty, but it will print without supports as long as you have adequate cooling.
thingiverse
free

E3D V6 Kossel Fan shroud by elmuchacho
... note: you'll still need to change the effector as the e3d is slightly bigger than the j-head for this view my other listing.
thingiverse
free

Kossel_Effector by yngbra94
...r cooling the hot end, and the two others is for cooling the filament when printing.
this effector will improve overhang printing
Hj3D
thingiverse
free

Handy bathroom hooks by HJ3D
...g which makes them almost invisible on the white radiator.
these babies can hold up to 20kg (theoretically).
happy toweling! hj3d
thingiverse
free

Wesco Kickmaster Replacement Pedal by HJ3D
...r other tough material and save a lot of cash.
requires 2x m4x12mm socket head cap screws,2x m4 nuts and 2x m4 rings.
enjoy! hj3d
thingiverse
free

Skateboard Skis WIP by HJ3D
...can still rotate.
tomorrow the snow is coming, print these tonight and enjoy snowboarding tomorrow.
test results are coming soon.
thingiverse
free

Logitech G940 Joystick Gimbal replacement by HJ3D
...strong nylon filament.
(pictures show a slightly older version, the final version is mounted in the joystick)
happy flying! hj3d
thingiverse
free

Funny Toilet Sign with background by HJ3D
...or. the first 1.00mm can be printed in a color, then the filament color can be changed for a great looking toilet sign. have fun!
thingiverse
free

Paragliding Brake Toggle Pro-grip by HJ3D
...uld never go without them, they improve the brake feedback significantly, increasing your control precision and therefore safety.
thingiverse
free

Slim profile scope mounts by HJ3D
... a few days.
list of non-printed parts:
2 - m5x30 mm socket head cap screws
2 - m5 nuts
2 - m4x10 mm shcs
2 - m4 nuts
enjoy! hj3d
thingiverse
free

Shrinkage and Accuracy Calibration Object by HJ3D
...meter 10mm & 20mm
outer diameter 40mm
vertical:
total height 40mm
half height 20mm
square 10x10mm
inner diameter 10mm
enjoy!
thingiverse
free

Rostock Max Large Spool holder by HJ3D
...d m8x160mm
1 washer m8
2 self-locking nuts/nylocs, or 4 normal nuts
1 piece of min 100mm long 1.75mm filament
the 2 printed files
thingiverse
free

Prusa Mk2 IKEA Dioder rear mount by HJ3D
...d the center of the build plate location. the 004 spreadlight version spreads the light distribution over the entire build plate.
Rostock
thingiverse
free
Endstop for Rostock by Raz0neR
...endstop for rostock by raz0ner
thingiverse
endstop for rostock.
thingiverse
free

Rostock Cooling by nobicore
...rostock cooling by nobicore
thingiverse
rostock cooling
thingiverse
free
ROSTOCK PARTS by OC3D
...rostock parts by oc3d
thingiverse
parts for our modified rostock extruder assembly
thingiverse
free
Rostock squirrel fan by MarioPanic
...rostock squirrel fan by mariopanic
thingiverse
rostock squirrel fan
thingiverse
free

FC Hansa Rostock by ron86
...fc hansa rostock by ron86
thingiverse
fc hans rostock logo
thingiverse
free

rostock mini carriage by cjol
...rostock mini carriage by cjol
thingiverse
carriage for my rostock mini project
thingiverse
free

Rostock and Rostock Mini Dual Extruder Mount by westonshakespear
...ht.
sorry about the pictures, my filament jammed for part of the print and i am waiting for a new part to print a better version.
thingiverse
free

Rostock mini clip by Scott_Chen
...rostock mini clip by scott_chen
thingiverse
rostock mini clip for printer base glass
thingiverse
free
Rostock Board holder by drewan
...rostock board holder by drewan
thingiverse
this is a clip for using a rostock board as a print surface.
thingiverse
free
Rostock Fan Bracket by ImprisonedByTime
...rostock fan bracket by imprisonedbytime
thingiverse
this bracket is for a 40mm fan to attach to the rostock 3d printer
Shroud
3d_export
$500

Centrifugal pump volute casing with impeller
...casing with impeller 3dexport volute casing with impeller and shroud ...
3d_export
$35
The Holy Face base relief 3D Model
...the holy face base relief 3d model 3dexport shroud turin veronica veronica's veil gospel ikon jesus holy face...
3d_export
$20
present car cloth presentation transport transportation shape concepts show celebration cover showro
...transportation shape concepts show celebration cover showroom covered revealin shroudd cover covering tarp draped fabric cloth showroom reveal revealing...
3d_export
$5

Lockheed F-117 Nighthawk lowpoly stealth bomber
...initial operating capability status in 1983. the aircraft was shroudd in secrecy until it was revealed to the public...
3d_export
$49
kriss vector gen 2 sub-d
...rear flip sight.<br>- vector ejection port.<br>- vector crb square shroud / 16"" sliencer.<br>- ds150 stock.<br>- .ma (maya 2020 ascii)<br>-...
3d_export
$10

vichy dining table
...in oak, sycamore and walnut marquetry.<br>even if the restaurant shroud the vichy in a long table cloth, two slender...
3d_export
$500

us navy pcu sterett ddg-104 arleigh burke class destroyer flight iia max
...the position has been shifted.<br>q. where are the exhaust shroud for the stacks?<br>a. since ddg-89, the exhaust system was...
thingiverse
free

shroud by samshay317
...shroud by samshay317
thingiverse
shroud
thingiverse
free

Fan Shroud
...fan shroud
thingiverse
this is a fan shroud for a 140mm fan
thingiverse
free
40mm fan shroud
...40mm fan shroud
thingiverse
40mm fan shroud
Ultimate
turbosquid
$3
Ultimate Grave
...model ultimate grave for download as blend, obj, stl, and fbx on turbosquid: 3d models for games, architecture, videos. (1636144)
turbosquid
$79

ULTIMATE GIRAFFE
... available on turbo squid, the world's leading provider of digital 3d models for visualization, films, television, and games.
turbosquid
$5
The Ultimate Bowl
... available on turbo squid, the world's leading provider of digital 3d models for visualization, films, television, and games.
turbosquid
$1

Ultimate Revolver
... available on turbo squid, the world's leading provider of digital 3d models for visualization, films, television, and games.
3ddd
$1

Kimera Ultimate DVD System
...kimera ultimate dvd system
3ddd
dvd
schneider kimera ultimate dvd system
cg_studio
$49

The Ultimate Lioness3d model
... model
cgstudio
.max .obj .fbx - the ultimate lioness 3d model, royalty free license available, instant download after purchase.
turbosquid
$5
Ultimate Brick Castle
...yalty free 3d model ultimate brick castle for download as fbx on turbosquid: 3d models for games, architecture, videos. (1335247)
turbosquid
$31

Zombie Ultimate pack
... available on turbo squid, the world's leading provider of digital 3d models for visualization, films, television, and games.
turbosquid
$8

Barrels Ultimate Pack
...ls ultimate pack for download as ma, max, obj, fbx, and blend on turbosquid: 3d models for games, architecture, videos. (1353281)
turbosquid
$25

Ultimate "F" Bomb
... available on turbo squid, the world's leading provider of digital 3d models for visualization, films, television, and games.
E3D
turbosquid
$23

E3D - Google Home
... 3d model e3d - google home for download as max, obj, and c4d on turbosquid: 3d models for games, architecture, videos. (1192509)
cg_studio
free

e3d model
...e3d model
cgstudio
- e 3d model, royalty free license available, instant download after purchase.
turbosquid
$2

Syringe C4D (E3D Ready)
...lty free 3d model syringe c4d (e3d ready) for download as c4d on turbosquid: 3d models for games, architecture, videos. (1336720)
turbosquid
$12

Microphone USB E3D and C4D
...ree 3d model microphone usb e3d & c4d for download as c4d on turbosquid: 3d models for games, architecture, videos. (1568216)
turbosquid
$29

E3D - OnePlus 6 Black
...model e3d - oneplus 6 black for download as max, obj, and c4d on turbosquid: 3d models for games, architecture, videos. (1358534)
turbosquid
$29

E3D - Motorola One 2018
...del e3d - motorola one 2018 for download as max, obj, and c4d on turbosquid: 3d models for games, architecture, videos. (1358533)
turbosquid
$29

E3D - Disney MagicBands 2
...l e3d - disney magicbands 2 for download as max, obj, and c4d on turbosquid: 3d models for games, architecture, videos. (1355515)
turbosquid
$29

E3D - Samsung Z4 Smartphone
...e3d - samsung z4 smartphone for download as max, obj, and c4d on turbosquid: 3d models for games, architecture, videos. (1182179)
turbosquid
$23

E3D - Razer Phone model
...del e3d - razer phone model for download as max, obj, and c4d on turbosquid: 3d models for games, architecture, videos. (1231207)
turbosquid
$23

E3D - Alcatel Idol 5
... model e3d - alcatel idol 5 for download as max, obj, and c4d on turbosquid: 3d models for games, architecture, videos. (1212799)
V6
3d_export
$100

v6 engine
...engine
3dexport
complete v6 engine modeled on solidworks 2017 along with .stl, .sldprt and .sldasm of all th parts and assembly.
3d_export
$10

V6 engine
... the first v6 engines were designed and produced independently by marmon motor car company, deutz gasmotoren fabrik and delahaye.
3d_export
$35

v6 engine
...s a complete model of a v6 engine containing over 400 components. you can contact me for a video of all the components assembling
3d_export
$10

v6 engine
...v6 engine
3dexport
turbosquid
$25

Bed1001-v6
... available on turbo squid, the world's leading provider of digital 3d models for visualization, films, television, and games.
turbosquid
$22

Chair2-v6
... available on turbo squid, the world's leading provider of digital 3d models for visualization, films, television, and games.
turbosquid
$20

V6.mb
... available on turbo squid, the world's leading provider of digital 3d models for visualization, films, television, and games.
3d_export
$20

V6 engine
...rovided in this package is all the parts in sldprt format and assembly in sldasm format. i can also convert the format on demand.
3ddd
$1

Стол V6
...6" в стиле дизельпанк изготовлен из блока двигателя, 4х поршней и 4х шатунов.
столешница изготовлена из стекла толщиной 8мм.
cg_studio
$199

V6 VVTi3d model
...v6 vvti3d model
cgstudio
.3ds - v6 vvti 3d model, royalty free license available, instant download after purchase.
V2
3d_export
free

Lamp v2
...lamp v2
3dexport
lamp v2 with solar panel
3d_export
$5

hammerhead v2
...hammerhead v2
3dexport
razer hammerhead v2 headphones, modeled in cinema 4d, render in corona
3d_export
$5

manometer v2
...manometer v2
3dexport
3d_export
$5

potato v2
...potato v2
3dexport
turbosquid
$52

Lifebuoys v2
...squid
royalty free 3d model lifebuoys v2 for download as fbx on turbosquid: 3d models for games, architecture, videos. (1560870)
turbosquid
$2

Mask v2
...turbosquid
royalty free 3d model mask v2 for download as stl on turbosquid: 3d models for games, architecture, videos. (1527741)
turbosquid
free

Flashlight V2
...d
free 3d model flashlight v2 for download as , obj, and fbx on turbosquid: 3d models for games, architecture, videos. (1663559)
turbosquid
$29

Thanos v2
...
royalty free 3d model thanos v2 for download as ztl and obj on turbosquid: 3d models for games, architecture, videos. (1651077)
turbosquid
$29

Titan v2
...d
royalty free 3d model titan v2 for download as ztl and obj on turbosquid: 3d models for games, architecture, videos. (1540228)
turbosquid
$29

Frieza v2
...
royalty free 3d model frieza v2 for download as ztl and obj on turbosquid: 3d models for games, architecture, videos. (1701238)
Fan
3d_export
$5

fan
...fan
3dexport
fan 3d model, table fan, fan, electric fan, ventilator
archibase_planet
free

Fan
...fan
archibase planet
fan large fan
fan out n260707 - 3d model for interior 3d visualization.
archibase_planet
free

Fan
...fan
archibase planet
fan ceiling fan ventilator
fan stealth n300615 - 3d model (*.gsm+*.3ds) for interior 3d visualization.
3d_export
$15

fan
...fan
3dexport
is an ancient fan
3ddd
$1

Fan-C-Fan by marco gallegos
...n-c-fan by marco gallegos
3ddd
вентилятор , marco gallegos
fan-c-fan by marco gallegos
3d_export
$10

fan
...fan
3dexport
a detailed fan designed for home or space blowing is now available for only 19.99!
turbosquid
$1

Fan
...fan
turbosquid
free 3d model fan for download as on turbosquid: 3d models for games, architecture, videos. (1427865)
turbosquid
$14

Fan
...fan
turbosquid
royalty free 3d model fan for download as on turbosquid: 3d models for games, architecture, videos. (1415642)
3ddd
$1

Светильник Fan
...светильник fan
3ddd
fan , italamp
светильник fan, производитель italamp
turbosquid
$25

Fan
...fan
turbosquid
royalty free 3d model fan for download as c4d on turbosquid: 3d models for games, architecture, videos. (1483246)
Layer
design_connected
$9

Layer
...layer
designconnected
gallotti & radice layer tables computer generated 3d model. designed by luca nichetto.
3ddd
$1

Calligaris LAYERS
...calligaris layers
3ddd
calligaris , layers
стол фабрики calligaris модель layers
3ddd
$1

Eglo Layer
...eglo layer
3ddd
eglo , layer
люстра eglo layer (89593) h=1100 l=655
3d_export
$5

pipe layer
...pipe layer
3dexport
3d_export
$25

mandala layer
... modelled in cinema 4d r23 hope you like it! also check out my other models, just click on my username to see a complete gallery.
turbosquid
$29

cloth layers
... 3d model cloth layers for download as 3ds, obj, c4d, and fbx on turbosquid: 3d models for games, architecture, videos. (1441919)
turbosquid
$29

Layer desk
... available on turbo squid, the world's leading provider of digital 3d models for visualization, films, television, and games.
3d_export
$65

layered traffic
...layered traffic
3dexport
simple rendering of the scene file
turbosquid
$400

testis with covering layers
...ee 3d model testis with covering layers for download as blend on turbosquid: 3d models for games, architecture, videos. (1431659)
turbosquid
$210

Thoracic wall layers
...alty free 3d model thoracic wall layers for download as blend on turbosquid: 3d models for games, architecture, videos. (1674521)