Thingiverse
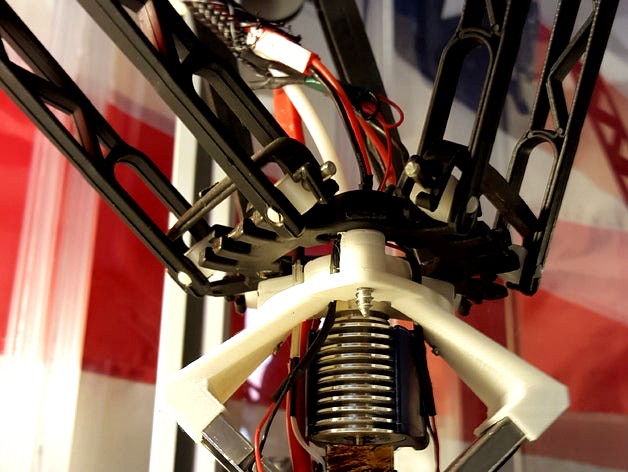
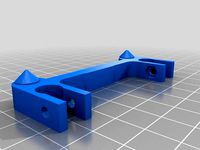
Rostock Max (Delta) - E3D v6 Mount and Layer Fan by Herrminator117
by Thingiverse
Last crawled date: 3 years ago
Two things prompted me to make yet another v6 mount and layer fan:
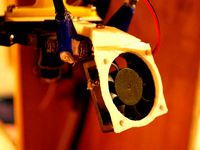
1) The lack of a compact efficient layer fan for delta printers. Which I needed since I have an enclosure on my RMv2
2) My old bulky layer fan was absolutely abismal. It would get caught on prints and wreck hours of prints, and and didnt even cool all that well.
I pulled inspiration from the Atom 2.0 Delta printer, google it! Quite fancy delta printer!
This layer fan is the second attempt, my first design had issues with the air stream being too far from the nozzle. Which meant that the PLA would just look like poop.
These are the fans the holder is designed around:http://www.mpja.com/5VDC-Mini-CPU-Fan/productinfo/32166%20FN/
NOTE:
Too get an effective layer fan I had to pull in the air stream very close to the nozzle to get the results I wanted. On the first few layers when the fan turns on, it will lower the temps maybe 3 degrees. It shouldnt be any more and it doesnt cause any jamming. As you get farther from the build plate the temps normal out. I have 60 hours of testing and printing with this setup (w/ long 15 hour prints) You must make sure the fans are seated correctly in the holders.
ASSEMBLY INSTRUCTIONS:
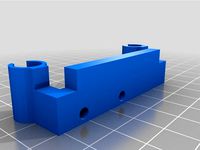
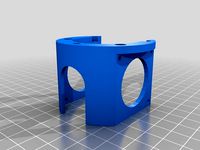
The collar and ring for mounting the v6 are pretty standard and straight forward. The notches are to keep your wires close and through the effector.
Steps:
1) Flip effector - smooth side facing bed
2) Put all wiring through effector hole before mounting
3) Seat fans in holder - NEED to be fully seated. Use vice grip to push fan in to holder. The fans are metal, dont need to worry about being gentle
4) Place ring and collar mount on v6 - Collar opening facing toward z arm (backwards)
5) Hook up all wiring if you havent already done so.
6) Re-calibrate bed level with new nozzle height
7) In your slicer set min fan speed to 35% and max to 100%
1) The lack of a compact efficient layer fan for delta printers. Which I needed since I have an enclosure on my RMv2
2) My old bulky layer fan was absolutely abismal. It would get caught on prints and wreck hours of prints, and and didnt even cool all that well.
I pulled inspiration from the Atom 2.0 Delta printer, google it! Quite fancy delta printer!
This layer fan is the second attempt, my first design had issues with the air stream being too far from the nozzle. Which meant that the PLA would just look like poop.
These are the fans the holder is designed around:http://www.mpja.com/5VDC-Mini-CPU-Fan/productinfo/32166%20FN/
NOTE:
Too get an effective layer fan I had to pull in the air stream very close to the nozzle to get the results I wanted. On the first few layers when the fan turns on, it will lower the temps maybe 3 degrees. It shouldnt be any more and it doesnt cause any jamming. As you get farther from the build plate the temps normal out. I have 60 hours of testing and printing with this setup (w/ long 15 hour prints) You must make sure the fans are seated correctly in the holders.
ASSEMBLY INSTRUCTIONS:
The collar and ring for mounting the v6 are pretty standard and straight forward. The notches are to keep your wires close and through the effector.
Steps:
1) Flip effector - smooth side facing bed
2) Put all wiring through effector hole before mounting
3) Seat fans in holder - NEED to be fully seated. Use vice grip to push fan in to holder. The fans are metal, dont need to worry about being gentle
4) Place ring and collar mount on v6 - Collar opening facing toward z arm (backwards)
5) Hook up all wiring if you havent already done so.
6) Re-calibrate bed level with new nozzle height
7) In your slicer set min fan speed to 35% and max to 100%
Similar models
thingiverse
free

Delta Effector for E3D V6 by Osechi
...effector offset : 25mm
i use the following parts,
・lj12a3-4-z-bx
・e3d v6 hotend
・3010 fans
・3010 blower fan
・m3 screws & nuts
thingiverse
free

40mm to 30mm E3D V6 Fan Mount by spencercga
...e it was originally mounted.
i printed with a raft but i had trouble getting the raft off that is why it seems wavy near the fan.
thingiverse
free

Kossel Pro Delta E3D V6 End Effector Version 8 by calviniba
...nd print super slow (30mm/s) to be able to print the overhangs properly with no support.
dimensions:
arm width: 41mm
radius: 30mm
thingiverse
free

Air cooler for Delta printer by ken1sand
...nects as a fan to the system.
good luck with your project.
the system have for me made warp free prints with all tested plastics.
thingiverse
free

Orca 0.43 x-carriage fan mount by Aggresive
...w out of the nozzle is good, i've printed this again and needed a lot less support for it to print, and there was no curling.
thingiverse
free

Monoprice Mini Delta Effector / Mount by mfink70
... e3d v6 to keep it from sliding in the mount. this will locate the bottom of the e3d v6 heatsink with the bottom of the effector.
thingiverse
free

Autolevel mount for V6 delta printers by citruspers
...vel probe.
open source
as always the original design file (fusion360) is included, so feel free to improve it (or learn from it)!
thingiverse
free

XYZ Davinci E3D V6 40mm Cooling Fan Shroud by njmerola
...o make the fan functional, i needed to modify the configuration.h file. once i find the instructions i used, i will add the link.
thingiverse
free

K40 Air Assist Radial Fan by Aleckz
...le which is exchangeable, the outer diameter is 10mm if you want to use another nozzle.
support is only needed for the main part.
thingiverse
free

Kossel Mini Delta Effector For E3D V6 With Dual Fan Mount by cristiprefac
...mount, so you can use auto bed leveling with it (see the pics).
you'll need a bunch of m3 screws and nuts to put it together.
Rostock
thingiverse
free
Endstop for Rostock by Raz0neR
...endstop for rostock by raz0ner
thingiverse
endstop for rostock.
thingiverse
free

Rostock Cooling by nobicore
...rostock cooling by nobicore
thingiverse
rostock cooling
thingiverse
free
ROSTOCK PARTS by OC3D
...rostock parts by oc3d
thingiverse
parts for our modified rostock extruder assembly
thingiverse
free
Rostock squirrel fan by MarioPanic
...rostock squirrel fan by mariopanic
thingiverse
rostock squirrel fan
thingiverse
free

FC Hansa Rostock by ron86
...fc hansa rostock by ron86
thingiverse
fc hans rostock logo
thingiverse
free

rostock mini carriage by cjol
...rostock mini carriage by cjol
thingiverse
carriage for my rostock mini project
thingiverse
free

Rostock and Rostock Mini Dual Extruder Mount by westonshakespear
...ht.
sorry about the pictures, my filament jammed for part of the print and i am waiting for a new part to print a better version.
thingiverse
free

Rostock mini clip by Scott_Chen
...rostock mini clip by scott_chen
thingiverse
rostock mini clip for printer base glass
thingiverse
free
Rostock Board holder by drewan
...rostock board holder by drewan
thingiverse
this is a clip for using a rostock board as a print surface.
thingiverse
free
Rostock Fan Bracket by ImprisonedByTime
...rostock fan bracket by imprisonedbytime
thingiverse
this bracket is for a 40mm fan to attach to the rostock 3d printer
Delta
design_connected
$16

Delta
...delta
designconnected
arflex international spa delta computer generated 3d model. designed by koivisto, eero.
design_connected
$16

Delta
...delta
designconnected
lj lamps delta computer generated 3d model. designed by janowski-lenhart, sasha.
design_connected
$13

Delta
...delta
designconnected
emu group delta armchairs computer generated 3d model. designed by marin chiaramonte .
3ddd
$1

Delta Light
...delta light
3ddd
delta light , you-turn reo 3033
точечний светильник delta light
3ddd
$1
Blanco / delta
...blanco / delta
3ddd
blanco , мойка
мойка blanco delta со смесителем
3ddd
$1
Delta Light Spot
...delta light spot
3ddd
delta light
светильник фирмы delta light
3ddd
free

Bianchi Delta LVMDLT200100
...i delta lvmdlt200100
3ddd
bianchi delta , смеситель
смеситель bianchi delta lvmdlt200100
design_connected
free

Delta 190
...delta 190
designconnected
free 3d model of delta 190 by zanotta designed by progetti, emaf.
design_connected
$27

Delta 211
...delta 211
designconnected
zanotta delta 211 computer generated 3d model. designed by progetti, emaf.
design_connected
$27

Delta 234
...delta 234
designconnected
zanotta delta 234 computer generated 3d model. designed by progetti, emaf.
E3D
turbosquid
$23

E3D - Google Home
... 3d model e3d - google home for download as max, obj, and c4d on turbosquid: 3d models for games, architecture, videos. (1192509)
cg_studio
free

e3d model
...e3d model
cgstudio
- e 3d model, royalty free license available, instant download after purchase.
turbosquid
$2

Syringe C4D (E3D Ready)
...lty free 3d model syringe c4d (e3d ready) for download as c4d on turbosquid: 3d models for games, architecture, videos. (1336720)
turbosquid
$12

Microphone USB E3D and C4D
...ree 3d model microphone usb e3d & c4d for download as c4d on turbosquid: 3d models for games, architecture, videos. (1568216)
turbosquid
$29

E3D - OnePlus 6 Black
...model e3d - oneplus 6 black for download as max, obj, and c4d on turbosquid: 3d models for games, architecture, videos. (1358534)
turbosquid
$29

E3D - Motorola One 2018
...del e3d - motorola one 2018 for download as max, obj, and c4d on turbosquid: 3d models for games, architecture, videos. (1358533)
turbosquid
$29

E3D - Disney MagicBands 2
...l e3d - disney magicbands 2 for download as max, obj, and c4d on turbosquid: 3d models for games, architecture, videos. (1355515)
turbosquid
$29

E3D - Samsung Z4 Smartphone
...e3d - samsung z4 smartphone for download as max, obj, and c4d on turbosquid: 3d models for games, architecture, videos. (1182179)
turbosquid
$23

E3D - Razer Phone model
...del e3d - razer phone model for download as max, obj, and c4d on turbosquid: 3d models for games, architecture, videos. (1231207)
turbosquid
$23

E3D - Alcatel Idol 5
... model e3d - alcatel idol 5 for download as max, obj, and c4d on turbosquid: 3d models for games, architecture, videos. (1212799)
V6
3d_export
$100

v6 engine
...engine
3dexport
complete v6 engine modeled on solidworks 2017 along with .stl, .sldprt and .sldasm of all th parts and assembly.
3d_export
$10

V6 engine
... the first v6 engines were designed and produced independently by marmon motor car company, deutz gasmotoren fabrik and delahaye.
3d_export
$35

v6 engine
...s a complete model of a v6 engine containing over 400 components. you can contact me for a video of all the components assembling
3d_export
$10

v6 engine
...v6 engine
3dexport
turbosquid
$25

Bed1001-v6
... available on turbo squid, the world's leading provider of digital 3d models for visualization, films, television, and games.
turbosquid
$22

Chair2-v6
... available on turbo squid, the world's leading provider of digital 3d models for visualization, films, television, and games.
turbosquid
$20

V6.mb
... available on turbo squid, the world's leading provider of digital 3d models for visualization, films, television, and games.
3d_export
$20

V6 engine
...rovided in this package is all the parts in sldprt format and assembly in sldasm format. i can also convert the format on demand.
3ddd
$1

Стол V6
...6" в стиле дизельпанк изготовлен из блока двигателя, 4х поршней и 4х шатунов.
столешница изготовлена из стекла толщиной 8мм.
cg_studio
$199

V6 VVTi3d model
...v6 vvti3d model
cgstudio
.3ds - v6 vvti 3d model, royalty free license available, instant download after purchase.
Fan
3d_export
$5

fan
...fan
3dexport
fan 3d model, table fan, fan, electric fan, ventilator
archibase_planet
free

Fan
...fan
archibase planet
fan large fan
fan out n260707 - 3d model for interior 3d visualization.
archibase_planet
free

Fan
...fan
archibase planet
fan ceiling fan ventilator
fan stealth n300615 - 3d model (*.gsm+*.3ds) for interior 3d visualization.
3d_export
$15

fan
...fan
3dexport
is an ancient fan
3ddd
$1

Fan-C-Fan by marco gallegos
...n-c-fan by marco gallegos
3ddd
вентилятор , marco gallegos
fan-c-fan by marco gallegos
3d_export
$10

fan
...fan
3dexport
a detailed fan designed for home or space blowing is now available for only 19.99!
turbosquid
$1

Fan
...fan
turbosquid
free 3d model fan for download as on turbosquid: 3d models for games, architecture, videos. (1427865)
turbosquid
$14

Fan
...fan
turbosquid
royalty free 3d model fan for download as on turbosquid: 3d models for games, architecture, videos. (1415642)
3ddd
$1

Светильник Fan
...светильник fan
3ddd
fan , italamp
светильник fan, производитель italamp
turbosquid
$25

Fan
...fan
turbosquid
royalty free 3d model fan for download as c4d on turbosquid: 3d models for games, architecture, videos. (1483246)
Layer
design_connected
$9

Layer
...layer
designconnected
gallotti & radice layer tables computer generated 3d model. designed by luca nichetto.
3ddd
$1

Calligaris LAYERS
...calligaris layers
3ddd
calligaris , layers
стол фабрики calligaris модель layers
3ddd
$1

Eglo Layer
...eglo layer
3ddd
eglo , layer
люстра eglo layer (89593) h=1100 l=655
3d_export
$5

pipe layer
...pipe layer
3dexport
3d_export
$25

mandala layer
... modelled in cinema 4d r23 hope you like it! also check out my other models, just click on my username to see a complete gallery.
turbosquid
$29

cloth layers
... 3d model cloth layers for download as 3ds, obj, c4d, and fbx on turbosquid: 3d models for games, architecture, videos. (1441919)
turbosquid
$29

Layer desk
... available on turbo squid, the world's leading provider of digital 3d models for visualization, films, television, and games.
3d_export
$65

layered traffic
...layered traffic
3dexport
simple rendering of the scene file
turbosquid
$400

testis with covering layers
...ee 3d model testis with covering layers for download as blend on turbosquid: 3d models for games, architecture, videos. (1431659)
turbosquid
$210

Thoracic wall layers
...alty free 3d model thoracic wall layers for download as blend on turbosquid: 3d models for games, architecture, videos. (1674521)
Mount
3d_export
free

mounting bracket
...mounting plate is the portion of a hinge that attaches to the wood. mounting plates can be used indoors, cabinetry and furniture.
turbosquid
$2

MOUNTING
... available on turbo squid, the world's leading provider of digital 3d models for visualization, films, television, and games.
turbosquid
free

Mounts
... available on turbo squid, the world's leading provider of digital 3d models for visualization, films, television, and games.
turbosquid
free

Mount Fuji
...fuji
turbosquid
free 3d model mount fuji for download as obj on turbosquid: 3d models for games, architecture, videos. (1579977)
3d_export
$5

Headphone mount LR
...headphone mount lr
3dexport
headphone mount l+r
turbosquid
$39

Mount rainier
...quid
royalty free 3d model mount rainier for download as fbx on turbosquid: 3d models for games, architecture, videos. (1492586)
turbosquid
$5

pipe mounting
...quid
royalty free 3d model pipe mounting for download as obj on turbosquid: 3d models for games, architecture, videos. (1293744)
turbosquid
$3

Mounting Tires
...uid
royalty free 3d model mounting tires for download as fbx on turbosquid: 3d models for games, architecture, videos. (1708511)
3d_export
$5

Magnetic GoPro Mount
...pro mount
3dexport
cool magnetic mount for gopro. allows you to mount the camera on flat metal surfaces and get exclusive shots.
turbosquid
$5

Stone Mount
...ty free 3d model stone mount for download as ma, obj, and fbx on turbosquid: 3d models for games, architecture, videos. (1370306)