Thingiverse
Rifraf 3D Carcassonne The Tower by Srifraf
by Thingiverse
Last crawled date: 3 years ago
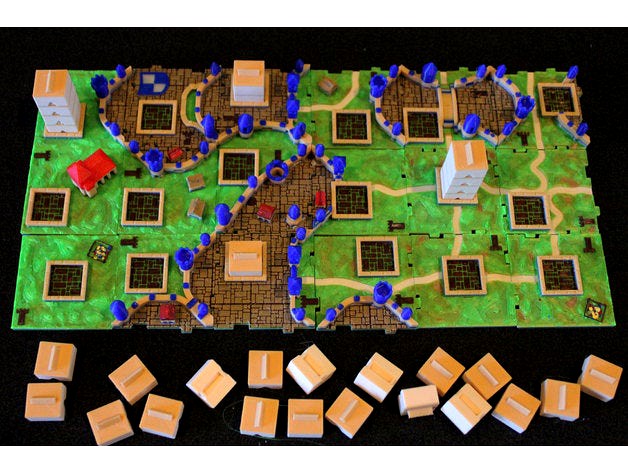
This is RIFRAF Carcassonne, The Tower Full Set
Printed on a single extruder printer. Approx. same size tiles as original. No two tiles are alike, all custom made with a “c” inlay and 3d texture to the fields and city floor... They are interlocking and can only be played in the correct position. There is very little to paint, I used 8 different colors of PLA filament and was very precise in my layering. Great thanks to all who went before with their developing this game and the many parts. There are dozens of “pieces” from others ideas assembled and added to here. Without the pioneers gone before us we would not be here today. As new expansions arrive I plan on adding and updating the sets. Enjoy!
The compete set so far is finished here, see Rifraf Carcassonne…the River, The River II, Festivals, Inns & Cathedrals, Traders & Builders, Abbey & Mayor, The Princess & the Dragon, Hills and Sheep, The Tower, Under the Big Top, The King and Robber, The Gold Mines, The Ferries, and Meeples and alternates in my other posts…. over 280 Tiles total.
RifRaf 3D Carcassonne The Original Set: 72 Tileshttps://www.thingiverse.com/thing:2722153
RifRaf 3D Carcassonne Expansion 1: Inns & Cathedrals: 18 Tileshttps://www.thingiverse.com/thing:2722137
RifRaf 3D Carcassonne Expansion 2: Traders & Builders: 24 Tileshttps://www.thingiverse.com/thing:2722125
RifRaf 3D Carcassonne Expansion 3: The Princess & the Dragon: 30 Tileshttps://www.thingiverse.com/thing:2722113
RifRaf 3D Carcassonne Expansion 4: The Tower: 18 Tileshttps://www.thingiverse.com/thing:2722103
RifRaf 3D Carcassonne Expansion 5: Abbey & Mayor 18: Tileshttps://www.thingiverse.com/thing:2722080
RifRaf 3D Carcassonne Expansion 6: Count, King & Robber: 22 Tileshttps://www.thingiverse.com/thing:2844088
Carcassonne Expansion 7: Das Katapult
Out of Print… not likely to be updated
RifRaf 3D Carcassonne Expansion 8: Bridges, Castles and Bazaars
A work in progress, waiting for full artwork and new English rules for pieces.
RifRaf 3D Carcassonne Expansion 9: Hills & Sheep: 18Tileshttps://www.thingiverse.com/thing:2812085
RifRaf 3D Carcassonne Expansion 10: Under the Big Top: 20 Tileshttps://www.thingiverse.com/thing:2763864
Integrated Score Board for RifRaf Carcassonne. Must See!https://www.thingiverse.com/thing:2846357
The River Expansion: 12 Tileshttps://www.thingiverse.com/thing:2722073
The River II 2 Expansion: 12 Tileshttps://www.thingiverse.com/thing:2823811
Mini Expansion The Ferries: 8 Tileshttps://www.thingiverse.com/thing:2826724
Mini Expansion The Gold Mines: 8 Tileshttps://www.thingiverse.com/thing:2826731
Game Board Score Tile: https://www.thingiverse.com/thing:2728487
Full reduced size Meeple Set: https://www.thingiverse.com/thing:2835441
Alternate Meeple Set: https://www.thingiverse.com/thing:2727218
Alternate Dragon: https://www.thingiverse.com/thing:2727227
Some Special Instructions:
For all sets: SEE Instructions below.
The Hills and Sheep: SPECIAL thanks for the collaboration from F1rst W0rd … If you think the flags on the hills are too fragile you can just snip it off before painting. In Game play there is no placing under of a second tile after drawing a hill tile... the only point of this was to elevate the hill tile...and with it being 3D printed the hill is of course elevated and clearly seen.
The Towers: The Towers are designed to fit snug.
The Ferries: files include various sizes and styles of the "ferry" pieces, print whatever suits you.
The King and Robbers: I have not made the Count City as all reviews state the River or River II is a better starting game and the artwork is inconsistent with the current tiles, I may look into it in the future. The idea behind the Big “trophies” and Little Meeples for the King and Robber (Highwayman) are that they reward you at the end of the game with one point for each finished city or road. When you have finished the first “biggest” city, you remove your meeple and score normally, but then place the small King meeple inside that city as a reminder of the current largest city and you hold the Big King trophy in your possession, when a larger city is finished the small king is moved there and the person finishing gets the big King, the small King will keep moving to the larger cities so you can “keep track” of what is the biggest city and only the person who holds the King trophy at the end of game scores. It works the same for the Robber and roads.
The Meeples: These are a reduced size set to better fit on the tiles, the extra Tower piece can be used in place of a player’s Meeple. Alternates: Lots to choose from...Just because they look cool, and maybe someone would want some to use... I have not printed all of these so your results may vary. I printed in detail at 10mm with a .25mm nozzle with the Meeple standing, scale to the size you want.
Under the Big Top: animal chips printed in 10mm High Rez…. (not all indicated in Pictures)
On Some sets I have included the option for printing special tiles with the Cloisters apart from the tile. This is so you do not have to paint either the city wall or the cloisters when printing the full tile, you can print separate and then glue the cloisters on...with oput any painting needed.
How I printed: On a Prusa i3 MK2 in all PLA (Meeples in Transparent PLA colors) with a base height of .200mm and a layer height of .150 with a 4mm nozzle. 4 Base layers and 3 top layers, 15% Cubic infill with a CONCENTRIC Top/Bottom fill pattern, This is important if you want the same layer divisions and “style”. I printed with a 3mm brim attached to all tiles, I found if I did not I got the occasional corner lift, but it did mean I had to trim the sides of all the tiles.
What I painted: The tops of the farm and city houses..BROWN or RED, the 6 Volcano and 6 “portal” tiles from The Princess and the Dragon…GREY, and the filled in the garden squares using a toothpick and 4 different paints for the flowers…and the tops of the festival tents…The Vinyards and Hills were green, That’s it
Some issues and tips: This is very important…When slicing in Slic3r sometimes the tiles would not render with the correct number of top layers, for example the roads would only have a layer or two finished and then the fill would show through…or the fields would not have all the layers… for some reason, rotating the affected tile 90 degrees on the plate sometimes a couple times and then reslicing fixed this issue…do a good preview check to examine how your layers are printing… it was a ton of wasted prints for me to work this out.
The very base layer has the “C” cut out, if you make your base layer one color, then change to a different color for the next few layers the filament with just “flow” into this space and it looks like you have a nice inlay…it does not affect the rest of the printing in any way… this is the “poor man’s inlay trick”…also the concentric fill pattern on the bottom gives it the “scattered” look sort of like the original tiles.
The fields have a darker layer under the light green, this adds to the textured look, also the City floor has a Dark brown layer followed by two copper layers for the “cobble stone” look, you can experiment with different color materials for enhance the “3d” look of these areas.
Everything looks look good now, but if they are anything like the rest of the tiles I will have to go back to correct an item or two.. Please let me know.
My Printing and colors: (How you slice will of course change any of these) I used Prusa Color print to define the layers.
For all tiles except the ones with a Cloister, the Cathedrals, and the Abbeys
0-.35 Light Green (The Base color, will be shaded according to the subsequent layers)
.35-1.25 Blue (For the "C", the base of the ponds and River)
1.25-2.0 Skin (for the base of the roads)
2.0-2.3 Copper (for the underlay dark field color)
2.3-3.2 Light Green (for the fields)
3.2-3.35 Dark Brown (for the underlay of the city floor)
3.35-3.35 Copper (for the city floor)
3.65 -4.1 Pearl White (for the base of the shields and emblems)
4.1-4.55 Blue (for the shield and emblem tops)
4.55-8.15 Khaki (for the walls)
8.15---- Blue (for the wall tops and towers)
For the Cloisters: Same to start then 3.65-9.95 is Khaki and then 9.95 and on is RED
For the Cathedrals and Abbey: Same to start then 3.65-13.40 Khaki and then 13.40 and on is RED
Your choices and colors will vary according to what you deicide.. this is just what I did. Have Fun!, and of course if it works for you please send me a "like"!!
Similar models
thingiverse
free

RifRaf 3D Carcassonne Expansion 6: Count, King & Robber by Srifraf
...g to what you deicide.. this is just what i did. have fun!, and of course if it works for you please send me a "like"!!
thingiverse
free

RifRaf 3D Carcassonne Under The Big Top Game by Srifraf
...g to what you deicide.. this is just what i did. have fun!, and of course if it works for you please send me a "like"!!
thingiverse
free

Rifraf 3D Carcassonne The River by Srifraf
...g to what you deicide.. this is just what i did. have fun!, and of course if it works for you please send me a "like"!!
thingiverse
free

Rifraf 3D Carcassonne Expansion 2 Traders & Builders by Srifraf
...g to what you deicide.. this is just what i did. have fun!, and of course if it works for you please send me a "like"!!
thingiverse
free

RifRaf 3D Carcassonne The River 2 II Game Tiles by Srifraf
...g to what you deicide.. this is just what i did. have fun!, and of course if it works for you please send me a "like"!!
thingiverse
free

RifRaf 3D Carcassonne The Gold Mines Mini Expantion by Srifraf
...g to what you deicide.. this is just what i did. have fun!, and of course if it works for you please send me a "like"!!
thingiverse
free

RifRaf Carcassonne The Festivals by Srifraf
...g to what you deicide.. this is just what i did. have fun!, and of course if it works for you please send me a "like"!!
thingiverse
free

RifRaf 3D Carcassonne Hills and Sheep by Srifraf
...g to what you deicide.. this is just what i did. have fun!, and of course if it works for you please send me a "like"!!
thingiverse
free

RifRaf 3D Carcassonne Custom Integrated Score Board -Can you see it? by Srifraf
...g to what you deicide.. this is just what i did. have fun!, and of course if it works for you please send me a "like"!!
thingiverse
free

RifRaf 3D Carcassonne Full Meeple Set -Reduced size by Srifraf
...g to what you deicide.. this is just what i did. have fun!, and of course if it works for you please send me a "like"!!
Srifraf
thingiverse
free

RifRaf Terraforming Mars Big Box Extra Tile by Srifraf
...https://www.thingiverse.com/thing:3153866
and is a 2 piece version of a tile found here:https://www.thingiverse.com/thing:4849577
thingiverse
free

Rifraf Terraforming Mars Artificial Lake Tile. by Srifraf
...one with multiple color changes of blue.
full set of terraforming mars tiles here"https://www.thingiverse.com/thing:3153866
thingiverse
free

RifRaf Terraforming Mars ALT 2020 Prelude Lava Tube Tile V2 by Srifraf
...the tube.
you can find the rest and instructions from this rifraf terrafoming mars set:https://www.thingiverse.com/thing:3153866
thingiverse
free

RifRaf Azul Tile Game by Srifraf
...p” to help out with my filament cost!
be sure and check out my terraforming mars, carcassonne, scythe and other gaming stuff too!
thingiverse
free

RifRaf Terraforming Mars 2020 ALT Cupola and Capital in 2 Parts by Srifraf
...parts, took me a couple tries and if i slightly heated the dome with a flame it helped so it would not snap when expanding a bit.
thingiverse
free

RifRaf Terraforming Mars Big Box Bonus Tiles 2021 by Srifraf
...e throw me a “tip”, it helps with printing as i always do print multiple “prototypes” before i arrive at a good finished product.
thingiverse
free

Rifraf 3D Carcassonne Expansion 8: Bridges, Castles, and Bazaars by Srifraf
...hat could also be printed (or one from the alternate set) as a 12 set in each player color and placed as the castle token.
enjoy!
thingiverse
free
RifRaf Carcassonne The Festivals by Srifraf
...g to what you deicide.. this is just what i did. have fun!, and of course if it works for you please send me a "like"!!
thingiverse
free

Board Game resources, Food-Grain, Pumpkin, Wood, Metal-Iron, Coal, Brick-Clay and Oil Tokens by Srifraf
...infill, for some reason when you sliced the original in cura it made it solid circles, issue with cura is fixed in this stl file.
thingiverse
free
Rifraf 3D Carcassonne The River by Srifraf
...g to what you deicide.. this is just what i did. have fun!, and of course if it works for you please send me a "like"!!
Rifraf
thingiverse
free
RifRaf Terraforming Mars ALT 2020 Prelude Lava Tube Tile V2 by Srifraf
...the tube.
you can find the rest and instructions from this rifraf terrafoming mars set:https://www.thingiverse.com/thing:3153866
thingiverse
free
RifRaf Terraforming Mars Big Box Extra Tile by Srifraf
...https://www.thingiverse.com/thing:3153866
and is a 2 piece version of a tile found here:https://www.thingiverse.com/thing:4849577
thingiverse
free

RifRaf Terraforming Mars Turmoil Cultural Metropolis AUSSIE Edition.
...n, printed in two parts and glued together.
part of the full set with instructions here:https://www.thingiverse.com/thing:3153866
thingiverse
free
RifRaf Carcassonne The Festivals by Srifraf
...g to what you deicide.. this is just what i did. have fun!, and of course if it works for you please send me a "like"!!
thingiverse
free

Triplestruder - 3 colour filament swapping extruder by RifRaf
... deleted all items in protest. thanks for wrecking a good thing guys!!!
http://3dprint.com/3187/makerbot-3d-printer-invention/
thingiverse
free
RifRaf Terraforming Mars 2020 ALT Cupola and Capital in 2 Parts by Srifraf
...parts, took me a couple tries and if i slightly heated the dome with a flame it helped so it would not snap when expanding a bit.
thingiverse
free

RifRaf Terraforming Mars Protected Valley -2 Part Tile
...
printed in 2 parts and glued.
forms part of the full set with insrtuctions posted here:https://www.thingiverse.com/thing:3153866
thingiverse
free
Rifraf 3D Carcassonne The River by Srifraf
...g to what you deicide.. this is just what i did. have fun!, and of course if it works for you please send me a "like"!!
thingiverse
free
Rifraf Terraforming Mars Artificial Lake Tile. by Srifraf
...one with multiple color changes of blue.
full set of terraforming mars tiles here"https://www.thingiverse.com/thing:3153866
Carcassonne
thingiverse
free

Carcassonne Meeple
...carcassonne meeple
thingiverse
carcassonne meeple (15mm16mm8mm)
thingiverse
free

Carcassonne Abbot by EccoNiGHTS
...carcassonne abbot by ecconights
thingiverse
this is the abbot piece for the carcassonne expansion.
thingiverse
free

Carcassonne - Separated boxes by TomJBC
...nne mini 4: the goldmines
carcassonne mini 5: mage & witch
carcassonne mini 6: the robber
carcassonne mini 7: corn circles ii
thingiverse
free

Carcassonne Base Edition by sketch3
...carcassonne base edition by sketch3
thingiverse
carcassonne
thingiverse
free

Carcassonne Boxes by conlan89
...giverse
boxes to organize the expansions for carcassonne board game.
designs for the base game and other expansions are in work.
thingiverse
free

Carcassonne Gutshof / Barn by trinita
...carcassonne gutshof / barn by trinita
thingiverse
replacement part for the parlor game carcassonne.
thingiverse
free

Original Carcassonne Meeples by impress3d_nl
...me. these are looking like the original meeples and also one meeple for the carcassonne expansion. have fun printing and playing!
thingiverse
free

Carcassonne Box organizer by SiebenDX
...ly (8 pieces for 8 sets of meeples) and can be used on a game without sorting the meeples before. feel free to edit and remix it.
thingiverse
free

Abbot Carcassonne biskup Opat by kwiatano
...abbot carcassonne biskup opat by kwiatano
thingiverse
abbot carcassonne biskup opat
thingiverse
free

Carcassonne Meeple: the Shepherd by McMosfet
...e
the meeple from the explansion hills & sheep
(https://boardgamegeek.com/boardgameexpansion/153773/carcassonne-hills-sheep)
Tower
thingiverse
free

Tower
...tower
thingiverse
this is a tower
thingiverse
free

tower
...tower
thingiverse
tower #massimino_martello #torre
thingiverse
free

The Tower of London White Tower by nathanbond
...the tower of london white tower by nathanbond
thingiverse
the tower of london white tower
thingiverse
free

The Tower
...the tower
thingiverse
dark tower game inspired cell phone holder
thingiverse
free

Tower
...tower
thingiverse
this is a tower i made as an idea for a game i was thinking of designing.
thingiverse
free

tower by Syzguru11
...tower by syzguru11
thingiverse
tower
thingiverse
free

Tower by chewie80524
...tower by chewie80524
thingiverse
tower
thingiverse
free

Towers by piglet88
...towers by piglet88
thingiverse
towers!!
thingiverse
free
Control Tower
...control tower
thingiverse
control tower or marshall tower for 1/32 slot car track
thingiverse
free

Tower by wi12stephr
...er that was the tallest, yet had the lowest weight. the max weight the tower had to hold was 15kg, this tower design help 11.5kg.