Thingiverse

Rey's Staff by JediTrooper
by Thingiverse
Last crawled date: 3 years ago
UPDATE: Uploaded photos of upgraded leather grips with leather detail.
UPDATE: Uploaded photo of optional design for a strap harness.
UPDATE: Uploaded photos and added instructions for the leather strap mount.
UPDATE: I uploaded a shorter version of Part_8, as the original felt a bit too long.
UPDATE: Uploaded STL versions of files.
UPDATE: Uploaded new smoother and shorter version of part_3-21.
UPDATE: Uploaded alternate files for Part_1 and Part_23. If you choose to use a rubber foot, then this version is one layer less and the foot becomes the top layer. Also smoothed out the curves on this file.
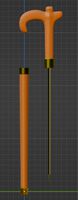
These are the parts I designed in Sketchup to build a replica of Rey's Staff from Star Wars Ep 7 - The Force Awakens. I create these models based on photo reference from the DK Star Wars Visual Guide, stills from the movie, as well as caliper measurements from the toy staff I bought on Amazon for 20 bucks.
http://static.comicvine.com/uploads/original/11117/111178634/4978032-visual+dictionary+rey.jpg
The parts are designed to slide over and be glued in sequential order onto an inner core. I would recommend using standard EMT conduit available at Home Depot or any hardware store.
I built the models in Sketchup in a smaller scale, as I was going to first make a 5' version of the staff for my 6 year old daughter. For this build I used a 5' section of 1/2" EMT conduit. After a few test builds, I found that I needed to adjust the scaling to 110% in the Makerware to allow for the proper clearance of the pipe and glue. The uploaded Thing files are already at the 110% increase.
If you are building a staff for an adult, my estimation is a 6' staff. This is based on photo reference of the actual hero staff against Daisy Ridley's height of 5'7". For the adult staff I would recommend that you reset the scaling to native, then start with a 135% increase. This is what I did to fit a larger 3/4" pipe, and bring the prop details up to adult size.
If you are unsure of the size of the pipe or rod you are using, do a few test prints with part_9 and check for fit.
Once you have the pieces, glue Part_1 onto one end, then slide the rest of the pieces on and glue them in place, in sequence. Some of the parts are duplicates, however I uploaded them with unique part numbers to keep them in order.
Please note that part_5 is one half of the required section. You will need to print two of these and glue them together. I did it this way to avoid the need of supports to create the inner detail work.
The middle grip section uses Parts 12 and 13, which are identical. You will print a total of four of these grips across the staff.
Part 19 is a different style grip to match the original prop.
On each end of the staff, I screwed on a rubber foot. The same kind you buy to put on a chair or table leg. This minimized the shock through the staff when it is tapped on the ground. It's also easier to replace that than reprint new end pieces.
Once everything was glued or set in place, with a space allowance for the wraps and shoulder strap anchors, I painted the staff with Rust Oleum Hammered Finish paint in dark bronze.
For the center wraps, I originally used strips of brown gaffers tape, and medical bandage for the two hand grips. I have since upgraded the design with actual leather, and strips of linen fabric for the adult sized prop. I cut the leather into strips and hot glued it into place. The criss cross detail of the makes for a nice grip.
For the shoulder strap anchors, I purchased a pair of surface mount anchors, some small d-rings, some leather material, and a button snap kit. Be sure and use the button snaps that have the screw threads. I crimped the D-rings a bit to make them more secure.
Cut the leather into two pieces at 4.5" x 3/4" (5" x 3/4" for the larger staff) and one piece at 1.5" by 1/2". Attach the button snaps to each end, looping the smaller leather piece as a bridge over the anchor. Use the threaded button snap to anchor the entire assembly to the staff. Repeat for the other side.
As an alternate option, you can take three pieces of leather and bind them together with button snaps and a D-Ring to make a strap harness. (see photo)
For an adult sized strap, I purchased a tan Condor shoulder strap from Amazon for 6.40 USD.
I hope you all enjoy this build as much as I did. This was my first attempt at fabricating a movie style replica prop and I learned some new modeling techniques in Sketchup in the process.
May the Force be with you.
UPDATE: Uploaded photo of optional design for a strap harness.
UPDATE: Uploaded photos and added instructions for the leather strap mount.
UPDATE: I uploaded a shorter version of Part_8, as the original felt a bit too long.
UPDATE: Uploaded STL versions of files.
UPDATE: Uploaded new smoother and shorter version of part_3-21.
UPDATE: Uploaded alternate files for Part_1 and Part_23. If you choose to use a rubber foot, then this version is one layer less and the foot becomes the top layer. Also smoothed out the curves on this file.
These are the parts I designed in Sketchup to build a replica of Rey's Staff from Star Wars Ep 7 - The Force Awakens. I create these models based on photo reference from the DK Star Wars Visual Guide, stills from the movie, as well as caliper measurements from the toy staff I bought on Amazon for 20 bucks.
http://static.comicvine.com/uploads/original/11117/111178634/4978032-visual+dictionary+rey.jpg
The parts are designed to slide over and be glued in sequential order onto an inner core. I would recommend using standard EMT conduit available at Home Depot or any hardware store.
I built the models in Sketchup in a smaller scale, as I was going to first make a 5' version of the staff for my 6 year old daughter. For this build I used a 5' section of 1/2" EMT conduit. After a few test builds, I found that I needed to adjust the scaling to 110% in the Makerware to allow for the proper clearance of the pipe and glue. The uploaded Thing files are already at the 110% increase.
If you are building a staff for an adult, my estimation is a 6' staff. This is based on photo reference of the actual hero staff against Daisy Ridley's height of 5'7". For the adult staff I would recommend that you reset the scaling to native, then start with a 135% increase. This is what I did to fit a larger 3/4" pipe, and bring the prop details up to adult size.
If you are unsure of the size of the pipe or rod you are using, do a few test prints with part_9 and check for fit.
Once you have the pieces, glue Part_1 onto one end, then slide the rest of the pieces on and glue them in place, in sequence. Some of the parts are duplicates, however I uploaded them with unique part numbers to keep them in order.
Please note that part_5 is one half of the required section. You will need to print two of these and glue them together. I did it this way to avoid the need of supports to create the inner detail work.
The middle grip section uses Parts 12 and 13, which are identical. You will print a total of four of these grips across the staff.
Part 19 is a different style grip to match the original prop.
On each end of the staff, I screwed on a rubber foot. The same kind you buy to put on a chair or table leg. This minimized the shock through the staff when it is tapped on the ground. It's also easier to replace that than reprint new end pieces.
Once everything was glued or set in place, with a space allowance for the wraps and shoulder strap anchors, I painted the staff with Rust Oleum Hammered Finish paint in dark bronze.
For the center wraps, I originally used strips of brown gaffers tape, and medical bandage for the two hand grips. I have since upgraded the design with actual leather, and strips of linen fabric for the adult sized prop. I cut the leather into strips and hot glued it into place. The criss cross detail of the makes for a nice grip.
For the shoulder strap anchors, I purchased a pair of surface mount anchors, some small d-rings, some leather material, and a button snap kit. Be sure and use the button snaps that have the screw threads. I crimped the D-rings a bit to make them more secure.
Cut the leather into two pieces at 4.5" x 3/4" (5" x 3/4" for the larger staff) and one piece at 1.5" by 1/2". Attach the button snaps to each end, looping the smaller leather piece as a bridge over the anchor. Use the threaded button snap to anchor the entire assembly to the staff. Repeat for the other side.
As an alternate option, you can take three pieces of leather and bind them together with button snaps and a D-Ring to make a strap harness. (see photo)
For an adult sized strap, I purchased a tan Condor shoulder strap from Amazon for 6.40 USD.
I hope you all enjoy this build as much as I did. This was my first attempt at fabricating a movie style replica prop and I learned some new modeling techniques in Sketchup in the process.
May the Force be with you.
Similar models
thingiverse
free

The Mandalorian Left Leg Armour
...eather was also used to create the leg pouch, holster and belts and shoulder straps.
i hope these files are useful to you.
enjoy!
thingiverse
free

Battle armor Pocahontas shoulder piece
...battle armor pocahontas shoulder piece
thingiverse
a simple shoulder piece. i glued on straps to connect it.
thingiverse
free

DJI Mavic Mini Shoulder Strap Battery Sheath/UAS ID Holder by SlumTek
...stall)
enjoy!!
updates:
4/26/21 uploaded plain versions
4/24/21 uploaded shoulder strap uas id holder (v3)
updated models 4/23/21
thingiverse
free

Fix for Guitar Strap Connector by ES0602
...hold it all in place.
so far, it works really well, and was much easier and cheaper than driving to the store to get
a new strap.
thingiverse
free

Strap Grip for HP Reverb G2 Controllers by cycowave
...er so that the friction in the lead through is high enough to hold the strap tight.
thanks to tigerflip for designing the grip.
3d_export
$29

Itty Bitty Fidget
...e. this is particularly important if you're printing the no-magnet version, as the case needs to flex slightly at the middle.
thingiverse
free

The Order 1866 Communicator by dominominomino
... in the proper arrangement that can be printed as a single piece instead of as individual components.
let me know what you think!
thingiverse
free

Strap adjuster for sewn on strap by dsal2019
...olt" part at 90 - 95% it's original size, or it won't fit.
use a screw to secure the other end to keep it all tight.
thingiverse
free

Photo Keychain by Indigojin
...ave uploaded them here to thingiverse to add to the library of physical objects that people find cool, useful, or just plain fun!
thingiverse
free

Adjustable sholder stock for HW40, Beeman p17 airguns by DerRose
...s before building and using it!!!!
if you like my design, please feel free to support me:
www.paypal.com/paypalme/michaelrose1981
Jeditrooper
thingiverse
free

Reys Staff Part 4 Fix by TheClaus
...fix by theclaus thingiverse i rebuilt part 4 of jeditrooper reys staff build in 123d. i was having problems...
thingiverse
free

Part 2, 6, 22 - Smoothed by conraad
...for doing a fantastic job modeling rey's staff. in jeditrooper#39;s photos of the ends of the staff, i could...
Rey
3ddd
$1

кресло REI
...кресло rei
3ddd
rei
кресло класика rei
turbosquid
$150

REY
...rey
turbosquid
royalty free 3d model rey for download as 3ds on turbosquid: 3d models for games, architecture, videos. (1234979)
turbosquid
$25

El Rey
...
turbosquid
royalty free 3d model el rey for download as max on turbosquid: 3d models for games, architecture, videos. (1261097)
turbosquid
$49

Rei Ayanami
... available on turbo squid, the world's leading provider of digital 3d models for visualization, films, television, and games.
turbosquid
$1

Rei Ayanami Figure
...oyalty free 3d model rei ayanami figure for download as blend on turbosquid: 3d models for games, architecture, videos. (1509930)
turbosquid
$25

Bed Felis Rey
... available on turbo squid, the world's leading provider of digital 3d models for visualization, films, television, and games.
3d_export
$5

Rey ban sunglass 3D Model
...rey ban sunglass 3d model
3dexport
rey ban sunglass 3d model sunnyanimetion143 60349 3dexport
3ddd
$1

Ergonomic chair (Rei)
...ergonomic chair (rei)
3ddd
кресло
ergonomic chair made by our studio
turbosquid
$150

Zbrush 7div CASIQUE REY
...lty free 3d model zbrush 7div casique rey for download as obj on turbosquid: 3d models for games, architecture, videos. (1602113)
3d_ocean
$5

Penholder Concept Piri Reis
...created for a design competition about piri reis. all questions about my models and designs will be answered lightning fast. p...
Staff
turbosquid
$5

God Staff Jax Staff
...d model god staff jax staff for download as max, obj, and fbx on turbosquid: 3d models for games, architecture, videos. (1290684)
turbosquid
$49

Staff
...f
turbosquid
royalty free 3d model staff for download as max on turbosquid: 3d models for games, architecture, videos. (1541991)
turbosquid
$2

Staff
...quid
royalty free 3d model staff for download as fbx and obj on turbosquid: 3d models for games, architecture, videos. (1682366)
3d_export
$5
Staff
...staff
3dexport
turbosquid
$50

Staff
...model staff for download as obj, fbx, blend, and unitypackage on turbosquid: 3d models for games, architecture, videos. (1428381)
turbosquid
$15

staff
... available on turbo squid, the world's leading provider of digital 3d models for visualization, films, television, and games.
turbosquid
$3

Staff
... available on turbo squid, the world's leading provider of digital 3d models for visualization, films, television, and games.
turbosquid
$1
Staff
... available on turbo squid, the world's leading provider of digital 3d models for visualization, films, television, and games.
turbosquid
free

staff
... available on turbo squid, the world's leading provider of digital 3d models for visualization, films, television, and games.
turbosquid
free

Staff
... available on turbo squid, the world's leading provider of digital 3d models for visualization, films, television, and games.