Thingiverse
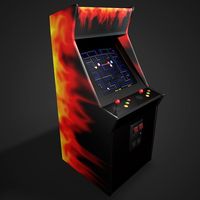
RetroPie Bartop Arcade Cabinet by relic
by Thingiverse
Last crawled date: 3 years ago
Relic's RetroPie Arcade Cabinet: Info, Tools & Assembly
UPDATES: (demo video - https://www.youtube.com/watch?v=YCD8WhAaCUk )
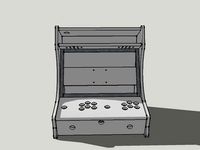
4/22/2018: Some updated and new models have been added. Monitor button cover/trim piece remixed (was too thin and warping), an alternative, solid marquee, and a LED bar that fits the inside/top of the marquee. 5 LED's (5mm) that can be connected to either RasPi or generic joystick 5V rail. Use TinkerCAD, the solid marquee model, and import your own SVG art if desired. I've included SVG files for "NEO-GEO" and the "RetroPie" logo but any SVG works. 2 new cabinet sides also now published - one has the monitor supports merged with the side (recommended side panel) and another alternative side panel grooved for use with T-Molding strips.
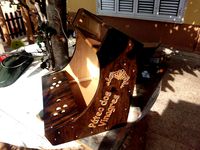
Cabinet build finished, except for inserting the new LED light bar under the marquee. More images and a video will follow. Use 5mm LED's and glue them into the light bar. Bend the leads over after glue sets and solder anode and cathode leads in parallel. Just bend them 90 degrees and solder. Add a 220 ohm resistor the the positive lead, then solder the power wires to a USB cable for connection to a spare RasPi USB port ... OR connect to the 5V rail and ground on the 40 pin header or joystick board. If using translucent PLA it lights up the marquee logo nicely.
ADDITIONAL TOOLS/NOTES:
Have various size wood clamps ready as well as gloves. The epoxy will make a mess of your hands. I can't emphasize enough about sanding parts before applying epoxy. Mix the resin/hardener well and always allow to fully cure. Also the control panel button holes may need to be filed down as I found not all arcade buttons are necessarily exactly the same diameter. I had to enlarge the 4 right-side buttons and the 2 on the panel front. A dremel rotary tool is ideal for this stuff. The "MAME" logo insert for the marquee will need to be filed down in order to insert. Mine was unusually out of tolerance but I figured out why - most parts were printed vertically @ .25 to .3 mm layer height but the logo was printed horizontally and on the bed. This led to the logo being slightly larger in the X/Y directions. Try printing the logo @ 99% size producing a very slightly smaller piece. Or use the rectangular marquee logo back piece (use transparent/translucent filament) if you do not want the logo inset. It does take a lot of filing/sanding to get it to fit.
NOTE: This was printed on a Creality CR-10. A build area of at least 300x300x400 will be required. I used approximately 3 spools of Hatchbox PLA filament for this project with about 100 hours of printing time, but well worth it !!! Also, the only part not designed by me was the hinges. Not sure who had designed those but props to whoever you are!
Tools & Hardware:
⦁ 100 Grit Sand Paper
⦁ Epoxy (I used Devcon 2-part resin/hardner epoxy)
⦁ M4 Bolts and M4 T-Nuts - https://www.amazon.com/gp/product/B06ZZBNVTB/ref=oh_aui_detailpage_o04_s00?ie=UTF8&psc=1
⦁ Razor Blade and/or file set for part post-processing of supports
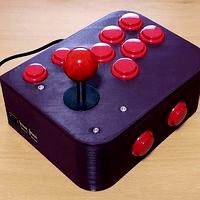
⦁ Generic USB Joystick Kit: https://www.amazon.com/gp/product/B01M2X88QP/ref=oh_aui_detailpage_o05_s01?ie=UTF8&psc=1
⦁ Raspberry Pi 2 or 3 with minimum of 16GB micro SD. I install Retropie on the SD and use the USB service turned ON to store ROMS on a USB flash drive. Here is the kit I purchased - https://www.amazon.com/gp/product/B0778CZ97B/ref=oh_aui_detailpage_o05_s00?ie=UTF8&psc=1
⦁ Various other cables may be required depending on your setup
⦁ Primer and paint if desired
⦁ Time and patience !!!
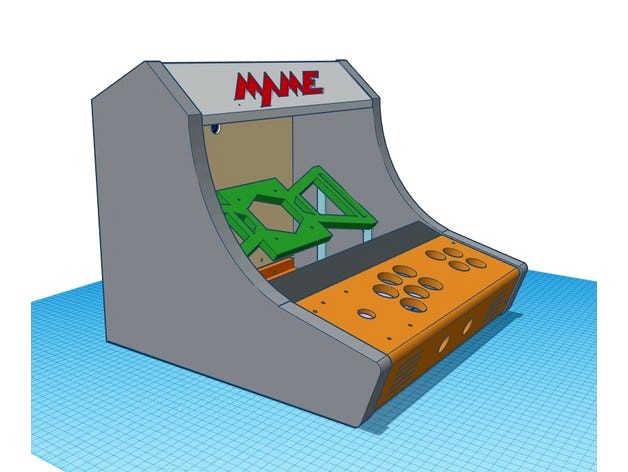
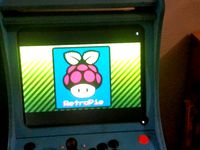
The cabinet is designed to fit many displays. The maximum display width is 350mm. A display with an aspect ration of 4:3 produces the best results as there is no black areas on the edges of the screen. Many new and used 4:3 displays can be found on Ebay.
This was also designed to use very few pices of mounting hardware. 4 M4 bolts are used to attach the monitor, 8 M4 bolts/nuts for the 3D-printed hinges, and 4 M4 bolts(18mm length) with hammerhead T-nuts are used to attach the control panel. 4 small machine screws hold the USB joystick controller in place. This leaves a very clean-look to the exterior of the cabinet.
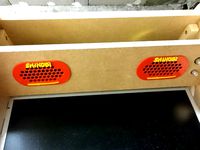
ALL other joints use epoxy. The display itself also plays a role in keeping everything together. Refer to the images for assembly. My display had built-in speaker that sounded fine to me but you may choose to add your own. There are vents on the control panel ideal for adding stereo speakers.
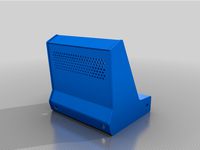
The monitor viewing angle is 36 degrees. The size/shape of your display will determine where you actually epoxy the monitor mount and it's supports. There are 2 side supports and 2 bottom supports. There is also a monitor bottom cover piece that is optional. I use it to give a nice finish to the area between the monitor's bottom edge and control panel and also to hide the monitor buttons. Due to the shape of my display a bezel was not necessary. However if you do need one, design it 350mm wide and 2mm thick with a cutout to suit your display.
It's VERY important to sand every joint where epoxy will be applied. Otherwise there will not be a strong bond. When done right, the plastic will break before the epoxy will.
A model of 2020 slotted, extruded aluminum (40mm in height) was used for mounting the control board. Simply use epoxy to attach as illustrated. After the epoxy cures, use the T-nuts and M4 bolts to attach the panel.
Assembly:
Start by laying one of the sides down. Attach the monitor mount to your display and decide where the monitor SIDE supports need to be epoxied. Next epoxy the monitor side supports to each cabinet side. These supports hold the monitor mount in place. Remove the display and epoxy the monitor mount to the supports and sides as illustrated. After curing, re-attach the monitor and then epoxy the monitor BOTTOM supports in place. Allow plenty of time to cure.
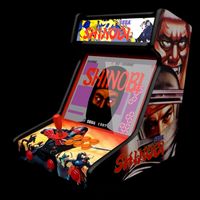
Turn the cabinet on it's side and mock up the marquee support. It can be inset a bit if desired. Epoxy the marquee supports into place. After allowing to cure, the marquee should rest nicely on these supports and can be epoxied into place. Unless you plan to primer and paint, the MAME marquee logo can be inserted. Some filing may be needed to get it to fit as it will be very tight.
Mock up the control panel with the cabinet upright and then epoxy the 2020 extruded aluminum models into place. They should be centered with the control panel's 4 mounting holes and be flush against the control panel. Wire up the control panel and attach to the 2020 models using M4 bolts and T-nuts.
Epoxy the hinged back door BOTTOM and the bottom support piece into place. After curing, attach the 3D-printed hinges and back door. The top lock can now be assembled. The hole at the bottom of the hinged back is used to route your cables. I suggest a small power strip which can be attached to the bottom support piece. The RasPi case can also be attached here.
SVG files for "RetroPie" and "NEO GEO" are supplied for alternative marquee themes. Just import the marquee support into TinkerCAD, import the desired SVG logo and mix it up! Or, use these svg files to create side panel art/stencils.
Enjoy, and if you build this cabinet I'd LOVE to see it. Contact: relicxyz@gmail.com
UPDATES: (demo video - https://www.youtube.com/watch?v=YCD8WhAaCUk )
4/22/2018: Some updated and new models have been added. Monitor button cover/trim piece remixed (was too thin and warping), an alternative, solid marquee, and a LED bar that fits the inside/top of the marquee. 5 LED's (5mm) that can be connected to either RasPi or generic joystick 5V rail. Use TinkerCAD, the solid marquee model, and import your own SVG art if desired. I've included SVG files for "NEO-GEO" and the "RetroPie" logo but any SVG works. 2 new cabinet sides also now published - one has the monitor supports merged with the side (recommended side panel) and another alternative side panel grooved for use with T-Molding strips.
Cabinet build finished, except for inserting the new LED light bar under the marquee. More images and a video will follow. Use 5mm LED's and glue them into the light bar. Bend the leads over after glue sets and solder anode and cathode leads in parallel. Just bend them 90 degrees and solder. Add a 220 ohm resistor the the positive lead, then solder the power wires to a USB cable for connection to a spare RasPi USB port ... OR connect to the 5V rail and ground on the 40 pin header or joystick board. If using translucent PLA it lights up the marquee logo nicely.
ADDITIONAL TOOLS/NOTES:
Have various size wood clamps ready as well as gloves. The epoxy will make a mess of your hands. I can't emphasize enough about sanding parts before applying epoxy. Mix the resin/hardener well and always allow to fully cure. Also the control panel button holes may need to be filed down as I found not all arcade buttons are necessarily exactly the same diameter. I had to enlarge the 4 right-side buttons and the 2 on the panel front. A dremel rotary tool is ideal for this stuff. The "MAME" logo insert for the marquee will need to be filed down in order to insert. Mine was unusually out of tolerance but I figured out why - most parts were printed vertically @ .25 to .3 mm layer height but the logo was printed horizontally and on the bed. This led to the logo being slightly larger in the X/Y directions. Try printing the logo @ 99% size producing a very slightly smaller piece. Or use the rectangular marquee logo back piece (use transparent/translucent filament) if you do not want the logo inset. It does take a lot of filing/sanding to get it to fit.
NOTE: This was printed on a Creality CR-10. A build area of at least 300x300x400 will be required. I used approximately 3 spools of Hatchbox PLA filament for this project with about 100 hours of printing time, but well worth it !!! Also, the only part not designed by me was the hinges. Not sure who had designed those but props to whoever you are!
Tools & Hardware:
⦁ 100 Grit Sand Paper
⦁ Epoxy (I used Devcon 2-part resin/hardner epoxy)
⦁ M4 Bolts and M4 T-Nuts - https://www.amazon.com/gp/product/B06ZZBNVTB/ref=oh_aui_detailpage_o04_s00?ie=UTF8&psc=1
⦁ Razor Blade and/or file set for part post-processing of supports
⦁ Generic USB Joystick Kit: https://www.amazon.com/gp/product/B01M2X88QP/ref=oh_aui_detailpage_o05_s01?ie=UTF8&psc=1
⦁ Raspberry Pi 2 or 3 with minimum of 16GB micro SD. I install Retropie on the SD and use the USB service turned ON to store ROMS on a USB flash drive. Here is the kit I purchased - https://www.amazon.com/gp/product/B0778CZ97B/ref=oh_aui_detailpage_o05_s00?ie=UTF8&psc=1
⦁ Various other cables may be required depending on your setup
⦁ Primer and paint if desired
⦁ Time and patience !!!
The cabinet is designed to fit many displays. The maximum display width is 350mm. A display with an aspect ration of 4:3 produces the best results as there is no black areas on the edges of the screen. Many new and used 4:3 displays can be found on Ebay.
This was also designed to use very few pices of mounting hardware. 4 M4 bolts are used to attach the monitor, 8 M4 bolts/nuts for the 3D-printed hinges, and 4 M4 bolts(18mm length) with hammerhead T-nuts are used to attach the control panel. 4 small machine screws hold the USB joystick controller in place. This leaves a very clean-look to the exterior of the cabinet.
ALL other joints use epoxy. The display itself also plays a role in keeping everything together. Refer to the images for assembly. My display had built-in speaker that sounded fine to me but you may choose to add your own. There are vents on the control panel ideal for adding stereo speakers.
The monitor viewing angle is 36 degrees. The size/shape of your display will determine where you actually epoxy the monitor mount and it's supports. There are 2 side supports and 2 bottom supports. There is also a monitor bottom cover piece that is optional. I use it to give a nice finish to the area between the monitor's bottom edge and control panel and also to hide the monitor buttons. Due to the shape of my display a bezel was not necessary. However if you do need one, design it 350mm wide and 2mm thick with a cutout to suit your display.
It's VERY important to sand every joint where epoxy will be applied. Otherwise there will not be a strong bond. When done right, the plastic will break before the epoxy will.
A model of 2020 slotted, extruded aluminum (40mm in height) was used for mounting the control board. Simply use epoxy to attach as illustrated. After the epoxy cures, use the T-nuts and M4 bolts to attach the panel.
Assembly:
Start by laying one of the sides down. Attach the monitor mount to your display and decide where the monitor SIDE supports need to be epoxied. Next epoxy the monitor side supports to each cabinet side. These supports hold the monitor mount in place. Remove the display and epoxy the monitor mount to the supports and sides as illustrated. After curing, re-attach the monitor and then epoxy the monitor BOTTOM supports in place. Allow plenty of time to cure.
Turn the cabinet on it's side and mock up the marquee support. It can be inset a bit if desired. Epoxy the marquee supports into place. After allowing to cure, the marquee should rest nicely on these supports and can be epoxied into place. Unless you plan to primer and paint, the MAME marquee logo can be inserted. Some filing may be needed to get it to fit as it will be very tight.
Mock up the control panel with the cabinet upright and then epoxy the 2020 extruded aluminum models into place. They should be centered with the control panel's 4 mounting holes and be flush against the control panel. Wire up the control panel and attach to the 2020 models using M4 bolts and T-nuts.
Epoxy the hinged back door BOTTOM and the bottom support piece into place. After curing, attach the 3D-printed hinges and back door. The top lock can now be assembled. The hole at the bottom of the hinged back is used to route your cables. I suggest a small power strip which can be attached to the bottom support piece. The RasPi case can also be attached here.
SVG files for "RetroPie" and "NEO GEO" are supplied for alternative marquee themes. Just import the marquee support into TinkerCAD, import the desired SVG logo and mix it up! Or, use these svg files to create side panel art/stencils.
Enjoy, and if you build this cabinet I'd LOVE to see it. Contact: relicxyz@gmail.com
Similar models
thingiverse
free

USB Joystick Controller Mount by wvcollenburg
... simple mount for the joystick controllers (2 of them). this mount fits the cy-822a that is commonly available through most site.
3dwarehouse
free

Ghost in the Machine MarkII
...ting lcd monitor, etched plexi and lumniglass marquee, side and bottom lit etched control panels, and el wire illuminated molding
3dwarehouse
free

Custom arcade cabinet titled: Legacy
...ular light-up control panels, and light-up t-moulding. #arcade #arcade_cabinet #mame #video_game #video_game_console #video_games
thingiverse
free

Joystick Mount Bracket for Zero Delay USB Encoder by digitalman2112
...alman2112
thingiverse
this bracket mounts a "zero delay" usb joystick / button encoder to the joystick mounting bolts.
3dwarehouse
free

RetroPie Arcade Cabinet
...control panel angle, better screen angle, better button layout. sanwa jlf joysticks and sanwa buttons. #arcade #cabinet #retropie
cults
free
Ultimate Retropie Joystick Controller -- Remix
... a remix to be able to use the snap-on buttons from this set: quimat arcade kit
also moved the side button to the front.
works!
thingiverse
free

Monitor Wall Mount
...d a nut so i wouldn't bottom out on the monitor threaded inserts.
the 'pins' are 5/16" x 4" carriage bolts.
thingiverse
free

Black Widow control box support by jartza
...bet someone else has too...
here is the cure, print few of these and drill holes, attach with m4 bolts and nuts and off you go :)
thingiverse
free

FPV Receiver / Monitor Mount by egnerfl
...o..!
you will also need a 1/4" to 3/8" convert screw adapter for the tripod which should be glued in place using epoxy.
thingiverse
free

Recycled Laptop Display Mount / Monitor (LTN154X3) by WillsWay
...lp support my maker habit; buy it here:https://pinshape.com/items/50018-3d-printed-recycled-laptop-display-mount-monitor-ltn154x3
Bartop
thingiverse
free
Bartop Arcade by mattsplat
...bartop arcade by mattsplat
thingiverse
mini bartop arcade made of mdf using raspberry pi.
thingiverse
free
BARTOP 2 players by wayzoken
...bartop 2 players by wayzoken
thingiverse
bartop 2 players
thingiverse
free
Bartop Arcades by Marksworld
...bartop arcades by marksworld
thingiverse
2 arcade bartop machines. basic shape designed ready for you do build or edit.
blendswap
free

Galaxian Bartop
...-0 cc0 cco creative commons libre open source 3d art
my new galaxian bartop design to become real with wood and stickers.
thingiverse
free
Shinobi handle and speaker enclosure for bartop by ian57
...shinobi handle and speaker enclosure for bartop by ian57
thingiverse
made these models for my bartop shinobi
blendswap
free
Shinobi Bartop
...re open source 3d art
here is my single bartop player modelisation on the theme shinobi. it helps me to build the real one ;)
thingiverse
free

Bartop Arcade toggle switch slot by eternityoffate
...e switch slot by eternityoffate
thingiverse
this is to fit a switch button the slot of a gameroomsolutions bartop arcade cabinet
thingiverse
free

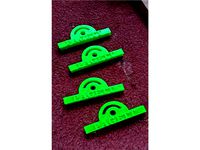
Piedino Bartop by MiguelBi
...ltrini da 20mm di diametro. h20mm.
base 43mm, perfetti per feltrini da 24mm di diametro. h20mm.
usare viti m5 in entrambi i casi.
thingiverse
free
Arcade BarTop by LisBonMeKat
...
videohttps://youtu.be/ruxvy5cawcw
added a v2.2 dxf file with 6 buttons and pinball, also readdy for a 120mm fan.. good games..
thingiverse
free
Arcade Bartop Monitor Backplate Adjustable Mount by dpagett
...or in your bartop or arcade machine if you need to adjust the angle of the display to sit flush or parallel with the bezel glass.
Retropie
thingiverse
free

RetroPi Logo by AwesomeA
...retropi logo by awesomea
thingiverse
retropi logo
thingiverse
free

My RetroPie
...my retropie
thingiverse
this is a test.
thingiverse
free

RetroPie Box by StreetMaker
... cabinet? its got to be portable! and better cost less than $50.
well here is my version of an all inclusive box for the retropie
thingiverse
free
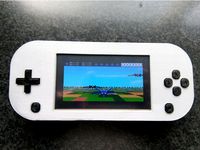
RetroPie Handheld by Cees_Meijer
... 3 a+ running retropie.
check the details and build instruction on hackaday:
https://hackaday.io/project/176661-retropie-handheld
thingiverse
free
Retropie Game Station 2 by paulvanviegen
...rse
with this design you can make a retropie game station. you need a raspberry pi with retropie installed and an 7 inch screen.
thingiverse
free

Retropie Game Station by paulvanviegen
...led and an 7 inch screen. the controllers can be stored on the front of the station. a speaker could be placed inside the sftion.
thingiverse
free

RetroPi TV front panel by BC_Jeffro
... bc_jeffro
thingiverse
front cover for retropi tv
by joo, that was published feb 4, 2015https://www.thingiverse.com/thing:666802
thingiverse
free

Retropie Gaming Station by Snille
...l to come together... this is just the 3d-printable box. :)
you can make the box your own, download and edit the sketchup file.
thingiverse
free

Retropie Arcade Stick by gerk20
... printer!
buttons and joystick - https://www.amazon.com/gp/product/b01m2x88qp/ref=ppx_yo_dt_b_search_asin_title?ie=utf8&psc=1
thingiverse
free

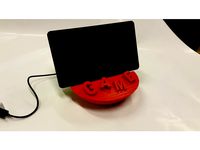
Retropie drinkcoaster
... (100 by 100 by 5 mm), to fit in my coasterholder:
https://www.thingiverse.com/thing:3130397
made with love by:
raimon of idealab
Relic
turbosquid
$2

Relic
... available on turbo squid, the world's leading provider of digital 3d models for visualization, films, television, and games.
turbosquid
$1

Relic
...ree 3d model relic for download as ma, obj, fbx, flt, and dae on turbosquid: 3d models for games, architecture, videos. (1379990)
3d_export
$18

antique-cultural relics-art-ceramics 01
...antique-cultural relics-art-ceramics 01
3dexport
antique-cultural relics-art-ceramics 01<br>3ds max 2015
3d_export
$18

antique-cultural relics-art-terracotta 14
...antique-cultural relics-art-terracotta 14
3dexport
antique-cultural relics-art-terracotta 14<br>3ds max 2015
3d_export
$19
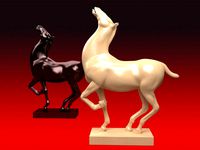
3D Ceramic Horse Sculpture ancient cultural relics
...amic horse sculpture ancient cultural relics
3dexport
1.3d ceramic horse sculpture ancient cultural relics 2.files include 3dmax
3d_export
$18

antique-cultural relics-art-ceramic workshop 12
...antique-cultural relics-art-ceramic workshop 12
3dexport
antique-cultural relics-art-ceramic workshop 12<br>3ds max 2015
turbosquid
$12

Statues stone carvings bronze horse relics
...es stone carvings bronze horse relics for download as max on turbosquid: 3d models for games, architecture, videos. (1636938)
turbosquid
$12

Ceramic Horse Sculpture ancient cultural relics
...orse sculpture ancient cultural relics for download as max on turbosquid: 3d models for games, architecture, videos. (1629677)
turbosquid
$12

Cultural Relics unearthed ancient tripod container bronze
...earthed ancient tripod container bronze for download as max on turbosquid: 3d models for games, architecture, videos. (1636952)
turbosquid
$12

Ancient artifacts unearthed cultural relics bronze tripod
... unearthed cultural relics bronze tripod for download as max on turbosquid: 3d models for games, architecture, videos. (1614417)
Arcade
3ddd
$1
Simas / Arcade
...dd
simas , simas arcade , тумба
simas arcade 46
3d_export
$5

Arcade
...arcade
3dexport
3ddd
free
Turri / Arcade
...turri / arcade
3ddd
turri , журнальный
turri / arcade
turbosquid
$35

arcade
... available on turbo squid, the world's leading provider of digital 3d models for visualization, films, television, and games.
turbosquid
$15
Arcade
... available on turbo squid, the world's leading provider of digital 3d models for visualization, films, television, and games.
turbosquid
free
Arcade
... available on turbo squid, the world's leading provider of digital 3d models for visualization, films, television, and games.
3d_ocean
$16
Arcade Game
...tomate button coin computer console fun game gamer gaming joystick machine play side art video game
detailed arcade game machine.
3d_export
$5

Arcade 3D Model
...arcade 3d model
3dexport
architecture arcade elements decor
arcade 3d model evgenadm 86783 3dexport
3d_export
$10

Arcade 3D Model
...arcade 3d model
3dexport
arcade arch porch portico well round
arcade 3d model loscarpello 54648 3dexport
3d_export
$9
Arcade 3D Model
...arcade 3d model
3dexport
arcade architecture old building classic arch
arcade 3d model lotfy 150 3dexport
Cabinet
3d_ocean
$5
Cabinet
...cabinet
3docean
cabinet furniture
a lowpoly cabinet .
3d_ocean
$5

Cabinet
...cabinet
3docean
cabinet furniture
a lowpoly cabinet.
3d_ocean
$5
Cabinet
...cabinet
3docean
cabinet furniture
a lowpoly cabinet .
3d_ocean
$6
Cabinet
...cabinet
3docean
cabinet furniture
a high quality cabinet .
3d_ocean
$5
Cabinet
...cabinet
3docean
cabinet furniture
a high quality cabinet .
3d_ocean
$5
Cabinet
...cabinet
3docean
cabinet furniture
a high quality cabinet ready to use .
3ddd
free
cabinet
...cabinet
3ddd
cabinet
3d_ocean
$12
Cabinet
...cabinet
3docean
cabinet furniture
a high quality cabinet with high quality textures.
3ddd
$1
cabinet
...cabinet
3ddd
тумба
cabinet
3ddd
$1
The cabinet
...the cabinet
3ddd
тумба
the cabinet