Thingiverse
Resistance Comlink and Holocom / flashlight by mooslug
by Thingiverse
Last crawled date: 4 years, 8 months ago
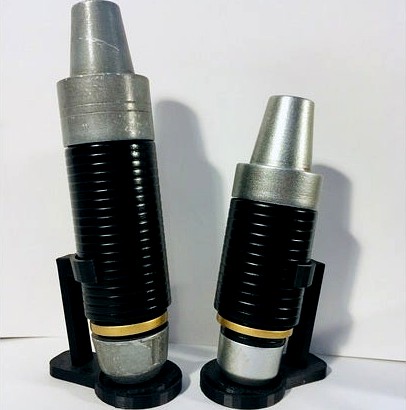
Here are files for both the standard comlink and the larger holocom from Star Wars Resistance. The comlink is standard issue for civilians and First Order forces and used throughout the show, while the holocom was used inconsistently across four episodes by Poe, Kaz, Synara, and Neeku.
Parts are included for the props both as static builds and hollowed out to fit small flashlights to recreate the holoprojector and flashlight functions as seen in the show.
The standard comlink was introduced in S01e05 when Kaz eavesdrops on Commander Pyre, and its capability to project holograms from the pointy silver cap was first shown when Pyre contacts Captain Phasma in S01e06. It's quite similar to the Rebels comlink, but with different proportions and an added brass/gold control ring just above the small cap.
Concept art from the episode "Signal from Sector Six" give the holocom its name, and shows that it was intended to include both a flashlight/torch and holoemitter on the short endcap. In practice, in all but one instance the short cap was used as the flashlight, and the long cap used as the holoprojector. This holocom was last used in the season 2 premiere AFAIK.
After this, the smaller comlink was used as a flashlight, with the light generally coming out the longer silver end, as did holograms.
See these links for concept art:https://www.starwars.com/star-wars-resistance-signal-from-sector-six-concept-art-galleryhttps://www.starwars.com/series/star-wars-resistance/the-escape-part-1-episode-guide
Parts List
The rechargeable USB cork lights as pictured above come in two sizes. The longer style is available on Amazon from various sellers, while the shorter one is manufactured by "Suck UK" and is sold in Michael's craft stores. Parts are included which will work with either of these for the comlink; the holocom requires the longer size as well as an additional small flashlight, the Streamlight Nano Mini Flashlight (available on amazon)
Here is an example of the cork light: https://www.amazon.com/gp/product/B0163N3KRC/
Streamlight Nano: https://www.amazon.com/gp/product/B0011UIPIW/
Comlink parts
For all comlinks, print:
comlink cap.stl
comlink grip cork.stl
comlink ring.stl
For a non-lit comlink, print:
comlink mic static.stl
For longer cork light, print "comlink mic long cork.stl"
For shorter cork light, print "comlink mic short cork.stl" and "comlink USB A holder.stl"
Holocom parts
All holocom builds need the "holocom ring.stl" part
For a non-lit holocom build:
holocom mic static.stl
holocom cap.stl
holocom lens.stl (print in clear)
holocom grip.stl
For a lit holocom, you need the longer USB cork light, a Streamlight Nano flashlight, and:
holocom mic cork.stl
holocom cap nano.stl
holocom grip cork nano.stl
Assembly
For both the holocom and comlink, the clear tip of the USB cork light will need to be glued into the "mic" piece. Don't get any glue on the white part of the cork light! The clear tip is the on/off switch of the cork light and adhering it at this point allows the light to be switched on and off by twisting the mic tip of the prop. Before gluing, insert the USB plug into the black grip piece and use it to help align the cap as the glue cures. The USB plug should be friction fit into the grip and removable for later charging. If you used the shorter cork light, the "USB A holder" piece will need to be glued into the grip piece to keep it from turning within the grip.
When assembling the holocom flashlight end, remove the keyring clip from Streamlight nano and insert it all the way into the holocom cap part, and glue only the surfaces that touch between the flashlight head and cap part. Then, insert a 5/8" long piece of filament or metal rod through the hole in the end of the flashlight as shown in the exploded view image; this will prevent the back end of the flashlight from turning within the holocom grip when the cap is twisted to turn on the light. Do not glue the back of the flashlight into the grip; this is a friction fit assembly.
The gold ring should snap onto the small end of the comlink and holocom while still rotating freely. Don't glue it! Note the inner surface is sloped to match the body so if it doesn't fit well one way try flipping it around.
An optional finishing touch is to add a 1/2" diameter mesh screen to the mic tip. These are sold on amazon as pipe screens under names that are a variation on "0.5" Pipe Screen, 100% Stainless Steel Pipe Screens, 1/2 Inch Pipe Screen with Flat Storage Box"
The cork light lens can also be coated with clear blue paint to represent the holoprojector's light.
The stand seen in the first image is the fantastic one by UnimatrixRed, found here https://www.thingiverse.com/thing:3545958