Thingiverse
Reprap - Funbot i1 by RepRapOsterlen
by Thingiverse
Last crawled date: 3 years ago
Added 2016-05-13
//////////////////////////////////////////////////////////////////////////////////////////////////////////////////////////////////////////////////
If you ask in comments or message me be patient as i started a new nightshift work that makes me pretty tired.
Only so you know.....
Added 2016-03-23
//////////////////////////////////////////////////////////////////////////////////////////////////////////////////////////////////////////////////
I recommend for any new builders to use mad mikes lmu8 remix to avoid any problems with printed bushings.
Its hard and tricky to get them working well with modern pla with all softeners added.
Use cheap hard glossy pla for bushings if you can find it.
Also recommended to use the Bowden remixes instead of the original mk8 version to make it simple.
Cheers cliff mellangård.
//////////////////////////////////////////////////////////////////////////////////////////////////////////////////////////////////////////////////
The longer spol top is to remove the pla from snapping of when you don't use the funbot and the extruder is homed.
Something I noticed whas that the angle for the pla where to sharp so it snapped of after 1-2 days above the extruder.
Its supposed to be placed in the rear.
The project is more or less now finished and will only be cleaned up for now on.
If you find any issues let me know so will I fix them.
The y upgrade is up for the ones that want it and removes the nead for the m5 threaded rod,1 bearing and the coupler.
The brand new mk8 combined print cooler and hotend cooler is also up that you see in my latest subscriber movie on my channel.
Cheers.
Update 7 is here now..https://youtu.be/JtbPYe5sG-w
Added the brand new small spol roller wheels and you nead to print 4 of them.
they are supposed to be like wheels on the pipes used for a spol holder so the filament roll rotates softly and should work just as fine on both eu 10 mm as us 3/8 pipes.
They are to compensate for some rolls that have plastic rolls that seam to rotate with resistance towards the chromed pipes.
also the brand new official funbot bushings that slides with very little resistance and flex on uneven surfaces.
they have only bin tested so far on y and x axis with great results.
no nead for multiple sizes anymore to fit all types of printers output.
My inspiration for them is a mashup of igus and traditional lm10uu bearings where the long housing is for stability while the actual contact surface is minimal with good wear.
All latest updates will be explained in a coming video on my channel so be patient ;)
Only bad thing for me is that I seam to have to do a more updated build guide again soon ;)
Added a new pulley wheel caps for the 2 624zz bearings on x and y
axis that will make it a lot easier for the motors to work.
also the new pulley wheel holder that works with the new caps for y axis.
Small update with a new wider x carriage this will decrease the print
size but increase stability and allowe wider bushing spacing.
also have a hole to attach a m3 screw to adjust the endstop hit zone without adjusting the endstop it self.
use a wide head m3 screw.
Updated with 2 new files where one of them are a new taller z base t
hat also have supports to work better on softer base plates.
Also uploaded a new z carriage that have a small attachment so you can finetune the endstop with a m3 screw now instead of moving the endstop itself.
I leaved the 2 old versions for the ones that want to use them instead.
The new z base takes ages to print but is worth it ;) ( 6 hours on slow print on my prusa i3 )
The first beta release of the funbot firmware is now up.
I still have a few things to do on it as the fans on the mk 8 behaves like a print cooler and speeds up at some stages during prints.
this is now based on the latest release of marlin and they made so many changes compared to the old one I used so will take some time to go thru it all.
But it works and iam using it now on my 2 funbots.
Be carful and see that the fan is cooling your mk 8 as if not will it get clogged very fast.
You can control the fan in slic3r with the fan settings this way so not bad at all actually :)
This explains the drill guide for the base.https://www.youtube.com/watch?v=DQHVo17kaQA
Keep in mind that build guide and boom are not up to date until I have uploaded everything and had the time to change it.
The boom should be up to date now only some screw dimensions I might miss ??
Bowden recommended setup for funbot.
You will only have to move the endstop for the y carriage.http://www.thingiverse.com/thing:547706
Sell this design???
I got the question from a reprap manufacturer if I mind if they produce and sell my design.
The simple answer is that I don't mind but I would love if anyone share wath they do with my little design as its cool to see wath others do with it.
I used my own money and skipped the suggested kickstarter solution as I want to share in a true reprap sense.
When you print do it with 3 perimeters like I do to get it as accurate as possible to wath I do.
I use a 0.4 nozzle so some people may nead to correct some settings in slicer to adjust to this.
Also remember to not go above 0.3 in infill density when printing parts that will carry weight or be under force when printer is working.
This is specially the z base and z base top part that holds a lot of weight.
xxxxxxxxxxxxxxxxxxxxxxxxxxxxxxxxxxxxxxxxxxxxxxxxxxxxxxxxxxxx
Work in progress created so I have a space to upload everything as soon as they are done.
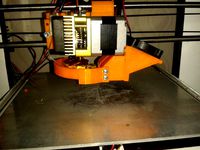
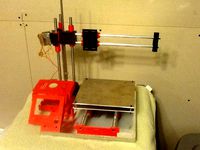
If you follow my bom and video build instructions so will you get this print area.
New build guide in the works.(2015-01-15)
Print size is x = 165 y = 170 z = 120
Hellboy print scaled up by 650%http://youtu.be/Bzg8LdMwHmQ
Build guide part 1.( 2015 )
http://youtu.be/tJCb8C3XPSY
Build guide part 2.
http://youtu.be/Ju_Pu2KTsOE
Build guide part 3.
http://youtu.be/GOH9yER8a5I
Build guide part 4.
http://youtu.be/vI6VEQjI7E8
This is going to replace my old tinkerbot design.
Keep in mind that the y base is redesigned from wath you see in the videos and picture to simplify assembly.
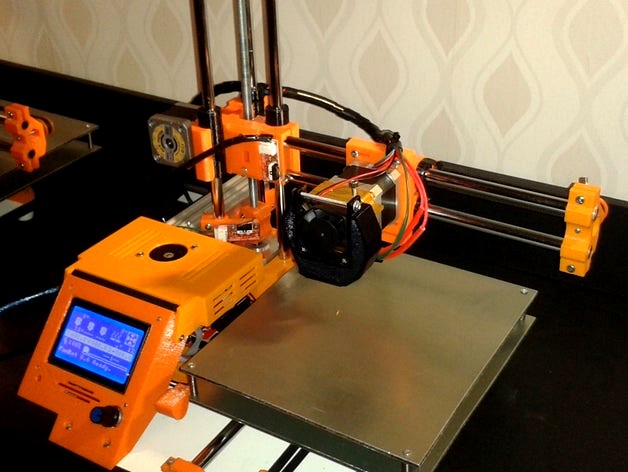
This design uses cheap chromed copper pipes and printed lm10uu for rods and sliding bearings.
Makes it very light and silent during prints.
Have bin tested for a while that it actually prints well and are up to the task to be called a printer.
Why I design my wacky builds?
The goal of the printer like all my designs is a lightweight easy to ship and assemble, and the most important goal is that it must be extremely cheap to build and easy to get most parts nearby where you live.
If we achive this so will we have soon have a repraper in every corner in the world independent on wealth and other things that can stop you :)
24-11-14
added various stl fixes and replacements because I noticed I uploaded the wrong files on some stl files..
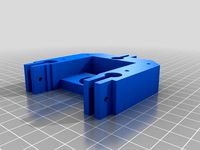
Added a reprap logo as a alternative cable bracket.
25-11-14
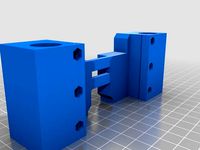
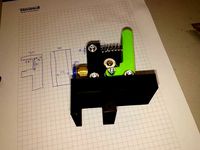
Added a better bearing housing for the y carriage bearing on the drive shaft.
Removed obsolete y carriage base.
Be patient with the updates because there will be many and often during the initial prototyping stage of the printer.
The first parts are more or less placeholders that work and have bin tested and many will be updated during time.
01-12-14
started on the wiki page.http://reprap.org/wiki/Funbot_i1
013-12-14
Uploaded the print cooler and large ramps cover.
Latest upgrades are uploaded.
//////////////////////////////////////////////////////////////////////////////////////////////////////////////////////////////////////////////////
If you ask in comments or message me be patient as i started a new nightshift work that makes me pretty tired.
Only so you know.....
Added 2016-03-23
//////////////////////////////////////////////////////////////////////////////////////////////////////////////////////////////////////////////////
I recommend for any new builders to use mad mikes lmu8 remix to avoid any problems with printed bushings.
Its hard and tricky to get them working well with modern pla with all softeners added.
Use cheap hard glossy pla for bushings if you can find it.
Also recommended to use the Bowden remixes instead of the original mk8 version to make it simple.
Cheers cliff mellangård.
//////////////////////////////////////////////////////////////////////////////////////////////////////////////////////////////////////////////////
The longer spol top is to remove the pla from snapping of when you don't use the funbot and the extruder is homed.
Something I noticed whas that the angle for the pla where to sharp so it snapped of after 1-2 days above the extruder.
Its supposed to be placed in the rear.
The project is more or less now finished and will only be cleaned up for now on.
If you find any issues let me know so will I fix them.
The y upgrade is up for the ones that want it and removes the nead for the m5 threaded rod,1 bearing and the coupler.
The brand new mk8 combined print cooler and hotend cooler is also up that you see in my latest subscriber movie on my channel.
Cheers.
Update 7 is here now..https://youtu.be/JtbPYe5sG-w
Added the brand new small spol roller wheels and you nead to print 4 of them.
they are supposed to be like wheels on the pipes used for a spol holder so the filament roll rotates softly and should work just as fine on both eu 10 mm as us 3/8 pipes.
They are to compensate for some rolls that have plastic rolls that seam to rotate with resistance towards the chromed pipes.
also the brand new official funbot bushings that slides with very little resistance and flex on uneven surfaces.
they have only bin tested so far on y and x axis with great results.
no nead for multiple sizes anymore to fit all types of printers output.
My inspiration for them is a mashup of igus and traditional lm10uu bearings where the long housing is for stability while the actual contact surface is minimal with good wear.
All latest updates will be explained in a coming video on my channel so be patient ;)
Only bad thing for me is that I seam to have to do a more updated build guide again soon ;)
Added a new pulley wheel caps for the 2 624zz bearings on x and y
axis that will make it a lot easier for the motors to work.
also the new pulley wheel holder that works with the new caps for y axis.
Small update with a new wider x carriage this will decrease the print
size but increase stability and allowe wider bushing spacing.
also have a hole to attach a m3 screw to adjust the endstop hit zone without adjusting the endstop it self.
use a wide head m3 screw.
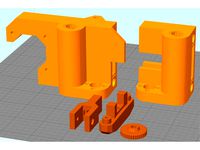
Updated with 2 new files where one of them are a new taller z base t
hat also have supports to work better on softer base plates.
Also uploaded a new z carriage that have a small attachment so you can finetune the endstop with a m3 screw now instead of moving the endstop itself.
I leaved the 2 old versions for the ones that want to use them instead.
The new z base takes ages to print but is worth it ;) ( 6 hours on slow print on my prusa i3 )
The first beta release of the funbot firmware is now up.
I still have a few things to do on it as the fans on the mk 8 behaves like a print cooler and speeds up at some stages during prints.
this is now based on the latest release of marlin and they made so many changes compared to the old one I used so will take some time to go thru it all.
But it works and iam using it now on my 2 funbots.
Be carful and see that the fan is cooling your mk 8 as if not will it get clogged very fast.
You can control the fan in slic3r with the fan settings this way so not bad at all actually :)
This explains the drill guide for the base.https://www.youtube.com/watch?v=DQHVo17kaQA
Keep in mind that build guide and boom are not up to date until I have uploaded everything and had the time to change it.
The boom should be up to date now only some screw dimensions I might miss ??
Bowden recommended setup for funbot.
You will only have to move the endstop for the y carriage.http://www.thingiverse.com/thing:547706
Sell this design???
I got the question from a reprap manufacturer if I mind if they produce and sell my design.
The simple answer is that I don't mind but I would love if anyone share wath they do with my little design as its cool to see wath others do with it.
I used my own money and skipped the suggested kickstarter solution as I want to share in a true reprap sense.
When you print do it with 3 perimeters like I do to get it as accurate as possible to wath I do.
I use a 0.4 nozzle so some people may nead to correct some settings in slicer to adjust to this.
Also remember to not go above 0.3 in infill density when printing parts that will carry weight or be under force when printer is working.
This is specially the z base and z base top part that holds a lot of weight.
xxxxxxxxxxxxxxxxxxxxxxxxxxxxxxxxxxxxxxxxxxxxxxxxxxxxxxxxxxxx
Work in progress created so I have a space to upload everything as soon as they are done.
If you follow my bom and video build instructions so will you get this print area.
New build guide in the works.(2015-01-15)
Print size is x = 165 y = 170 z = 120
Hellboy print scaled up by 650%http://youtu.be/Bzg8LdMwHmQ
Build guide part 1.( 2015 )
http://youtu.be/tJCb8C3XPSY
Build guide part 2.
http://youtu.be/Ju_Pu2KTsOE
Build guide part 3.
http://youtu.be/GOH9yER8a5I
Build guide part 4.
http://youtu.be/vI6VEQjI7E8
This is going to replace my old tinkerbot design.
Keep in mind that the y base is redesigned from wath you see in the videos and picture to simplify assembly.
This design uses cheap chromed copper pipes and printed lm10uu for rods and sliding bearings.
Makes it very light and silent during prints.
Have bin tested for a while that it actually prints well and are up to the task to be called a printer.
Why I design my wacky builds?
The goal of the printer like all my designs is a lightweight easy to ship and assemble, and the most important goal is that it must be extremely cheap to build and easy to get most parts nearby where you live.
If we achive this so will we have soon have a repraper in every corner in the world independent on wealth and other things that can stop you :)
24-11-14
added various stl fixes and replacements because I noticed I uploaded the wrong files on some stl files..
Added a reprap logo as a alternative cable bracket.
25-11-14
Added a better bearing housing for the y carriage bearing on the drive shaft.
Removed obsolete y carriage base.
Be patient with the updates because there will be many and often during the initial prototyping stage of the printer.
The first parts are more or less placeholders that work and have bin tested and many will be updated during time.
01-12-14
started on the wiki page.http://reprap.org/wiki/Funbot_i1
013-12-14
Uploaded the print cooler and large ramps cover.
Latest upgrades are uploaded.
Similar models
thingiverse
free

Reprap - AtomX Micro Bot by RepRapOsterlen
....https://youtu.be/iiad7d7niw4
bom will be added during a longer time :)
this is a early beta access.
http://reprap.org/wiki/atomx
thingiverse
free

Filament Sensor with Roller Guide - Ender 3
...g
bowden tube
attention: if oversized in cura, slic3r you will need to scale it to 10%. ive tested this and worked perfectly.
thingiverse
free

Adjustable endstop by DracenKnights
...of the one i'm using but when i installed it i found i still needed more offset so redid the design and just updated it here.
thingiverse
free

Replicator and duplicator y axis pillows for 625zz bearings by RepRapOsterlen
...l after i where told this :)
front..https://www.youtube.com/watch?v=ogegxd7cy1m
rear..https://www.youtube.com/watch?v=qstyjz7dukg
thingiverse
free
Funbot Y-Carriage & Z-carriage 8mm with bearing clamps by Wolfire18
...check the tolerances, if you want to print the test pieces too before going for this one you can find them under the remixed tab.
thingiverse
free

Tesla Cybertruck With Ball Bearings by jckhjnthmsn
...s 10x5x4 mm.
use support for the updates rims.
check my video where i build and paint my cybertruck:https://youtu.be/fek0myo_nxc
thingiverse
free
Hesine M505 Anet A8 (Prusa i3) X-Mounts incl. 8mm bearing (LM8UU) and belt tensioner by Spirit00
...thing:2389929 - version without tensioning
just pick what you need or ask me for a change if you have an idea for an optimization
thingiverse
free

Reprap Huxley Mechanical endstop holder by thinkl33t
...
thingiverse
this is a thing to hold a microswitch to a 6mm rod. i use them for the z and y axes on my reprap huxley (original)
thingiverse
free

Tevo Tarantula Trust Bearing Guide by sj_baird
...016 added a file with thicker bottom of inner guide, and added an outer bearing guide with screw hole, to keep it from spinning.)
thingiverse
free

Prusa i3 Adjustable Spool Holder with Desk Legs and 3030 Legs for Haribo by MIKEYMCC
...ament guide as they were not high enough on a haribo.
update: have uploaded new 3030 legs as i had left out some chamfers on one.
Repraposterlen
thingiverse
free
Replicator and duplicator y axis pillows for 625zz bearings by RepRapOsterlen
...l after i where told this :)
front..https://www.youtube.com/watch?v=ogegxd7cy1m
rear..https://www.youtube.com/watch?v=qstyjz7dukg
thingiverse
free

Creatbot DX2 replacement hotend base. by RepRapOsterlen
...adjustment.
only replace the original if you know wath you are doing or actually have a broken part.
https://youtu.be/zlmgwn9jmw0
thingiverse
free

Playpi a Raspberry pi 2 case for retropie by RepRapOsterlen
...for retro pie builds but its up to you.
its done in tinkercad the free cad prg.
video.https://www.youtube.com/watch?v=hkyouk_mzqq
thingiverse
free
Reprap - AtomX Micro Bot by RepRapOsterlen
....https://youtu.be/iiad7d7niw4
bom will be added during a longer time :)
this is a early beta access.
http://reprap.org/wiki/atomx
thingiverse
free

Reprep Atomx mods by Al_Ross
...for the reprap atomx. kudos to the original designer: repraposterlen www.thingiverse.com/thing:1444061 these were mainly made so i that i...
thingiverse
free

RepRap TinkerBot I1 - 3d printer by RepRapOsterlen
...d part 5-6 to the build guide.
[--2014-09-08 --------------------------------------------------]
added part 7 to the build guide.
thingiverse
free
Direct drive mk8 print cooler that works with most types. by RepRapOsterlen
...h together.
use a glue gun to get it tight in the seams.
i made it for personal use but uploaded it here if anyone else neads it.
thingiverse
free
Funbot i1 Remake by moebius_2033
...me here. thanks again!!! update i've received word from repraposterlen he said i can work on his wiki page,...
Funbot
unity_asset_store
$5

FUNBOTS.
...our workflow with the funbots. asset from tiger shark studios. find this & other robots options on the unity asset store.
thingiverse
free

Funbot MK8 Extruder Mount by Humanisticnick
...funbot mk8 extruder mount by humanisticnick
thingiverse
useful if your filament is mounted in a similar location
thingiverse
free

Funbot i1 - bowden hotend holder by Georg_cz
...er i have modify a little hotend holder. i would like to use bowden hotend because of weight of extruder instead original holder.
thingiverse
free
FunBot Foot by madmike8
...uan.
if you want to follow along on the funbot build you can check out this thread.http://forums.reprap.org/read.php?166,429588
thingiverse
free
Bernis extruder holder for Funbot i1 by Georg_cz
...ed use bowden and bernis extruder. so here is my holder for it. is working well as is and z axis can go to the end of posibility.
thingiverse
free

Funbot Y axis Motor mount by georgehine
...ht it might be a cleaner way to mount the nema 17 motor. i also added the tall carriage needed for the table to clear the motor.
thingiverse
free

Funbot 8mm x Carriage by Humanisticnick
...s are i3 compatible. also the zip ties hold the lm8uu a little better in my opinion. printed and jogged but not tested otherwise.
thingiverse
free
Funbot i1 Z Axis Base Remake - La Pedrada by Tempest815
...nd others) in a way to bring some aesthetics to the functionality.
this hasn't been tested, i am not responsible for failure
thingiverse
free
Funbot i1 Remake by moebius_2033
...red, and noticed i had the amount of bushings backwards. it's proper now. also added the 10mm version of the winged bushings.
thingiverse
free

Funbot Mods by djinn5150
...bracket for your auto level sensor, or whatever you wish to mount there, holes are spaced at 18mm to fit an ir sensor from pibot.
I1
3d_ocean
$30

Kitchen set i1
...ven plates shelves sink table ware
kitchen set i1 include 3d models: sink, cupboards, table, chair, plates, oven, hob, extractor.
humster3d
$40

3D model of Kitchen Set I1
...uy a detailed 3d model of kitchen set i1 in various file formats. all our 3d models were created maximally close to the original.
3d_export
$50

Kitchen set i1 3D Model
...ances kitchen utensils cups sink cupboards table chair plates oven hob extractor
kitchen set i1 3d model humster3d 33973 3dexport
cg_studio
$50

Kitchen set i13d model
...el
cgstudio
.3ds .lwo .max .obj .pz3 - kitchen set i1 3d model, royalty free license available, instant download after purchase.
3d_ocean
$5

Curtain - With Window (Vray-C4D)
...home interior files: .c4d 3ds obj for outside image. http://i1trekearth.com/photos/14190/kouri_trees_11.jpg ...
cg_studio
$49

Sony Xperia Z1 White3d model
...cell phone mobile cellular tft lcd touchscreen touch screen i1 honami z1s c6916 c6903 c6906 c6943 white .max .obj...
cg_studio
$49

Sony Xperia Z1 Purple3d model
...cell phone mobile cellular tft lcd touchscreen touch screen i1 honami z1s c6916 c6903 c6906 c6943 purple .max .obj...
thingiverse
free
Funbot i1 - bowden hotend holder by Georg_cz
...er i have modify a little hotend holder. i would like to use bowden hotend because of weight of extruder instead original holder.
thingiverse
free
Bernis extruder holder for Funbot i1 by Georg_cz
...ed use bowden and bernis extruder. so here is my holder for it. is working well as is and z axis can go to the end of posibility.
thingiverse
free

Carabiner S i1 by JcDenton
...-type first interation
part1 - 0.3lh_75%infill/2perimeters
part2 - 0.2lh_100%infill/2perimeters
pins should be semi-loose fitting
Reprap
turbosquid
$1

Go Pro Balance Hand Wand Reprap
... available on turbo squid, the world's leading provider of digital 3d models for visualization, films, television, and games.
thingiverse
free
Reprap keychain by AndreasD
...reprap keychain by andreasd
thingiverse
a simple reprap logo keychain for the reprap lovers like me!
thingiverse
free

REPRAP CHASSIS by leonk
...reprap chassis by leonk
thingiverse
reprap chassis
thingiverse
free

COUPLER RepRap by leonk
...coupler reprap by leonk
thingiverse
coupler reprap
thingiverse
free

RepRap Switch by n3opl4n
...reprap switch by n3opl4n
thingiverse
switch for reprap prusa i2.
p-space hackerspace logo.
thingiverse
free

Reprap pendulum by mr_seeker
...ap pendulum by mr_seeker
thingiverse
its a pendulum in the shape of the reprap logo. it has a 1mm hole for putting a wire in it.
thingiverse
free

RepRap Ornament by redskinsjbs
...reprap ornament by redskinsjbs
thingiverse
i tried to make a teardrop shape ornament for the holiday season in honor of reprap
thingiverse
free
Spool holder reprap by mdnm
...spool holder reprap by mdnm
thingiverse
this is spool holder for reprap.
thingiverse
free

RepRap logo keyring by mrjohnc
...reprap logo keyring by mrjohnc
thingiverse
reprap logo keyring
thingiverse
free

REPRAP LEON K by leonk
...reprap leon k by leonk
thingiverse
reprap leon k