Thingiverse
Replicator 2x E3D-v6 Upgrade by cadsys
by Thingiverse
Last crawled date: 4 years, 6 months ago
UPDATE 12-27-2020: Added v11 holder. Now you can adjust the left hotend up and down. Use an M3 nut and an M3 set screw or cap screw. I have not printed this yet to test so let me know how it works!
UPDATE 12-12-2020: E3D has k-couple cartridge available for the V6 heater blockhttps://e3d-online.com/products/type-k-thermocouple-cartridge?_pos=1&_sid=a9928e8ed&_ss=r
or in the stateshttps://www.matterhackers.com/store/l/e3d-type-k-thermocouple-cartridge/sk/MNXPV29Z
UPDATE 7-10-2019: New files uploaded. Improved tolerances for "right off-the bed" use. I highly recommend using Poly-Carbonate for this print, but I will say my original ABS one lasted many prints and performed quite well.
UPDATE 6-23-2019: Added V2 files. Rounded edges for a sleeker look. Modified fan ducts to allow for more space to run wires. Went back to the old design....no extra recess for nozzle leveling. Putting a small shim under one side where the holder bolts to the carriage seems to work just fine.
UPDATE 3-11-2017: Added "Hotend_Holder_adjustable.stl" and "left_mount.stl. Now you can level the hotends to the bed! The recesses for the left hotend have been deepened to allow for slight vertical travel up and down.
Turn that old POS Replicator 2x into a powerful and functional printer by upgrading your extruders with an E3D-v6 kit.
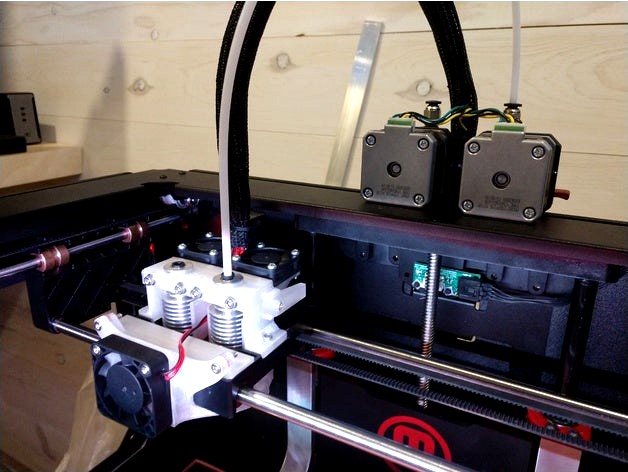
This modification/upgrade will improve printing performance tremendously and will allow the use of higher temp printing materials like nylon and Poly-Carbonate! Moving the extruder motors off of the x-carriage reduces weight and drag, producing more precise movements and ultimately better prints. No physical modification of the x-carriage is required!
I printed the original ABS one (the red one in pics) on a Huxley, then used it to print the new PC one (the translucent one in pics)
Rep 2x Poly-Carbonate Settings:
Extruder temp: 270C
Bed Temp: 112C
General Speed: 28 mm/s
Infill: 100%
I used Kapton Tape with a PVA Glue stick on top with a glass bed.
Active Cooling Duct found here: https://www.thingiverse.com/thing:3756027
Parts:
2x E3Dv6 24v 1.75mm Kit (w Bowden add-on) see note at bottom.....!
2x 4mm Push In Joint Pneumatic Connector Quick Fittings (5mm Male Thread)
4x M3 x 25 Hex-Head Socket Cap Screws
4x M3 Washers
4x M3 x 8 Hex-Head Socket Cap Screws
2x M3 x 12 Hex-Head Socket Cap Screws
2x M3 Nylock Nuts
4x M3 Nuts
1x M6 x 16 Button-Head Socket Cap Screw
Part 1 - Extruder Removal and Relocation
1.) disassemble the Rep2x's extruder down to just the plastic carriage
2.) remove the two flat head socket screws from the extruder and spin 180 degrees and remount using the same screws; do the same for the second extruder
3.) use a M5 tap or carefully thread the quick connectors into the filament openings on the top of the extruder holder (makerbot_ext.stl)
3.) attach the "flipped" extruders to the extruder holder (makerbot_ext.stl) using four M3 x 8 screws
4.) remove the cable tie mount from back of the Rep2x; mount the new extruder assembly to the Rep2x using the same hole; replace the factory screw with a M6 x 16. The extruder motors rest directly on the frame of the Rep 2x
Part 2 - Hotends
1.) refer to the E3Dv6 instructions to wire hotends. The Rep 2x can't use the thermistors that come in the kits; just thread the factory thermocouples from the Rep 2x into the E3D's heater block instead
2.) use a small screw to attach the endstop to the side of the holder
3.) add four M3 nuts to the recesses on the back of the hotend holder (hotend_holder.stl); drop the two hotends into the holder and fix in place using two of the (mount.stl) parts. Bolt together using four M3 x 25 screws and M3 washers.
4.) using screws from the kit, attach the fans to the fan ducts; keep track of left and right. snap/push on fan ducts to the heatsinks......when mounted correctly the ducts angle away from each other
5.) drop two M3 Nylocks into the recesses of the holder; mount the holder complete with fan ducts to the Rep2x's x-carriage using two M3 x 12 screws
6.) route wires between fan ducts then use a cable tie to attach control wires to the wire holding post that came with your rep 2x. Attach the wire at the extruder holder using a cable tie as well. You may need to adjust the nylon wire shroud to gain some length to attach it to the hotend holder
NOTE: You cannot use thermisters with the rep2x.....you need a k-type thermocouple. There are two different versions of the e3dv6 kits; the older kits come with thermisters and have a threaded mount. You can use the factory thermocouples from your rep2x in this case. The newer kits have a cartridge sensor that is held by a set screw; make sure you get the K-type cartridge.
NOTE: There are two files for the extruder holder, one is for aluminum extruders (alum_ext.stl) and one is for the factory MB extruders (makerbot_ext.stl)
you can get the aluminum extruders here:http://www.ebay.com/itm/Makerbot-Replicator-2X-Extruder-Upgrade-Filament-Drive-Build-Plate-Glass-/141896285178?hash=item2109ad7bfa:g:Mi8AAOSwwbdWMSx8
Only the ducts need supports when printing
IMPORTANT! You may have to adjust your extrusion multiplier.....this can fluctuate between different filaments......even a simple color change can affect this.
If you get any stringing, increase your retraction distance in small increments until it disappears. You may need to adjust your retraction speed as well.
UPDATE 12-12-2020: E3D has k-couple cartridge available for the V6 heater blockhttps://e3d-online.com/products/type-k-thermocouple-cartridge?_pos=1&_sid=a9928e8ed&_ss=r
or in the stateshttps://www.matterhackers.com/store/l/e3d-type-k-thermocouple-cartridge/sk/MNXPV29Z
UPDATE 7-10-2019: New files uploaded. Improved tolerances for "right off-the bed" use. I highly recommend using Poly-Carbonate for this print, but I will say my original ABS one lasted many prints and performed quite well.
UPDATE 6-23-2019: Added V2 files. Rounded edges for a sleeker look. Modified fan ducts to allow for more space to run wires. Went back to the old design....no extra recess for nozzle leveling. Putting a small shim under one side where the holder bolts to the carriage seems to work just fine.
UPDATE 3-11-2017: Added "Hotend_Holder_adjustable.stl" and "left_mount.stl. Now you can level the hotends to the bed! The recesses for the left hotend have been deepened to allow for slight vertical travel up and down.
Turn that old POS Replicator 2x into a powerful and functional printer by upgrading your extruders with an E3D-v6 kit.
This modification/upgrade will improve printing performance tremendously and will allow the use of higher temp printing materials like nylon and Poly-Carbonate! Moving the extruder motors off of the x-carriage reduces weight and drag, producing more precise movements and ultimately better prints. No physical modification of the x-carriage is required!
I printed the original ABS one (the red one in pics) on a Huxley, then used it to print the new PC one (the translucent one in pics)
Rep 2x Poly-Carbonate Settings:
Extruder temp: 270C
Bed Temp: 112C
General Speed: 28 mm/s
Infill: 100%
I used Kapton Tape with a PVA Glue stick on top with a glass bed.
Active Cooling Duct found here: https://www.thingiverse.com/thing:3756027
Parts:
2x E3Dv6 24v 1.75mm Kit (w Bowden add-on) see note at bottom.....!
2x 4mm Push In Joint Pneumatic Connector Quick Fittings (5mm Male Thread)
4x M3 x 25 Hex-Head Socket Cap Screws
4x M3 Washers
4x M3 x 8 Hex-Head Socket Cap Screws
2x M3 x 12 Hex-Head Socket Cap Screws
2x M3 Nylock Nuts
4x M3 Nuts
1x M6 x 16 Button-Head Socket Cap Screw
Part 1 - Extruder Removal and Relocation
1.) disassemble the Rep2x's extruder down to just the plastic carriage
2.) remove the two flat head socket screws from the extruder and spin 180 degrees and remount using the same screws; do the same for the second extruder
3.) use a M5 tap or carefully thread the quick connectors into the filament openings on the top of the extruder holder (makerbot_ext.stl)
3.) attach the "flipped" extruders to the extruder holder (makerbot_ext.stl) using four M3 x 8 screws
4.) remove the cable tie mount from back of the Rep2x; mount the new extruder assembly to the Rep2x using the same hole; replace the factory screw with a M6 x 16. The extruder motors rest directly on the frame of the Rep 2x
Part 2 - Hotends
1.) refer to the E3Dv6 instructions to wire hotends. The Rep 2x can't use the thermistors that come in the kits; just thread the factory thermocouples from the Rep 2x into the E3D's heater block instead
2.) use a small screw to attach the endstop to the side of the holder
3.) add four M3 nuts to the recesses on the back of the hotend holder (hotend_holder.stl); drop the two hotends into the holder and fix in place using two of the (mount.stl) parts. Bolt together using four M3 x 25 screws and M3 washers.
4.) using screws from the kit, attach the fans to the fan ducts; keep track of left and right. snap/push on fan ducts to the heatsinks......when mounted correctly the ducts angle away from each other
5.) drop two M3 Nylocks into the recesses of the holder; mount the holder complete with fan ducts to the Rep2x's x-carriage using two M3 x 12 screws
6.) route wires between fan ducts then use a cable tie to attach control wires to the wire holding post that came with your rep 2x. Attach the wire at the extruder holder using a cable tie as well. You may need to adjust the nylon wire shroud to gain some length to attach it to the hotend holder
NOTE: You cannot use thermisters with the rep2x.....you need a k-type thermocouple. There are two different versions of the e3dv6 kits; the older kits come with thermisters and have a threaded mount. You can use the factory thermocouples from your rep2x in this case. The newer kits have a cartridge sensor that is held by a set screw; make sure you get the K-type cartridge.
NOTE: There are two files for the extruder holder, one is for aluminum extruders (alum_ext.stl) and one is for the factory MB extruders (makerbot_ext.stl)
you can get the aluminum extruders here:http://www.ebay.com/itm/Makerbot-Replicator-2X-Extruder-Upgrade-Filament-Drive-Build-Plate-Glass-/141896285178?hash=item2109ad7bfa:g:Mi8AAOSwwbdWMSx8
Only the ducts need supports when printing
IMPORTANT! You may have to adjust your extrusion multiplier.....this can fluctuate between different filaments......even a simple color change can affect this.
If you get any stringing, increase your retraction distance in small increments until it disappears. You may need to adjust your retraction speed as well.