Thingiverse
REMIX - Extruder Nozzle Cleaning System
by Thingiverse
Last crawled date: 4 years, 2 months ago
This is loaded as a remix of the things cited here, as I used them in this project. However, a few months of work went into getting everything to work as it should. I'm posting complete instructions and links here so no one else has to "reinvent the wheel"... The things cited in this post were not changed from the original designs.
This is going to be kinda long, so I apologize in advance...
NOTE: This will work for almost any printer that is controlled through Octoprint, whether the printer has the ability to add a servo to it or not.
I have a Geeetech A30 printer that I love and that I have tweaked to the point that it produces very accurate prints for me. The problem I had that originated this project, was that as the extruder heated up, of course the cold filament left in the nozzle from the last print would expand as it heated and ooze out of the nozzle, leaving "filament boogers" on the print bed as it went through it's auto-leveling routine before starting to print. I tried various methods to solve this, but all were only partially successful, until I stumbled on the thing from LumberjackEngineering. I build and fly RC Helicopters, so I had quite a few very powerful standard size servos laying around in the workshop, so thought this would be a great way to solve this! So, I printed out the parts, assmebled them, only to find the mother board in the A30 has absolutely no way to hook up a hobby servo to it. Great idea, no way to execute it - or so I thought. Then I stumbled on the answer - Something called a Servo Trigger made by Sparkfun (link below). This is a small electronic circuit board that is designed to move a hobby servo to specific positions based on the state of a switch that is connected to it. It is independently powered by an external 5V power source so it presents no load to the circuitry it's attached to. This is triggered by a single Arduino relay package in order to isolate it from the Pi, which is triggered by a pin state on the Pi's GPIO header (high or low). The pin state causes the relay to either open or close, which the servo trigger reads as a switch state and executes the desired servo motion in response. The pin state is set in Octoprint by re-purposing an existing plugin (LED Strip Control) which is designed to control RGB LED strips from commands in Octoprint. I simply only told the plugin it had one pin to control, and using it's command set, set that pin to high or low. So, here's how I did it:
NEEDED HARDWARE
Sparkfun Servo Trigger (https://www.amazon.com/gp/product/B01GM5Y2Q4/ref=ppx_yo_dt_b_asin_title_o01_s00?ie=UTF8&psc=1)
Arduino Single Relay Package (https://www.amazon.com/gp/product/B00VRUAHLE/ref=ppx_yo_dt_b_asin_title_o02_s00?ie=UTF8&psc=1)
Servos (if you don't have any laying around) (https://www.amazon.com/gp/product/B07RFRLRV8/ref=ppx_yo_dt_b_asin_title_o02_s00?ie=UTF8&psc=1)
12/24V to 5V Buck Converter (https://www.amazon.com/gp/product/B00LUIHZZE/ref=ppx_yo_dt_b_asin_title_o09_s00?ie=UTF8&psc=1)
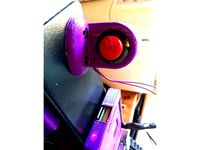
Cleaning brush (https://www.amazon.com/gp/product/B06XWFM1HJ/ref=ppx_yo_dt_b_asin_title_o05_s00?ie=UTF8&psc=1)
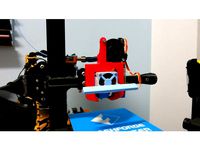
Depending on your printer, you may also need to print something to anchor the servo mount to your printer with. I printed this (https://www.thingiverse.com/thing:3754792), cut the upper arm off, then drilled mounting holes in it for the servo mount. (NOTE: The license for this thing does not allow remixes. It was printed as designed, and then physically modified as a servo mount stand)
Various jumper wires to connect the components together based on where you put them
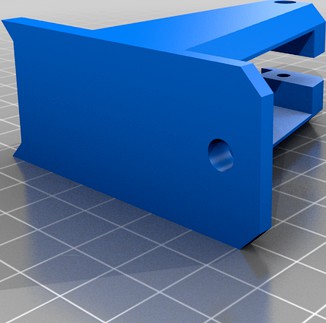
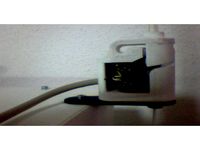
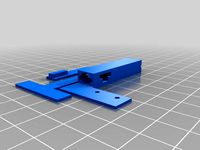
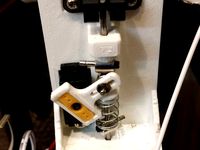
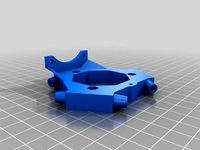
Print out the parts cited in this post orienting them for best print with fewest supports. You will have to tinker with the Servo Trigger Mount, as I slapped it together in a hurry in Fusion 360. Install the servo in the mount and mount all the components where it makes sense on your printer. The servo connects to the servo trigger (pay attention to the pin orientation!) which is powered by the buck converter (buck converter connected to the printers power supply, or independently powered). The switch pins on the servo trigger connect to the output of the relay package (NO - Normally Open). The relay package connects as follows on the Pi's GPIO header:
Ground to physical pin 14 (Ground)
VCC to physical pin 2 or 4 (5V power)
Signal to physical pin 12
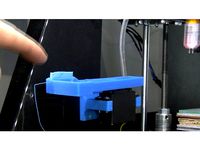
OK - that takes care of the electronics. Open and close the switch pins on the servo trigger manually using a jumper to set the servo position in it's open state (position A or brush home), and in it's closed state (position B or brush deployed). The goal is to home the brush out of the way of the extruder during prints (position A), and to deploy it in the way of the extruder for cleaning (position B).
NOTE: There seems to be a couple of versions of the servo trigger out there. One version responds to the switch state being open or closed moving the servo in response to that state, the other responds to a cycle of the switch (off/on/off). Test to find out which version you have before you set the programming in your startup scripts.
Deploy the brush to it's cleaning position over the print bed to determine the right height to move the Z Axis to for the cleaning cycle, then home the brush back out of the way.
On your Octopi, install the LED Strip Control plugin. Set the plugin so that it only knows about the red pin, and that pin is physical pin 12 on the GPIO header. (NOTE: you will need to have the Pi GPIO package installed also).
In your startup scripts in what ever slicer you are using (I use Simplify 3D) set the following command sequence:
(NOTE: You will need to adjust these parameters for your printer. These are for the Geeetech A30, which has a 330x330x430 print volume. Also note, the following MUST run after your extruder heats to printing temperature!)
G28; (home all axes forces a bounce in the center on the A30)
G1 Z32 F1200; (lift Z 32mm for cleaning)
M150 R0; (start brush deploy sequence)
G4 P500
M150 R255
G4 P500
M150 R0
G4 P500; (brush deployment complete)
G1 X335 F1200; (first scrub pass)
G1 X300 F1200; (second scrub pass)
G1 X335 F1200; (third scrub pass)
G1 X165 F1200; (fourth scrub pass and move extruder back to center)
M150 R0; (start brush home sequence)
G4 P500
M150 R255
G4 P500
M150 R0
G4 P500
M150 R0
G4 P500
M150 R255
G4 P500
M150 R0
G4 P500; (complete brush home sequence)
The M150 commands are the commands in the LED Strip Control plugin that set the Pi's GPIO pins to either high or low. Using the Red command only (set for pin 12 in the plugin), M150 R0 sets the pin state to low, M150 R255 sets it to high. The G4 commands cause a 500 millisecond pause between commands to allow the servo trigger time to read the switch state, and are NECESSARY in order for it to execute those commands. It is not capable of reading the switch states at machine speed, so you have to slow it down a little.
(NOTE: The above sequence is for the servo trigger version that requires a switch cycle (off/on/off) to execute). For some reason I have yet to figure out, the sequence has to be passed twice to home the brush out of the way at the end. If you have the servo trigger version that simply requires either an on or off state, change the M150 commands to the following:
M150 R0; (set brush state to home)
G4 P500
M150 R255; (deploy brush for cleaning)
G4 P500
(cleaning passes)
M150 R0; (home the brush)
G4 P500
M150 R0
Final Note: This was derived after several extruder crashes into the brush. I HIGHLY recommend that the first few times you use this, that you are standing by the printer when it executes. If things begin to appear to not be going right, IMMEDIATELY hit the power switch on the printer to stop it and avoid a crash. Octoprint will NOT stop it fast enough by simply hitting the cancel button!
Use this at your own risk folks. I take no responsibility for any damage that may occur by not following these instructions, or for failing to modify them for your particular printer.
This is going to be kinda long, so I apologize in advance...
NOTE: This will work for almost any printer that is controlled through Octoprint, whether the printer has the ability to add a servo to it or not.
I have a Geeetech A30 printer that I love and that I have tweaked to the point that it produces very accurate prints for me. The problem I had that originated this project, was that as the extruder heated up, of course the cold filament left in the nozzle from the last print would expand as it heated and ooze out of the nozzle, leaving "filament boogers" on the print bed as it went through it's auto-leveling routine before starting to print. I tried various methods to solve this, but all were only partially successful, until I stumbled on the thing from LumberjackEngineering. I build and fly RC Helicopters, so I had quite a few very powerful standard size servos laying around in the workshop, so thought this would be a great way to solve this! So, I printed out the parts, assmebled them, only to find the mother board in the A30 has absolutely no way to hook up a hobby servo to it. Great idea, no way to execute it - or so I thought. Then I stumbled on the answer - Something called a Servo Trigger made by Sparkfun (link below). This is a small electronic circuit board that is designed to move a hobby servo to specific positions based on the state of a switch that is connected to it. It is independently powered by an external 5V power source so it presents no load to the circuitry it's attached to. This is triggered by a single Arduino relay package in order to isolate it from the Pi, which is triggered by a pin state on the Pi's GPIO header (high or low). The pin state causes the relay to either open or close, which the servo trigger reads as a switch state and executes the desired servo motion in response. The pin state is set in Octoprint by re-purposing an existing plugin (LED Strip Control) which is designed to control RGB LED strips from commands in Octoprint. I simply only told the plugin it had one pin to control, and using it's command set, set that pin to high or low. So, here's how I did it:
NEEDED HARDWARE
Sparkfun Servo Trigger (https://www.amazon.com/gp/product/B01GM5Y2Q4/ref=ppx_yo_dt_b_asin_title_o01_s00?ie=UTF8&psc=1)
Arduino Single Relay Package (https://www.amazon.com/gp/product/B00VRUAHLE/ref=ppx_yo_dt_b_asin_title_o02_s00?ie=UTF8&psc=1)
Servos (if you don't have any laying around) (https://www.amazon.com/gp/product/B07RFRLRV8/ref=ppx_yo_dt_b_asin_title_o02_s00?ie=UTF8&psc=1)
12/24V to 5V Buck Converter (https://www.amazon.com/gp/product/B00LUIHZZE/ref=ppx_yo_dt_b_asin_title_o09_s00?ie=UTF8&psc=1)
Cleaning brush (https://www.amazon.com/gp/product/B06XWFM1HJ/ref=ppx_yo_dt_b_asin_title_o05_s00?ie=UTF8&psc=1)
Depending on your printer, you may also need to print something to anchor the servo mount to your printer with. I printed this (https://www.thingiverse.com/thing:3754792), cut the upper arm off, then drilled mounting holes in it for the servo mount. (NOTE: The license for this thing does not allow remixes. It was printed as designed, and then physically modified as a servo mount stand)
Various jumper wires to connect the components together based on where you put them
Print out the parts cited in this post orienting them for best print with fewest supports. You will have to tinker with the Servo Trigger Mount, as I slapped it together in a hurry in Fusion 360. Install the servo in the mount and mount all the components where it makes sense on your printer. The servo connects to the servo trigger (pay attention to the pin orientation!) which is powered by the buck converter (buck converter connected to the printers power supply, or independently powered). The switch pins on the servo trigger connect to the output of the relay package (NO - Normally Open). The relay package connects as follows on the Pi's GPIO header:
Ground to physical pin 14 (Ground)
VCC to physical pin 2 or 4 (5V power)
Signal to physical pin 12
OK - that takes care of the electronics. Open and close the switch pins on the servo trigger manually using a jumper to set the servo position in it's open state (position A or brush home), and in it's closed state (position B or brush deployed). The goal is to home the brush out of the way of the extruder during prints (position A), and to deploy it in the way of the extruder for cleaning (position B).
NOTE: There seems to be a couple of versions of the servo trigger out there. One version responds to the switch state being open or closed moving the servo in response to that state, the other responds to a cycle of the switch (off/on/off). Test to find out which version you have before you set the programming in your startup scripts.
Deploy the brush to it's cleaning position over the print bed to determine the right height to move the Z Axis to for the cleaning cycle, then home the brush back out of the way.
On your Octopi, install the LED Strip Control plugin. Set the plugin so that it only knows about the red pin, and that pin is physical pin 12 on the GPIO header. (NOTE: you will need to have the Pi GPIO package installed also).
In your startup scripts in what ever slicer you are using (I use Simplify 3D) set the following command sequence:
(NOTE: You will need to adjust these parameters for your printer. These are for the Geeetech A30, which has a 330x330x430 print volume. Also note, the following MUST run after your extruder heats to printing temperature!)
G28; (home all axes forces a bounce in the center on the A30)
G1 Z32 F1200; (lift Z 32mm for cleaning)
M150 R0; (start brush deploy sequence)
G4 P500
M150 R255
G4 P500
M150 R0
G4 P500; (brush deployment complete)
G1 X335 F1200; (first scrub pass)
G1 X300 F1200; (second scrub pass)
G1 X335 F1200; (third scrub pass)
G1 X165 F1200; (fourth scrub pass and move extruder back to center)
M150 R0; (start brush home sequence)
G4 P500
M150 R255
G4 P500
M150 R0
G4 P500
M150 R0
G4 P500
M150 R255
G4 P500
M150 R0
G4 P500; (complete brush home sequence)
The M150 commands are the commands in the LED Strip Control plugin that set the Pi's GPIO pins to either high or low. Using the Red command only (set for pin 12 in the plugin), M150 R0 sets the pin state to low, M150 R255 sets it to high. The G4 commands cause a 500 millisecond pause between commands to allow the servo trigger time to read the switch state, and are NECESSARY in order for it to execute those commands. It is not capable of reading the switch states at machine speed, so you have to slow it down a little.
(NOTE: The above sequence is for the servo trigger version that requires a switch cycle (off/on/off) to execute). For some reason I have yet to figure out, the sequence has to be passed twice to home the brush out of the way at the end. If you have the servo trigger version that simply requires either an on or off state, change the M150 commands to the following:
M150 R0; (set brush state to home)
G4 P500
M150 R255; (deploy brush for cleaning)
G4 P500
(cleaning passes)
M150 R0; (home the brush)
G4 P500
M150 R0
Final Note: This was derived after several extruder crashes into the brush. I HIGHLY recommend that the first few times you use this, that you are standing by the printer when it executes. If things begin to appear to not be going right, IMMEDIATELY hit the power switch on the printer to stop it and avoid a crash. Octoprint will NOT stop it fast enough by simply hitting the cancel button!
Use this at your own risk folks. I take no responsibility for any damage that may occur by not following these instructions, or for failing to modify them for your particular printer.
Similar models
thingiverse
free
40mm Fan Cover with Bar for 100mm LED Light Strip by itrdc5
...o the extruder
m400 ;wait for current moves to finish
m150 255 ;white led
;m150 r u b ;led off
m117 now printing ;display message
thingiverse
free
On/Off Button mount for Makerselect v2/wanhao duplicator. by mkanoap
... &
now enjoy turning your printer on and off with the press of a button, while still being able to control it from octoprint.
thingiverse
free
Craftbot filament sensor by rocker_bbert
...aftbot and resume the print on command.
part 3 needs to be clued on part 1. part2 (just a cover) can be scewed with the switches.
thingiverse
free
Automatic printer switch off by gigl
...onality
of the switch is at http://youtu.be/8bw0qots684.
here you see my installed auto-power-off :http://youtu.be/idwwwwvruuy
thingiverse
free
SteelNeedleProbe by FrankenKai
...rint head,
ususal due to the glitches in the servo control pwm and the servo itself the standard servo probe is not that acurate.
thingiverse
free
Groove Effector for Delta Printers by AndreaDV
... the switch snapping it.
i added the side cover and support for the leds
please send me all your comment.
good 3d printing at all
thingiverse
free
Servo driven nozzle wiper arm by ProtomakerSprint
... left
g1 x245 y0 f12500 ; right
g1 xo y0 f12500 ; left
g1 x245 y0 f12500 ; right
g1 xo y0 f12500 ; left
g1 x245 y0 f12500 ; right
thingiverse
free
Malyan M150 - SainSmart Flex Extruder Part by ps915
...quot; very well. so i took it apart and did a complete design of the extruder part.
now no flex filament wont stop my printer! =)
thingiverse
free
Creality Ender 3 Y-Axis Limit Switch Mount (Extended edition) by James18
...front by ~10mm which creates a bit more clearance to enable the switch to trigger before the bed crashes into the y-axis stepper!
thingiverse
free

Raspberry pi 3 model A GPIO protection by mattoni
...rotects pins on the lower part od the board.
i suggest to print on the printer bed with the orientation as shown in the picture.
Nozzle
3d_export
$5
nozzle
...nozzle
3dexport
3d_export
$49
fuel nozzles
...fuel nozzles
3dexport
fuel nozzles 3d model. include max, obj, fbx files.
archive3d
free

Nozzle 3D Model
...archive3d
nozzle hair-drier ware
nozzle - 3d model (*.gsm+*.3ds) for interior 3d visualization.
turbosquid
$25

Pirouette Nozzle
... available on turbo squid, the world's leading provider of digital 3d models for visualization, films, television, and games.
turbosquid
$10

Fuel Nozzle
...model fuel nozzle for download as c4d, fbx, obj, 3ds, and stl on turbosquid: 3d models for games, architecture, videos. (1672732)
turbosquid
$8
Aeration Nozzles
... available on turbo squid, the world's leading provider of digital 3d models for visualization, films, television, and games.
3d_export
$10

laval airjet nozzle
...laval airjet nozzle
3dexport
a simple modified laval nozzle (airjet shooter) for sorting purposes.
3d_export
$36

Gas nozzle 3D Model
... 3d model
3dexport
gas pump nozzle dispenser filling station petrol fuel spout tank gun
gas nozzle 3d model tartino 1945 3dexport
turbosquid
$10

Diecast Jet nozzle
... free 3d model diecast jet nozzle for download as obj and stl on turbosquid: 3d models for games, architecture, videos. (1425990)
turbosquid
$39
Rocket nozzle, supressor.
... available on turbo squid, the world's leading provider of digital 3d models for visualization, films, television, and games.
Extruder
3ddd
$1

Extruded Chair
...extruded chair
3ddd
extruded , tom dixon
inspired by tom dixon extruded chair
turbosquid
$15

Extruded Table
... extruded table for download as blend, dae, fbx, obj, and stl on turbosquid: 3d models for games, architecture, videos. (1634137)
turbosquid
$2

3D Printer Extruder
...d
royalty free 3d model 3d printer extruder for download as on turbosquid: 3d models for games, architecture, videos. (1537359)
turbosquid
$1

Zombie extruded text
...oyalty free 3d model zombie extruded text for download as obj on turbosquid: 3d models for games, architecture, videos. (1322198)
turbosquid
$4

Extruder conical screw
...el extruder conical screw for download as sldpr, ige, and stl on turbosquid: 3d models for games, architecture, videos. (1524433)
turbosquid
$50

3d PRINTER - Extruder
... available on turbo squid, the world's leading provider of digital 3d models for visualization, films, television, and games.
turbosquid
$15

Extruded Table 2
...xtruded table 2 for download as blend, dae, fbx, obj, and stl on turbosquid: 3d models for games, architecture, videos. (1621846)
turbosquid
$10

Maya Extrude Tool
... available on turbo squid, the world's leading provider of digital 3d models for visualization, films, television, and games.
3d_export
$5

world earth extrude map
...world earth extrude map
3dexport
3ddd
$1

Simply Elegant Extruded Tree Coffee Table Design
...ble by link studios. the silhouette of a tree is visible at one angle, extruded from the surface to create the support structure.
Remix
turbosquid
$5

MODA Collection Remix Chair
... available on turbo squid, the world's leading provider of digital 3d models for visualization, films, television, and games.
3d_export
$12

remix yamaha rm1x
...remix yamaha rm1x
3dexport
geometry triangles 15.2k vertices 7.6k pbr no textures 1 materials 1 uv layers yes
3d_ocean
$5

Vray fabric Kvadrat remix green - tileable
...th vray and 3dsmax. high-resolution texture images (2000×2000 px) file included: shader vray 2.40 texture image 3ds max 2011 file
turbosquid
$20

Gerrit Rietveld 1938 Zig Zag Chair Remix
... available on turbo squid, the world's leading provider of digital 3d models for visualization, films, television, and games.
3d_export
$10

multicolored remix parametric table furniture
... fbx, obj, mtl, archive with textures. the model has no glitches. render and materials - vray . without using plugins. good use!
3ddd
$1

Barovier&Toso / Manhattan Remix 7192
... 004293-142405
в коллекции есть люстры 7, 9, 12 рожковые. диаметр соответственный 1000, 1250, 1500 мм.
3ddd
$1

Muuto fiber chair
...grey/grey, dusty green/dusty green, nature/oak, natural white/oak upholstery options remix 183/black, remix 133/grey, remix 643/dusty red leather options black...
3ddd
$1

Barovier&Toso 7190-7195
...7190-7195 3ddd barovier&toso потолочнай люстра фабрики barovier&toso;, коллекция manhattan remix артикул 7190-7195. размеры в inches: 39"...
3d_export
$5

3D Locking Handle Weatherproof Storage Box Container
...handle weatherproof storage box container 3dexport new, improved and remixd! no screws required. print-in-place. weatherproof. parametric. 2 parts. easy...
cg_studio
$49

HTC One Mini 2 Amber Gold3d model
...cell phone mobile cellular super lcd touchscreen touch screen remix amber gold .max .obj .mb .lwo .fbx .c4d .3ds...
Cleaning
turbosquid
$29

Clean Bow
...osquid
royalty free 3d model clean bow for download as blend on turbosquid: 3d models for games, architecture, videos. (1257234)
turbosquid
$25
Jacuzzi Clean
...quid
royalty free 3d model jacuzzi clean for download as max on turbosquid: 3d models for games, architecture, videos. (1461249)
turbosquid
$32

Bobcat Clean
... free 3d model bobcat clean for download as max, obj, and fbx on turbosquid: 3d models for games, architecture, videos. (1393706)
turbosquid
$1
Zanbato - Clean
...ree 3d model zanbato - clean for download as ma, obj, and fbx on turbosquid: 3d models for games, architecture, videos. (1328531)
turbosquid
$10

Cleaning Products
...model cleaning products for download as ma, max, fbx, and obj on turbosquid: 3d models for games, architecture, videos. (1559247)
turbosquid
$25
cleaning kit
... available on turbo squid, the world's leading provider of digital 3d models for visualization, films, television, and games.
turbosquid
$20

Cleaning pads
... available on turbo squid, the world's leading provider of digital 3d models for visualization, films, television, and games.
turbosquid
$16
Cleaning Bucket
... available on turbo squid, the world's leading provider of digital 3d models for visualization, films, television, and games.
turbosquid
$10
cleaning bucket
... available on turbo squid, the world's leading provider of digital 3d models for visualization, films, television, and games.
turbosquid
free

Cleaning Equipment
...ng equipment for download as max, 3ds, dae, dxf, fbx, and obj on turbosquid: 3d models for games, architecture, videos. (1693554)
System
archibase_planet
free

System
...m
archibase planet
fire alarm system fire alarm box
security light system - 3d model (*.gsm+*.3ds) for interior 3d visualization.
archibase_planet
free

Spider system
...stem spider glass system
spider system to fix glass stefano galli n050912 - 3d model (*.gsm+*.3ds) for interior 3d visualization.
3ddd
$1

Euforia System
...euforia system
3ddd
euforia
euforia system
3d_export
$50

Roof system Truss system 3D Model
...oof system truss system 3d model
3dexport
roof system truss truss stage
roof system truss system 3d model aleksbel 38970 3dexport
3ddd
$1

DVD System
...dvd system
3ddd
dvd , schneider
dvd system
design_connected
free

Seating system
...seating system
designconnected
free 3d model of seating system
3d_export
$5

solar system
...solar system
3dexport
solar system in c4d, with 8k nasa textures
3ddd
$1

Quanta System
...quanta system
3ddd
медицина
quanta system.
лазерное оборудование для медицинских центров
3d_export
$15

solar system
...nd the other the sun, the earth and the moon, the latter has an animation with camera movement included, the files are in spanish
3d_export
$14

missile system
...missile system
3dexport