Thingiverse
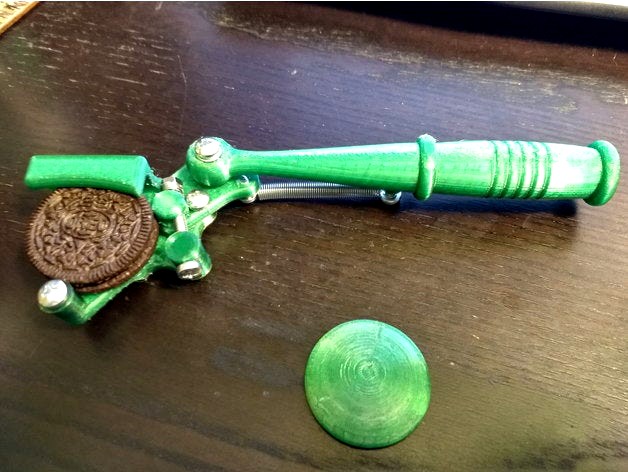
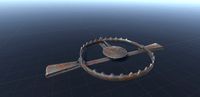
RemingtOreo Automatic Hand Trap by ShrubTek
by Thingiverse
Last crawled date: 2 years, 10 months ago
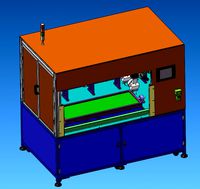
Inspired by a recent episode of C&Rsenal's It's a Trap series (highly recommend if you haven't seen it yet), I give you the RemingtOreo Automatic Hand Trap. Following the same basic operating principles as the original Remington design but shrunken down, all of the parts can fit on an Ender 2 printbed at the same time (barely).
One thing to keep in mind if you want to yeet some Oreos, the channel is tall enough to fit most regular oreos but there will naturally be a few in the pack that are too thick. To be specific, the maximum height is 12.75mm. I also included a printable practice disc, so this can be used indoors without leaving oreo residue everywhere.
This design is comprised of 5 printed parts, and the following hardware:
4 x M5x10 bolt
1 x M5x15 bolt
1 x M5x20 bolt
1 x M5x40 bolt
2 x M5 washers
1 x M5 nut
1 x ~1.5" extension spring
1 x ~0.5" compression spring
Your local hardware store is the best bet for finding a good set of springs, I had pretty good luck at a nearby Ace hardware. Either way, it may take some trial and error, or shortening of springs, to get everything dialed in.
Build instructions:
3D print components: See the attached Cura screenshot for the recommended orientation. I used PETG with 4 walls and 30% infill (100% for the spring anchor), with support enabled.
Tap holes: Holes which need to be tapped for M5x0.80 threads are marked with red arrows in the same Cura screenshot. If you don't have a tap, you can just use a short bolt and a manual screwdriver. Resist the urge to use a power screwdriver or you may melt the surrounding area.
Assemble tension arm: Attach the tapered bushing (wider end on top) and the spring anchor to the tension arm using two M5x10 bolts. Make sure they can turn freely, but with minimal slop. Start threading the M5x40 bolt through the spring anchor, but leave about 4-5mm hanging out for now.
Assemble throwing arm: Line the 40mm bolt up with the guide slot, and use an M5x10 bolt to attach the tension arm through the hole closest to the guide slot. Once again, ensure the tension arm is tight but still able to move freely.
5: Attach tension spring: Slide the compression spring over the 40mm bolt, and then line the 5mm nut up with the end of the bolt. Hold the nut in place as you finish screwing the 40mm bolt into the anchor, compressing the spring in the process.
6: Attach throwing arm to handle: Pass the 20mm bolt through the handle and thread it into the center pivot of the throwing arm, placing a washer on either side of the handle surface.
7: Attach extension spring: Loop one end of extension spring over 10mm bolt, and and then screw said bolt into the bung on the handle. Insert another 10mm bolt through the other end of the spring, and then thread it into the offset hole on the throwing arm. Adjust throwing strength by shortening extension spring if needed.
8: PULL!
The set-up for the tension arm spring could use a little more refinement still, if you have a better idea of how to set it up I can send some STEPs your way. If you run into any other issues, feel free to let me know.
Similar models
thingiverse
free

Ball-Spring Latch for Doors or Cabinets by ffleurey
...:
1 x m3 bolt (20 or 25mm long)
1 x m3 nut
1 x spring (i am using one from an ikea pressa clothespin)
1 x 11mm steel ball
grabcad
free

Bolt
...r plants. they can also be used to firmly affix embed plates to a concrete foundation when used with a structural steel element.
grabcad
free

Tension And Compression Load Cell With M20 Threaded Hole
...sion and compression force measurement, rated capacities available are 10kn, 20kn, 30kn and 50kn. drawn based on model flaf-30kn.
thingiverse
free

Coilover
... all parts except spring
print spring with 100% infill this allow it to compress without breaking.
message me with any questions
thingiverse
free

The qInch Project : Spring Phone Grip v2 by sketchpunk
...2045468
http://www.amazon.com/gp/product/b000k7m36w/ref=oh_aui_detailpage_o04_s00?ie=utf8&psc=1
freecad source included.
thingiverse
free

M5 Tap Handle by danricho
...secure the tap and for extra strength through the arms.
the tap has a 4.5mm square profile which is what the model is suited for.
3dwarehouse
free

Hardware-1/4'; Nuts & Bolts, Adjustable Length
...s and nuts (respectively) to other end; tighten. simple, low-poly graphically effective component. #bolts #hardware #nuts #washer
thingiverse
free

Phone Clamp by JustinSpanier
...one clipped in. once i had the right amount of tension, i put in the screw to hold the spring in place. it works pretty slick!!
thingiverse
free

Knob for Printruder II tension adjustment bolt by Revar
...sion adjustment, then you can more easily adjust the idler tension if you have a knob on the end of the bolt. this is that knob.
thingiverse
free

Ball grip positioning arm with mount for Infocus SP 5000 projector by Remondi2
...t with wingnut, washer, and lock washer. balls can also be re-enforced with same bolts and large fender style washers if wanted.
Shrubtek
thingiverse
free

Clippy 2021 by ShrubTek
... principle and form factor as the original. i recommend using petg for durability, but it should still work with other filaments.
thingiverse
free

UberGB - 3 x 18mm by ShrubTek
...required is the material and the will to do so.
i recommend using petg (my choice) or abs for the higher temperature resistance.
Trap
archibase_planet
free
Trap
...trap
archibase planet
trap playground
trap - 3d model for interior 3d visualization.
turbosquid
$10
Animal Trapping - Bamboo Trap
...g - bamboo trap for download as 3ds, lwo, obj, blend, and dae on turbosquid: 3d models for games, architecture, videos. (1179483)
3d_export
free
spring trap
...spring trap
3dexport
just a free fnaf spring trap
turbosquid
$7

Traps
... available on turbo squid, the world's leading provider of digital 3d models for visualization, films, television, and games.
turbosquid
$10

Animal Trapping - Leg-hold trap
...- leg-hold trap for download as 3ds, lwo, obj, blend, and dae on turbosquid: 3d models for games, architecture, videos. (1178754)
archive3d
free

Trap 3D Model
...trap 3d model
archive3d
trap playground
trap - 3d model for interior 3d visualization.
3d_export
$25
Trap 3D Model
...trap 3d model
3dexport
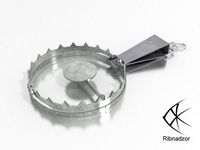
trap hunter steel spring lure ruse mousetrap
trap 3d model ribnadzor 60575 3dexport
turbosquid
$10
Cartoon trap
...rbosquid
royalty free 3d model cartoon trap for download as on turbosquid: 3d models for games, architecture, videos. (1674027)
turbosquid
$2
Wooden trap
...urbosquid
royalty free 3d model wooden trap for download as on turbosquid: 3d models for games, architecture, videos. (1641947)
turbosquid
$30
Metal Trap
...bosquid
royalty free 3d model metal trap for download as fbx on turbosquid: 3d models for games, architecture, videos. (1439394)
Automatic
archibase_planet
free

Automat
...automat
archibase planet
automat equipment
automat n190510 - 3d model (*.gsm+*.3ds) for interior 3d visualization.
3d_export
$17

Automatic wire bending machine wire automatic bending machine
...atic wire bending machine wire automatic bending machine
3dexport
automatic wire bending machine, wire automatic bending machine
archive3d
free

Automat 3D Model
...ive3d
automat equipment
automat n190510 - 3d model (*.gsm+*.3ds) for interior 3d visualization.
3d_export
$20

Design of automatic laminator
...design of automatic laminator
3dexport
design of automatic laminator
3d_export
$6
Automatic soldering machine
...automatic soldering machine
3dexport
automatic soldering machine
turbosquid
$20

automatic rifle
...id
royalty free 3d model automatic rifle for download as fbx on turbosquid: 3d models for games, architecture, videos. (1163137)
turbosquid
$9

automatic gun
...yalty free 3d model automatic gun for download as max and obj on turbosquid: 3d models for games, architecture, videos. (1226948)
turbosquid
$5

Automatic Knife
...lty free 3d model automatic knife for download as max and fbx on turbosquid: 3d models for games, architecture, videos. (1378253)
turbosquid
$15

Automatic Stamp
...d model automatic stamp for download as ma, max, fbx, and obj on turbosquid: 3d models for games, architecture, videos. (1569569)
turbosquid
$1
flashlight for automat
...flashlight for automat for download as 3ds, max, obj, and fbx on turbosquid: 3d models for games, architecture, videos. (1314717)
Hand
3d_export
$8
hand
...hand
3dexport
fantasy hand
3d_export
$5

hand
...hand
3dexport
male hand
3d_export
$5
hand
...hand
3dexport
realistic male hand
3d_export
$5

hand
...hand
3dexport
hand with nails and structure
archibase_planet
free

Hand
...hand
archibase planet
hand
hand n190111 - 3d model (*.gsm+*.3ds) for interior 3d visualization.
3ddd
$1

Hand
...hand
3ddd
hand
модель руки будды
3d_export
$5

hand
...hand
3dexport
it is my wrist of hand and this is on 3d sculpt
3d_export
$5
hand
...hand
3dexport
realistic male hand obj file
3d_export
$7

hand-006 rigged hand
...hand-006 rigged hand
3dexport
rigged right hand 3d model additional textures for pbr rendering included
3d_ocean
$6
Hand
...
this 3d models of the hands, made in 3ds max, has textures(.jpg), materials(.mat), rigged, the models in .max, fbx, obj format.