Thingiverse

Raspberry Pi Mini Desktop Vertical Case with 40mm Fan
by Thingiverse
Last crawled date: 4 years, 3 months ago
EDIT: October 28 2019 - I made an iteration of this case that is optimized for shorter print time, fewer screws and nuts, and to show off the Pi board more when used with clear acrylic panels instead of wood. All that at the expense of a fair amount of strength.
Link to new version here --> https://www.thingiverse.com/thing:3942831
I made a (not very good) video detailing some aspects about this thing.
https://youtu.be/nZuMiytBGjc
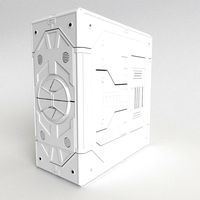
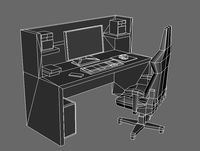
This is a case for the Raspberry Pi 3 or Raspberry Pi 4.
They hold the Pi vertically on its side. Power and HDMI cords plug into the Pi through the bottom between the uprights. The fan is at the top and can be oriented to blow in either direction (up or down).
There are two variants.
The taller variant has holes for cable routing and an option strain relief and/or cosmetic cover for the cord holes if you choose not to use them.
The shorter version is cuter, but requires some 90 degree adapters (or special cables with 90 degree ends) as it sit too short for most cable connectors to fit under.
It is quite sturdy and features pressed in captive nuts for all structural screw locations.
All exterior screws are countersunk for a clean look.
There is 27mm of headroom above the processor for a large heatsink.
There is 10mm of headroom below the board for heatsinks on components on the bottom of the board.
The fan blows across both sides of the board.
There is room next to the fan under the lid for cable management without excess cable length blocking airflow through the cavity around the Pi.
There is a recessed divot to ease access to the SD card.
The parts are designed to print flat on their face (get your first layer game on) and require no infill, require almost no support (only around the recessed divot for the SD card access). There is a part ( SDdivotSUPPORTtest.stl ) so you can tune your support settings for this part before endeavoring to print the whole side.
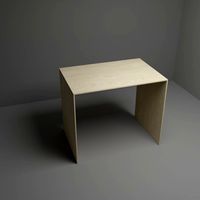
There are two faces of the finished case which in the pictures are made from wood. These are intended to minimize print time and to give the maker the opportunity to customize their case. The slots that hold these sides are .25" (~6.5mm) and the inserts are intended to be 75mm x 86mm.
There are 9mm x 2mm recesses in the bottom for silicon foot pads. These are the foot pads I use for all of my designs. -->https://www.amazon.com/gp/product/B07QW58TZH/ref=ppx_yo_dt_b_asin_title_o01_s00?ie=UTF8&psc=1
There are more pics of the shorty version here --> https://imgur.com/a/UoAlEnf
There are more pics of the tall version here --> https://imgur.com/a/RjQQ7zu
NECESSARY HARDWARE
16x m3x8mm countersunk screws
16x m3 nuts (for 5.5mm wrench - 2.5mm thick).
4x m3x16mm screws for fan
4x m2x6mm screws to mount Pi to structure
2 m3x6mm screws for optional strain relief and/or blank plate on tall version
If you would like to customize the strain relief for your particular cables, they are simple a 22mm radius quadrant, for an 8mm thick hole. I made mine 21.5mm radius with a 5 degree draft angle on the sides to ease installation.
I originally designed these to not use nuts, I can upload files designed for the screws to self-tap into the printed parts on request, but there are so many file already I decided to only upload the nut version. I found that upon repeated assembly and disassembly during the iteration process that the threads tend to pull out - thus the redesign to use nuts.
The total print time on my Ender 3, sliced in Cura, with 5 walls and no infill, at .2mm layer height, at 50mm/s (Cura default print speeds) is about 10 hours. Maybe an hour less for the shorty version.
If you wish to mount the fan so that it blows upwards (drawing hot air out of the cavity) screw the mount screws in from the bottom. The fan will be held captive by the lid. Or use countersunk screws.
Mounting the fan so it blows down from the top, standard m3 cap head screws can be used.
10/24/2019 - Uploaded FACEshimADJUSTED which is the same as face shim, just slightly taller (2mm) and slightly narrower (.5mm) for a better fit.
Link to new version here --> https://www.thingiverse.com/thing:3942831
I made a (not very good) video detailing some aspects about this thing.
https://youtu.be/nZuMiytBGjc
This is a case for the Raspberry Pi 3 or Raspberry Pi 4.
They hold the Pi vertically on its side. Power and HDMI cords plug into the Pi through the bottom between the uprights. The fan is at the top and can be oriented to blow in either direction (up or down).
There are two variants.
The taller variant has holes for cable routing and an option strain relief and/or cosmetic cover for the cord holes if you choose not to use them.
The shorter version is cuter, but requires some 90 degree adapters (or special cables with 90 degree ends) as it sit too short for most cable connectors to fit under.
It is quite sturdy and features pressed in captive nuts for all structural screw locations.
All exterior screws are countersunk for a clean look.
There is 27mm of headroom above the processor for a large heatsink.
There is 10mm of headroom below the board for heatsinks on components on the bottom of the board.
The fan blows across both sides of the board.
There is room next to the fan under the lid for cable management without excess cable length blocking airflow through the cavity around the Pi.
There is a recessed divot to ease access to the SD card.
The parts are designed to print flat on their face (get your first layer game on) and require no infill, require almost no support (only around the recessed divot for the SD card access). There is a part ( SDdivotSUPPORTtest.stl ) so you can tune your support settings for this part before endeavoring to print the whole side.
There are two faces of the finished case which in the pictures are made from wood. These are intended to minimize print time and to give the maker the opportunity to customize their case. The slots that hold these sides are .25" (~6.5mm) and the inserts are intended to be 75mm x 86mm.
There are 9mm x 2mm recesses in the bottom for silicon foot pads. These are the foot pads I use for all of my designs. -->https://www.amazon.com/gp/product/B07QW58TZH/ref=ppx_yo_dt_b_asin_title_o01_s00?ie=UTF8&psc=1
There are more pics of the shorty version here --> https://imgur.com/a/UoAlEnf
There are more pics of the tall version here --> https://imgur.com/a/RjQQ7zu
NECESSARY HARDWARE
16x m3x8mm countersunk screws
16x m3 nuts (for 5.5mm wrench - 2.5mm thick).
4x m3x16mm screws for fan
4x m2x6mm screws to mount Pi to structure
2 m3x6mm screws for optional strain relief and/or blank plate on tall version
If you would like to customize the strain relief for your particular cables, they are simple a 22mm radius quadrant, for an 8mm thick hole. I made mine 21.5mm radius with a 5 degree draft angle on the sides to ease installation.
I originally designed these to not use nuts, I can upload files designed for the screws to self-tap into the printed parts on request, but there are so many file already I decided to only upload the nut version. I found that upon repeated assembly and disassembly during the iteration process that the threads tend to pull out - thus the redesign to use nuts.
The total print time on my Ender 3, sliced in Cura, with 5 walls and no infill, at .2mm layer height, at 50mm/s (Cura default print speeds) is about 10 hours. Maybe an hour less for the shorty version.
If you wish to mount the fan so that it blows upwards (drawing hot air out of the cavity) screw the mount screws in from the bottom. The fan will be held captive by the lid. Or use countersunk screws.
Mounting the fan so it blows down from the top, standard m3 cap head screws can be used.
10/24/2019 - Uploaded FACEshimADJUSTED which is the same as face shim, just slightly taller (2mm) and slightly narrower (.5mm) for a better fit.
Similar models
thingiverse
free

Vertical Case for Raspberry Pi 4 with Ice Tower Cooler
...ttps://imgur.com/a/xnnljwp
pics of the first prototype and disassembly (reverse process of assembly) https://imgur.com/a/fuhbiuq
thingiverse
free

"The Wind Tunnel" Raspberry Pi Cluster Case v1 by johtib
...witch.
slide in the trays. they should snap in.
connect the network cables, sata adaters cables, and the fan hub's usb cable.
thingiverse
free

Duet 3 support (with Raspberry Pi) by cad405
...cools down both the pi and the bottom part of the duet. in my case i have a noctua nf12x25 cooling this setup (overkill, i know).
thingiverse
free

Raspberry Pi 4 B Case With Fan Cross Blow by Coolkid171717
...s across the board instead of blowing down on top of the board.
it will take a bit of super glue to attach the parts for the fan.
thingiverse
free

Raspberry Pi A+ Case | simple by TueftelTyp
...h 30mm fan
top2 = with air passage
top3 = without any cuts
as always i would be happy to see your print as a make to get feedback
thingiverse
free

Raspberry Pi Case by edsped
...se
basic raspberry pi case. requires (4) m3 x 8 socket head cap screws. top and bottoms are 2mm thick, sides are 1.5mm thick.
thingiverse
free

Raspberry Pi 3 A+ Case (remix from tvarok)
...ll just go back to the screws instead(screw holes hidden from top). the nut recess is completely removed for the 2mm screw holes.
thingiverse
free

Raspberry PI 2 Case by Davideraffo
...tted to 8) with 4 m2 nut (for the raspberry board)
i hope you like it!
if you have any problem with the printing, please write me
thingiverse
free

Raspberry Pi Model B (B+/2/3) Case for 40mm Low Profile Fan
...countersink machine screws. the raspberry pi board itself is attached by use of standard m2.5x6 machine screws and m2.5 hex nuts.
thingiverse
free

Ender 3 OctoPi Case (with GeekPi Cooling Fan clearance) by DrakonKlaw
...:4568590) to be place on the v-slots of the ender 3.
this is meant for an octopi.
image bypass: https://imgur.com/gallery/dm03ydo
Raspberry
3d_export
free

raspberry
...raspberry
3dexport
3d model of a raspberry. i tried to make it realistic.
turbosquid
$27

Raspberries
...y free 3d model raspberries for download as max, obj, and stl on turbosquid: 3d models for games, architecture, videos. (1354176)
turbosquid
$14

Raspberries
...y free 3d model raspberries for download as max, obj, and fbx on turbosquid: 3d models for games, architecture, videos. (1364663)
3d_export
$5

raspberry pi
...raspberry pi
3dexport
carcasa para la raspberry pi
turbosquid
$99

Raspberry
... available on turbo squid, the world's leading provider of digital 3d models for visualization, films, television, and games.
turbosquid
$10

raspberries
... available on turbo squid, the world's leading provider of digital 3d models for visualization, films, television, and games.
archive3d
free

Raspberries 3D Model
...raspberries 3d model archive3d raspberries raspberry raspberries n300911 - 3d model (*.3ds) for interior 3d...
3d_export
$5

raspberry fruit
...raspberry fruit
3dexport
3d_export
$5

raspberry
...y different sizes. their color ranges from light burgundy to pink. there are formats: obj, 3ds, blend, dae, fbx, mtl.<br>:)
evermotion
$12

raspberries 23 am130
...evermotion raspberries 23 am130 evermotion key 23 food fruit raspberry fruits am130 raspberries highly detailed 3d model of raspberries...
40Mm
turbosquid
$10

40MM Bullet
... available on turbo squid, the world's leading provider of digital 3d models for visualization, films, television, and games.
turbosquid
$49
40mm Vickers-Terni
... free 3d model 40mm vickers-terni for download as lwo and obj on turbosquid: 3d models for games, architecture, videos. (1260063)
turbosquid
$3
40mm grenade M9XX
...y free 3d model 40mm grenade m9xx for download as obj and fbx on turbosquid: 3d models for games, architecture, videos. (1408150)
turbosquid
$3

40mm grenade M3XX
...y free 3d model 40mm grenade m3xx for download as obj and fbx on turbosquid: 3d models for games, architecture, videos. (1408145)
turbosquid
$3
40mm grenade M1XX
...y free 3d model 40mm grenade m1xx for download as obj and fbx on turbosquid: 3d models for games, architecture, videos. (1408144)
turbosquid
$8

40mm Smith & Wesson
... available on turbo squid, the world's leading provider of digital 3d models for visualization, films, television, and games.
turbosquid
free
Free 40mm grenade M433
...e 3d model free 40mm grenade m433 for download as obj and fbx on turbosquid: 3d models for games, architecture, videos. (1404768)
turbosquid
$98

40mm 6G30 grenade launcher
... available on turbo squid, the world's leading provider of digital 3d models for visualization, films, television, and games.
turbosquid
$10

Famas G2 M203 40mm.
... available on turbo squid, the world's leading provider of digital 3d models for visualization, films, television, and games.
turbosquid
free
40mm Bofors TNT-11606
... available on turbo squid, the world's leading provider of digital 3d models for visualization, films, television, and games.
Desktop
3d_export
$5
desktop
...desktop
3dexport
full desktop
3d_export
$15

Desktop
...desktop
3dexport
desktop, monitor, system unit, backlit keyboard.
3d_export
$5

desktop
...desktop
3dexport
desktop with shelving. very convenient and practical find.
turbosquid
$5
Desktop
...turbosquid
royalty free 3d model desktop for download as jpg on turbosquid: 3d models for games, architecture, videos. (1329464)
turbosquid
$1

Desktop
...turbosquid
royalty free 3d model desktop for download as fbx on turbosquid: 3d models for games, architecture, videos. (1661325)
3d_export
$10
110x60 desktop
...110x60 desktop
3dexport
110x60 desktop
turbosquid
$20

Desktop
...lty free 3d model desktop for download as blend, fbx, and obj on turbosquid: 3d models for games, architecture, videos. (1624648)
turbosquid
$20
Desktop
...oyalty free 3d model desktop for download as ma, obj, and fbx on turbosquid: 3d models for games, architecture, videos. (1309418)
turbosquid
$15

Desktop
...yalty free 3d model desktop for download as 3ds, obj, and c4d on turbosquid: 3d models for games, architecture, videos. (1445073)
3d_export
$5
desktop
...desktop
3dexport
a desk will fit into the room
Pi
design_connected
$11

Pi
...pi
designconnected
ligne roset pi chairs computer generated 3d model. designed by thibault desombre.
3d_export
$5
raspberry pi
...raspberry pi
3dexport
carcasa para la raspberry pi
turbosquid
$18

pied
... available on turbo squid, the world's leading provider of digital 3d models for visualization, films, television, and games.
3ddd
$1

Emme pi light
...emme pi light
3ddd
emme pi light
люста emme pi light
3ddd
$1

Emme pi light
...emme pi light
3ddd
emme pi light
бра классическое emme pi light
3ddd
$1

Emme Pi Light
...emme pi light
3ddd
emme pi light
3ddd
$1

Emme Pi Light
...emme pi light
3ddd
emme pi light
design_connected
$16

Pi-Air
...pi-air
designconnected
living divani pi-air lounge chairs computer generated 3d model. designed by harry & camila.
3d_ocean
$15

Manneken Pis
...picting a naked little boy urinating into a fountain’s basin. (wikipedia) the model was sculpted in blender 2.70a rendered wit...
3ddd
$1

Emme pi light
...emme pi light
3ddd
emme pi light
люстра классическая фирма: emme pi light
артикул: 3595/5/cot/12/wh
Mini
turbosquid
$10

Mini Mini Luceplan
...
royalty free 3d model mini mini luceplan for download as max on turbosquid: 3d models for games, architecture, videos. (1227359)
3d_ocean
$39

Mini Cooper
...mini cooper
3docean
cabrioler cooper mini
mini cooper cabrioler
3d_export
$30

Mini lathe
...mini lathe
3dexport
mini lathe
3d_export
$5

mini mouse
...mini mouse
3dexport
mini mouse
3d_export
$5

mini house
...mini house
3dexport
mini house
3d_export
free

Mini Mecha
...mini mecha
3dexport
concept of mini mecha
3d_ocean
$20

Mini Gun
...mini gun
3docean
gatling gun gun machine gun mini gun weapon
model of a mini gatling gun.
3ddd
free

Herve mini
... кофейный , herve
http://www.mobiliavenanti.it/ru/products/hervè-mini
3d_export
$5

mini wall
...mini wall
3dexport
mini wall for living room
3d_export
$5

mini bank
...mini bank
3dexport
mini bank 3d model
Fan
3d_export
$5

fan
...fan
3dexport
fan 3d model, table fan, fan, electric fan, ventilator
archibase_planet
free

Fan
...fan
archibase planet
fan large fan
fan out n260707 - 3d model for interior 3d visualization.
archibase_planet
free

Fan
...fan
archibase planet
fan ceiling fan ventilator
fan stealth n300615 - 3d model (*.gsm+*.3ds) for interior 3d visualization.
3d_export
$15

fan
...fan
3dexport
is an ancient fan
3ddd
$1

Fan-C-Fan by marco gallegos
...n-c-fan by marco gallegos
3ddd
вентилятор , marco gallegos
fan-c-fan by marco gallegos
3d_export
$10

fan
...fan
3dexport
a detailed fan designed for home or space blowing is now available for only 19.99!
turbosquid
$1

Fan
...fan
turbosquid
free 3d model fan for download as on turbosquid: 3d models for games, architecture, videos. (1427865)
turbosquid
$14

Fan
...fan
turbosquid
royalty free 3d model fan for download as on turbosquid: 3d models for games, architecture, videos. (1415642)
3ddd
$1

Светильник Fan
...светильник fan
3ddd
fan , italamp
светильник fan, производитель italamp
turbosquid
$25

Fan
...fan
turbosquid
royalty free 3d model fan for download as c4d on turbosquid: 3d models for games, architecture, videos. (1483246)
Vertical
3ddd
$1
Vertical curtain
...vertical curtain
3ddd
роллеты
vertical curtain
modern curtain
design_connected
$11
Mr.Tubes Vertical
...mr.tubes vertical
designconnected
tonone mr.tubes vertical computer generated 3d model.
3ddd
free
Vertical gardening
... фитомодуль , фитостена
vertical gardening
2000x1000x165
vizpark
$5
Einstein Vertical
...tical is a set of 3d brick textures for modern buildings, including mulit-textures and 4k tileable textures with material layers.
turbosquid
$5

brazier vertical
... free 3d model brazier vertical for download as sldas and ige on turbosquid: 3d models for games, architecture, videos. (1647570)
turbosquid
$18
Vertical blinds
...ee 3d model vertical blinds for download as max, obj, and fbx on turbosquid: 3d models for games, architecture, videos. (1604868)
3d_export
$40

vertical stirling engine
...vertical stirling engine
3dexport
vertical stirling engine
turbosquid
$6
vertical fence
...d model vertical fence for download as c4d, 3ds, dxf, and obj on turbosquid: 3d models for games, architecture, videos. (1571631)
turbosquid
$50

Vertical Garden
... available on turbo squid, the world's leading provider of digital 3d models for visualization, films, television, and games.
turbosquid
$20

vertical flag
... available on turbo squid, the world's leading provider of digital 3d models for visualization, films, television, and games.
Case
3d_export
$1

case
...case
3dexport
case
archibase_planet
free

Case
...case
archibase planet
showcase show-case glass case
glass-case + cakes - 3d model for interior 3d visualization.
archibase_planet
free

Case
...case
archibase planet
showcase show-case glass case
glass-case for chips - 3d model for interior 3d visualization.
archibase_planet
free

Case
...case
archibase planet
case shelving drawer
case - 3d model for interior 3d visualization.
archibase_planet
free

Case
...case
archibase planet
case rack locker
case - 3d model for interior 3d visualization.
archibase_planet
free

Case
...case
archibase planet
case drawer kitchen furniture
case - 3d model for interior 3d visualization.
archibase_planet
free

Case
...case
archibase planet
case cupboard shelving
glass case - 3d model for interior 3d visualization.
archibase_planet
free

Case
...case
archibase planet
case handbag suitcase
case - 3d model (*.gsm+*.3ds) for interior 3d visualization.
archibase_planet
free

Case
...case
archibase planet
case suitcase
case 5 - 3d model (*.gsm+*.3ds) for interior 3d visualization.
archibase_planet
free

Case
...case
archibase planet
locker case dresser
case - 3d model (*.gsm+*.3ds) for interior 3d visualization.