Thingiverse
Raspberry Pi Camera Mount for MP Select Mini by Bogdan87
by Thingiverse
Last crawled date: 3 years ago
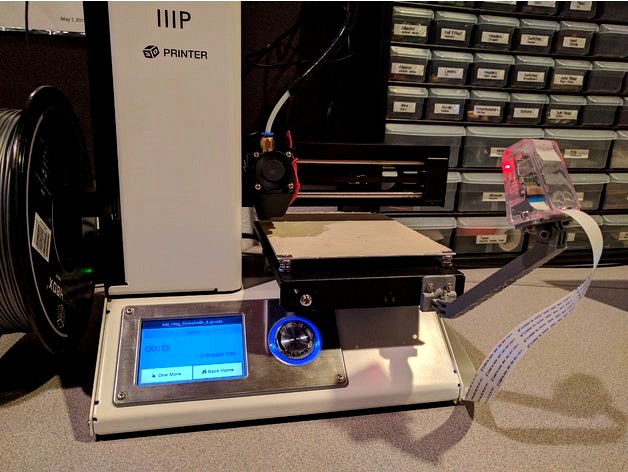
This mount allows you to attach Raspberry Pi camera directly to the bed of Monoprice Select Mini, for a great videos/timelapses and monitoring the progress of your prints.
Raspberry Pi Camera is significantly lighter than, for example, GoPro, so it won't put much strain on the bed/stepper motor. Also, many of us already have a Raspberry Pi running OctoPrint, so this is an easy addition.
See a video of the mount in use:http://youtu.be/EGkVbrJnm24
Note that there are 2 alternative camera mounts: one directly for the Raspberry Pi and one for a camera case I had (link below), and decided to make one mount for it too - for those of us that prefer the camera to be enclosed. Both designs have been tested.
Requirements:
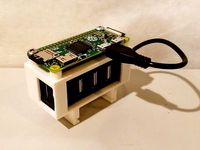
Raspberry Pi (1/2/3/anything that runs OctoPrint/OctoPi)
Raspberry Pi Camera (V1 or V2, Note: I only have V1 thus I haven't tried with V2 myself, I'm hoping it should work as well as the size seems to be same)
longer camera cable: https://www.amazon.com/gp/product/B00M4DAQH8/ref=as_li_ss_tl?ie=UTF8&linkCode=sl1&tag=bberg-20&linkId=952e392a3b7c959f07e79b9ad41ab5aa
M3 screws and M2 spacers
Optional:
Camera case: https://www.amazon.com/gp/product/B00M4DAQH8/ref=as_li_ss_tl?ie=UTF8&linkCode=sl1&tag=bberg-20&linkId=952e392a3b7c959f07e79b9ad41ab5aa
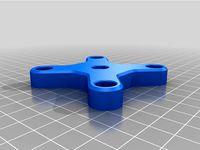
In most cases you'll need to print only those 3 pars:
bed mount
arm (use longer or shorter depending on the preference of camera angle)
camera mount
I had the above camera case available, thus the "camera housing mount" is designed to fit with this particular element, if you happen to have it too and would prefer to use it instead of the open "camera mount".
If you want to make your own element to hold the camera (i.e. for any other camera case), here are the tab dimensions, to allow seamless joining with the arm:
tab length: 12mm
tab height: 10mm
tab thickness: 2mm
tab spacing: 2.55mm (note: this is space between tabs, not the pitch, and is slightly larger than tab thickness to allow easy fitting)
M3 hole diameter: 3.75mm
fillet at the end of the tab: 6mm (half of the tab length, so it's completely round)
*** bed and camera housing mounts have 2 tabs (prongs?) in a joint, the arm has 3 tabs for joint on each side
Moreover, provided is a test pieces for the joints. Please feel free to use it for your remakes for a quicker development :)
To make sure the joints fit nicely with your print settings, you can print the "camera housing mount" and "joint for test" files, and then check the fitting. If it's correct, print the remaining parts.
Screws required for assembly:
M3x8mm - quantity: 4 (4 screws, 4 nuts)
M3x16mm - quantity: 2 (2 screws, 2 nuts)
M2 spacers, screws, nuts - quantity: 4 pairs (to attach the camera to the mount)
If you don't have those, they can be easily purchased i.e. on Amazon: -
M3 and M2 screws: https://www.amazon.com/gp/product/B00M4DAQH8/ref=as_li_ss_tl?ie=UTF8&linkCode=sl1&tag=bberg-20&linkId=952e392a3b7c959f07e79b9ad41ab5aa
M2 spacers (stand-offs): https://www.amazon.com/gp/product/B00M4DAQH8/ref=as_li_ss_tl?ie=UTF8&linkCode=sl1&tag=bberg-20&linkId=952e392a3b7c959f07e79b9ad41ab5aa
Those are the exact sets I use, thus I guarantee the required sizes are in those sets.
No drilling required, and it screws right onto the bed, which happens to have conveniently located holes. It doesn't collide with the base as bed moves, with fan/hot end, x/y gantry, doesn't come in the way of linear bearings under the bed - I checked it all :)
And mounting camera this way makes time-lapses significantly better: instead of bed jumping back and forth (as is the case with cameras mounted to the base instead of bed, or standing next to the printer), you can actually see the product being constructed.
Great for use with OctoPrint!
[Updated on 4/23/2017]: I re-uploaded updated version of the "bed mount" - considering that there are various M3 screws out there, with varying head heights, I moved the tabs a little higher to minimize the risk of scratching the base.
[Updated on 4/30/2017]: Added short arm - about half the length of the original arm. Makes for a more compact package, and provide slightly better view of the printed object.
Note: if the footage from your Raspberry Pi camera appears blurry, you can adjust the focus by screwing the lens - there's even a dedicated tool to do that. Quick search will tell you everything :)
Enjoy!
For more projects, please visit my personal blog:http://www.BogdanBerg.com/
Raspberry Pi Camera is significantly lighter than, for example, GoPro, so it won't put much strain on the bed/stepper motor. Also, many of us already have a Raspberry Pi running OctoPrint, so this is an easy addition.
See a video of the mount in use:http://youtu.be/EGkVbrJnm24
Note that there are 2 alternative camera mounts: one directly for the Raspberry Pi and one for a camera case I had (link below), and decided to make one mount for it too - for those of us that prefer the camera to be enclosed. Both designs have been tested.
Requirements:
Raspberry Pi (1/2/3/anything that runs OctoPrint/OctoPi)
Raspberry Pi Camera (V1 or V2, Note: I only have V1 thus I haven't tried with V2 myself, I'm hoping it should work as well as the size seems to be same)
longer camera cable: https://www.amazon.com/gp/product/B00M4DAQH8/ref=as_li_ss_tl?ie=UTF8&linkCode=sl1&tag=bberg-20&linkId=952e392a3b7c959f07e79b9ad41ab5aa
M3 screws and M2 spacers
Optional:
Camera case: https://www.amazon.com/gp/product/B00M4DAQH8/ref=as_li_ss_tl?ie=UTF8&linkCode=sl1&tag=bberg-20&linkId=952e392a3b7c959f07e79b9ad41ab5aa
In most cases you'll need to print only those 3 pars:
bed mount
arm (use longer or shorter depending on the preference of camera angle)
camera mount
I had the above camera case available, thus the "camera housing mount" is designed to fit with this particular element, if you happen to have it too and would prefer to use it instead of the open "camera mount".
If you want to make your own element to hold the camera (i.e. for any other camera case), here are the tab dimensions, to allow seamless joining with the arm:
tab length: 12mm
tab height: 10mm
tab thickness: 2mm
tab spacing: 2.55mm (note: this is space between tabs, not the pitch, and is slightly larger than tab thickness to allow easy fitting)
M3 hole diameter: 3.75mm
fillet at the end of the tab: 6mm (half of the tab length, so it's completely round)
*** bed and camera housing mounts have 2 tabs (prongs?) in a joint, the arm has 3 tabs for joint on each side
Moreover, provided is a test pieces for the joints. Please feel free to use it for your remakes for a quicker development :)
To make sure the joints fit nicely with your print settings, you can print the "camera housing mount" and "joint for test" files, and then check the fitting. If it's correct, print the remaining parts.
Screws required for assembly:
M3x8mm - quantity: 4 (4 screws, 4 nuts)
M3x16mm - quantity: 2 (2 screws, 2 nuts)
M2 spacers, screws, nuts - quantity: 4 pairs (to attach the camera to the mount)
If you don't have those, they can be easily purchased i.e. on Amazon: -
M3 and M2 screws: https://www.amazon.com/gp/product/B00M4DAQH8/ref=as_li_ss_tl?ie=UTF8&linkCode=sl1&tag=bberg-20&linkId=952e392a3b7c959f07e79b9ad41ab5aa
M2 spacers (stand-offs): https://www.amazon.com/gp/product/B00M4DAQH8/ref=as_li_ss_tl?ie=UTF8&linkCode=sl1&tag=bberg-20&linkId=952e392a3b7c959f07e79b9ad41ab5aa
Those are the exact sets I use, thus I guarantee the required sizes are in those sets.
No drilling required, and it screws right onto the bed, which happens to have conveniently located holes. It doesn't collide with the base as bed moves, with fan/hot end, x/y gantry, doesn't come in the way of linear bearings under the bed - I checked it all :)
And mounting camera this way makes time-lapses significantly better: instead of bed jumping back and forth (as is the case with cameras mounted to the base instead of bed, or standing next to the printer), you can actually see the product being constructed.
Great for use with OctoPrint!
[Updated on 4/23/2017]: I re-uploaded updated version of the "bed mount" - considering that there are various M3 screws out there, with varying head heights, I moved the tabs a little higher to minimize the risk of scratching the base.
[Updated on 4/30/2017]: Added short arm - about half the length of the original arm. Makes for a more compact package, and provide slightly better view of the printed object.
Note: if the footage from your Raspberry Pi camera appears blurry, you can adjust the focus by screwing the lens - there's even a dedicated tool to do that. Quick search will tell you everything :)
Enjoy!
For more projects, please visit my personal blog:http://www.BogdanBerg.com/
Similar models
thingiverse
free

Pi Camera Bed Mount by SrgntBallistic
..._ss_tl?ie=utf8&psc=1&linkcode=sl1&tag=srgnballgam08-20&linkid=028bc89a9db7d0b42ea4716749a6c14b&language=en_us
thingiverse
free
Pi Zero DIN rail mount with USB by cdoc83
...duct/b01hyjlzh6/ref=as_li_ss_tl?ie=utf8&psc=1&linkcode=sl1&tag=dtech1c-20&linkid=6c14fa74b8c872f1ad8524053f0c2c57
thingiverse
free

Camera Housing for OV5647 Raspberry Pi Camera by willburns1
...ct/b06xydcn5n/ref=as_li_ss_tl?ie=utf8&psc=1&linkcode=sl1&tag=wilthethr-20&linkid=9785d6032317c2a2f39e18949a6861f5
thingiverse
free

Arcade Joystick / Pi Console by KyleMohr
...1&tag=kmpro03-20&linkid=d06b7eb13997617527994b9af0dee76f
printable pizero case: https://www.thingiverse.com/thing:1167846
thingiverse
free
Onefinity Monitor Arm Connector by cyberreefguru
...g=cyberreefgu0c-20&linkid=14415004f4b141eaae9525187bb68eb3&language=en_us&ref_=as_li_ss_tl (for 7" monitor only)
thingiverse
free

Portal Button Coaster - Multimaterial by danellinwood
...&linkcode=sl1&tag=dellinwo-20&linkid=7f0f72b95d3965e96e272a307e4a7a93) underneath so it does not slide around. enjoy!
thingiverse
free

Motor Speed Controller housing for openbuild's camera slider by Jason3030
... for the motor mount, 2040 extrusion, and pulley gears: http://openbuildspartstore.com/v-slot-linear-actuator-bundle-belt-driven/
grabcad
free

Arducam OV5647
..._ss_tl?ie=utf8&psc=1&linkcode=sl1&tag=thingiverse09-20&linkid=e2797db44db54482950d4da82781a6a7&language=en_us
thingiverse
free

Root 2 CNC - Y-Axis Lead Screw by buffcleb
...l1&tag=wwwbethnchris-20&linkid=787274899a636388afbef7bf399e9845
2 - 8mm to 8mm shaft couplers : i 3d-printed some for now
thingiverse
free

SSR Box w/Fan for 120VAC heated bed by jterranella
...duct/b00nwle4u6/ref=as_li_ss_tl?ie=utf8&psc=1&linkcode=sl1&tag=joemike-20&linkid=54e04dfc5d7b866921a57b3ea50cac98
Bogdan87
thingiverse
free

Ring - Paw Print by Bogdan87
...es: https://en.wikipedia.org/wiki/ring_size
enjoy!
for more interesting projects, please visit my blog:http://www.bogdanberg.com/
thingiverse
free

MP Select Mini - Extruder Spinner by Bogdan87
...fit - can be removed in a second if needed.
enjoy!
for more interesting projects, please visit my blog:http://www.bogdanberg.com/
thingiverse
free

Ring - Cat Ears by Bogdan87
...es: https://en.wikipedia.org/wiki/ring_size
enjoy!
for more interesting projects, please visit my blog:http://www.bogdanberg.com/
thingiverse
free

Pet Cage Hanger by Bogdan87
...s, gerbils, guinea pigs, ferrets, etc.).
enjoy! :)
for more interesting projects, please visit my blog:http://www.bogdanberg.com/
thingiverse
free

Logitech G29 / G920 Magnetic Shifter Mod by Bogdan87
...tp://www.bogdanberg.com
to find more sim racing mods, as well as a complete build instructions for diy motion platform (sfx-100).
thingiverse
free

Spinner - with bearings and cap, balanced, no glue by Bogdan87
...youtu.be/cmrsjpeinfs
for more information, and other interesting projects, please visit my blog:http://www.bogdanberg.com/
enjoy!
thingiverse
free

Hamster Wheel (Silent Spinner) Mount by Bogdan87
... of your happy hamster if you make one of those :)
for more interesting projects, please visit my blog:http://www.bogdanberg.com/
thingiverse
free

Monoprice Select Mini GoPro Mount by jonotr
...the bed of the printer, found the design by bogdan87 and decided to remove some of the arms etc....
thingiverse
free

HTC Vive Gun Stock (magnetic, adjustable, easy print) by Bogdan87
...#39;re available in home depot as well.
hope you enjoy!
for other hobby projects, please visit my blog:http://www.bogdanberg.com/
Mp
turbosquid
$19
MP-5
...-5
turbosquid
royalty free 3d model mp-5 for download as fbx on turbosquid: 3d models for games, architecture, videos. (1537795)
turbosquid
$3

MP-18
...turbosquid
royalty free 3d model mp-18 for download as blend on turbosquid: 3d models for games, architecture, videos. (1506436)
turbosquid
$5

Mp-28
...quid
royalty free 3d model mp-28 for download as fbx and obj on turbosquid: 3d models for games, architecture, videos. (1613220)
turbosquid
$5

Nightstand MP
...yalty free 3d model nightstand mp for download as max and fbx on turbosquid: 3d models for games, architecture, videos. (1655571)
turbosquid
$25

MP 3008
... available on turbo squid, the world's leading provider of digital 3d models for visualization, films, television, and games.
turbosquid
$25

MP 28
... available on turbo squid, the world's leading provider of digital 3d models for visualization, films, television, and games.
turbosquid
$20
MP-44
... available on turbo squid, the world's leading provider of digital 3d models for visualization, films, television, and games.
turbosquid
$20
MP-153
... available on turbo squid, the world's leading provider of digital 3d models for visualization, films, television, and games.
turbosquid
$2

Mp 41
... available on turbo squid, the world's leading provider of digital 3d models for visualization, films, television, and games.
turbosquid
free
MP-44.3ds
... available on turbo squid, the world's leading provider of digital 3d models for visualization, films, television, and games.
Raspberry
3d_export
free

raspberry
...raspberry
3dexport
3d model of a raspberry. i tried to make it realistic.
turbosquid
$27

Raspberries
...y free 3d model raspberries for download as max, obj, and stl on turbosquid: 3d models for games, architecture, videos. (1354176)
turbosquid
$14

Raspberries
...y free 3d model raspberries for download as max, obj, and fbx on turbosquid: 3d models for games, architecture, videos. (1364663)
3d_export
$5

raspberry pi
...raspberry pi
3dexport
carcasa para la raspberry pi
turbosquid
$99

Raspberry
... available on turbo squid, the world's leading provider of digital 3d models for visualization, films, television, and games.
turbosquid
$10

raspberries
... available on turbo squid, the world's leading provider of digital 3d models for visualization, films, television, and games.
archive3d
free

Raspberries 3D Model
...raspberries 3d model archive3d raspberries raspberry raspberries n300911 - 3d model (*.3ds) for interior 3d...
3d_export
$5

raspberry fruit
...raspberry fruit
3dexport
3d_export
$5

raspberry
...y different sizes. their color ranges from light burgundy to pink. there are formats: obj, 3ds, blend, dae, fbx, mtl.<br>:)
evermotion
$12

raspberries 23 am130
...evermotion raspberries 23 am130 evermotion key 23 food fruit raspberry fruits am130 raspberries highly detailed 3d model of raspberries...
Pi
design_connected
$11

Pi
...pi
designconnected
ligne roset pi chairs computer generated 3d model. designed by thibault desombre.
3d_export
$5
raspberry pi
...raspberry pi
3dexport
carcasa para la raspberry pi
turbosquid
$18

pied
... available on turbo squid, the world's leading provider of digital 3d models for visualization, films, television, and games.
3ddd
$1

Emme pi light
...emme pi light
3ddd
emme pi light
люста emme pi light
3ddd
$1

Emme pi light
...emme pi light
3ddd
emme pi light
бра классическое emme pi light
3ddd
$1

Emme Pi Light
...emme pi light
3ddd
emme pi light
3ddd
$1

Emme Pi Light
...emme pi light
3ddd
emme pi light
design_connected
$16

Pi-Air
...pi-air
designconnected
living divani pi-air lounge chairs computer generated 3d model. designed by harry & camila.
3d_ocean
$15

Manneken Pis
...picting a naked little boy urinating into a fountain’s basin. (wikipedia) the model was sculpted in blender 2.70a rendered wit...
3ddd
$1

Emme pi light
...emme pi light
3ddd
emme pi light
люстра классическая фирма: emme pi light
артикул: 3595/5/cot/12/wh
Select
3ddd
$1

TUBADZIN SELECT
...max 2014, 2011.
fbx 2014, 2013, 2011,
obj
_____________________________________http://www.tubadzin.pl/en/collection/324
3ddd
$1
Плитка Selection
... supergres , плитка
плитка selection - supergres ceramiche
turbosquid
$15
Christmas Selection
...royalty free 3d model christmas selection for download as fbx on turbosquid: 3d models for games, architecture, videos. (1696333)
turbosquid
$39

Vases selection
... available on turbo squid, the world's leading provider of digital 3d models for visualization, films, television, and games.
turbosquid
free

SELECTIVE RACKING SYSTEM
...yalty free 3d model selective racking system for download as on turbosquid: 3d models for games, architecture, videos. (1282512)
turbosquid
$10
Hansgrohe ShowerTablet Select
...ee 3d model hansgrohe showertablet select for download as max on turbosquid: 3d models for games, architecture, videos. (1336955)
turbosquid
$29
Chill selectional sofa
...odel chill selectional sofa for download as max, obj, and fbx on turbosquid: 3d models for games, architecture, videos. (1465691)
3ddd
free

Lunaria - Nova, ASA Selection
... asa selection , dried flowers
ветка лунарии в вазе nova, asa selection
3ddd
$1
inno SELECT SLIM chair
...inno select slim chair
3ddd
inno
high detailed inno select slim chair
turbosquid
$29

Select Chaise Lounge
... available on turbo squid, the world's leading provider of digital 3d models for visualization, films, television, and games.
Mini
turbosquid
$10

Mini Mini Luceplan
...
royalty free 3d model mini mini luceplan for download as max on turbosquid: 3d models for games, architecture, videos. (1227359)
3d_ocean
$39

Mini Cooper
...mini cooper
3docean
cabrioler cooper mini
mini cooper cabrioler
3d_export
$30

Mini lathe
...mini lathe
3dexport
mini lathe
3d_export
$5

mini mouse
...mini mouse
3dexport
mini mouse
3d_export
$5

mini house
...mini house
3dexport
mini house
3d_export
free

Mini Mecha
...mini mecha
3dexport
concept of mini mecha
3d_ocean
$20

Mini Gun
...mini gun
3docean
gatling gun gun machine gun mini gun weapon
model of a mini gatling gun.
3ddd
free

Herve mini
... кофейный , herve
http://www.mobiliavenanti.it/ru/products/hervè-mini
3d_export
$5

mini wall
...mini wall
3dexport
mini wall for living room
3d_export
$5

mini bank
...mini bank
3dexport
mini bank 3d model
Camera
archibase_planet
free
Camera
...base planet
camera surveillance camera video camera
camera surveillance n090211 - 3d model (*.3ds) for interior 3d visualization.
archibase_planet
free

Camera
...hibase planet
camera security camera video camera
camera security n210515 - 3d model (*.gsm+*.3ds) for exterior 3d visualization.
archibase_planet
free
Camera
...se planet
camera web camera webcam
camera butterfly usb pc camera n090713 - 3d model (*.gsm+*.3ds) for interior 3d visualization.
archibase_planet
free
Camera
...mera
archibase planet
surveillance camera video camera camcorder
camera n011211 - 3d model (*.3ds) for exterior 3d visualization.
archibase_planet
free
Camera
...camera
archibase planet
camera digital camera
camera canon digital n041211 - 3d model (*.3ds) for interior 3d visualization.
archibase_planet
free
Camera
...camera
archibase planet
camera film camera phototechnique
camera n100214 - 3d model (*.gsm+*.3ds) for interior 3d visualization.
archibase_planet
free

Camera
...amera
archibase planet
camera video camera camcorder
camera video n070315 - 3d model (*.gsm+*.3ds) for interior 3d visualization.
archibase_planet
free
Camera
...rchibase planet
camera video camera camcorder
camera studio n101213 - 3d model (*.gsm+*.3ds+*.max) for interior 3d visualization.
archibase_planet
free
Camera
...ibase planet
digital camera camera phototechnique
camera canon ixus 400 n310311 - 3d model (*.3ds) for interior 3d visualization.
archibase_planet
free
Camera
...ase planet
photocamera video camera camera
camera sony t300 black n291010 - 3d model (*.gsm+*.3ds) for interior 3d visualization.
Mount
3d_export
free

mounting bracket
...mounting plate is the portion of a hinge that attaches to the wood. mounting plates can be used indoors, cabinetry and furniture.
turbosquid
$2

MOUNTING
... available on turbo squid, the world's leading provider of digital 3d models for visualization, films, television, and games.
turbosquid
free

Mounts
... available on turbo squid, the world's leading provider of digital 3d models for visualization, films, television, and games.
turbosquid
free

Mount Fuji
...fuji
turbosquid
free 3d model mount fuji for download as obj on turbosquid: 3d models for games, architecture, videos. (1579977)
3d_export
$5

Headphone mount LR
...headphone mount lr
3dexport
headphone mount l+r
turbosquid
$39

Mount rainier
...quid
royalty free 3d model mount rainier for download as fbx on turbosquid: 3d models for games, architecture, videos. (1492586)
turbosquid
$5

pipe mounting
...quid
royalty free 3d model pipe mounting for download as obj on turbosquid: 3d models for games, architecture, videos. (1293744)
turbosquid
$3

Mounting Tires
...uid
royalty free 3d model mounting tires for download as fbx on turbosquid: 3d models for games, architecture, videos. (1708511)
3d_export
$5

Magnetic GoPro Mount
...pro mount
3dexport
cool magnetic mount for gopro. allows you to mount the camera on flat metal surfaces and get exclusive shots.
turbosquid
$5

Stone Mount
...ty free 3d model stone mount for download as ma, obj, and fbx on turbosquid: 3d models for games, architecture, videos. (1370306)