Thingiverse
Raise3D N2/N2+ Bed modification by TobyCWood
by Thingiverse
Last crawled date: 4 years, 6 months ago
This thing will be discussed in detail on the 3D Printing Today Podcast:
threedprintingtoday.libsyn.com or search the iTunes music store or stitcher radio for "3D Printing Today"
This thing is a modification of the Raise3D N2 and N2+ bed. The bed as delivered is a fixed position, factory leveled bed. Unfortunately, the folks at Raise3D did not take into account the probability of the bed going out of level, which it did for me. They also do not take into account when a user has a number of build plates and the plate height changes. Changing the distance between the hotend and the plate with the adjustment screw is tedious and painful. With this mod you can adjust it on the fly and get it just right without having to stop everything again and again. Additionally there were 2 major safety issues related to the bed which I address in this modification:
Raising the bed off the lock screws which would eventually eat through the insulation fish paper Raise3D used which in turn would short out the bed. We are told by Raise3D that they only used these for the first batch of N2s that were delivered and that the path of the heater traces are no longer on these screws... and they changed the screws to nylon tipped.
Insulating the edges and exposed solder points under the bed to protect against shorts which could easily be caused by using binder clips to hold the plate on to the bed. This condition is still apparent in machines being delivered.
The modification includes:
Replacing the 9 M3 bolts that currently hold the bed downward on to the lockscrews with 5 longer bolts.
Insulating parts of the underside of the bed with Kapton tape
Adding lock nuts over PETG washers immediately under the bed
Adding compression springs
Adding PETG stabilizers which the springs sit on
Adding PETG wing nuts with nylon insert lock nuts
Parts List:
1.qty of 5 of, Type 18-8 Stainless Steel Flat-Head Socket Cap Screw, DIN 7991-A2, M3 Thread, 35MM Long, Packs of 50 McMaster Carr #92125A141
Qty of 5 13/32" x 1" Compression Spring; Midwest Fastener Corp. (1) 13/32" x 1" Compression Spring - M159http://www.tooldepot247.com/catalogsearch/result/?q=M159
Qty of 10 M3 Nylon insert lock nutshttp://www.mcmaster.com/#nylon-insert-locknuts/=11hwvxd
5 printed washers
5 printed spring stabilizers
5 printed wing nuts. These were made using the AWESOME Ultimate Nut Knob Generator from wstein, thing number; 713300
UNPLUG the bot! if you are not sure what you are doing then i suggest NOT doing this. This Mod may be more complex for casual users which was why I tried to convince Raise3D to abandon the fixed bed approach.
I suggest printing all of the parts in a higher temp filament such as PETG or nylon. This modification will use about 3/4 of an inch of Z height from the build area.
To start, I removed the hot glue from the bed heater connection using a heat gun. You can also dab it with alcohol to get it to soften. Disconnect the bed.
Next I remove the 9 bolts/nuts holding the bed down and remove the bed. Remove the insulators which the lock screws press against. I left the lock screws in place. They do not get in the way.
Add thick kapton tape to the edges of the bed to protect against damage from use of clips for the build plate(note the pic of the heater traces along the edge of the underside of the bed). Also add kapton over the exposed surface mount resistor right next to where the center bolt goes through as well as the exposed connections by the heater's connectors.
Next put on the new longer M3 screws. Note the nylon locking nuts will in time loosen since they will be close to the heater and they are rated to 102C. I set my HBP to 95C for ABS. Some Locktight might be a good idea.
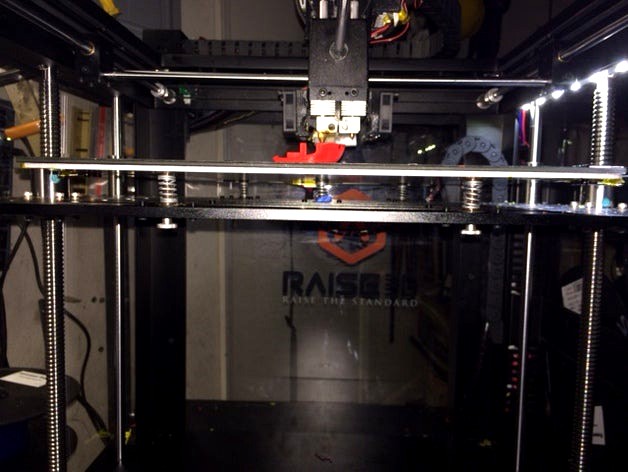
Add the springs and the stabilizers then a small piece of tape to hold them all together when you flip the bed over to replace it on the Z shelf. Make sure all the bolts are through their respective holes then remove the tape. Then compress each spring with one hand above and one hand below and screw on the wing nut with an M3 locknut set into it.
You will also need to move the limit switch bracket from under the Z shelf to above so that the limit switch thumbscrew can reach the limit switch.
Adjusting:
Plug the Printer in and let it boot. Go to the utilities menu and home the z axis then disable the motors(the icon in the upper left corner). Then move the extruder carriage manually to each position. When adjusted right, you want the entire motion distance between the bed and the bottom to be minimal. The springs should be partially compressed and tight.
Tighten all 5 points of the bed. Best way to do this is again compressing each spring one at a time with one hand above and one below. Next manually raise the bed by rotating the Z rods you want to move the bed upwards so that the head of the thumbscrew for the limit clicks the switch. Adjust the thumbscrew as needed. Then use a biz card or thick card stock as a feeler and position the nozzle over each bolt and adjust to the nozzle accordingly. I start in the center then go around, then do it again.
The trick to getting this right are the springs. These springs are the right size and strength to hold, in combination, about 40lbs without them compressing further. It has been argued that for the N2+ model with a print that could fill the entire 2 foot tall bed, these springs would compress and the object would then miss layers and ruin the print. If I were worried about printing that tall with that high a weight I'd either clamp the bed upwards so the springs would not compress or simply add four more springs without the bolts going through them using the four holes that are left unused from the previous approach. However, the springs i spec’ed, The Midwest fastener #M159… I tested it with a digital scale. At mid compression each holds up 8lbs of pressure. 8x5=40… that’s 40lbs of pressure before the 5 springs are compressed further… that’s 18 spools of filament!
My bed is still rock solid. No more too low in the front and too close in the back. I also can adjust bed height on the fly and not blind via the limit switch screw. There is zero x/y motion and I am finding the bed stays nice and level. I only need to check it when I remove/replace the plate. Thanks to the center bolt/spring I am able to adjust the bed to ensure there is no crowning effect as seen on 4 point leveling approaches on larger bed machines.
threedprintingtoday.libsyn.com or search the iTunes music store or stitcher radio for "3D Printing Today"
This thing is a modification of the Raise3D N2 and N2+ bed. The bed as delivered is a fixed position, factory leveled bed. Unfortunately, the folks at Raise3D did not take into account the probability of the bed going out of level, which it did for me. They also do not take into account when a user has a number of build plates and the plate height changes. Changing the distance between the hotend and the plate with the adjustment screw is tedious and painful. With this mod you can adjust it on the fly and get it just right without having to stop everything again and again. Additionally there were 2 major safety issues related to the bed which I address in this modification:
Raising the bed off the lock screws which would eventually eat through the insulation fish paper Raise3D used which in turn would short out the bed. We are told by Raise3D that they only used these for the first batch of N2s that were delivered and that the path of the heater traces are no longer on these screws... and they changed the screws to nylon tipped.
Insulating the edges and exposed solder points under the bed to protect against shorts which could easily be caused by using binder clips to hold the plate on to the bed. This condition is still apparent in machines being delivered.
The modification includes:
Replacing the 9 M3 bolts that currently hold the bed downward on to the lockscrews with 5 longer bolts.
Insulating parts of the underside of the bed with Kapton tape
Adding lock nuts over PETG washers immediately under the bed
Adding compression springs
Adding PETG stabilizers which the springs sit on
Adding PETG wing nuts with nylon insert lock nuts
Parts List:
1.qty of 5 of, Type 18-8 Stainless Steel Flat-Head Socket Cap Screw, DIN 7991-A2, M3 Thread, 35MM Long, Packs of 50 McMaster Carr #92125A141
Qty of 5 13/32" x 1" Compression Spring; Midwest Fastener Corp. (1) 13/32" x 1" Compression Spring - M159http://www.tooldepot247.com/catalogsearch/result/?q=M159
Qty of 10 M3 Nylon insert lock nutshttp://www.mcmaster.com/#nylon-insert-locknuts/=11hwvxd
5 printed washers
5 printed spring stabilizers
5 printed wing nuts. These were made using the AWESOME Ultimate Nut Knob Generator from wstein, thing number; 713300
UNPLUG the bot! if you are not sure what you are doing then i suggest NOT doing this. This Mod may be more complex for casual users which was why I tried to convince Raise3D to abandon the fixed bed approach.
I suggest printing all of the parts in a higher temp filament such as PETG or nylon. This modification will use about 3/4 of an inch of Z height from the build area.
To start, I removed the hot glue from the bed heater connection using a heat gun. You can also dab it with alcohol to get it to soften. Disconnect the bed.
Next I remove the 9 bolts/nuts holding the bed down and remove the bed. Remove the insulators which the lock screws press against. I left the lock screws in place. They do not get in the way.
Add thick kapton tape to the edges of the bed to protect against damage from use of clips for the build plate(note the pic of the heater traces along the edge of the underside of the bed). Also add kapton over the exposed surface mount resistor right next to where the center bolt goes through as well as the exposed connections by the heater's connectors.
Next put on the new longer M3 screws. Note the nylon locking nuts will in time loosen since they will be close to the heater and they are rated to 102C. I set my HBP to 95C for ABS. Some Locktight might be a good idea.
Add the springs and the stabilizers then a small piece of tape to hold them all together when you flip the bed over to replace it on the Z shelf. Make sure all the bolts are through their respective holes then remove the tape. Then compress each spring with one hand above and one hand below and screw on the wing nut with an M3 locknut set into it.
You will also need to move the limit switch bracket from under the Z shelf to above so that the limit switch thumbscrew can reach the limit switch.
Adjusting:
Plug the Printer in and let it boot. Go to the utilities menu and home the z axis then disable the motors(the icon in the upper left corner). Then move the extruder carriage manually to each position. When adjusted right, you want the entire motion distance between the bed and the bottom to be minimal. The springs should be partially compressed and tight.
Tighten all 5 points of the bed. Best way to do this is again compressing each spring one at a time with one hand above and one below. Next manually raise the bed by rotating the Z rods you want to move the bed upwards so that the head of the thumbscrew for the limit clicks the switch. Adjust the thumbscrew as needed. Then use a biz card or thick card stock as a feeler and position the nozzle over each bolt and adjust to the nozzle accordingly. I start in the center then go around, then do it again.
The trick to getting this right are the springs. These springs are the right size and strength to hold, in combination, about 40lbs without them compressing further. It has been argued that for the N2+ model with a print that could fill the entire 2 foot tall bed, these springs would compress and the object would then miss layers and ruin the print. If I were worried about printing that tall with that high a weight I'd either clamp the bed upwards so the springs would not compress or simply add four more springs without the bolts going through them using the four holes that are left unused from the previous approach. However, the springs i spec’ed, The Midwest fastener #M159… I tested it with a digital scale. At mid compression each holds up 8lbs of pressure. 8x5=40… that’s 40lbs of pressure before the 5 springs are compressed further… that’s 18 spools of filament!
My bed is still rock solid. No more too low in the front and too close in the back. I also can adjust bed height on the fly and not blind via the limit switch screw. There is zero x/y motion and I am finding the bed stays nice and level. I only need to check it when I remove/replace the plate. Thanks to the center bolt/spring I am able to adjust the bed to ensure there is no crowning effect as seen on 4 point leveling approaches on larger bed machines.