Thingiverse
QRpi Raspberry Pi QR mount (with STEP file) by MyStoopidStuff
by Thingiverse
Last crawled date: 4 years, 7 months ago
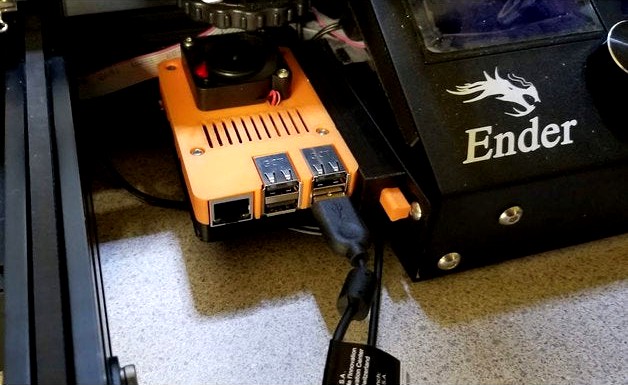
This is a quick release case and mount for a Raspberry Pi, remixed from the "Raspberry Pi 3 B Case" by jayftee. The case is the same as the original with a few differences. In order to make the quick release work, I added some catches on the side. There is also a hole for a 40mm fan and both the top and bottom are vented.
The QR base has a cable channel which can accommodate several USB cables.
Like the original, this uses M2.5 screws, which is a limitation of the Raspberry Pi unfortunately (the holes in the board are not big enough for M3). I did use M3 screws on the one in the pics, but had to widen the holes in the board which I do not recommend since it could damage the board if not careful (I did not upload those files with the M3 hardware). The model uploaded here however is using the same M2.5 screws and nuts as Jayftee's original design.
Update 9-8-2018 - I uploaded a new version of the "QR-Pi-Case-v3N1--base-top.stl", which is the top part of the mount. The only difference is that I moved the end 0.159mm in to make the fit just a bit tighter. It is pretty negligible but I feel it is an improvement.
To print this, orient the QR mount parts so they stand vertically and use the minimum of supports. The case parts can be oriented so the flat parts are on the print surface to minimize supports. I used a support interface when printing the case parts.
There is an area on the slider bases listed below which requires special care in the slicer:
QR-Pi-Case-v3M4S-base-2020-type2.stl
QR-Pi-Case-v3M4S-base-2020-type1.stl
QR-Pi-Case-v3M4S-surface-mount.stl
The above parts are all the same except for the mounting options (so pick one). They will need to have supports excluded from the area of the clip (on one end of the part), since supports will keep the clip from being able to flex downward. I used Cura's support blocking feature to do that.
I also found that since the original Rpi Case was very tight, and I had to scale by 102% even with PLA (monoprice PLA+), to get the parts the same dimensions as the model. If you need to scale, be sure to scale all the parts the same amount since tolerances are going to be close. I printed this in 0.2 layer height, with 3 walls and 35% infill, with supports everywhere (again note the warning on the parts listed above).
To assemble, this will require:
4x M2.5x20mm screws
4x M2.5 nuts
4x M3x12mm screws (or longer depending on the fan and any grill covers used)
4x M3 nuts
1x Spring from a cheap pen
1x 5V 40mm fan
And one or two M4 screws and t-nuts if you are going to mount this to 2020 extrusions.
To put it together, first install the slider in the top of the mount. Then put the spring in the base of the mount and carefully slide the top and base together (the slider will move with the top of the mount). The base should snap into place when it reaches the end. It for some reason it does not, check that there are no supports in the notch the clip will need to catch on. If you need to disassemble, there is a 50/50 chance that the clip will break, but if it does you can glue it back together instead of relying on the clip.
If you want a stronger spring action (which I tested and works pretty well), you can double the spring by threading two of them together before you install it. doubling the springs will take out some of the travel, but there will still be enough. If you double the spring, be sure to install the M4x8mm mounting screw and M4 t-nut in the front of the mount first, since it will be hard to install later.
The STEP files are posted for easy remixing. Please post your makes and likes if you like it.
Update 7-14-2019: Uploaded a pair of tall versions:
QR-Pi-Case-v4-60mm-fan-1D-TALL-40mm-FAN.stl
QR-Pi-Case-v4-60mm-fan-1D8-TALL-60mm-FAN.stl
There is a 40mm fan and 60mm fan version. These also have a small notch for running wires. Both the tall versions are untested, but should allow using standard Dupont connectors on the Raspberry Pi I/O pins and then running them out through the notch in the case. The idea with this case was if it were to be used with a filament run out sensor that would use the I/O pins. I posted some pics of the 60mm fan case.
If you make one, please post it, and if you have any suggestions or problems please post them in the comments.