Thingiverse
QR Code Generator for Customizer by mcg1355
by Thingiverse
Last crawled date: 4 years, 4 months ago
This is a QR code generator to make 3D printed tags, labels, and iPhone cases. Please follow the instructions below to generate the QR code data for input into the customizer. The objects generated are very customizable, this was done in the interest of making them as customizable as possible; however, this also results in a good amount of responsibility on the user to design a functional object. Just inputting the code data will not necessarily make the object you want, everything can be sized, located, rotated, etc. but it should be reasonably straightforward to get what you want to make.
Use this to make a custom iPhone case with your contact information encoded into it for easy sharing. Or a tag for your luggage so your personal data such as name, address, and phone number are not easily visible to criminals that may go break into your home while you are traveling. Make a business card that links to your website or has your business contact info. Make a simple tag for just about anything! From mounting it somewhere to carrying it with you a printed tag will be more durable and longer lasting than any paper code would be.
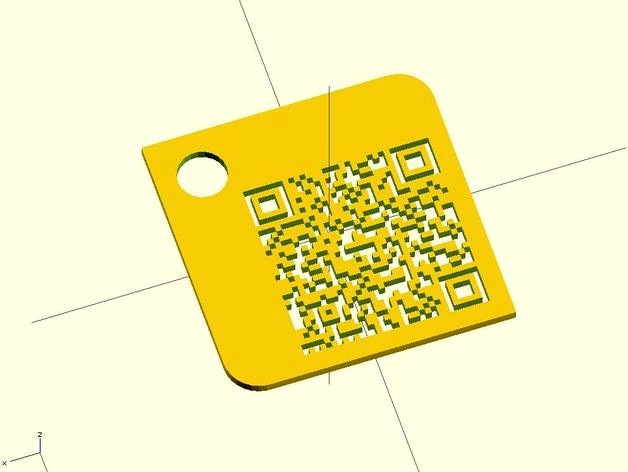
The QR code is generated with cubes; therefore, the code data geometry may be added or subtracted from the basic tag shape. The currently available object shapes are:
Just the QR code data geometry.
A rectangular object of specified width, height, and thickness.
An iPhone 4 case.
An iPhone 5 case.
A rectangular object with hole in it of specified width, height, thickness, hole location, and hole radius.
Corners of the rectangles can also be rounded with a specified radius, with two opposite corners or all four corners rounded. There is also the option of to add a perimeter. This will make a wall around the object in the same shape of the object that is a specified distance from the object with specified wall thickness and wall height. The perimeter will mirror the shape based on the rectangular dimensions and round corner options selected, it will not automatically size for the iPhone cases if that is the selected object, you must change the tag_width, tag_height, and perimeter values accordingly. There is also an option to flip the QR code. This will mirror the code geometry so that it will be readable from the bottom of the object. This is because QR codes are only readable from one side, they can be rotated in any direction but flipping it will produce an unreadable code. If you intend the QR code to be readable from the top of the object, leave it in normal orientation. If you intend it to be readable from the bottom of the object, flip it over. Note, the code is already flipped for the iPhone cases so they will be readable from the back of the phone.
I’ve had a few ideas of how best to print a readable QR code.
-Suggested by Austin in the comments:
“Another coloring method that has given me good results with small text/icons: Print in white or clear, and rub the raised surface with an angled fat-tip black sharpie. It takes a little bit of practice, but the normal "bleeding" that occurs between the print-layers is surprisingly invisible when done that way.
The technique works best if there's a small panel on the object that contains the inscription with sharp edges on the outside, such as the butt of a handle. In this case, I would assume it would mean putting the QR code in a raised square frame.â€
-The QR code geometry could be added to the object shape so it is raised above the top surface. Start the print, pause it once the base is finished but before all the code geometry has printed, switch to a contrasting color filament and finish the print.
-The QR code could be recessed into the object then filled with a colored resin / epoxy or you could print the positive geometry of the QR code separately and glue it into the recessed hole (this is what the tolerance option was created for).
-The tag or code could be printed with the QR code geometry completely removed from the tag with the perimeter activated. Then remove the build platform (or tape) with the print still attached. Then pour a clear or colored resin, using the perimeter as a mold edge. This same method could be used with printing just the QR code data geometry, effectively making a QR code floating in resin.
-I feel like this is begging for a dual extrusion printer. I’m interested in adding compatibility for dual extrusion but haven’t found any information of what I would need to add for it to be integrated into customizer.
There are many more option; however, I still don’t have a printer so haven’t been able to try them out first hand. Just customize away and see what works. As far as I can tell there haven’t been a lot of QR codes printed before so this may very well be new territory for all of us.
I’m planning on adding more object shapes so feel free to post what shapes you would like down below and I’ll try to add them if possible. Also I’m interested in adding a text option so that object could be made with both words and a QR code. I haven’t found a good source of information on how text works so any help would be appreciated with that.
Finally the iPhone case models are not of my design. I got them from the makerbot customizable iPhone case for the customizer so can’t take credit for the models.
NOTE: The program I created to generate data from the QR code image is a .exe file. I know this will run on window computers. You can likely run it on a mac through parallels or a similar windows emulation program. I am unsure about running it in linux. I am interested in getting the image analysis program into a more compatible format but don’t know how. I am open to any help if someone know how to achieve this.
Use this to make a custom iPhone case with your contact information encoded into it for easy sharing. Or a tag for your luggage so your personal data such as name, address, and phone number are not easily visible to criminals that may go break into your home while you are traveling. Make a business card that links to your website or has your business contact info. Make a simple tag for just about anything! From mounting it somewhere to carrying it with you a printed tag will be more durable and longer lasting than any paper code would be.
The QR code is generated with cubes; therefore, the code data geometry may be added or subtracted from the basic tag shape. The currently available object shapes are:
Just the QR code data geometry.
A rectangular object of specified width, height, and thickness.
An iPhone 4 case.
An iPhone 5 case.
A rectangular object with hole in it of specified width, height, thickness, hole location, and hole radius.
Corners of the rectangles can also be rounded with a specified radius, with two opposite corners or all four corners rounded. There is also the option of to add a perimeter. This will make a wall around the object in the same shape of the object that is a specified distance from the object with specified wall thickness and wall height. The perimeter will mirror the shape based on the rectangular dimensions and round corner options selected, it will not automatically size for the iPhone cases if that is the selected object, you must change the tag_width, tag_height, and perimeter values accordingly. There is also an option to flip the QR code. This will mirror the code geometry so that it will be readable from the bottom of the object. This is because QR codes are only readable from one side, they can be rotated in any direction but flipping it will produce an unreadable code. If you intend the QR code to be readable from the top of the object, leave it in normal orientation. If you intend it to be readable from the bottom of the object, flip it over. Note, the code is already flipped for the iPhone cases so they will be readable from the back of the phone.
I’ve had a few ideas of how best to print a readable QR code.
-Suggested by Austin in the comments:
“Another coloring method that has given me good results with small text/icons: Print in white or clear, and rub the raised surface with an angled fat-tip black sharpie. It takes a little bit of practice, but the normal "bleeding" that occurs between the print-layers is surprisingly invisible when done that way.
The technique works best if there's a small panel on the object that contains the inscription with sharp edges on the outside, such as the butt of a handle. In this case, I would assume it would mean putting the QR code in a raised square frame.â€
-The QR code geometry could be added to the object shape so it is raised above the top surface. Start the print, pause it once the base is finished but before all the code geometry has printed, switch to a contrasting color filament and finish the print.
-The QR code could be recessed into the object then filled with a colored resin / epoxy or you could print the positive geometry of the QR code separately and glue it into the recessed hole (this is what the tolerance option was created for).
-The tag or code could be printed with the QR code geometry completely removed from the tag with the perimeter activated. Then remove the build platform (or tape) with the print still attached. Then pour a clear or colored resin, using the perimeter as a mold edge. This same method could be used with printing just the QR code data geometry, effectively making a QR code floating in resin.
-I feel like this is begging for a dual extrusion printer. I’m interested in adding compatibility for dual extrusion but haven’t found any information of what I would need to add for it to be integrated into customizer.
There are many more option; however, I still don’t have a printer so haven’t been able to try them out first hand. Just customize away and see what works. As far as I can tell there haven’t been a lot of QR codes printed before so this may very well be new territory for all of us.
I’m planning on adding more object shapes so feel free to post what shapes you would like down below and I’ll try to add them if possible. Also I’m interested in adding a text option so that object could be made with both words and a QR code. I haven’t found a good source of information on how text works so any help would be appreciated with that.
Finally the iPhone case models are not of my design. I got them from the makerbot customizable iPhone case for the customizer so can’t take credit for the models.
NOTE: The program I created to generate data from the QR code image is a .exe file. I know this will run on window computers. You can likely run it on a mac through parallels or a similar windows emulation program. I am unsure about running it in linux. I am interested in getting the image analysis program into a more compatible format but don’t know how. I am open to any help if someone know how to achieve this.