GrabCAD
Pyrolysis mini stove in refractory ceramics with water heater, coocking place and heat storage
by GrabCAD
Last crawled date: 1 year, 11 months ago
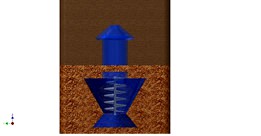
A pyrolysis process means you will not burn the wood, but take it into a high enough temperature that forces it release the gasses contained within, and you burn those gasses in a separate burning chamber (not necessarily another room, the separation can be a thin empty space like in our case where oxygen is not available for the gas to start burning)
To accomplish this you need a pipe in iron or ceramic wide as a 1 gallon milk boiling pot, and twice tall that you make crenelates to it on the top, than you cover it with a conic lid that had a large hole in the center top of it, so oxygen passes through the crenelates and mixes with gas coming from the wood in the pot, climbs up in the hole and burns with flame but no ashes.
Fill the pipe to the top (nearly) put some fire ignition substance on it to light it on (I said fire ignition not petrol, that is fire explosion... rather use cooking oil or so) and wait until the heat acts on the wood beneath and starts gasseification, from that moment on there is no more smoke and ashes, just pure hot flame.
That gives you 4 times more heat with the same amount of chopped wood, or 4 times more fire time, your choice.
1
build a pipe 100 mm or more inside diameter out of 3 mm thick iron or 10 mm thick ceramic (clay plus sand, go online to learn the correct proportion for refractory ceramics homemade) 200 mm tall with a bottom and another piece of pipe beneath the bottom, cut a fuel chops entry in the bottom, crenelate the top accordingly.
2
Build the cone to fit 10mm thick if ceramics, iron 3 mm should do.
3
build the base in 2 mm thick iron or 10 mm thick ceramics as in the drawings
4
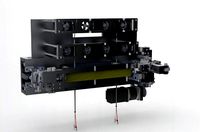
buy the Archimedes screw plus motor somewhere to fit your diameters and pushing needs (chops size dictates them, the one you get with a branches shredder)
5
according to the drawings build the base, the fireplace and the water boiler space and the stove top and the heat storage unit, like doing pottery somehow, just bigger dimensions, more patience, and use plywood walls jigs to help you get a proper job done.
6
Ask a good welder to weld you the water boiler in no rust steel, with threaded fittings exit curves already welded on in position, not a job for any John and Jane Doe
7
When done and all is dry burn the ceramics either the classic manner to bake it to refractary, or pay somebody that has a ceramic burning oven to do it for you.
8
Than take it home and mount it
9
Chop the branches, cereals left overs, dry food, anything that is natural and burns (no plastic or rubber please) and feed your stove to stay warm and nice in the winter.
Refractory ceramics is heavy stuff, ask friends for help, use car shop cranes to lift, don’t let it fall on your foot.
bad made pyrolysis burners might allow return of flame with oxygen into the burner with a strong wind raffic pushing air down the chimney thus creating conditions for an explosion that might deteriorate your burner or the entire stove, make sure you put a wind self orientation protection on top of your chimney on the house.
Bad mixed clay and sand might result in cracks while drying, or later on while operating the stove, make sure you mix the right proportions and pretty much perfectly homogeneous.
Too big wood chops might result in the screw blocking, and too fine or wet materials (wood dust, wet kitchen garbage) might clog the screw, pay attention.
To accomplish this you need a pipe in iron or ceramic wide as a 1 gallon milk boiling pot, and twice tall that you make crenelates to it on the top, than you cover it with a conic lid that had a large hole in the center top of it, so oxygen passes through the crenelates and mixes with gas coming from the wood in the pot, climbs up in the hole and burns with flame but no ashes.
Fill the pipe to the top (nearly) put some fire ignition substance on it to light it on (I said fire ignition not petrol, that is fire explosion... rather use cooking oil or so) and wait until the heat acts on the wood beneath and starts gasseification, from that moment on there is no more smoke and ashes, just pure hot flame.
That gives you 4 times more heat with the same amount of chopped wood, or 4 times more fire time, your choice.
1
build a pipe 100 mm or more inside diameter out of 3 mm thick iron or 10 mm thick ceramic (clay plus sand, go online to learn the correct proportion for refractory ceramics homemade) 200 mm tall with a bottom and another piece of pipe beneath the bottom, cut a fuel chops entry in the bottom, crenelate the top accordingly.
2
Build the cone to fit 10mm thick if ceramics, iron 3 mm should do.
3
build the base in 2 mm thick iron or 10 mm thick ceramics as in the drawings
4
buy the Archimedes screw plus motor somewhere to fit your diameters and pushing needs (chops size dictates them, the one you get with a branches shredder)
5
according to the drawings build the base, the fireplace and the water boiler space and the stove top and the heat storage unit, like doing pottery somehow, just bigger dimensions, more patience, and use plywood walls jigs to help you get a proper job done.
6
Ask a good welder to weld you the water boiler in no rust steel, with threaded fittings exit curves already welded on in position, not a job for any John and Jane Doe
7
When done and all is dry burn the ceramics either the classic manner to bake it to refractary, or pay somebody that has a ceramic burning oven to do it for you.
8
Than take it home and mount it
9
Chop the branches, cereals left overs, dry food, anything that is natural and burns (no plastic or rubber please) and feed your stove to stay warm and nice in the winter.
Refractory ceramics is heavy stuff, ask friends for help, use car shop cranes to lift, don’t let it fall on your foot.
bad made pyrolysis burners might allow return of flame with oxygen into the burner with a strong wind raffic pushing air down the chimney thus creating conditions for an explosion that might deteriorate your burner or the entire stove, make sure you put a wind self orientation protection on top of your chimney on the house.
Bad mixed clay and sand might result in cracks while drying, or later on while operating the stove, make sure you mix the right proportions and pretty much perfectly homogeneous.
Too big wood chops might result in the screw blocking, and too fine or wet materials (wood dust, wet kitchen garbage) might clog the screw, pay attention.
Similar models
cg_trader
$9

Wood Burning Stove
...livingroom living room living room house interior home interior house interior interior room living room room interior wood house
3dwarehouse
free

Wood fire burner
...re burner
3dwarehouse
wood fire burner #burn #chimney #cosy #fire #furniture #heat #heater #heating #log #wood #wood_fire_burner
3dwarehouse
free

Wood stove
...ng stove, you burn wood in it, the fire puts out heat, heat is used to cook food and warm people. #wood_burning_stove #wood_stove
3dwarehouse
free

Aga Little wenlock
...aga little wenlock
3dwarehouse
wood burning stove #burning #fire #heat #stove #wood
grabcad
free

Gas burner
...gas burner
grabcad
gas burner for drying up or heating up procedure on refractory works.
3dwarehouse
free

tyrolean heating stove
...tyrolean design #antigorite #arhn_valley #heating_oven #heating_stove #leadstone #masonry #olivine #refractory #serpentine #stone
3dwarehouse
free

Wood Burning Stove
...wood burning stove
3dwarehouse
small wood burner with glass window and straight chimney pipe
3d_export
$24

Fireplace 3D Model
...ce wood flame fire woods classic heat burn heating chimney sheet logs stove furniture misc
fireplace 3d model seki 78491 3dexport
cg_trader
$29

SiberStove Wood Heating And Cooking Stove Cendrillon
...heater wood grill burn burning fire flame oven furnace bath bathhouse heating firewood coal brazier sauna siberia household other
3dwarehouse
free

Castle Torchiere
... an open flame in a large bowl. #black_cat #castle #fire #flame #iron #lamp #light #maurice_woodworth #medieval #steel #torchiere
Coocking
3d_ocean
$25

Kitchen Set
...kitchen set 3docean 3d model coocking electric hood indoor kitchen metal oven vray wood kitchen...
thingiverse
free

Casing for mobile home hood speed regulator by 3daybreaker
...our mobile home, i created a hood above the coocking area. that fan motor needs a rev control. i...
thingiverse
free

hook for lenovo yoga tab 3 8 by julienbelver
...i use for the door off kitchen when i coocking an i open the...
thingiverse
free

muzzle for clip stops glass - mordacchia per molletta ferma vetro by GiovanniMarletta
...make it like you want, because if during the "coockingquot; it become soften it does nothing. petg 235/80 layer...
thingiverse
free

Cooking handle adapter (FIXPERTS)
...a wheel chair) short (helps with hard use of coocking tools - lifting\smaching..) whats in the files: 2 types...
cg_trader
$3

sink and coocking plates 3D model
...sink and coocking plates 3d model
cg trader
sink and coocking plates 3d model
grabcad
free

sudok
...sudok grabcad for coocking ...
cg_trader
$4

Halloween Ghost Coockies Form | 3D
...best halloween coockie ever with this form. halloween cookies coocking ghost scary gadgets...
cg_trader
$4

Christmas Star Coockies Form | 3D
...the best christmas star coockies ever. christmas star cookies coocking form gadgets...
cg_trader
$4

Christmas Tree Coockies Form | 3D
...look great with this form. christmas form cookies tree coocking gadgets other christmas tree christmas...
Pyrolysis
grabcad
free

Pyrolysis Screw
...pyrolysis screw
grabcad
pyrolysis unit for gasifying process
grabcad
free

Pyrolysis Plant
...pyrolysis plant
grabcad
it's an experimental set up of pyrolysis analysis. hope it will help you.
grabcad
free

Catalytic Pyrolysis Reactor
...catalytic pyrolysis reactor
grabcad
optimize catalytic pyrolysis reactor
grabcad
free

Water Pyrolysis
...water pyrolysis
grabcad
a design for an industrial use
grabcad
free

Reactor for Pyrolysis
...reactor for pyrolysis
grabcad
with cover, gasket, and reactor base
grabcad
free

Pyrolysis reactor
...pyrolysis reactor
grabcad
for the vaporization of waste lube oil
grabcad
free

PYROLYSIS REACTOR
...pyrolysis reactor
grabcad
plastic waste to energy generation
grabcad
free

Furnace pyrolysis 40 kW
...furnace pyrolysis 40 kw
grabcad
furnace pyrolysis 40 kw
grabcad
free

Portable Pyrolysis plant
...ble pyrolysis machine that is used in turning plastic into fuel and can be carried about easily as a trailer. best used on farms.
grabcad
free

Pyrolysis Tank concept
...pyrolysis tank concept
grabcad
for new projects
Refractory
3d_export
$5

Brake pads 3D Model
...brake pads 3d model 3dexport brake pads ceramic refractory for the car heat -resistant black metal brakes racing...
3d_export
$5

brazier - b-b-q
...peephole and metal protection inside the hood. with double refractory brazier. top in marmotech with red granite look. firewood...
3d_export
$15

Pizza oven
...as follows:<br>- the internal room in completely covered by refractory bricks.<br>- the external part (outside the core structure) is...
3d_export
$17

cone crusher
...crushing and superfine crushing of hard rock, ore, slag, refractory etc. compared with other types of crushers, it has...
3d_export
$10

cone crusher
...crushing and superfine crushing of hard rock, ore, slag, refractory etc. compared with other types of crushers, it has...
thingiverse
free

Castable refractory mold by Professor_Fungus
... of the firebrick) drastically increases the cross-sectional area of the kiln. designed around 2.5x4.5x9" 2600*f firebrick.
thingiverse
free

Toggle Switch Guard by refractory
...fractory
thingiverse
we needed a guard for vacuum chamber bell jar switch. here is a functional design in case you need one too?
thingiverse
free

Picatinny Pressure switch mount Nitecore by refractory
...picatinny pressure switch mount nitecore by refractory
thingiverse
let me know if you have questions!
3d_sky
$8

Telescope
...telescope 3dsky school refractory telescope 3ds max 2009 vray...
thingiverse
free

Foundry Plinth Model
...for my backyard foundry. i've printed this and put refractory inside and then just burned off the pla. i've...
Heater
archibase_planet
free

Heater
... gas water heater
heater ariston gi7s 11l ffi ng gas water heater n160815 - 3d model (*.gsm+*.3ds) for interior 3d visualization.
3d_export
$5

heater
...heater
3dexport
heater 3d modelling.
3d_export
$5

heater
...heater
3dexport
simple room heater
archibase_planet
free

Heater
...ater water heater hot-water generator
heater thermex if 80 v tank n290114 - 3d model (*.gsm+*.3ds) for interior 3d visualization.
turbosquid
$20

Heater
...
turbosquid
royalty free 3d model heater for download as c4d on turbosquid: 3d models for games, architecture, videos. (1145030)
turbosquid
$25
Heater
... available on turbo squid, the world's leading provider of digital 3d models for visualization, films, television, and games.
turbosquid
$24

Heater
... available on turbo squid, the world's leading provider of digital 3d models for visualization, films, television, and games.
turbosquid
$20
heaters
... available on turbo squid, the world's leading provider of digital 3d models for visualization, films, television, and games.
turbosquid
$12
heater
... available on turbo squid, the world's leading provider of digital 3d models for visualization, films, television, and games.
turbosquid
$5

heater
... available on turbo squid, the world's leading provider of digital 3d models for visualization, films, television, and games.
Stove
3ddd
$1

Stove
...stove
3ddd
stove , камин
камин, stove
3d_export
$5

stove
...stove
3dexport
stove to put in the sink
3ddd
free

pellet stove
...pellet stove
3ddd
fireplace fire stove pellet
pellet stove
3d_ocean
$6

Stove
...lygons: 17,740 vertices: 12,731 =======formats=========== • max (3dstudiomax 2011) • 3ds • fbx • obj ========render======== v-ray
turbosquid
$18

stove
...turbosquid
royalty free 3d model stove for download as blend on turbosquid: 3d models for games, architecture, videos. (1659653)
turbosquid
$9

Stove
...ve
turbosquid
royalty free 3d model stove for download as ma on turbosquid: 3d models for games, architecture, videos. (1566883)
3d_export
$12

pocket stove
...pocket stove
3dexport
pocket stove
archibase_planet
free
Gas-stove
...e
archibase planet
gas-stove gas cooker kitchen-range gas stove
gas-stove - 3d model (*.gsm+*.3ds) for interior 3d visualization.
3d_export
$15

stove
...stove
3dexport
archibase_planet
free
Gas stove
...ase planet
gas stove kitchen-range gas-stove gas cooker
gas stove n280711 - 3d model (*.gsm+*.3ds) for interior 3d visualization.
Ceramics
design_connected
$16

Ceramics
...ceramics
designconnected
piet hein eek ceramics computer generated 3d model. designed by eek, piet hein.
turbosquid
$1

ceramic
...turbosquid
royalty free 3d model ceramic for download as max on turbosquid: 3d models for games, architecture, videos. (1651807)
turbosquid
$3

Ceramics
... model ceramics for download as 3ds, obj, fbx, blend, and dae on turbosquid: 3d models for games, architecture, videos. (1453821)
turbosquid
free

Ceramic
... available on turbo squid, the world's leading provider of digital 3d models for visualization, films, television, and games.
design_connected
$9

Ceramic Cups
...ceramic cups
designconnected
ceramic cups computer generated 3d model.
3ddd
$1

Унитаз Art Ceram
...унитаз art ceram
3ddd
art ceram
унитаз art ceram
design_connected
$11

Ceramic Clocks
...ceramic clocks
designconnected
vitra ceramic clocks computer generated 3d model. designed by nelson, george.
design_connected
$20

Cartoccio Ceramics
...cartoccio ceramics
designconnected
paola paronetto cartoccio ceramics computer generated 3d model. designed by paronetto, paola.
3d_ocean
$2

Ceramic Vase
...ceramic vase 3docean ceramic ceramics flower furniture misc pot pottery vase vases a vase...
3d_ocean
$2

Ceramic
...ceramic
3docean
this is textures for bathroom format include : .c4d .3ds .obj .png
Heat
3d_export
$5
heat
...heat
3dexport
heat tool
3ddd
$1
electric heating
...electric heating
3ddd
обогреватель
electric heating
3d_export
$6
The heating module
...any questions also you can email to me. designed with solidworks 2017, render with keyshot **************************************
turbosquid
$2
Heating Radiator
...
royalty free 3d model heating radiator for download as blend on turbosquid: 3d models for games, architecture, videos. (1561908)
3d_export
$35
heating instalation with heat pump and solar system
...el , please contact me. before buying a model, you can try to download one of my free models and testing. thank you for watching.
turbosquid
$29
Heating Mantle
... available on turbo squid, the world's leading provider of digital 3d models for visualization, films, television, and games.
turbosquid
$25
Heating Radiator
... available on turbo squid, the world's leading provider of digital 3d models for visualization, films, television, and games.
turbosquid
$20
AT_airship_control_stand_(heated)
... available on turbo squid, the world's leading provider of digital 3d models for visualization, films, television, and games.
turbosquid
$20
AT_airship_(heated)
... available on turbo squid, the world's leading provider of digital 3d models for visualization, films, television, and games.
turbosquid
$10
Heating radiator
... available on turbo squid, the world's leading provider of digital 3d models for visualization, films, television, and games.
Storage
archibase_planet
free

Storage
...storage
archibase planet
shelf locker shelving
overhead storage unit - 3d model for interior 3d visualization.
turbosquid
$3

storage
...id
royalty free 3d model storage for download as stl and ipt on turbosquid: 3d models for games, architecture, videos. (1249483)
3d_export
$5

Oil storage
...oil storage
3dexport
big oil storage or barrel or storage tank 2 formats lwo & obj
turbosquid
$15

storage
... available on turbo squid, the world's leading provider of digital 3d models for visualization, films, television, and games.
turbosquid
$15

storage
... available on turbo squid, the world's leading provider of digital 3d models for visualization, films, television, and games.
turbosquid
$12

storage
... available on turbo squid, the world's leading provider of digital 3d models for visualization, films, television, and games.
3ddd
$1

Storage Baskets
...storage baskets
3ddd
restoration hardware , корзина
restoration hardware storage baskets
3d_export
$5

water tank of storage-tank oiltanker storage
...ater tank of storage-tank | oiltanker storage can be used in ed model environment. this low poly water tank can be used for free.
archive3d
free

Storage 3D Model
...3d model
archive3d
storage shelving furniture
storage - 3d model for interior 3d visualization.
3d_export
$8

chain storage wheel
...chain storage wheel
3dexport
chain storage wheel
Mini
turbosquid
$10

Mini Mini Luceplan
...
royalty free 3d model mini mini luceplan for download as max on turbosquid: 3d models for games, architecture, videos. (1227359)
3d_ocean
$39

Mini Cooper
...mini cooper
3docean
cabrioler cooper mini
mini cooper cabrioler
3d_export
$30

Mini lathe
...mini lathe
3dexport
mini lathe
3d_export
$5

mini mouse
...mini mouse
3dexport
mini mouse
3d_export
$5

mini house
...mini house
3dexport
mini house
3d_export
free

Mini Mecha
...mini mecha
3dexport
concept of mini mecha
3d_ocean
$20

Mini Gun
...mini gun
3docean
gatling gun gun machine gun mini gun weapon
model of a mini gatling gun.
3ddd
free

Herve mini
... кофейный , herve
http://www.mobiliavenanti.it/ru/products/hervè-mini
3d_export
$5

mini wall
...mini wall
3dexport
mini wall for living room
3d_export
$5

mini bank
...mini bank
3dexport
mini bank 3d model
Water
turbosquid
$2
water bin water tank
...e 3d model water bin water tank for download as blend and obj on turbosquid: 3d models for games, architecture, videos. (1594026)
archibase_planet
free
Water purifier
... purifier water purification water treatment
water purifier n050914 - 3d model (*.gsm+*.3ds+*.max) for interior 3d visualization.
3d_ocean
$6
glass water
...glass water
3docean
clear glass glass water
glass filled with water
3ddd
$1

Watering pot
...watering pot
3ddd
watering pot лейка поливалка , лейка
watering pot
3d_ocean
$12
Water Dispenser
...dispenser furnishings lowpoly water
this is a water dispenser hot water for tea is winter and summer is cold for souls. have fun!
3d_ocean
$2
Water
...water
3docean
this is a tile able, hand painted water texture tile. included is one versions at 512×512 pixels in .tga format.
3d_export
$6
water tanker
...water tanker
3dexport
water tanker
3d_export
$6

water bottle
...water bottle
3dexport
water bottle
3d_export
$5

water bottle
...water bottle
3dexport
water bottle
3d_export
$5

water thermos
...water thermos
3dexport
water thermos
Place
3d_ocean
$7

game place
...game place
3docean
children game game park game place kids play luna park play
for kids game place
3d_export
$5

seating places
...seating places
3dexport
seating places with coverage modeling by: sketch up rendering by: lumion
3d_export
$5

seating places
...seating places
3dexport
seating places with coverage modeling by: sketch up 2017 rendering by: lumion 6.5.1
3ddd
$1

Vitra Place Sofa
...3ddd
vitra , place , модульный
vitra place sofa
turbosquid
$30

Chimney place
...quid
royalty free 3d model chimney place for download as obj on turbosquid: 3d models for games, architecture, videos. (1557502)
3ddd
$1

theodore alexander place to place
...pinched' rectangular tops with brass carrying handles to the centre, on turned and gilt highlighted legs with brass cappings.
turbosquid
$29

BOURKE PLACE
... free 3d model bourke place for download as 3ds, c4d, and skp on turbosquid: 3d models for games, architecture, videos. (1148874)
turbosquid
$10

Lounge Place
...free 3d model lounge place for download as ma, fbx, and blend on turbosquid: 3d models for games, architecture, videos. (1491379)
turbosquid
$7

Place of Ritual
... 3d model place of ritual for download as blend, fbx, and obj on turbosquid: 3d models for games, architecture, videos. (1620181)
3d_export
$100
fair place
...ir place realistic stereoscopic natural size applied to communicate sed77665544@gmail.com what's up 00962788214043 i am ahmed