Thingiverse
Prusa Touchscreen 3.5" with Raspberry Pi 4b and a Fan v4 kit by RockLava
by Thingiverse
Last crawled date: 3 years ago
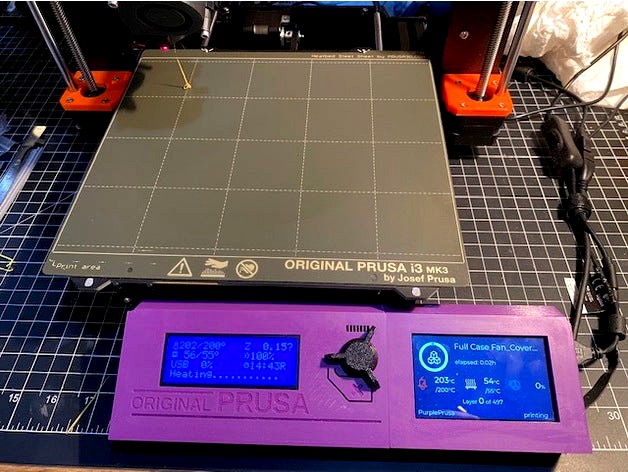
The point is to use a $30 3.5” screen that runs off the DSI ribbon cable connected directly to a Raspberry Pi 4b so I don’t have to have drivers installed or modify anything on the OS. It is just plug and play and just runs right away. I also wanted to have active cooling so I have a very thin Pi Fan (comes with heat sink for 4b and 3b) and I have used the brass/copper heatsink for the 3b to have low profile with a fan sitting on top. I had to move one of the heatsinks on the board next to the fan to be able to put the fan on it. This entire assembly will sit on the table and touch it after kind of like feet so that no pressure on the top causes it to bend. Its thick enough that it should not bend anyway and I have added to the walls so it’s pretty strong.
In v2 I added a rear replacement panel with a clip in wall so the front hole is covered. You only have to reprint the rear cover with wall.
I am using a Raspberry Pi 4b 4gig and a 32gig MicroSD card. I did not include those below as I already had them. I put my pricing next to the item when I bought it below. All the accessories including the screen was $70 USD. I bought everything on amazon.
I printed it with supports only on the outside ramps that connect the LCD to the Prusa Frame, and the two-bottom touchscreen supports where there are floating squares to keep them straight. They do print ok without supports but not as clean. Like the normal Prusa LCD case, it has some supports that need to be broken out in the rear of the case where the screen clips in, and on the SD card side where the SD card sticks out.
I have two L shape cables that can connect to the pi and fit in the case and run between the screen and the Pi so you don’t have to have a cable coming out the top. Both I tested are listed below. I put this part together before putting the Pi In.
When you assemble the two parts for the screens joining the Prusa LCD with the Touchscreen, install the three screws on the Prusa panel first and tighten them. You have to push down on the emergency button to get the screw to fit in, don’t push to hard on it, just enough to get the screw started. Then install the Prusa LCD.
The touchscreen can go in two ways, A) from the bottom carefully but you need to make sure you watch the cable for the screen. This way will require removal of the SD card to install. B) This way you can keep the SD Card installed when putting it in. From the top you can put the screen in diagonally putting the bottom side in first and slowly and carefully lowering the top part turning it inside until you get it to fit like a puzzle. Don’t push hard on the screen cause you don’t want to crack it, if it doesn’t fit it might be some print or plastic stopping and you can take it out with Xacto. It is too tight depending on your print you might need to just make sure the plastic in the two corners is trim and smooth on the inside. It should be a just right tight fit so it doesn’t move around. Once you put the back on it will hold it all in place.
Put the back together and break out one section of the grill to be able to plug in the fan pins after its assembled. Put the side the says Pi Fan towards the RPi4b. It will blow toward the Pi. Then the grill goes on top with the nuts on the top outside. If you tried putting them inside, they might touch the RPi and short something. Again, I have used the brass/copper heatsink for the 3b that came with the fan to have low profile with a fan sitting on top.
Note: I have had problems with Raspberry Pi 4b power supplies saying they are 3.5 Amp that don’t work and when I put a meter on them, they are not 3.5amp. I did locate and test two models that worked but one came in a different kit. The one I listed below worked. You will know when you plug in the screen and power on the Pi 4b because you will see a little lightning bolt on the screen top left corner when there is not enough power.
Ps: I have modified so many models I don’t even know who to give credit to at this point, so thank you to everyone I stole from! I have taken things from others and combined and I’ve added to them but all of these pieces have been modified in some way except the back fan grill.
3.5” Screen =$30
OSOYOO 3.5 Inch DSI Touchscreen LCD Display for Raspberry Pi 4 B 3 Model B+ 2 | Capacitive Finger Touch screen | Plug and Play Monitor Compatible with Raspbain Ubuntu Kali RetroPie Windows 10 IOT core
by osoyoo
https://www.amazon.com/dp/B08634Y16L/ref=cm_sw_em_r_mt_dp_WJHFA0FKRMMWWKQ4H5AZ
Super Thin Pi Fan and comes with smaller heat sinks for 3b but I use for 4b = $7
GeeekPi Raspberry Pi 4 Fan, Raspberry Pi Cooling Fan 30x30x7mm DC 5V Brushless CPU Cooling Fan with 7PCS Raspberry Pi Heatsink for Raspberry Pi 4 Model B,3B+,Pi 3 & Retroflag NESPI CASE Plus (1-Pack) by GeeekPi
https://www.amazon.com/dp/B07C9C99RM/ref=cm_sw_em_r_mt_dp_PYBGAEP4C9S8XGS0YAGF
Screws = $8
100pcs M3 x 8mm 12.9 Grade Alloy Steel Hex Socket Head Cap Screws Bolts,Black Oxide Finish by zw99 Store
https://www.amazon.com/dp/B07CMQ1SQH/ref=cm_sw_em_r_mt_dp_NWDP1T69PG54VHVVV1JP
Choice A: Thin Long Cable – USB-C for Power to RPi4b = $13
ADT-LINK USB 3.1 Type-C Male to USB3.1 Type-C Male Up/Down Angle 3A USB Data Sync & Charge Cable Type c Cord Connector Adapter FPC FPV Flat 10G.BPS 20cm (20CM, T2-T1)
https://www.amazon.com/dp/B08DTF5W81/ref=cm_sw_em_r_mt_dp_JC8XEBBDZ0Q2DGZ904TB
Choice B: Thin Short Cable – USB-C alternative cable for RPi4b = $13
Short Slim USBC Cable FPV Soft Ribbon FPC Cable USB Type C 90 Degree Angled to USB Type C Straight for sync and Charging (5CM)
by permanent industry
https://www.amazon.com/dp/B07LFZ5RV7/ref=cm_sw_em_r_mt_dp_AW5BSGYCWB4CHKCC367J
Better Power supply 3.5 amp verified works with screen and camera attached to RPi4b = $12
Argon ONE Raspberry Pi 4 USB Type C Cable Power Supply | 5 Feet Long | UL Listed 18 Watts 5.25 Volts 3.5 Amps USB C Cable Power Adapter
https://www.amazon.com/dp/B07TW4Q693/ref=cm_sw_em_r_mt_dp_JQ7MQYQ1D35W63HDZFWW
Connector for Extension cable from USB-C to hook the small RPi4b cable to power supply =$7
Cellularize USB C Female to Female Adapter (Black, 2 Pack) 3.1/10Gbps USB Type C Coupler Extender Extension Connector for Samsung Galaxy S8, Google Pixel, Nintendo Switch by Cellularize
https://www.amazon.com/dp/B07S292X2V/ref=cm_sw_em_r_mt_dp_F9C74YSF5FBDBSVZ8FNK
Similar models
thingiverse
free

Raspberry Pi Wall Holder (with 40mm Fan) by ei23
...thingiverse
this can be used for raspberry pi 4b / 3b / 3b+
with a 40mm fan for cooling.
keeps temperature of a pi 4b unter 40°c
thingiverse
free

Touch Screen for Prusa MK3s, Octopi, Octoprint TFT
...ry of screw length. in some areas (for the fan and the touch screen), if the screw is too long you will deform the exterior face.
thingiverse
free

The Eidevo One by DPS_Design
...-_ml5w4c5&shareid=20205698714&businesstype=productdetail&platform=ae&terminal_id=6cbb03a5909147a1ad3185602843b2f8
thingiverse
free
BT7200+Raspberry-Pi-3b+LCD Screen
...bt7200+raspberry-pi-3b+lcd screen
thingiverse
bt7200+raspberry-pi-3b+lcd screen
thingiverse
free

Raspberry Pi case for 3D printer by demolitions
...sb connector for power (will upload photos), a raspberry pi (i used a pi 3 model b), and a kuman 3.5" touchscreen (mpi3508).
thingiverse
free

Raspberry pi 3 all in one! by Spacecore214
...id=1527302027&sr=1-11&keywords=7%22+touchscreen+display
hdmi cable and raspberry pi power cables, headphones and keyboard
thingiverse
free

Modular Raspberry Pi 2B|3B|3B+|4B Case 60/80Fan PiCam Update 22.09.2019 by Edd77
...raspberry pi 2b|3b|3b+|4b case 60/80fan picam update 22.09.2019 by edd77
thingiverse
modular raspberry pi 2b|3b|3b+|4b case fan
grabcad
free

Raspberry Pi 3B Octoprint Case with Fan
...ase with fan 30x30x7/10 made from 4b cover as different openings for usb..here original https://www.thingiverse.com/thing:3852672
thingiverse
free

Sovol SV01 Re-Oriented Screen with Octoprint by chilman408
...e specific 3.5" touch screen i'm using is this:
https://www.amazon.com/dp/b01n48noxi/ref=cm_sw_r_tw_dp_u_x_21miebvqhe2cv
thingiverse
free

Raspberry Pi Enclosures - 4B, 3B, 3B+, Zero W, 2.5" HDD by msonst
...a software for creating and using file hosting services similar to dropbox. unlike dropbox, nextcloud is free and open-source,...

4B
3ddd
$1
GLOBO 5433-4B
...globo 5433-4b
3ddd
globo
модель светильника globo глобо 5433-4b
turbosquid
$25

Street light 4b
... available on turbo squid, the world's leading provider of digital 3d models for visualization, films, television, and games.
3d_export
$10

Overgrown Lamp Post 4B
...overgrown lamp post 4b
3dexport
turbosquid
$32

V-2 A-4B missile
... available on turbo squid, the world's leading provider of digital 3d models for visualization, films, television, and games.
turbosquid
$18

Viking Stove VGIC245-4B 24
...ng stove vgic245-4b 24 for download as max, 3ds, fbx, and obj on turbosquid: 3d models for games, architecture, videos. (1698000)
3ddd
$1

The Zara Collection from Feiss
...no.: f2736/4bs 4-light cnandelier no.: f2745/4bs 4-light cnandelier no.: f2737/4b в архиве 3 модели, 2011 и 2014...
3d_export
$41

V2 A4B missile 3D Model
...tic missile sounding rocket experimental weapon military program surface srbm
v2 a4b missile 3d model visualmotion 86520 3dexport
3d_export
$99

Audi A6 saloon C5 2001 3D Model
...saloon c5 2001 3d model 3dexport audi a6 c5 4b 1997 1998 1999 2000 2001 2002 2003 2004 4-door...
3d_export
$99

Audi A6 avant C5 2001 3D Model
...avant c5 2001 3d model 3dexport audi a6 c5 4b 1997 1998 1999 2000 2001 2002 2003 2004 5-door...
3d_ocean
$89

Audi A6 saloon (C5) 2001
...audi a6 saloon (c5) 2001 3docean 1997-2004 4-door 4b a6 audi audi a6 c5 germany saloon sedan volkswagen...
Touchscreen
3d_ocean
$10

Touchscreen Phone
...r stand alone renderings. the button as well as speaker on the front are modelled for added realism and depth for those tight ...
turbosquid
$2

Touchscreen Kiosk
... available on turbo squid, the world's leading provider of digital 3d models for visualization, films, television, and games.
3d_export
$35
TF 700 Tablet PC 10 in touchscreen 3D Model
...export
universal tablet pc 10 in touchscreen android notebook
tf 700 tablet pc 10 in touchscreen 3d model plasticv 80776 3dexport
3d_ocean
$10

Sleek Touchscreen Smart Phone
... of multi-touch smart phone designs. the small details such as the buttons, camera lens, speaker and other components have bee...
3ddd
$1
Celular Samsung
...3ddd телефон , samsung samsung s5230 mid level full touchscreen ...
3d_export
$30
LG arena 3D Model
...arena 3d model 3dexport lg km900 arena phone mobile touchscreen lg arena 3d model s.e.3ddd 26566...
3d_export
$30

SONY Xperia Tablet 3D Model
...xperia tablet 3d model 3dexport sony xperia tablet android touchscreen sony xperia tablet 3d model barbarosa222 58716...
3d_export
$15

Iphone Black 3D Model
...black 3d model 3dexport phone electronics iphone cellphone smartphone touchscreen touch screen iphone black 3d model ryleyswan 81168...
3d_export
$40

Google Nexus One 3D Model
...3d model 3dexport google nexus one phone mobile cellular touchscreen google nexus one 3d model h1studio 21421...
3d_export
$45
HTC Flyer Tablet 3D Model
...htc flyer tablet 3d model 3dexport touchscreen tablet htc 3d model 3ds max phone htc flyer...
V4
design_connected
$16

V4 vases
...v4 vases
designconnected
sy design v4 vases computer generated 3d model. designed by song, seung-yong.
turbosquid
$20

Door v4
...yalty free 3d model door v4 for download as max, max, and obj on turbosquid: 3d models for games, architecture, videos. (1523140)
turbosquid
$5

Hand v4
...yalty free 3d model hand v4 for download as ztl, obj, and stl on turbosquid: 3d models for games, architecture, videos. (1567431)
turbosquid
$9

silencer v4
...3d model silencer v4 for download as blend, dae, fbx, and obj on turbosquid: 3d models for games, architecture, videos. (1711410)
turbosquid
$90

V4 Engine
... available on turbo squid, the world's leading provider of digital 3d models for visualization, films, television, and games.
turbosquid
$35
Payphone v4
... available on turbo squid, the world's leading provider of digital 3d models for visualization, films, television, and games.
turbosquid
$28
HAZRO V4
... available on turbo squid, the world's leading provider of digital 3d models for visualization, films, television, and games.
turbosquid
$15

Carousel v4
... available on turbo squid, the world's leading provider of digital 3d models for visualization, films, television, and games.
turbosquid
$1

PokBall V4
... available on turbo squid, the world's leading provider of digital 3d models for visualization, films, television, and games.
3ddd
free

фонтан V4
...фонтан v4
3ddd
фонтан
фонтан, fantan, fontan
Raspberry
3d_export
free

raspberry
...raspberry
3dexport
3d model of a raspberry. i tried to make it realistic.
turbosquid
$27

Raspberries
...y free 3d model raspberries for download as max, obj, and stl on turbosquid: 3d models for games, architecture, videos. (1354176)
turbosquid
$14

Raspberries
...y free 3d model raspberries for download as max, obj, and fbx on turbosquid: 3d models for games, architecture, videos. (1364663)
3d_export
$5

raspberry pi
...raspberry pi
3dexport
carcasa para la raspberry pi
turbosquid
$99

Raspberry
... available on turbo squid, the world's leading provider of digital 3d models for visualization, films, television, and games.
turbosquid
$10

raspberries
... available on turbo squid, the world's leading provider of digital 3d models for visualization, films, television, and games.
archive3d
free

Raspberries 3D Model
...raspberries 3d model archive3d raspberries raspberry raspberries n300911 - 3d model (*.3ds) for interior 3d...
3d_export
$5

raspberry fruit
...raspberry fruit
3dexport
3d_export
$5

raspberry
...y different sizes. their color ranges from light burgundy to pink. there are formats: obj, 3ds, blend, dae, fbx, mtl.<br>:)
evermotion
$12

raspberries 23 am130
...evermotion raspberries 23 am130 evermotion key 23 food fruit raspberry fruits am130 raspberries highly detailed 3d model of raspberries...
Prusa
turbosquid
$2

Frame Filament Guide Clip-On for Prusa Mk3
...rame filament guide clip-on for prusa mk3 for download as stl on turbosquid: 3d models for games, architecture, videos. (1634730)
3d_export
free

prusa i3 mk3s laser mount for opt lasers
...to learn more about the blue laser technology that conceived the cutting and engraving laser heads from opt lasers, please visit:
turbosquid
free

Prusa small printer adapter holder
...er for download as ipt, skp, dwg, dxf, fbx, ige, obj, and stl on turbosquid: 3d models for games, architecture, videos. (1642936)
3d_export
$30

geisha by jonathan adler
...** i did a 3d printing test in the prusa software, you can find it among the attached images.<br>exchange:<br>.blend...
thingiverse
free

Prusa without Prusa (rc2) by madless
...prusa without prusa (rc2) by madless
thingiverse
just the main part of prusa rc2 faceshield, without writing.
enjoy :)
thingiverse
free

Prusa by acejbc
...prusa by acejbc
thingiverse
prusa knob info
m3 8mm screw
thingiverse
free

Prusa house
...prusa house
thingiverse
how prusa house could look like...
thingiverse
free

Prusa Mk2 "Fake Prusa" LCD cover by anraf1001
...r by anraf1001
thingiverse
version of prusa's lcd cover with "fake prusa" instead of "original prusa"
thingiverse
free

Prusa stabilizator by gutiueugen
...prusa stabilizator by gutiueugen
thingiverse
prusa stabilizator
thingiverse
free

Keychain Prusa by rbarbalho
...keychain prusa by rbarbalho
thingiverse
keychain with text prusa.
Pi
design_connected
$11

Pi
...pi
designconnected
ligne roset pi chairs computer generated 3d model. designed by thibault desombre.
3d_export
$5
raspberry pi
...raspberry pi
3dexport
carcasa para la raspberry pi
turbosquid
$18

pied
... available on turbo squid, the world's leading provider of digital 3d models for visualization, films, television, and games.
3ddd
$1

Emme pi light
...emme pi light
3ddd
emme pi light
люста emme pi light
3ddd
$1

Emme pi light
...emme pi light
3ddd
emme pi light
бра классическое emme pi light
3ddd
$1

Emme Pi Light
...emme pi light
3ddd
emme pi light
3ddd
$1

Emme Pi Light
...emme pi light
3ddd
emme pi light
design_connected
$16

Pi-Air
...pi-air
designconnected
living divani pi-air lounge chairs computer generated 3d model. designed by harry & camila.
3d_ocean
$15

Manneken Pis
...picting a naked little boy urinating into a fountain’s basin. (wikipedia) the model was sculpted in blender 2.70a rendered wit...
3ddd
$1

Emme pi light
...emme pi light
3ddd
emme pi light
люстра классическая фирма: emme pi light
артикул: 3595/5/cot/12/wh
Kit
turbosquid
$3

Bathroom Kit Baño kit
... available on turbo squid, the world's leading provider of digital 3d models for visualization, films, television, and games.
turbosquid
$19

Kit
... available on turbo squid, the world's leading provider of digital 3d models for visualization, films, television, and games.
3d_export
$20

Drift Kit
...drift kit
3dexport
turbosquid
$40

BitCoin Kit
...urbosquid
royalty free 3d model bitcoin kit for download as on turbosquid: 3d models for games, architecture, videos. (1519068)
turbosquid
$9

Industrial kit
...osquid
royalty free 3d model industrial kit for download as on turbosquid: 3d models for games, architecture, videos. (1144117)
turbosquid
$6

Kit Vases
...
turbosquid
royalty free 3d model kit vases for download as on turbosquid: 3d models for games, architecture, videos. (1285114)
turbosquid
free

Survival Kit
...rbosquid
royalty free 3d model survival kit for download as on turbosquid: 3d models for games, architecture, videos. (1637721)
turbosquid
$50

Ninja Kit
...rbosquid
royalty free 3d model ninja kit for download as fbx on turbosquid: 3d models for games, architecture, videos. (1672364)
turbosquid
$35

Brushes Kit
...osquid
royalty free 3d model brushes kit for download as max on turbosquid: 3d models for games, architecture, videos. (1216721)
turbosquid
$19

Kit Bedroom
...osquid
royalty free 3d model kit bedroom for download as max on turbosquid: 3d models for games, architecture, videos. (1290049)
Fan
3d_export
$5

fan
...fan
3dexport
fan 3d model, table fan, fan, electric fan, ventilator
archibase_planet
free

Fan
...fan
archibase planet
fan large fan
fan out n260707 - 3d model for interior 3d visualization.
archibase_planet
free

Fan
...fan
archibase planet
fan ceiling fan ventilator
fan stealth n300615 - 3d model (*.gsm+*.3ds) for interior 3d visualization.
3d_export
$15

fan
...fan
3dexport
is an ancient fan
3ddd
$1

Fan-C-Fan by marco gallegos
...n-c-fan by marco gallegos
3ddd
вентилятор , marco gallegos
fan-c-fan by marco gallegos
3d_export
$10

fan
...fan
3dexport
a detailed fan designed for home or space blowing is now available for only 19.99!
turbosquid
$1

Fan
...fan
turbosquid
free 3d model fan for download as on turbosquid: 3d models for games, architecture, videos. (1427865)
turbosquid
$14

Fan
...fan
turbosquid
royalty free 3d model fan for download as on turbosquid: 3d models for games, architecture, videos. (1415642)
3ddd
$1

Светильник Fan
...светильник fan
3ddd
fan , italamp
светильник fan, производитель italamp
turbosquid
$25

Fan
...fan
turbosquid
royalty free 3d model fan for download as c4d on turbosquid: 3d models for games, architecture, videos. (1483246)
5
turbosquid
$6

Rock 5-5
...urbosquid
royalty free 3d model rock 5-5 for download as obj on turbosquid: 3d models for games, architecture, videos. (1639063)
3d_export
$5

hinge 5
...hinge 5
3dexport
hinge 5
turbosquid
$10

A-5
... available on turbo squid, the world's leading provider of digital 3d models for visualization, films, television, and games.
turbosquid
$2

A-5
... available on turbo squid, the world's leading provider of digital 3d models for visualization, films, television, and games.
turbosquid
$12

Calligraphic Digit 5 Number 5
...hic digit 5 number 5 for download as max, obj, fbx, and blend on turbosquid: 3d models for games, architecture, videos. (1389333)
3ddd
$1

5 роз
...5 роз
3ddd
5 роз в стеклянной вазе
design_connected
$11

iPhone 5
...iphone 5
designconnected
apple iphone 5 computer generated 3d model.
3ddd
$1

Lola 5
...lola 5
3ddd
miniforms
lola 5 miniforms 300*65*134
3ddd
$1

Nexus 5
...dd
nexus , phone , телефон
google nexus 5 phone
3d_ocean
$15

iPhone 5
...iphone 5
3docean
3d 4d apple cinema iphone model modeling phone screen texture
iphone 5 3d model and texture realistic iphone 5.
3
turbosquid
$10

Mountain Bike 3 -3 of 3
...model mountain bike 3 (#3 of 3) for download as fbx and blend on turbosquid: 3d models for games, architecture, videos. (1438752)
turbosquid
$6

Rock 3-3
...urbosquid
royalty free 3d model rock 3-3 for download as obj on turbosquid: 3d models for games, architecture, videos. (1628065)
turbosquid
$29

Books 150 pieces 3-3-3
...books 150 pieces 3-3-3 for download as max, obj, fbx, and stl on turbosquid: 3d models for games, architecture, videos. (1384033)
turbosquid
$3

Genesis 3 Clothing 3
... available on turbo squid, the world's leading provider of digital 3d models for visualization, films, television, and games.
3d_export
$5

hinge 3
...hinge 3
3dexport
hinge 3
3ddd
$1

Розетка 3
...розетка 3
3ddd
розетка
розетка 3
turbosquid
$50

is-3
... available on turbo squid, the world's leading provider of digital 3d models for visualization, films, television, and games.
turbosquid
$10

Mountain Bike 3 -2 of 3
...model mountain bike 3 (#2 of 3) for download as fbx and blend on turbosquid: 3d models for games, architecture, videos. (1438750)
turbosquid
$10

Mountain Bike 1 -3 of 3
...model mountain bike 1 (#3 of 3) for download as fbx and blend on turbosquid: 3d models for games, architecture, videos. (1438743)
3d_export
$5

3 CATS
...3 cats
3dexport
3 cats pen holder