Thingiverse

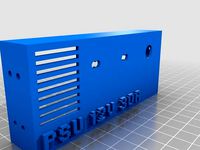
Prusa i3 PSU Cover Upgrade (+ Pi3 & +Relay) by irawans
by Thingiverse
Last crawled date: 3 years ago
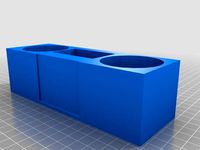
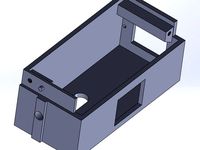
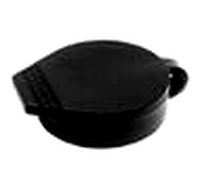
I made changes on the current Prusa i3 PSU cover to accommodate Raspberry Pi3 and 1 Chanel Relay. The relay board is used to turn On and Off the LED (additional). The design is compatible with Prusa i3 MK2, MK2S and MMU. One thing that you need to change is the head of cable ties from the Right Z Motor, due to the expanding of PSU cover's high.
Also you need some items:
Raspberry Pi3, for running the OctoPrint or others.
1 Channel Relay board, for turning the LED On and Off, or any other things you might use (https://www.amazon.com/gp/product/B0151F3A9Q/ref=oh_aui_search_detailpage?ie=UTF8&psc=1)
DC to DC step down Power Module Mini, https://www.amazon.com/Icstation-Voltage-Regulator-Converter-Charger/dp/B06XDMFBMJ/ref=sr_1_10?ie=UTF8&qid=1504972708&sr=8-10&keywords=dc+to+dc+power+down+mini
OTG Adapter Connector, https://www.amazon.com/CHENYANG-Ultra-Adapter-Connector-Tablet/dp/B015GZOHKW/ref=sr_1_5?s=industrial&ie=UTF8&qid=1504972764&sr=1-5&keywords=otg
Flat Head M3 Screw Nuts: 12mm x 2 For the AC Power Socket
Hex Socket Head M3: 5mm x 3 ; 2 For Raspberry Pi board and 1 for the Lid, 10mm x 2 for the Relay board.
M3 Nut x 4, for Power Plug and Relay Board
5mm Spacer (optional), for Relay Board.
6 Circular Magnets with 6mm in Diameter and 3mm in Thickness
In addition, I design a small tool box which can be used to put the Alcohol Swab and Spatula, tweezer , etc.
Please give me feedback on the design, as I am very new to Fusion 360/3D software. This is my 3rd model I design in Fusion 360, and thanks to Lars Christensen's Great tutorials which teach me from nothing about Fusion 360, you could find it in here: https://www.youtube.com/channel/UCo29kn3d9ziFUZGZ50VKvWA
Similar models
thingiverse
free

gMax, 80/20 frame parts for mods, hacks, and addons by Spudwheelie
...pport-terminal-rocker-toggle-switch/dp/b00zwwyucu/ref=sr_1_15?ie=utf8&qid=1464391427&sr=8-15&keywords=switch+spst#ask
thingiverse
free

3D Printable 3D Printer by TheJadeRabbit
...r_1_4?ie=utf8&qid=1530916900&sr=8-4&keywords=3d+printer+hotend
code(marlin): https://github.com/marlinfirmware/marlin
thingiverse
free

40A Power Supply Cover W/LCD Display by hkgary_g
...lpage_o06_s01?ie=utf8&psc=1
power socket
www.amazon.com/gp/product/b06xnmt3wl/ref=oh_aui_detailpage_o06_s00?ie=utf8&psc=1
thingiverse
free

Liqoo 12 V PSU Cover by Ampa_DE
...ckdose-schalter-stecker/dp/b00f4mfmxe/ref=sr_1_1?ie=utf8&qid=1487476734&sr=8-1&keywords=c14+buchse
have fun with it !
thingiverse
free

Jointing 3.5 inch monitor to xbox 360 controller by kantamochida
...tf8&qid=1511399907&sr=8-1&keywords=osoyoo
hdmi adapterhttps://www.amazon.com/dp/b06wglryn4/ref=sspa_dk_detail_1?psc=1
thingiverse
free

Mini desk fan by Creborg319
....com/6300rpm-shaft-magnetic-motor-hobby/dp/b00bg61s44/ref=sr_1_5?ie=utf8&qid=1533705112&sr=8-5&keywords=mini+dc+motor
thingiverse
free
Speaker box by Ratakis
...-4ft/dp/b01kstsv76/ref=sr_1_1_sspa?s=electronics&ie=utf8&qid=1521518432&sr=1-1-spons&keywords=aux+cable&psc=1
thingiverse
free

NFC Reader RC522 Arduino and Ethernet controlling relay by squipa
...trasonic-intelligent/dp/b075cx2l7z/ref=sr_1_6?s=electronics&ie=utf8&qid=1534773106&sr=1-6&keywords=arduino+uno+r3
3ddd
$1

Tea set from the Big Bang Theory / Набор для чаепития
...qid;=1449144667&sr;=1-66&keywords;=creamer+and+sugar+service
файл мах 2016!!!
+файл мах 2013 vray
+файл мах 2013 corona
thingiverse
free

The Cube Mini Fridge by thewatchmakerfl
...ref=sr_1_2?ie=utf8&qid=1436833279&sr=8-2&keywords=potentiometer&pebp=1436833322445&perid=0pmtmyyyy6vn4mzst3fx
Irawans
thingiverse
free

Dove Tail Puzzle by irawans
...thickness, and 1 steel bearing ball (https://www.amazon.com/gp/product/b007b2ag3g/ref=oh_aui_search_detailpage?ie=utf8&psc=1)
thingiverse
free

Google AIY Kit Box (Portable) by irawans
... open it if you need to access the raspberry.
with all of those components the aiy box won't be restricted by power adapter.
thingiverse
free

New Bukobot Spool Holder (Revision 3) by NoiseReduction
...2: now includes corrections based on spool measurements by irawans now compatible with 32 mm hole diameter spools! improved...
3dwarehouse
free

TIGERMART IRAWAN
...tigermart irawan
3dwarehouse
located at bgy. irawan
3dwarehouse
free

Irawan madiun
...irawan madiun
3dwarehouse
fck
3dwarehouse
free

LKOM08-UNMUL-Kamarku-ADI IRAWAN
...lkom08-unmul-kamarku-adi irawan
3dwarehouse
0807055006
3dwarehouse
free

Perumahan Cluster Adella Irawan - XI IPA 2
...perumahan cluster adella irawan - xi ipa 2
3dwarehouse
perumahan cluster dibuat oleh adella irawan - xi ipa 2
3dwarehouse
free

ILKOM08-UNMUL-LEMARI_BAJU-ADI IRAWAN-0807055006
...ilkom08-unmul-lemari_baju-adi irawan-0807055006
3dwarehouse
lemari baju
3dwarehouse
free

ILKOM08-UNMUL-RUMAHKU-Adi Irawan-0807055006
...ilkom08-unmul-rumahku-adi irawan-0807055006
3dwarehouse
rumahku-tugas akhir
Pi3
thingiverse
free

Raspberry Pi3 Pi3 B+ support by paolinux78
...raspberry pi3 pi3 b+ support by paolinux78
thingiverse
a support for raspberry pi3 and pi3 b+
thingiverse
free

Pi3 NES by joeplaz
...pi3 nes by joeplaz
thingiverse
pi3 version of my nes case. 2 usb ports only.
thingiverse
free

Case - Raspberry Pi3 by DragonSK
...case - raspberry pi3 by dragonsk
thingiverse
case - raspberry pi3
thingiverse
free

Pi3 Zelda NES by joeplaz
...pi3 zelda nes by joeplaz
thingiverse
zelda style nes pi3 case.
thingiverse
free

Boitier PI3 by THENAF
...ngiverse
un boitier pour pi3.
avec le même fond, vous pouvez utiliser le couvercle percé pour ventilo ou le 'non-percé'.
thingiverse
free

Raspberry PI3 Box
...raspberry pi3 box
thingiverse
this is a simple raspberry pi 3 box
thingiverse
free

Arcade joystick pi3 by citroen4158
...arcade joystick pi3 by citroen4158
thingiverse
*
thingiverse
free

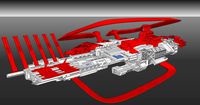
Empire PI3 Case by Moby2112
...3 case by moby2112
thingiverse
here is a star wars remix pi3 case. i did not use any supports and printed out with 100% infill.
thingiverse
free

kyle name plate by pi3
...kyle name plate by pi3
thingiverse
use thingiview to see the name.
thingiverse
free

PI3 case bottom with slot
... on "anycubic i3 mega raspberry pi 4b holder with raspberry pi camera mount " https://www.thingiverse.com/thing:3950698
Relay
turbosquid
$50
Relay Spaceship
... model relay spaceship for download as skp, 3ds, dae, and obj on turbosquid: 3d models for games, architecture, videos. (1655800)
3ddd
$1

Scavolini / Grand Relais
...scavolini / grand relais
3ddd
scavolini
scavolini модель grand relais дизайн gianni pareschi
3ddd
$1
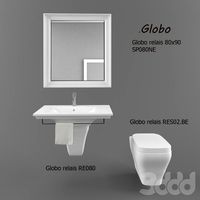
Сантехника Globo Relais
... унитаз , зеркало
сантехника globo relais
умывальник,зеркало,унитаз.
3d_export
$8
relay automatic assembly line
...relay automatic assembly line
3dexport
relay automatic assembly line
3ddd
free
Унитаз и биде Relais
... биде , унитаз
унитаз art.re001 bi и биде art.re009 bi
turbosquid
free

Relay 8 pin
... available on turbo squid, the world's leading provider of digital 3d models for visualization, films, television, and games.
cg_studio
$110
Power relay station3d model
...el
cgstudio
.3ds .fbx .max .obj - power relay station 3d model, royalty free license available, instant download after purchase.
3ddd
$1
Стол обеденный -Scavolini- Grand Relais
...s
3ddd
обеденный , scavolini
обеденный стол scavolini - grand relais, в трёх расцветках.
3d_export
$10
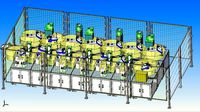
relay jd1912 12v 40a with connector
...lowing bodies: 1. relay jd1912 12v 40a - 1 piece; 2. connector housing - 1 piece; 3. terminal with a part of the wire - 4 pieces.
3ddd
free

Globo Relais furnitures
... , раковина
раковина с консолью st070.ne
зеркалоsp070.bi
стакан re0381x
мыльница re0391x
Psu
3d_ocean
$17

Computer Case
...3docean atx case computer corsair full game gaming pc psu full tower-like computer case model with 113946...
cg_studio
$9

Power Supply Unit PSU3d model
...d .fbx .lwo .ma .max .obj .xsi - power supply unit psu 3d model, royalty free license available, instant download after purchase.
thingiverse
free
PSU cover for 12v 30A PSU by Salti
...
cover for the "dangerous" end of a standard led psu
230v input, 2 x 12v outputs
supports psu width 11cm and height 5cm
thingiverse
free

psu holder by sta8atos
...psu holder by sta8atos
thingiverse
psu holder
thingiverse
free

psu stamp by astorck
...psu stamp by astorck
thingiverse
psu stamp
thingiverse
free

PSU Cover by Shojo
...psu cover by shojo
thingiverse
psu cover
thingiverse
free
PSU cover by chroja
...psu cover by chroja
thingiverse
psu cover
thingiverse
free

PSU Cover for 9,9 cm PSU Anet A8 by Wolverine_DH
...a8 by wolverine_dh
thingiverse
psu cover for 9.9sm psu optimal high for anet a8 screw holes, more side holes for diffrend psus.
thingiverse
free

Anet A8 PSU Fan (2017 PSU)
...coarse threaded fan screws. additionally 2 x m3x8mm machine screws needed to attach fan mount to psu. do not use long than 8mm.
thingiverse
free

SFX PSU to ATX PSU adapter by Kanashii
... atx format adapter so i made my own adapter. better use hard plastic to stick psu to pc's case without breaking the adapter.
Upgrade
turbosquid
$15

Upgraded Glock
...e 3d model upgraded glock for download as obj, fbx, and blend on turbosquid: 3d models for games, architecture, videos. (1185950)
3ddd
$1

Calligaris / UPGRADE
...calligaris / upgrade
3ddd
calligaris
c материалом
3d_export
free

cz upgrade
...cz upgrade
3dexport
https://www.buymeacoffee.com/mestrezen3d https://linktr.ee/mestrezen3
turbosquid
$80

Custer Tank upgrade
... available on turbo squid, the world's leading provider of digital 3d models for visualization, films, television, and games.
turbosquid
$39

Domestos 1 upgrade
... available on turbo squid, the world's leading provider of digital 3d models for visualization, films, television, and games.
3d_export
$10

Upgraded tea cup
...upgraded tea cup
3dexport
a cup with an unusual design and a unique shape for a more enjoyable tea experience
3d_export
$8

dixy outlander classic style upgraded poplar wood lounge chair
...utlander classic style upgraded poplar wood lounge chair
3dexport
dixy outlander classic style upgraded poplar wood lounge chair
turbosquid
free

AK-12 + Upgrades low-poly 3D model
...ow-poly 3d model for download as fbx, blend, and unitypackage on turbosquid: 3d models for games, architecture, videos. (1501145)
evermotion
$700

Upgrade from V-ray 1.5 to 3.5 for 3ds max
...here is no need to purchase a new dongle - your current dongles will be reprogrammed to carry v-ray 3. evermotion 3d models shop.
evermotion
$300

Upgrade from V-Ray 2.0 to V-ray 3.5 for 3ds Max
... interface (gui) for editing settings on one machine and one render node for rendering on one machine. evermotion 3d models shop.
I3
3d_export
$10

suv i3
...suv i3
3dexport
suv i3 2013 series
3d_ocean
$89

BMW i3 2012
...y, in real units of measurement, qualitatively and maximally close to the original. model formats: - *.max (3ds max 2008 scanl...
cg_studio
$99

BMW i3 20143d model
...
cgstudio
.3ds .c4d .fbx .lwo .max .obj - bmw i3 2014 3d model, royalty free license available, instant download after purchase.
cg_studio
$99

BMW i3 20123d model
...tudio
.3ds .c4d .fbx .lwo .max .mb .obj - bmw i3 2012 3d model, royalty free license available, instant download after purchase.
cg_studio
$99

BMW i3 20143d model
...tudio
.3ds .c4d .fbx .lwo .max .mb .obj - bmw i3 2014 3d model, royalty free license available, instant download after purchase.
humster3d
$75

3D model of BMW i3 2014
...
buy a detailed 3d model of bmw i3 2014 in various file formats. all our 3d models were created maximally close to the original.
humster3d
$40

3D model of Kitchen Set I3
...uy a detailed 3d model of kitchen set i3 in various file formats. all our 3d models were created maximally close to the original.
3d_ocean
$30

Kitchen set i3
...ensils oven plates shelves sink table ware
kitchen set i3 include 3d models: cooker, oven, sink, cupboards, table, chair, plates.
3d_ocean
$89

BMW i3 2014
...y, in real units of measurement, qualitatively and maximally close to the original. model formats: - *.max (3ds max 2008 scanl...
cg_studio
$99

BMW i3 Concept 20113d model
...i3
.3ds .c4d .fbx .lwo .max .obj - bmw i3 concept 2011 3d model, royalty free license available, instant download after purchase.
Prusa
turbosquid
$2

Frame Filament Guide Clip-On for Prusa Mk3
...rame filament guide clip-on for prusa mk3 for download as stl on turbosquid: 3d models for games, architecture, videos. (1634730)
3d_export
free

prusa i3 mk3s laser mount for opt lasers
...to learn more about the blue laser technology that conceived the cutting and engraving laser heads from opt lasers, please visit:
turbosquid
free

Prusa small printer adapter holder
...er for download as ipt, skp, dwg, dxf, fbx, ige, obj, and stl on turbosquid: 3d models for games, architecture, videos. (1642936)
3d_export
$30

geisha by jonathan adler
...** i did a 3d printing test in the prusa software, you can find it among the attached images.<br>exchange:<br>.blend...
thingiverse
free

Prusa without Prusa (rc2) by madless
...prusa without prusa (rc2) by madless
thingiverse
just the main part of prusa rc2 faceshield, without writing.
enjoy :)
thingiverse
free

Prusa by acejbc
...prusa by acejbc
thingiverse
prusa knob info
m3 8mm screw
thingiverse
free

Prusa house
...prusa house
thingiverse
how prusa house could look like...
thingiverse
free

Prusa Mk2 "Fake Prusa" LCD cover by anraf1001
...r by anraf1001
thingiverse
version of prusa's lcd cover with "fake prusa" instead of "original prusa"
thingiverse
free

Prusa stabilizator by gutiueugen
...prusa stabilizator by gutiueugen
thingiverse
prusa stabilizator
thingiverse
free

Keychain Prusa by rbarbalho
...keychain prusa by rbarbalho
thingiverse
keychain with text prusa.
Cover
archibase_planet
free

Cover
...cover
archibase planet
cover place setting
cover n170807 - 3d model for interior 3d visualization.
3ddd
$1
cover
...cover
3ddd
ковер , круглый
cover decor
archibase_planet
free

Cover
...cover
archibase planet
cover place setting setting
servis-cafe1930 - 3d model for interior 3d visualization.
turbosquid
free
Coverings
...rings
turbosquid
free 3d model coverings for download as dwg on turbosquid: 3d models for games, architecture, videos. (1279391)
3d_export
$5
plug cover
...plug cover
3dexport
plug cover
turbosquid
$25

Covers
... available on turbo squid, the world's leading provider of digital 3d models for visualization, films, television, and games.
3d_export
$10
manhole cover
...manhole cover
3dexport
manhole cover gost, stl, step
turbosquid
$5

Street Gas Cover Manhole Cover
... available on turbo squid, the world's leading provider of digital 3d models for visualization, films, television, and games.
3ddd
free

Bed cover
...bed cover
3ddd
постельное белье
very useful bed cover
3d_export
$5
cpu cover
...cpu cover
3dexport
cpu cover, cpu box, sheet metal container