Thingiverse
Prusa i3 MK2 LED Lighting Mount by 3DExtruded
by Thingiverse
Last crawled date: 3 years ago
Stop!
There is a new and improved version -- print that instead :)https://www.thingiverse.com/thing:2667553
Update:
I uploaded this before finishing the installation. In hindsight, I might have done things differently with this. The tabs at the top of each arm are there for wire management -- they don't really do much for this purpose. I might have tried to make a path inside the model for this if I had given this more thought. Other wire management is also not awesome, currently, I'm using black tape on the back of the frame for most of it. But I am looking for a better option.
Additionally, the strip lighting is a poor choice for this. I would recommend getting a small LED panel instead. I was able to fit 10 3 light segments on each side (which only draws about 300ma of power by the way, for both sides combined). But soldering all of the connections was a real pain (maybe someone more adept with a soldering iron wouldn't see it as such). Additionally, there isn't a lot of room for the wires so you can kind of see them.
That said I am keeping mine setup this way. It does provide a nice amount of light and I am happy with my installation. But if anyone wants to remix this into something a little more polished that would be great.
I have included the Fusion 360 file for the left arm and the switch holder, the right arm was flipped using Tinkercad.
In any case, I hope this is helpful to some folks.
Parts Needed
LED Strip -- Here is what I used:https://amazon.com/gp/product/B00HSF65MC/ref=oh_aui_detailpage_o00_s00?ie=UTF8&psc=1&sa-no-redirect=1
Switch -- Here is one like I used:https://amazon.com/AutoEC-Rocker-Toggle-Switch-Control/dp/B012IJ38S6/ref=sr_1_13?ie=UTF8&qid=1499352050&sr=8-13&keywords=12v+switch+red+led
Notes, etc...
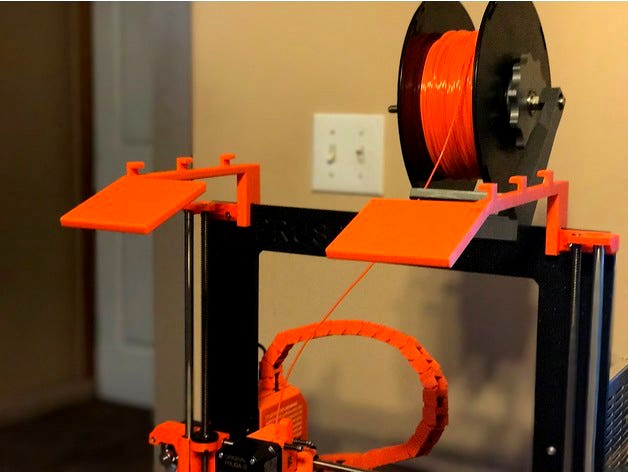
I was using a LED holder, thing 2120195, but I recently added a cable chain to my MK2S and mostly from thing 2224025, and the light bar wasn't working right. So I decided to look for a replacement. I couldn't find anything that quite matched what I wanted, so I designed this.
I designed the left one in Fusion 360 and used Tinkercad to flip it for the right one.
I have noticed the left side does interfere -- very slightly -- with Z calibration. I'm not sure I could redesign it to prevent that -- it seems to just touch the bearing on X carriage. In my case, I am still able to complete the calibration but sometimes it pushes the LED bracket up slightly. I probably won't change anything for this at this point.
I have designed the switch mount to fit loosely above the power supply (i.e it will move up and down) but it may take a bit of pressure (it did with my PETG parts) to get it to mount on the frame. If it is too loose for your liking, being able to move it up or down, you can do as I did, which is to take a small zip tie and cut off about 20 mm or so off the end. You can slip this between the frame and the side of the switch bracket to act as a shim (see image). You could skip the switch -- but for me, the switch was nice because there are times I want to be printing but not have the lights on.
There is a new and improved version -- print that instead :)https://www.thingiverse.com/thing:2667553
Update:
I uploaded this before finishing the installation. In hindsight, I might have done things differently with this. The tabs at the top of each arm are there for wire management -- they don't really do much for this purpose. I might have tried to make a path inside the model for this if I had given this more thought. Other wire management is also not awesome, currently, I'm using black tape on the back of the frame for most of it. But I am looking for a better option.
Additionally, the strip lighting is a poor choice for this. I would recommend getting a small LED panel instead. I was able to fit 10 3 light segments on each side (which only draws about 300ma of power by the way, for both sides combined). But soldering all of the connections was a real pain (maybe someone more adept with a soldering iron wouldn't see it as such). Additionally, there isn't a lot of room for the wires so you can kind of see them.
That said I am keeping mine setup this way. It does provide a nice amount of light and I am happy with my installation. But if anyone wants to remix this into something a little more polished that would be great.
I have included the Fusion 360 file for the left arm and the switch holder, the right arm was flipped using Tinkercad.
In any case, I hope this is helpful to some folks.
Parts Needed
LED Strip -- Here is what I used:https://amazon.com/gp/product/B00HSF65MC/ref=oh_aui_detailpage_o00_s00?ie=UTF8&psc=1&sa-no-redirect=1
Switch -- Here is one like I used:https://amazon.com/AutoEC-Rocker-Toggle-Switch-Control/dp/B012IJ38S6/ref=sr_1_13?ie=UTF8&qid=1499352050&sr=8-13&keywords=12v+switch+red+led
Notes, etc...
I was using a LED holder, thing 2120195, but I recently added a cable chain to my MK2S and mostly from thing 2224025, and the light bar wasn't working right. So I decided to look for a replacement. I couldn't find anything that quite matched what I wanted, so I designed this.
I designed the left one in Fusion 360 and used Tinkercad to flip it for the right one.
I have noticed the left side does interfere -- very slightly -- with Z calibration. I'm not sure I could redesign it to prevent that -- it seems to just touch the bearing on X carriage. In my case, I am still able to complete the calibration but sometimes it pushes the LED bracket up slightly. I probably won't change anything for this at this point.
I have designed the switch mount to fit loosely above the power supply (i.e it will move up and down) but it may take a bit of pressure (it did with my PETG parts) to get it to mount on the frame. If it is too loose for your liking, being able to move it up or down, you can do as I did, which is to take a small zip tie and cut off about 20 mm or so off the end. You can slip this between the frame and the side of the switch bracket to act as a shim (see image). You could skip the switch -- but for me, the switch was nice because there are times I want to be printing but not have the lights on.
Similar models
thingiverse
free

LED Light Bar Front & Back CR-10 / CR-10S (No Screws Needed) by Dooder_Snickel
...wgcd-solder-position-panel-switch/dp/b06xfxwljp/ref=sr_1_1?ie=utf8&qid=1515286479&sr=8-1&keywords=slide+switch+100+pc
thingiverse
free

LED bar for 3D printer U30 Pro by Lionelc
...00_s01?ie=utf8&psc=1
spacer :https://www.amazon.fr/gp/product/b078k9dt69/ref=ppx_yo_dt_b_asin_title_o00_s01?ie=utf8&psc=1
thingiverse
free

Ender 3 Pro LED Light Bar by MattKapper
...sc=1
24v to 12v buck transformer:https://www.amazon.ca/gp/product/b00jufj1ga/ref=ppx_yo_dt_b_asin_title_o04_s04?ie=utf8&psc=1
thingiverse
free

LED light bracket for Prusa MK2S MK2 by Jason3030
...t/b00t4gppd8/ref=as_li_ss_tl?ie=utf8&psc=1&linkcode=sl1&tag=product03c-20&linkid=2389957b9197829994a2f98cc4d248fe
thingiverse
free

X Gantry LED Light bar for Ender 3 by JDubNutz
...f8&psc=1
optional extender: https://www.amazon.com/gp/product/b01e8qrhkm/ref=ppx_yo_dt_b_asin_title_o01_s00?ie=utf8&psc=1
thingiverse
free

Hictop i3 Lower Z-Axis Brace by chaoren
...nting.
these are the bearings i used:https://www.amazon.com/gp/product/b002bbd6x4/ref=oh_aui_detailpage_o00_s00?ie=utf8&psc=1
thingiverse
free

LED Light CR-10/CR-10s Fan Blower Mount (No Screws Needed) by Dooder_Snickel
...wgcd-solder-position-panel-switch/dp/b06xfxwljp/ref=sr_1_1?ie=utf8&qid=1515286479&sr=8-1&keywords=slide+switch+100+pc
thingiverse
free

Creality CR-10 X-Carriage LED Light Bar by jantzenday
...age_o07_s00?ie=utf8&psc=1
-i would recommend using a touch of epoxy or super glue to ensure the led's stick to the mount.
thingiverse
free

Lighted Curved Lithophane Box with Switch by Handler5785sd
...1
powered by 12 v transformer https://smile.amazon.com/gp/product/b01hcrugpw/ref=ppx_yo_dt_b_asin_title_o00_s00?ie=utf8&psc=1
thingiverse
free

3030 Light bracket for Prusa MK2(S) by Jason3030
...t/b00t4gppd8/ref=as_li_ss_tl?ie=utf8&psc=1&linkcode=sl1&tag=product03c-20&linkid=2389957b9197829994a2f98cc4d248fe
3Dextruded
thingiverse
free

"DINE" Letters by 3DExtruded
... will add a photo once they are hung, of the actual letters -- but i have included a render of the letters in this thing for now.
thingiverse
free

Snowflake Magnets by 3DExtruded
...2.5 inches wide (~59mm)
here are the magnets i used:https://amazon.com/gp/product/b018ittfdm (~18mm diameter, ~5mm height, round)
thingiverse
free

Xfinity Remote Caddy with Apple TV Remote Dock by 3DExtruded
...or me the inclusion lightning cable required a bit of super glue to keep it in the dock while docking/undocking the apple remote.
thingiverse
free

Reinforced Resistor Organizer by 3DExtruded
.... i also filleted a bunch of the edges and shrunk the top down.
thank you jonquilmusic for sharing your design and source files!
thingiverse
free

Christmas Stocking Magnet by 3DExtruded
...ould work with some hot glue).
i have included the f3d archive file in case you would like to use it to change the magnet size.
thingiverse
free

FFCP and Others Right Fan Duct only by 3DExtruded
...th just the right extruder.
all credit goes to vexelius for his design -- the change to do just the right side was pretty simple.
thingiverse
free

Flashforge & Clones Inland Filament Spacer by 3DExtruded
...hforge models and clones with dual spool holders on the back. you need to print two for each spool holder you want to use it on.
thingiverse
free

SideClick Roku 3 Remote Holder by 3DExtruded
...erse.com/thing:2826922
there are two versions of the dock. one that incorporates the roku logo as an inset and one that is blank.
thingiverse
free

LED Strip 7 Segment by 3DExtruded
...ay want to consider running these leds at 9v instead of 12, they are very bright at 12v.
https://www.instagram.com/p/bxd6xsoabdg/
thingiverse
free

MK2 Spool Holder Extension by 3DExtruded
...ight rolls (bigger than 1kg) on the holder because the plastic holding the holder to the printer might give with too much weight.
Mk2
turbosquid
$4

Mk2
...
royalty free 3d model mk2 for download as max, obj, and fbx on turbosquid: 3d models for games, architecture, videos. (1305687)
turbosquid
$9
Mk2 Grenade
...osquid
royalty free 3d model mk2 grenade for download as fbx on turbosquid: 3d models for games, architecture, videos. (1175401)
turbosquid
$4

Mk2 Grenade
...quid
royalty free 3d model mk2 grenade for download as blend on turbosquid: 3d models for games, architecture, videos. (1228888)
turbosquid
$2

GRENADE MK2
...osquid
royalty free 3d model grenade mk2 for download as fbx on turbosquid: 3d models for games, architecture, videos. (1202615)
turbosquid
$2

Grenade Mk2
...osquid
royalty free 3d model grenade mk2 for download as max on turbosquid: 3d models for games, architecture, videos. (1658201)
turbosquid
$2

mk2 Grenade
...osquid
royalty free 3d model mk2 grenade for download as fbx on turbosquid: 3d models for games, architecture, videos. (1329079)
turbosquid
$75

Lanchester Mk2
...alty free 3d model lanchester mk2 for download as 3ds and max on turbosquid: 3d models for games, architecture, videos. (1497085)
turbosquid
$10

Grenade MK2
...royalty free 3d model grenade mk2 for download as max and fbx on turbosquid: 3d models for games, architecture, videos. (1146970)
turbosquid
$10

MK2 helmet
...
royalty free 3d model mk2 helmet for download as max and obj on turbosquid: 3d models for games, architecture, videos. (1371428)
turbosquid
free

MK2 Grenade
...
free 3d model mk2 grenade for download as png, obj, and fbx on turbosquid: 3d models for games, architecture, videos. (1225336)
I3
3d_export
$10

suv i3
...suv i3
3dexport
suv i3 2013 series
3d_ocean
$89

BMW i3 2012
...y, in real units of measurement, qualitatively and maximally close to the original. model formats: - *.max (3ds max 2008 scanl...
cg_studio
$99

BMW i3 20143d model
...
cgstudio
.3ds .c4d .fbx .lwo .max .obj - bmw i3 2014 3d model, royalty free license available, instant download after purchase.
cg_studio
$99

BMW i3 20123d model
...tudio
.3ds .c4d .fbx .lwo .max .mb .obj - bmw i3 2012 3d model, royalty free license available, instant download after purchase.
cg_studio
$99

BMW i3 20143d model
...tudio
.3ds .c4d .fbx .lwo .max .mb .obj - bmw i3 2014 3d model, royalty free license available, instant download after purchase.
humster3d
$75

3D model of BMW i3 2014
...
buy a detailed 3d model of bmw i3 2014 in various file formats. all our 3d models were created maximally close to the original.
humster3d
$40

3D model of Kitchen Set I3
...uy a detailed 3d model of kitchen set i3 in various file formats. all our 3d models were created maximally close to the original.
3d_ocean
$30

Kitchen set i3
...ensils oven plates shelves sink table ware
kitchen set i3 include 3d models: cooker, oven, sink, cupboards, table, chair, plates.
3d_ocean
$89

BMW i3 2014
...y, in real units of measurement, qualitatively and maximally close to the original. model formats: - *.max (3ds max 2008 scanl...
cg_studio
$99

BMW i3 Concept 20113d model
...i3
.3ds .c4d .fbx .lwo .max .obj - bmw i3 concept 2011 3d model, royalty free license available, instant download after purchase.
Prusa
turbosquid
$2

Frame Filament Guide Clip-On for Prusa Mk3
...rame filament guide clip-on for prusa mk3 for download as stl on turbosquid: 3d models for games, architecture, videos. (1634730)
3d_export
free

prusa i3 mk3s laser mount for opt lasers
...to learn more about the blue laser technology that conceived the cutting and engraving laser heads from opt lasers, please visit:
turbosquid
free

Prusa small printer adapter holder
...er for download as ipt, skp, dwg, dxf, fbx, ige, obj, and stl on turbosquid: 3d models for games, architecture, videos. (1642936)
3d_export
$30

geisha by jonathan adler
...** i did a 3d printing test in the prusa software, you can find it among the attached images.<br>exchange:<br>.blend...
thingiverse
free

Prusa without Prusa (rc2) by madless
...prusa without prusa (rc2) by madless
thingiverse
just the main part of prusa rc2 faceshield, without writing.
enjoy :)
thingiverse
free

Prusa by acejbc
...prusa by acejbc
thingiverse
prusa knob info
m3 8mm screw
thingiverse
free

Prusa house
...prusa house
thingiverse
how prusa house could look like...
thingiverse
free

Prusa Mk2 "Fake Prusa" LCD cover by anraf1001
...r by anraf1001
thingiverse
version of prusa's lcd cover with "fake prusa" instead of "original prusa"
thingiverse
free

Prusa stabilizator by gutiueugen
...prusa stabilizator by gutiueugen
thingiverse
prusa stabilizator
thingiverse
free

Keychain Prusa by rbarbalho
...keychain prusa by rbarbalho
thingiverse
keychain with text prusa.
Led
3d_export
$5

led
...led
3dexport
the led is cut with all the parts.
3ddd
$1

Monacor / PARL56DMX / LED-320RGBW / LED-345RGBW / LED-300RGB
... прожектор
http://www.monacor.dk/
parl56dmx
led-320rgbw
led-345rgbw
led-300rgb
turbosquid
$10

LED
...led
turbosquid
free 3d model led for download as blend on turbosquid: 3d models for games, architecture, videos. (1691856)
3d_export
$5

led lamp
...led lamp
3dexport
led lamp, brightness animation
3ddd
free

leds-c4
...leds-c4
3ddd
leds-c4
современный торшер
3ddd
free

leds-c4
...leds-c4
3ddd
leds-c4
настольный лампа
turbosquid
$19

LED
... available on turbo squid, the world's leading provider of digital 3d models for visualization, films, television, and games.
turbosquid
$12

Led
... available on turbo squid, the world's leading provider of digital 3d models for visualization, films, television, and games.
turbosquid
free

LED
... available on turbo squid, the world's leading provider of digital 3d models for visualization, films, television, and games.
turbosquid
free

LED
... available on turbo squid, the world's leading provider of digital 3d models for visualization, films, television, and games.
Mount
3d_export
free

mounting bracket
...mounting plate is the portion of a hinge that attaches to the wood. mounting plates can be used indoors, cabinetry and furniture.
turbosquid
$2

MOUNTING
... available on turbo squid, the world's leading provider of digital 3d models for visualization, films, television, and games.
turbosquid
free

Mounts
... available on turbo squid, the world's leading provider of digital 3d models for visualization, films, television, and games.
turbosquid
free

Mount Fuji
...fuji
turbosquid
free 3d model mount fuji for download as obj on turbosquid: 3d models for games, architecture, videos. (1579977)
3d_export
$5

Headphone mount LR
...headphone mount lr
3dexport
headphone mount l+r
turbosquid
$39

Mount rainier
...quid
royalty free 3d model mount rainier for download as fbx on turbosquid: 3d models for games, architecture, videos. (1492586)
turbosquid
$5

pipe mounting
...quid
royalty free 3d model pipe mounting for download as obj on turbosquid: 3d models for games, architecture, videos. (1293744)
turbosquid
$3

Mounting Tires
...uid
royalty free 3d model mounting tires for download as fbx on turbosquid: 3d models for games, architecture, videos. (1708511)
3d_export
$5

Magnetic GoPro Mount
...pro mount
3dexport
cool magnetic mount for gopro. allows you to mount the camera on flat metal surfaces and get exclusive shots.
turbosquid
$5

Stone Mount
...ty free 3d model stone mount for download as ma, obj, and fbx on turbosquid: 3d models for games, architecture, videos. (1370306)
Lighting
archibase_planet
free

Light
...light archibase planet lamp lighting light light - s2 - 3d model for interior...
archibase_planet
free

Light
...light archibase planet light luminaire lighting light l0465 - 3d model (*.gsm+*.3ds) for interior 3d...
3d_export
$5

lighting
...lighting
3dexport
lighting
3d_export
$5

lighting
...lighting
3dexport
lighting in livingroom
turbosquid
$3

Lighting Tree with Lights
...d model lighting tree with lights for download as max and 3ds on turbosquid: 3d models for games, architecture, videos. (1585507)
archibase_planet
free

Light
...light archibase planet luster lighting solution light - s - 3d model for interior...
archibase_planet
free

Light
...light archibase planet luster lamp lighting light 1 - 3d model for interior 3d...
archibase_planet
free

Lights
...lights
archibase planet
surgical lights surgical lamp
surgical lights (floor) - 3d model for interior 3d visualization.
archibase_planet
free

Light
...light archibase planet lighting luminaire candlelight light l0463 - 3d model (*.gsm+*.3ds) for...
3d_export
$18

street light-lighting-light-xia bing
...
3dexport
street light-lighting-light-xia bing<br>max 2015 v-ray 3 max 2015<br>textures<br>all files in zip...