Thingiverse
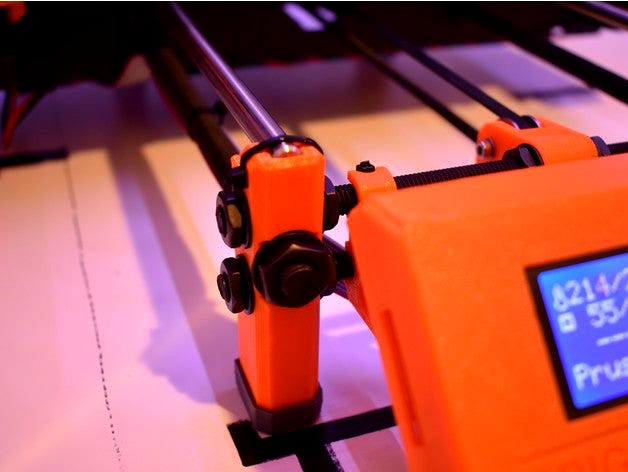
Prusa i3 MK2 Extended Y Corners by brentwerder
by Thingiverse
Last crawled date: 4 years ago
WARNING - These parts require the Y-axis to be disassembled & reassembled. Only continue with this project if you're comfortable taking apart your printer, or if you're assembling a new printer.
Need some extra room under your Prusa for expansion? What a coincidence! These corners are extended by an extra 30mm (~1in), plus another 6mm if you decide to print the anti-slip feet.
I modeled these to make the MK2 compatible with Ystrouzas' excellent Prusa i3 Octoprint Raspberry Pi case. Without modification, the electronics box is barely too tall for the MK2 frame.
This model is a modified version of Prusa's Y-corners, found on Prusa's site. Included in the part is a captive M3 nut, so you can attach these feet to anything you like. If you're interested in damping your printer's vibration, you may want to bolt the corners to a concrete paver, as detailed by CNC Kitchen.
Here's how to put some big boy boots on your MK2 (also works on MK2S, MK2.5, MK2.5S with any MMU):
Download. You'll need the Extended Y Corner file. If you have flexible material, also download the Boot file.
Import the files into your slicer. You'll need 4x corners and 4x boots, printed in separate jobs. However, I STRONGLY recommend printing extras! You will not be able to print parts when your printer is in pieces. Both parts should appear in the correct orientation - the corner should have one vertical hole, with the support structure against the bed. The boot should have the bottom surface against the bed.
Slice. I printed everything at 0.200mm layers, although I believe Prusa uses 0.300mm layers in their print farm. Ensure that these parts are printed with at least 30% infill, and at least 3 perimeters - these need to be extremely sturdy. I printed the boots with 10% infill to ensure a little bit of springiness.
Print. I used the PETG Prusa uses on their print farm from FilamentPM's US warehouse. For the feet, I used ColorFabb NGEN Flex. Any flexible material should work.
Inspect parts. Make sure there's absolutely NO layer separation, underextrusion, or any other print defects that could negatively impact the strength of the corners. Remember, these parts are load-bearing, and need to be extremely strong to hold your printer together rigidly. If you see ANY issues with your print, go back to step 3 and change settings as necessary.
(OPTIONAL) Assemble. If you're using the flexible boots, now's the time to use 4x M3 nuts and 4x M3x20mm socket head machine screws to put them together.
Install. This is tricky. I recommend disconnecting all Y-axis cables from the board, then detaching Y from the frame by loosening the nuts holding the frame in place. Carefully remove the bed, then disassemble the Y-axis, keeping the old corners in storage just in case. Then, follow Prusa's Y-axis assembly manual. Substitute the Extended Y Corners in for all steps involving the Y Corners. If you have any difficulty, please don't hesitate to leave a comment, and I'll try to help as best I can.
That's about it! Have fun with your NBA-ready printer. Dang, that thing is tall!
-Brent
Similar models
thingiverse
free

PRUSA I3 MK2(S) & MK2.5 Y AXIS UPGRADE FEET
...mp; mk2.5 y axis upgrade feet
thingiverse
feet for prusa i3 mk2(s) & mk2.5 y axis upgrade.
www.thingiverse.com/thing:2836470
thingiverse
free

prusa mk2 (mk2.5 and mk2.5s) y axis belt tensioner by Poblopuablo
...sacrificial single layers in the print. 4 walls, 25%infill i used
hardware needed:
6x m3 nuts
2x m3x20mm screws
4x m3x10mm screws
thingiverse
free

Prusa MK2/MK2S/MK2.5S ext. driver board box by toto99303
...it allows usage of tmc2100 (silent step stick and similar drivers, so your printer will become a lot quieter...
thingiverse
free

Prusa Mk2s Ball and Claw Foot Dampeners by AutopsyTurvy
...to fit on the y-axis corner pieces without the small bit of felt - they're set deep enough you can still use the felt though.
thingiverse
free

LCD supports for MK2s/mk2.5 raised by 2 mm - for use with pcky's y axis upgrade (POTENTIALY OBSOLETE!!!) by Picazsoo
...should therefore be considered potentially obsolete - they might be too high for the modified axis upgrade. you have been warned.
thingiverse
free

Prusa i3 MK2(S) & MK2.5 y axis upgrade by pcky
...d front plate to the download section which should fix this issue.
also step files of the plates are now available for download.
thingiverse
free

Yet another Prusa MK2 feet (flex materials) by spegelius
...al, printer quieted down also.
there's one feet that needed a bit of cutting, i'll need to edit that and upload the model
thingiverse
free

Y Corner for i3 mk2 / mk2s with ball damper support by crynool
...rsion from prusa, not an import or converted file.
please don't hit me hard, just started to look into solidworks last week.
thingiverse
free

Prusa Mk2.5S -> Mk2.5S+ X-axis end-stop actuator & fan cover by DockGuy
...mk3-style extruders. the actuator also includes a fan cover similar to thing:3624919 you will need a 25mm m3 bolt...
thingiverse
free

Prusa i3 MK2* rubber damper by bibomator
...oorboard.
printed parts
2x y-corners_damper_left_2x.stl
1x y-corners_damper_right_back_1x.stl
1x y-corners_damper_right_1x.stl
Brentwerder
thingiverse
free

Multicolor Buddha Shrek by brentwerder
...st 3d model i have ever seen. if you've got a multicolor setup for your printer, try printing out one (or several) of these.
thingiverse
free

In-N-Out Scale Model by brentwerder
...school project. hopefully someone will try printing this out - probably one of the most fun 3d projects i've ever worked on.
thingiverse
free

Rear PTFE Coupler for McMaster Heatsert 94180A361 by ptrkueffner
...the holes and on the coupling face. thanks to brentwerder and iwagner for providing the .stp file so i...
thingiverse
free

Mini Face Shield - 3D Verkstan (US Version) by brentwerder
...ts of the stacks, so feel free to experiment with different separation distances.
happy printing, and stay safe out there!
-brent
Mk2
turbosquid
$4

Mk2
...
royalty free 3d model mk2 for download as max, obj, and fbx on turbosquid: 3d models for games, architecture, videos. (1305687)
turbosquid
$9
Mk2 Grenade
...osquid
royalty free 3d model mk2 grenade for download as fbx on turbosquid: 3d models for games, architecture, videos. (1175401)
turbosquid
$4

Mk2 Grenade
...quid
royalty free 3d model mk2 grenade for download as blend on turbosquid: 3d models for games, architecture, videos. (1228888)
turbosquid
$2

mk2 Grenade
...osquid
royalty free 3d model mk2 grenade for download as fbx on turbosquid: 3d models for games, architecture, videos. (1329079)
turbosquid
$2

GRENADE MK2
...osquid
royalty free 3d model grenade mk2 for download as fbx on turbosquid: 3d models for games, architecture, videos. (1202615)
turbosquid
$2

Grenade Mk2
...osquid
royalty free 3d model grenade mk2 for download as max on turbosquid: 3d models for games, architecture, videos. (1658201)
turbosquid
$75

Lanchester Mk2
...alty free 3d model lanchester mk2 for download as 3ds and max on turbosquid: 3d models for games, architecture, videos. (1497085)
turbosquid
$10

MK2 helmet
...
royalty free 3d model mk2 helmet for download as max and obj on turbosquid: 3d models for games, architecture, videos. (1371428)
turbosquid
$10

Grenade MK2
...royalty free 3d model grenade mk2 for download as max and fbx on turbosquid: 3d models for games, architecture, videos. (1146970)
turbosquid
free

MK2 Grenade
...
free 3d model mk2 grenade for download as png, obj, and fbx on turbosquid: 3d models for games, architecture, videos. (1225336)
I3
3d_export
$10

suv i3
...suv i3
3dexport
suv i3 2013 series
3d_ocean
$89

BMW i3 2012
...y, in real units of measurement, qualitatively and maximally close to the original. model formats: - *.max (3ds max 2008 scanl...
cg_studio
$99

BMW i3 20143d model
...
cgstudio
.3ds .c4d .fbx .lwo .max .obj - bmw i3 2014 3d model, royalty free license available, instant download after purchase.
cg_studio
$99

BMW i3 20123d model
...tudio
.3ds .c4d .fbx .lwo .max .mb .obj - bmw i3 2012 3d model, royalty free license available, instant download after purchase.
cg_studio
$99

BMW i3 20143d model
...tudio
.3ds .c4d .fbx .lwo .max .mb .obj - bmw i3 2014 3d model, royalty free license available, instant download after purchase.
humster3d
$75

3D model of BMW i3 2014
...
buy a detailed 3d model of bmw i3 2014 in various file formats. all our 3d models were created maximally close to the original.
humster3d
$40

3D model of Kitchen Set I3
...uy a detailed 3d model of kitchen set i3 in various file formats. all our 3d models were created maximally close to the original.
3d_ocean
$30

Kitchen set i3
...ensils oven plates shelves sink table ware
kitchen set i3 include 3d models: cooker, oven, sink, cupboards, table, chair, plates.
3d_ocean
$89

BMW i3 2014
...y, in real units of measurement, qualitatively and maximally close to the original. model formats: - *.max (3ds max 2008 scanl...
cg_studio
$99

BMW i3 Concept 20113d model
...i3
.3ds .c4d .fbx .lwo .max .obj - bmw i3 concept 2011 3d model, royalty free license available, instant download after purchase.
Prusa
turbosquid
$2

Frame Filament Guide Clip-On for Prusa Mk3
...rame filament guide clip-on for prusa mk3 for download as stl on turbosquid: 3d models for games, architecture, videos. (1634730)
3d_export
free

prusa i3 mk3s laser mount for opt lasers
...to learn more about the blue laser technology that conceived the cutting and engraving laser heads from opt lasers, please visit:
turbosquid
free

Prusa small printer adapter holder
...er for download as ipt, skp, dwg, dxf, fbx, ige, obj, and stl on turbosquid: 3d models for games, architecture, videos. (1642936)
3d_export
$30

geisha by jonathan adler
...** i did a 3d printing test in the prusa software, you can find it among the attached images.<br>exchange:<br>.blend...
thingiverse
free

Prusa without Prusa (rc2) by madless
...prusa without prusa (rc2) by madless
thingiverse
just the main part of prusa rc2 faceshield, without writing.
enjoy :)
thingiverse
free

Prusa by acejbc
...prusa by acejbc
thingiverse
prusa knob info
m3 8mm screw
thingiverse
free

Prusa house
...prusa house
thingiverse
how prusa house could look like...
thingiverse
free

Prusa Mk2 "Fake Prusa" LCD cover by anraf1001
...r by anraf1001
thingiverse
version of prusa's lcd cover with "fake prusa" instead of "original prusa"
thingiverse
free

Prusa stabilizator by gutiueugen
...prusa stabilizator by gutiueugen
thingiverse
prusa stabilizator
thingiverse
free

Keychain Prusa by rbarbalho
...keychain prusa by rbarbalho
thingiverse
keychain with text prusa.
Extended
turbosquid
$39
Extending table
...id
royalty free 3d model extending table for download as max on turbosquid: 3d models for games, architecture, videos. (1290552)
turbosquid
$5

Extend Table
...squid
royalty free 3d model extend table for download as skp on turbosquid: 3d models for games, architecture, videos. (1372508)
turbosquid
$40
Engine Extended
... available on turbo squid, the world's leading provider of digital 3d models for visualization, films, television, and games.
turbosquid
$12

Triple extender
... available on turbo squid, the world's leading provider of digital 3d models for visualization, films, television, and games.
turbosquid
$99

Monica (Extended Pack)
... available on turbo squid, the world's leading provider of digital 3d models for visualization, films, television, and games.
turbosquid
$19
Berlino Extendable Table
... available on turbo squid, the world's leading provider of digital 3d models for visualization, films, television, and games.
turbosquid
$3
Extendable Modern Table
... available on turbo squid, the world's leading provider of digital 3d models for visualization, films, television, and games.
3d_export
$32

KC10 Extender 3D Model
...c 10 aircraft jet fighter bomber close support interceptor spy attacker plane
kc10 extender 3d model martialartist 24527 3dexport
3d_export
$50
Extended Range Trailer 3D Model
...railer 3d model
3dexport
extended range trailer military patrol equipment
extended range trailer 3d model dougmavs 75684 3dexport
design_connected
$13

Big Dining Tables Extended
...ining tables extended
designconnected
bonaldo big dining tables extended computer generated 3d model. designed by gilles, alain.
Corners
archibase_planet
free
Corner
...corner
archibase planet
nook corner
corner n030708 - 3d model (*.gsm+*.3ds) for interior 3d visualization.
archibase_planet
free
Corner
...corner
archibase planet
corner post rack
fp corner wh - 3d model (*.gsm+*.3ds) for interior 3d visualization.
3ddd
$1

Country Corner
...country corner , комод , прованс
country corner
3ddd
$1
Corner 8140
... corner
corner 8140 - 16,5 x 17,4 (cm)
corner 8141 - 16,5 x 29,5 (cm)
corner 8142 - 16,5 x 41,5 (cm)
corner 8143 - 28 x 28 (cm)
archibase_planet
free
Corner
...corner
archibase planet
seat easy chair furniture
havanna corner - 3d model (*.gsm+*.3ds) for interior 3d visualization.
3ddd
$1

Country corner
... country corner , romance
рамка country corner, romance,
артикул cc0141
3ddd
$1

Country corner
...country corner
3ddd
country corner , журнальный
country corner pbth размеры 169*69*49
3d_export
$5

Corner
...corner
3dexport
3ddd
$1
Table-Corner
...table-corner
3ddd
круглый
table,corner
3ddd
$1
Table,Corner
...table,corner
3ddd
журнальный
table,corner
Y
turbosquid
$1

Tetera y Galletas y Caf
... available on turbo squid, the world's leading provider of digital 3d models for visualization, films, television, and games.
3ddd
$1

Смеситель Y-CON
...смеситель y-con
3ddd
смеситель , y-con
смеситель y-con
3ddd
$1

Y-Chair
...y-chair
3ddd
tom dixon
y-chair designed by tom dixon,
3ds max + obj, corona
3ddd
$1

Y Chair compilation
....net/products/us/y-chair-sled-base
y chair swivel basehttp://www.tomdixon.net/products/us/y-chair-swivel-base
turbosquid
$190

Y-8
...y-8
turbosquid
royalty free 3d model y-8 for download as max on turbosquid: 3d models for games, architecture, videos. (1658891)
turbosquid
$7

Bench Y
...turbosquid
royalty free 3d model bench y for download as obj on turbosquid: 3d models for games, architecture, videos. (1488746)
turbosquid
$15

bonePile Y
...oyalty free 3d model bonepile y for download as blend and obj on turbosquid: 3d models for games, architecture, videos. (1546374)
turbosquid
$7

Y for Yarn
...d
royalty free 3d model y for yarn model for download as max on turbosquid: 3d models for games, architecture, videos. (1699732)
turbosquid
$2

FONT Y
...quid
royalty free 3d model font y for download as ma and obj on turbosquid: 3d models for games, architecture, videos. (1549457)
3ddd
$1

WOOD-y
...wood-y
3ddd
wooden guy