Thingiverse
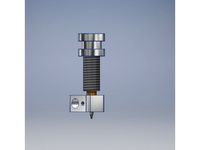
Prusa i3 Bowden X-carriage and e3d v6 hotend mount by Iakouben
by Thingiverse
Last crawled date: 2 years, 12 months ago
EDIT 16/4/16: I feel that I have finally completed this thing and I have re uploaded it here. I would recommend you use the updated design, however this one is still fully functional
EDIT 29/3/16: The Pins should be multiplied to have a total of 4
-I REALLY recommend to print and use this x-axis endstop holder as it seemed to have a perfect position to be triggered by this x-carriage.
EDIT 21/02/16: As promised, I updated everything that I mentioned in the comments:
Over the next week, I will be making some changes to the model:
1) Made the space for the heatsink a little larger because I had some issue getting the hotend in, and resulted in me taking a hammer to it to get it in (even after some filing.
2) I have added another set of holes for the inductive sensor mount to be places on the other side of the hotend mount, to give a user a choice where they want it, depending on their desired configuration.
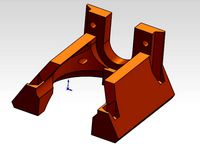
3) I have made the bearing holders in the x-carriage a little larger because I had to sand mine a LOT to be able to put in the bearings without flexing the actual carriage.
4) I have enlarged the belt retention system.
5) I have added a little more tolerance into the hotend clamp, as that also seemed a little tight to insert without sanding.
6) Modified the pin design for easier insertion.
7) Changed the wire retention bracket because both times that I printed the hotend mount, I snapped it off.
8)The inductive sensor distance also changed to an offset of [40, 0] since at [35, 0] the sensor would be pushed sideways by the screws.
The model is again printable. Happy printing!
EDIT 15/02/2016: Got my MOSFETS, turned out it was my ATMEL chip, fixed that and I go the x-carriage printed. I do not recommend you print this right now because a lot will be changed by the end of the week. Stay tuned.
I'm in the process of designing a new x-carriage for my P3Steel while I'm waiting for replacement MOSFETs (I have hence not printed this yet).
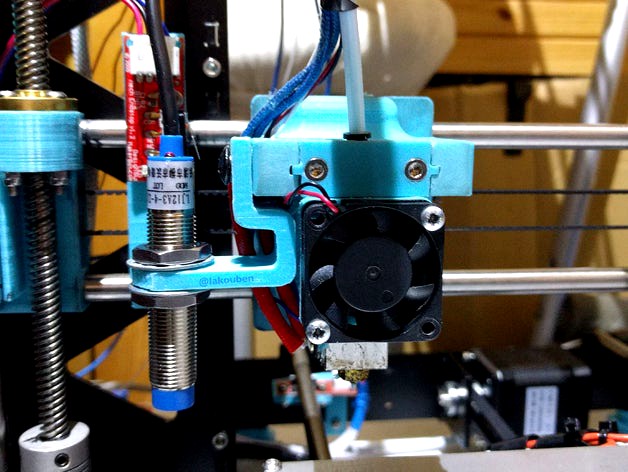
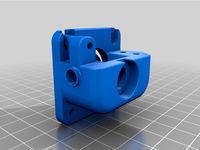
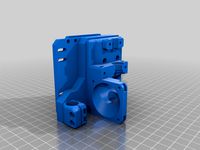
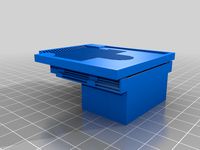
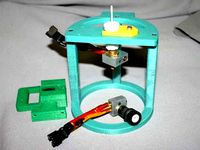
My main goal for this project is to make an easily removable E3D v6 hot end mount, which would be able to snap together with magnets (and stabilisation pins) to allow for easy work or modifications to be done to the hot end.
The hot end mount includes an inductive sensor mount (offset [40,0] from the tip of the hot end)
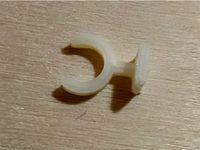
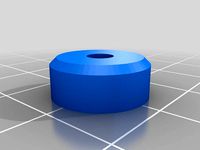
To make this, I have modified Toolsons x-carriage (http://www.thingiverse.com/thing:1036871) and made the magnetic hot end mount to fit into it. The mount is designed to use four 6x3mm magnets and 4 3D printed pins (4) that should be super glued into the hot end mount (2) to add stability. I have also tried to maximise the Z height by mounting the hot end as high as I could.
In my final build, I will be using this fan shroud (http://www.thingiverse.com/thing:1165614) by Neo_Usagi to cool my hot end and provide cooling for PLA prints since I will be able to have the 2 fans and sensor mounted compactly together (will definitely post pictures when I get the chance to print it).
I will greatly appreciate any criticism that you guys may have, so let me know if there is anything I can improve in the comments.
I can't wait to see your prints of this! Happy printing!
EDIT 29/3/16: The Pins should be multiplied to have a total of 4
-I REALLY recommend to print and use this x-axis endstop holder as it seemed to have a perfect position to be triggered by this x-carriage.
EDIT 21/02/16: As promised, I updated everything that I mentioned in the comments:
Over the next week, I will be making some changes to the model:
1) Made the space for the heatsink a little larger because I had some issue getting the hotend in, and resulted in me taking a hammer to it to get it in (even after some filing.
2) I have added another set of holes for the inductive sensor mount to be places on the other side of the hotend mount, to give a user a choice where they want it, depending on their desired configuration.
3) I have made the bearing holders in the x-carriage a little larger because I had to sand mine a LOT to be able to put in the bearings without flexing the actual carriage.
4) I have enlarged the belt retention system.
5) I have added a little more tolerance into the hotend clamp, as that also seemed a little tight to insert without sanding.
6) Modified the pin design for easier insertion.
7) Changed the wire retention bracket because both times that I printed the hotend mount, I snapped it off.
8)The inductive sensor distance also changed to an offset of [40, 0] since at [35, 0] the sensor would be pushed sideways by the screws.
The model is again printable. Happy printing!
EDIT 15/02/2016: Got my MOSFETS, turned out it was my ATMEL chip, fixed that and I go the x-carriage printed. I do not recommend you print this right now because a lot will be changed by the end of the week. Stay tuned.
I'm in the process of designing a new x-carriage for my P3Steel while I'm waiting for replacement MOSFETs (I have hence not printed this yet).
My main goal for this project is to make an easily removable E3D v6 hot end mount, which would be able to snap together with magnets (and stabilisation pins) to allow for easy work or modifications to be done to the hot end.
The hot end mount includes an inductive sensor mount (offset [40,0] from the tip of the hot end)
To make this, I have modified Toolsons x-carriage (http://www.thingiverse.com/thing:1036871) and made the magnetic hot end mount to fit into it. The mount is designed to use four 6x3mm magnets and 4 3D printed pins (4) that should be super glued into the hot end mount (2) to add stability. I have also tried to maximise the Z height by mounting the hot end as high as I could.
In my final build, I will be using this fan shroud (http://www.thingiverse.com/thing:1165614) by Neo_Usagi to cool my hot end and provide cooling for PLA prints since I will be able to have the 2 fans and sensor mounted compactly together (will definitely post pictures when I get the chance to print it).
I will greatly appreciate any criticism that you guys may have, so let me know if there is anything I can improve in the comments.
I can't wait to see your prints of this! Happy printing!
Similar models
thingiverse
free

P3Steel X_carriage by hinge
...or the e3d hotend with and without 3mm nuts in.
8) hall sensor mount
all prints with 40% infil, on my reprappro.
please enjoy
thingiverse
free

Modular Hotend Mount for Prometheus V2 Hotend by Xanthux
...r for unobstructed printing from sensor. added the following part with notch 2mm recessed ledge. e3d_bowden_mount_b_8.2mm.stl
thingiverse
free

Tevo Tarantula Sensor holder by marvinmarmelade
...de of the x-axis.
you will need: -taralu.net aluminium modular x-carriage for this mount to work!!!
-standart m3 bolts and nuts
thingiverse
free

inductive sensor holder for kuehlings / Stoffels x-carriage by WhoTheHeck
...ncreased some values
printed the part and will test it's functionality
update 07.03.16:
it works!
sensor i use: lj12a3-4-z/bx
thingiverse
free

inductive sensor mount for my -> magnetic hotend changer by Skimmy
...giverse
mount for my magnetic hotendchanger for an inductive sensor with 12mm diameter. can be used without the fanducts aswell.
thingiverse
free

Tevo Stock Dual Hotend Magnetic Mount by cardiac4
... setup on the dual extruder so i made this. i did shave a little off the sides so parts like fang fans would fit a little better.
thingiverse
free

Geeetech e3d v6 hotend and inductive mount by shooter40000
...shooter40000
thingiverse
mounting e3d hotend with inductive sensor using the original x-axis carriage. two longer screws needed.
thingiverse
free

Inductive Proximity Sensor Mount for Bed Leveling by swissarmyknife
...riage and used for bed leveling.
sensor used:https://www.amazon.com/uxcell-lj12a3-4-z-approach-inductive-proximity/dp/b0058gdrro
thingiverse
free

50mm blower fan and 12mm inductive probe mount for a Prusa i3 X-Carriage by rtheiss
...d: blower fan needs to move away from the hotend to allow for a shroud and inductive probe can be move back toward the carraige.
thingiverse
free

dual hot end mount for V3 hot end and RepRap Mendel by rbisping
...ce.
this is made to match up with my http://www.thingiverse.com/thing:4006
x carriage and it would mount to a modified top plate.
Iakouben
thingiverse
free

Husky Cookie Cutter by Iakouben
...le different in the photo. the top filled part is now on the bottom area, to allow for a little indent in the dough for the face.
thingiverse
free

Extruder fan shroud by Iakouben
...hat are 25mm in diameter and about 30mm high.
ready to print straight from the stl file with no supports.
(17mm screws work best)
thingiverse
free

Nexus 5X case Open Hardware by Iakouben
...ase.
there are 2 versions, one with a full open hardware logo through the case, and one with a 0.6mm indented open hardware logo.
thingiverse
free

Stupid Simple Nozzle Holder by Iakouben
...t for my p3steel, but it should fit any machine that has a 3mm frame.
happy printing.
edits
8/9/2016 - added a 6mm frame option
thingiverse
free

Honeycomb PC Grill by Iakouben
...iles for both are included so you can do whatever you want with them.
all comments, suggestions and tips are greatly appreciated.
thingiverse
free

SD card holder for P3Steel and Prusa i3 by Iakouben
...s made to have them a little loose.
there are 2 designs:
3mm for the p3steel frame
6mm for other prusa i3 frames
happy printing!
thingiverse
free

Raspberry Pi Zero W case by Iakouben
...e hard way.
the step and f3d files are also available in case you want to remix it or customize the design in any way you please.
thingiverse
free

Prusa i3 magnetic bowden X-carriage for E3D v6 by Iakouben
...ot;stock" flavour, although any endstop holder with a similar design should work.
thanks to neo_usagi for his e3d v6 model.
Bowden
turbosquid
$199
Vintage Ben Bowden Spacelander bike
... available on turbo squid, the world's leading provider of digital 3d models for visualization, films, television, and games.
3ddd
$1

Manooi Artica
...and pendants in various sizes and forms. suspension: galvanized bowden - dia. 1,5 mm. bulb: max 60 w -...
thingiverse
free
Remix Compact Bowden extruder - m6 bowden couplers and bowden tube pass-through
...ouplers and bowden tube pass-through
thingiverse
remix compact bowden extruder - m6 bowden couplers and bowden tube pass-through
thingiverse
free

Bowden Extruder
...bowden extruder
thingiverse
i have created bowden extruder for flsun delta 3d printer.
thingiverse
free

bowden 3mm by spee_D
...bowden 3mm by spee_d
thingiverse
for bowden 3mm
thingiverse
free
Bowden Tube Cutter
...bowden tube cutter
thingiverse
bowden tube cutter
thingiverse
free
Customizable Bowden Clip
...customizable bowden clip
thingiverse
customizable bowden clip
thingiverse
free
Bowden Oiler by fcheshire
...bowden oiler by fcheshire
thingiverse
inline bowden oiler
thingiverse
free

Bowden adapter by helkaroui
...bowden adapter by helkaroui
thingiverse
this is a fixed bowden adapter
thingiverse
free

Adventure3 Bowden Clip
...adventure3 bowden clip
thingiverse
adventure3 bowden clip
Hotend
thingiverse
free
hotend by fablab_lueneburg
...hotend by fablab_lueneburg
thingiverse
hotend model
thingiverse
free
Hotend for Graber
...hotend for graber
thingiverse
hotend complement pastes for graber printerhttps://youtu.be/0koxhnsuhdy
thingiverse
free
Hotend adapter by antaviana
...hotend adapter by antaviana
thingiverse
hotend adapter
thingiverse
free
hotend fan by mming1106
...hotend fan by mming1106
thingiverse
hotend fan
thingiverse
free

Hotend schema by ione
...hotend schema by ione
thingiverse
hotend project schema
thingiverse
free
Fabtotum XY Hotend holder for E3D Hotend
...s with integrated supports.
more for the project you can see here: https://kf-designs.com/2019/09/07/fabtotum-printer-conversion/
thingiverse
free
HotEnd Stand by onepointdiy
...tend, when you make your new hotend or repair your j-head or mg-plus hotend.
the hole of 16mm, please adjust using a reamer, etc.
thingiverse
free

fast magnetic hotend changer for Chimera Hotend by Draman
...chimera hotend !
and new basis (the hole from original is to small)
it is a remix form skimmy's fast magnetic hotend changer
thingiverse
free

Hotend Fan Adapter for MicroSwiss All Metal Hotend by jo_schi_man
...
thingiverse
little change for the hotend fan adapter to hold the microswiss all metal hotend (slightly longer and sharp edges).
thingiverse
free
Merlin Hotend by Alejanson
...merlin hotend by alejanson
thingiverse
this is a 1:1 drawing of the classic merlin hotend.
E3D
cg_studio
free

e3d model
...e3d model
cgstudio
- e 3d model, royalty free license available, instant download after purchase.
turbosquid
$2

Syringe C4D (E3D Ready)
...lty free 3d model syringe c4d (e3d ready) for download as c4d on turbosquid: 3d models for games, architecture, videos. (1336720)
turbosquid
$12

Microphone USB E3D and C4D
...ree 3d model microphone usb e3d & c4d for download as c4d on turbosquid: 3d models for games, architecture, videos. (1568216)
cg_studio
$35
Picture Frame Style E3d model
...
cgstudio
.3ds .max .obj .wrl - picture frame style e 3d model, royalty free license available, instant download after purchase.
cg_studio
$10

EVE from cartoon WALL-E3d model
...3d model
cgstudio
.3ds .max - eve from cartoon wall-e 3d model, royalty free license available, instant download after purchase.
cg_studio
$45
WW2 Pz VI Tiger SdKfz 181 Ausf. E3d model
....lwo .ma .max .obj - ww2 pz vi tiger sdkfz 181 ausf. e 3d model, royalty free license available, instant download after purchase.
3d_ocean
$6

Love Heart Element 3D & Cinema4D
...red heart romance valentines simple project simple heart models e3d files, cinema 4d files & obj files step 1...
3d_export
$14

Xiaomi mi band 6
...360. materials for rendering are configured in keyshot, v-ray, e3d blender. the keyshot has 6 strap colors configured. there...
3d_export
$20

apple airpods 3
...max vray, keyshot, e3d. - formats: 3dm, aep, bip, e3d f3d, iges, ksp, max 2013, max 2016, obj, fbx,...
3d_export
$20

Samsung galaxy tab s8 ultra
...blue, beige, white, black, graphite. - in blender and e3d one color of the model is configured, graphite. -...
V6
3d_export
$100

v6 engine
...engine
3dexport
complete v6 engine modeled on solidworks 2017 along with .stl, .sldprt and .sldasm of all th parts and assembly.
3d_export
$10

V6 engine
... the first v6 engines were designed and produced independently by marmon motor car company, deutz gasmotoren fabrik and delahaye.
3d_export
$35

v6 engine
...s a complete model of a v6 engine containing over 400 components. you can contact me for a video of all the components assembling
3d_export
$10

v6 engine
...v6 engine
3dexport
turbosquid
$25

Bed1001-v6
... available on turbo squid, the world's leading provider of digital 3d models for visualization, films, television, and games.
turbosquid
$22

Chair2-v6
... available on turbo squid, the world's leading provider of digital 3d models for visualization, films, television, and games.
turbosquid
$20

V6.mb
... available on turbo squid, the world's leading provider of digital 3d models for visualization, films, television, and games.
3d_export
$20

V6 engine
...rovided in this package is all the parts in sldprt format and assembly in sldasm format. i can also convert the format on demand.
3ddd
$1

Стол V6
...6" в стиле дизельпанк изготовлен из блока двигателя, 4х поршней и 4х шатунов.
столешница изготовлена из стекла толщиной 8мм.
cg_studio
$199

V6 VVTi3d model
...v6 vvti3d model
cgstudio
.3ds - v6 vvti 3d model, royalty free license available, instant download after purchase.
Carriage
archibase_planet
free

Carriage
...arriage
archibase planet
perambulator baby carriage pram
carriage n250908 - 3d model (*.gsm+*.3ds) for interior 3d visualization.
3d_export
free

carriage
...carriage
3dexport
old fashion carriage model, more files here:
turbosquid
$140

Carriage
...urbosquid
royalty free 3d model carriage for download as max on turbosquid: 3d models for games, architecture, videos. (1482052)
turbosquid
$25

Carriage
...urbosquid
royalty free 3d model carriage for download as max on turbosquid: 3d models for games, architecture, videos. (1285944)
3d_export
free

carriage
...carriage
3dexport
game cart
3d_ocean
$15

Barrel Carriage
...ieval oak old transport wheels wine wood
this model contains a barrel and a carriage. it is a medieval type of wood oak carriage.
turbosquid
$40

Carriage
...ty free 3d model carriage for download as obj, fbx, and blend on turbosquid: 3d models for games, architecture, videos. (1290094)
turbosquid
free

Carriage
...yalty free 3d model carriage for download as ma, obj, and fbx on turbosquid: 3d models for games, architecture, videos. (1239157)
3d_export
$5

Medieval carriage
...medieval carriage
3dexport
medieval carriage in fairy style
turbosquid
$58

Carriage
...d model carriage with scene for download as max, obj, and fbx on turbosquid: 3d models for games, architecture, videos. (1276262)
I3
3d_export
$10

suv i3
...suv i3
3dexport
suv i3 2013 series
3d_ocean
$89

BMW i3 2012
...y, in real units of measurement, qualitatively and maximally close to the original. model formats: - *.max (3ds max 2008 scanl...
cg_studio
$99

BMW i3 20143d model
...
cgstudio
.3ds .c4d .fbx .lwo .max .obj - bmw i3 2014 3d model, royalty free license available, instant download after purchase.
cg_studio
$99

BMW i3 20123d model
...tudio
.3ds .c4d .fbx .lwo .max .mb .obj - bmw i3 2012 3d model, royalty free license available, instant download after purchase.
cg_studio
$99

BMW i3 20143d model
...tudio
.3ds .c4d .fbx .lwo .max .mb .obj - bmw i3 2014 3d model, royalty free license available, instant download after purchase.
humster3d
$75

3D model of BMW i3 2014
...
buy a detailed 3d model of bmw i3 2014 in various file formats. all our 3d models were created maximally close to the original.
humster3d
$40

3D model of Kitchen Set I3
...uy a detailed 3d model of kitchen set i3 in various file formats. all our 3d models were created maximally close to the original.
3d_ocean
$30

Kitchen set i3
...ensils oven plates shelves sink table ware
kitchen set i3 include 3d models: cooker, oven, sink, cupboards, table, chair, plates.
3d_ocean
$89

BMW i3 2014
...y, in real units of measurement, qualitatively and maximally close to the original. model formats: - *.max (3ds max 2008 scanl...
cg_studio
$99

BMW i3 Concept 20113d model
...i3
.3ds .c4d .fbx .lwo .max .obj - bmw i3 concept 2011 3d model, royalty free license available, instant download after purchase.
Prusa
turbosquid
$2

Frame Filament Guide Clip-On for Prusa Mk3
...rame filament guide clip-on for prusa mk3 for download as stl on turbosquid: 3d models for games, architecture, videos. (1634730)
3d_export
free

prusa i3 mk3s laser mount for opt lasers
...to learn more about the blue laser technology that conceived the cutting and engraving laser heads from opt lasers, please visit:
turbosquid
free

Prusa small printer adapter holder
...er for download as ipt, skp, dwg, dxf, fbx, ige, obj, and stl on turbosquid: 3d models for games, architecture, videos. (1642936)
3d_export
$30

geisha by jonathan adler
...** i did a 3d printing test in the prusa software, you can find it among the attached images.<br>exchange:<br>.blend...
thingiverse
free

Prusa without Prusa (rc2) by madless
...prusa without prusa (rc2) by madless
thingiverse
just the main part of prusa rc2 faceshield, without writing.
enjoy :)
thingiverse
free

Prusa by acejbc
...prusa by acejbc
thingiverse
prusa knob info
m3 8mm screw
thingiverse
free

Prusa house
...prusa house
thingiverse
how prusa house could look like...
thingiverse
free

Prusa Mk2 "Fake Prusa" LCD cover by anraf1001
...r by anraf1001
thingiverse
version of prusa's lcd cover with "fake prusa" instead of "original prusa"
thingiverse
free

Prusa stabilizator by gutiueugen
...prusa stabilizator by gutiueugen
thingiverse
prusa stabilizator
thingiverse
free

Keychain Prusa by rbarbalho
...keychain prusa by rbarbalho
thingiverse
keychain with text prusa.
Mount
3d_export
free

mounting bracket
...mounting plate is the portion of a hinge that attaches to the wood. mounting plates can be used indoors, cabinetry and furniture.
turbosquid
$2

MOUNTING
... available on turbo squid, the world's leading provider of digital 3d models for visualization, films, television, and games.
turbosquid
free

Mounts
... available on turbo squid, the world's leading provider of digital 3d models for visualization, films, television, and games.
turbosquid
free

Mount Fuji
...fuji
turbosquid
free 3d model mount fuji for download as obj on turbosquid: 3d models for games, architecture, videos. (1579977)
3d_export
$5

Headphone mount LR
...headphone mount lr
3dexport
headphone mount l+r
turbosquid
$39

Mount rainier
...quid
royalty free 3d model mount rainier for download as fbx on turbosquid: 3d models for games, architecture, videos. (1492586)
turbosquid
$5

pipe mounting
...quid
royalty free 3d model pipe mounting for download as obj on turbosquid: 3d models for games, architecture, videos. (1293744)
turbosquid
$3

Mounting Tires
...uid
royalty free 3d model mounting tires for download as fbx on turbosquid: 3d models for games, architecture, videos. (1708511)
3d_export
$5

Magnetic GoPro Mount
...pro mount
3dexport
cool magnetic mount for gopro. allows you to mount the camera on flat metal surfaces and get exclusive shots.
turbosquid
$5

Stone Mount
...ty free 3d model stone mount for download as ma, obj, and fbx on turbosquid: 3d models for games, architecture, videos. (1370306)