Thingiverse

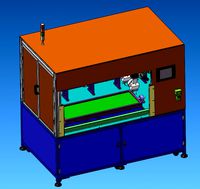
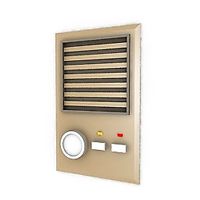
Proteus Solder Station - 80mm fan by ProteanMan
by Thingiverse
Last crawled date: 3 years, 1 month ago
Updated February 15th 2021
Uploaded the 120mm fan version and changed the side components slightly. This was a long time coming. Photos on the way when it is assembled. New Components needed with lists below in Parts.
Updated March 6th 2020
New version with updated everything. Older version files are in a zip file to download if needed.
Makes
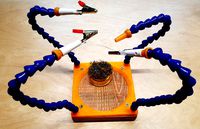
Have a look at @streetmaker and @memisis who printed this out in some great colours! The real life photos are from their makes of the solder station.
Streetmaker: https://www.thingiverse.com/make:474512
Memisis: https://www.thingiverse.com/make:491823
Safety Disclaimer:
The purpose is to pull fumes away from your face. Please use adequate ventilation and/or attach a solder fume filter to the back of the fan using the filter holder. Be safe and think about your lungs. Carbon filters are easily purchased in sheets and can be cut to fit the filter slot.
Ideas:
Click the "Remixes" tab to see other great ideas for this project. If you have your own ideas about what to add you can create Side Stations for both stations. The Left and Right sides have two 4mm holes for you to add anything you want of your own design, most common being a custom solder rod holder. Put your name on your adaptation for credit.
Options
80mm fan size - 100mm fan and more coming soon. The files will have the size in their title if they are for that specific fan size.
Electronics/Wiring
Make your life easy and get a fan/LED strip that use the same DC Voltage. 12V is a good standard.
Suggested parts:
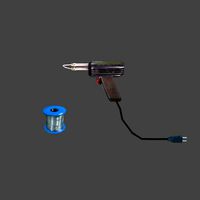
2.1mm DC jack - in back: see image and below for link
AC to DC power converter that plugs into 2.1mm jack
PWM DC motor controller to control fan speed - on left side of fan base: see image and below for link
LED Strip with high CRI rating 80+ (Optional) - attached to the end of the movable arms.
DC on/off switch (same voltage as fan/LEDs) - on right side of fan base: see image and below for link
Solder the fan and LED ground wires together and to the DC power jack's ground pin.
Solder the DC power jack's positive pin to your On/Off switch, and then from the switch to the LED positive and fan positive. This will turn everything on at the same time.
Printing
Use any material you prefer. My standard is PETG on almost everything I print.
The ball joints MUST be printed with TPU. The flexibility of TPU and the rubber like grip it creates makes the ball joints work perfectly.
Ball joints are designed to be a perfectly snug fit. If you find they are too tight then adjust your "Horizontal Expansion" setting in your slicer to allow for a looser fit. Test this on a few different prints to find your perfect settings.
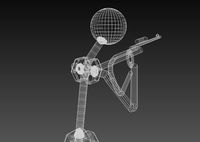
Assembly
Parts are designed to fit M3 bolts/nuts (or brass inserts) - which is 1/8" bolts/nuts for the USA.
All parts should line up and be easily assembled.
Printing ball joint parts in TPU ensures a snug and flexible fit.
I find that for each arm I need:
1 Ball Joint Base
2 or 3 Ball Joints
1 Alligator Clip and Ball Joint End.
Attach the fan to the solder station with bolts/nuts. Attach the filter holder to the back of the fan with bolts/nuts. Insert filter that you can cut to size.
Alligator clips can be soldered to a ground wire and run through the center hole of arms if needed.
LED strip should be glued since the sticking back typically gives out over time.
Wire the LED strip through the center hole of the arms.
Filter
It is highly encouraged to purchase solder filter sheets (charcoal filters) that are 10mm thick. You can cut these to size with a knife or scissors to fit the filter holder that attaches to the back of the fan. This will ensure better air quality when soldering and remove heavy solder fume particles.
Let me know if there is anything else I am missing. I can create a 100mm and 120mm Fan base if requested.
Please share any great images with me and I may add them to this page for others to use as reference.
Links to Parts:
DC Power Brick: (choose12v 3A+, or other depending on fan/LEDs)https://www.aliexpress.com/item/32859196804.html?spm=a2g0o.productlist.0.0.3f7d270fwqRK00&algo_pvid=288d2847-bc54-4034-b68b-4fa0647ebc75&algo_expid=288d2847-bc54-4034-b68b-4fa0647ebc75-0&btsid=0bb0623e16134327344954188eb3fb&ws_ab_test=searchweb0_0,searchweb201602_,searchweb201603_
DC Power Plug: *DC022 - 5.5mmx2.1mmhttps://www.aliexpress.com/item/4001050150711.html?spm=a2g0o.productlist.0.0.6ee71f0ftgMxGY&algo_pvid=4b468c12-a520-4d46-8ec5-6e8623fab2bf&algo_expid=4b468c12-a520-4d46-8ec5-6e8623fab2bf-2&btsid=0bb0624116134278079113741e6819&ws_ab_test=searchweb0_0,searchweb201602_,searchweb201603_
Toggle Button With Light: you can obviously use whatever you want instead of this. *Choose the 19mm version**https://www.aliexpress.com/item/1005001640045513.html?spm=a2g0o.productlist.0.0.260e6bc85hpNmO&algo_pvid=c48ba3e4-f0f5-4436-ba04-5b1af355a33e&algo_expid=c48ba3e4-f0f5-4436-ba04-5b1af355a33e-8&btsid=0bb0624716134328003262811e5dc3&ws_ab_test=searchweb0_0,searchweb201602_,searchweb201603_
DC PWM Motor Controller: should look like pictures abovehttps://www.aliexpress.com/item/1005001883595551.html?spm=a2g0o.productlist.0.0.6c0d3deauCuK6q&algo_pvid=bea1b415-8cb0-47bd-85e1-8039b682b027&algo_expid=bea1b415-8cb0-47bd-85e1-8039b682b027-2&btsid=0bb0600116134379013002568e0d49&ws_ab_test=searchweb0_0,searchweb201602_,searchweb201603_
Any ideas for add-ons please let me know! Other clip types, front tray types, etc.
Uploaded the 120mm fan version and changed the side components slightly. This was a long time coming. Photos on the way when it is assembled. New Components needed with lists below in Parts.
Updated March 6th 2020
New version with updated everything. Older version files are in a zip file to download if needed.
Makes
Have a look at @streetmaker and @memisis who printed this out in some great colours! The real life photos are from their makes of the solder station.
Streetmaker: https://www.thingiverse.com/make:474512
Memisis: https://www.thingiverse.com/make:491823
Safety Disclaimer:
The purpose is to pull fumes away from your face. Please use adequate ventilation and/or attach a solder fume filter to the back of the fan using the filter holder. Be safe and think about your lungs. Carbon filters are easily purchased in sheets and can be cut to fit the filter slot.
Ideas:
Click the "Remixes" tab to see other great ideas for this project. If you have your own ideas about what to add you can create Side Stations for both stations. The Left and Right sides have two 4mm holes for you to add anything you want of your own design, most common being a custom solder rod holder. Put your name on your adaptation for credit.
Options
80mm fan size - 100mm fan and more coming soon. The files will have the size in their title if they are for that specific fan size.
Electronics/Wiring
Make your life easy and get a fan/LED strip that use the same DC Voltage. 12V is a good standard.
Suggested parts:
2.1mm DC jack - in back: see image and below for link
AC to DC power converter that plugs into 2.1mm jack
PWM DC motor controller to control fan speed - on left side of fan base: see image and below for link
LED Strip with high CRI rating 80+ (Optional) - attached to the end of the movable arms.
DC on/off switch (same voltage as fan/LEDs) - on right side of fan base: see image and below for link
Solder the fan and LED ground wires together and to the DC power jack's ground pin.
Solder the DC power jack's positive pin to your On/Off switch, and then from the switch to the LED positive and fan positive. This will turn everything on at the same time.
Printing
Use any material you prefer. My standard is PETG on almost everything I print.
The ball joints MUST be printed with TPU. The flexibility of TPU and the rubber like grip it creates makes the ball joints work perfectly.
Ball joints are designed to be a perfectly snug fit. If you find they are too tight then adjust your "Horizontal Expansion" setting in your slicer to allow for a looser fit. Test this on a few different prints to find your perfect settings.
Assembly
Parts are designed to fit M3 bolts/nuts (or brass inserts) - which is 1/8" bolts/nuts for the USA.
All parts should line up and be easily assembled.
Printing ball joint parts in TPU ensures a snug and flexible fit.
I find that for each arm I need:
1 Ball Joint Base
2 or 3 Ball Joints
1 Alligator Clip and Ball Joint End.
Attach the fan to the solder station with bolts/nuts. Attach the filter holder to the back of the fan with bolts/nuts. Insert filter that you can cut to size.
Alligator clips can be soldered to a ground wire and run through the center hole of arms if needed.
LED strip should be glued since the sticking back typically gives out over time.
Wire the LED strip through the center hole of the arms.
Filter
It is highly encouraged to purchase solder filter sheets (charcoal filters) that are 10mm thick. You can cut these to size with a knife or scissors to fit the filter holder that attaches to the back of the fan. This will ensure better air quality when soldering and remove heavy solder fume particles.
Let me know if there is anything else I am missing. I can create a 100mm and 120mm Fan base if requested.
Please share any great images with me and I may add them to this page for others to use as reference.
Links to Parts:
DC Power Brick: (choose12v 3A+, or other depending on fan/LEDs)https://www.aliexpress.com/item/32859196804.html?spm=a2g0o.productlist.0.0.3f7d270fwqRK00&algo_pvid=288d2847-bc54-4034-b68b-4fa0647ebc75&algo_expid=288d2847-bc54-4034-b68b-4fa0647ebc75-0&btsid=0bb0623e16134327344954188eb3fb&ws_ab_test=searchweb0_0,searchweb201602_,searchweb201603_
DC Power Plug: *DC022 - 5.5mmx2.1mmhttps://www.aliexpress.com/item/4001050150711.html?spm=a2g0o.productlist.0.0.6ee71f0ftgMxGY&algo_pvid=4b468c12-a520-4d46-8ec5-6e8623fab2bf&algo_expid=4b468c12-a520-4d46-8ec5-6e8623fab2bf-2&btsid=0bb0624116134278079113741e6819&ws_ab_test=searchweb0_0,searchweb201602_,searchweb201603_
Toggle Button With Light: you can obviously use whatever you want instead of this. *Choose the 19mm version**https://www.aliexpress.com/item/1005001640045513.html?spm=a2g0o.productlist.0.0.260e6bc85hpNmO&algo_pvid=c48ba3e4-f0f5-4436-ba04-5b1af355a33e&algo_expid=c48ba3e4-f0f5-4436-ba04-5b1af355a33e-8&btsid=0bb0624716134328003262811e5dc3&ws_ab_test=searchweb0_0,searchweb201602_,searchweb201603_
DC PWM Motor Controller: should look like pictures abovehttps://www.aliexpress.com/item/1005001883595551.html?spm=a2g0o.productlist.0.0.6c0d3deauCuK6q&algo_pvid=bea1b415-8cb0-47bd-85e1-8039b682b027&algo_expid=bea1b415-8cb0-47bd-85e1-8039b682b027-2&btsid=0bb0600116134379013002568e0d49&ws_ab_test=searchweb0_0,searchweb201602_,searchweb201603_
Any ideas for add-ons please let me know! Other clip types, front tray types, etc.
Similar models
thingiverse
free

GaPa Radio Mini (Karadio32) by yamaha_xg
...b-4a5f-95a1-8987412cf988-1&btsid=0bb0623e16034350037585008e69f6&ws_ab_test=searchweb0_0,searchweb201602_,searchweb201603_
thingiverse
free
Simple helping hands (soldering) by salami738
...88e72e-2&btsid=0b0a01f816148695362425184e33ff&ws_ab_test=searchweb0_0,searchweb201602_,searchweb201603_
to complete this.
thingiverse
free

Peltier holder waterblock and heatsink holder 40x40x20 by Dskill3Dlovethings
...8-4806-bca5-427f454c8183-0&btsid=0ab6d69f15866887037078335e08c6&ws_ab_test=searchweb0_0,searchweb201602_,searchweb201603_
thingiverse
free

Among Us by GrowingUp
...-4bfd-8334-497c14944e74-13&btsid=0b0a555c16057673539875365e55dc&ws_ab_test=searchweb0_0,searchweb201602_,searchweb201603_
thingiverse
free

among us led flower pot by GrowingUp
...6-4214-8d79-daf0bbe2e09b-1&btsid=0bb0623316072553736731770e914d&ws_ab_test=searchweb0_0,searchweb201602_,searchweb201603_
thingiverse
free

Car starter with USB by yanew
...-4ca4-901e-7c286ce789c9-10&btsid=0bb0624216018388590743668ebb2e&ws_ab_test=searchweb0_0,searchweb201602_,searchweb201603_
thingiverse
free

Among Us flower pot by GrowingUp
...e0ffb&ws_ab_test=searchweb0_0,searchweb201602_,searchweb201603_
see yt video for details:https://youtu.be/m5pru19mqem
enjoy !
thingiverse
free

Power supply cover by parek
...b-49a3-a06e-a7be7ef71152-8&btsid=0ab6f83a15854357046013239e05ba&ws_ab_test=searchweb0_0,searchweb201602_,searchweb201603_
grabcad
free

RFID 13.56Mhz IC USB Reader
...-4ee0-9ea2-bbec68f5d2b2-26&btsid=0bb0622d16140586744082817e7981&ws_ab_test=searchweb0_0,searchweb201602_,searchweb201603_
thingiverse
free

Akvárium LED-COB-12v
...8-48ba-8308-1d14cf66f2ae-2&btsid=0ab6f82c15826496859562394e7d7e&ws_ab_test=searchweb0_0,searchweb201602_,searchweb201603_
Proteanman
thingiverse
free

GoPro Tripod Mount (Targus) by ProteanMan
...erent brands of tripod. there is a clip at the back of the tripod attaches to this insert.
this was designed for a targus tripod.
thingiverse
free

Ukulele Wall Mount by ProteanMan
... tear.
check out my vlog and 3d printing videos on youtube - protean manhttps://www.youtube.com/channel/ucz64raasrj9v66rt3bdeo2w
thingiverse
free

Instrument Mustaches by ProteanMan
...n for some of them since the clips may break with pla. i haven't tried pla so let me know if they are strong enough with pla?
thingiverse
free

Dreadnought Fidget Spinner by ProteanMan
... of the spinner. be careful not to get glue on the bearing.
7-clamp the handles together to that they are straight, then let dry.
thingiverse
free

Whiteboard Pen Holder X5 by ProteanMan
...that if your printer prints with a larger tolerance around tight fitting parts then you will need to drill or sand out the holes.
thingiverse
free

Proteus Headphone Stand by ProteanMan
...back face. if you have amazing bridging capabilities on your printer then you can print it on the bottom face.
print, use, enjoy!
thingiverse
free

Proteus Cable Roller by ProteanMan
...way that does not earn you monetary value.
if you do wish to sell these products please let me know and we can come an agreement.
thingiverse
free
Box Making Parts by ProteanMan
...way that does not earn you monetary value.
if you do wish to sell these products please let me know and we can come an agreement.
thingiverse
free

Proteus Key Holder by ProteanMan
...d. this should work perfectly for any printer.
try using high infill - 50% or above when printing.
any ideas let me know. enjoy!
thingiverse
free

Custom Speaker Cover Plates by ProteanMan
...e option and type in 0.796. this resizes the file to the right size for my speaker.
now you have a perfectly sized speaker cover!
Proteus
3d_export
$199

Proteus 3D Model
...proteus 3d model
3dexport
sci-fi spaceship warship cruiser destroyer
proteus 3d model psicore 4922 3dexport
turbosquid
$25

Proteus PEC 2025
...d
royalty free 3d model proteus pec 2025 for download as c4d on turbosquid: 3d models for games, architecture, videos. (1275757)
thingiverse
free
Proteus Proxy Detailed
...proteus proxy detailed
thingiverse
this is a version of the proteus proxy with a detailed interior.
unity_asset_store
$36

PROTEUS Frigate
...te your workflow with the proteus frigate asset from cgpitbull. find this & other space options on the unity asset store.
3dcadbrowser
free
Proteus
...software.this 3d object can be downloaded in .max, .obj, .3ds, .fbx, .dxf, .lwo, .stl, .wrl, .ma, .dae, .x and .asc file formats.
unity_asset_store
$7

Proteus Mech Robot
...r workflow with the proteus mech robot asset from polyanarchy. find this & other robots options on the unity asset store.
thingiverse
free

Proteus Concept Boat by omega
...is is my grabcad entry for the
makerbot replicator 2 desktop 3d printer challenge
http://grabcad.com/library/proteus-boat-concept
thingiverse
free
Proteus with Fuse Rear Motor mount by MADRobotNO
...tor cables.
this is 200 version of proteus: https://www.thingiverse.com/thing:2086413
2 last parts er designet for gopro session.
thingiverse
free
Proteus (halved) by guydebored
...e made a few changes on this version. the rear fins should be better conected now and you won't need rafts or support.
enjoy!
thingiverse
free
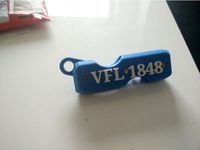
VFL Bochum 1848 - Proteus Key Holder by MacNite
...e
i made this quick mod of the proteus key holder by proteanman for my grand-father-in-law.
i hope, it may help someone as well.
80Mm
3d_export
$15

mortar 80mm
...mortar 80mm
3dexport
mortar 4k textures uvw
3ddd
$1

Faucet Leva 80mm Basin
...faucet leva 80mm basin
3ddd
смеситель , leva
faucet leva 80mm basin
3d_ocean
$45

RED DRAGON 6K + Angenieux Optimo DP 30-80mm T2.8
...ighly detailed cinema camera. made in blender 2.69 for cycles rendering.format like *.max was basically tuned with the materials.
3ddd
$1

Светильник точечный
...светильник с хрустальными подвесками фирмы asfour. размеры: 80mm x 80mm высота 35...
3ddd
$1

Thermometer round
...thermometer round 3ddd термометр diameter: 80mm ...
3ddd
$1

Римские шторы
...римская производитель: - модель: римские шторы размеры : w-980mm, d-80mm h-...
3d_export
$12
emu36 train
...emu36 train 3dexport train size 450mm x 80mm x 100mm<br>assembled 3...
3d_export
$5

empty glass - medium size
...subdivision surface modifier for high resolution render.<br> x = 80mm y = 80mm, z=136mm<br>226<br> 256<br> .blend, .fbx, .obj,...
3ddd
$1

DelightFULL Coltrane
...delightfull коллекция: coltrane модель: suspension размеры: 1000mm х diam 80mm ...
3ddd
free

DelightFULL Coltrane
...delightfull коллекция: coltrane модель: wall размеры: 1000mm х diam 80mm ...
Solder
3d_export
$6

Solder toy
...solder toy
3dexport
solder toy arnold render
3d_export
$6
Automatic soldering machine
...automatic soldering machine
3dexport
automatic soldering machine
turbosquid
$10
Solder Tools
...rbosquid
royalty free 3d model solder tools for download as on turbosquid: 3d models for games, architecture, videos. (1624226)
turbosquid
$1
Solderer simple
...squid
royalty free 3d model solderer simple for download as on turbosquid: 3d models for games, architecture, videos. (1171836)
turbosquid
$2
tin for soldering
...free 3d model tin for soldering for download as blend and fbx on turbosquid: 3d models for games, architecture, videos. (1689841)
turbosquid
$1
Soldering Iron
...ty free 3d model soldering iron for download as obj and blend on turbosquid: 3d models for games, architecture, videos. (1447146)
3d_export
$15

Solder 3D Model
...ing soldering iron electronic gun alloys tin lead electrical wire coil flux welding welder
solder 3d model firdz3d 77641 3dexport
turbosquid
$14

Soldering iron
...d model soldering iron for download as 3ds, max, obj, and fbx on turbosquid: 3d models for games, architecture, videos. (1389924)
turbosquid
$13

Soldering station
...el soldering station for download as blend, fbx, obj, and stl on turbosquid: 3d models for games, architecture, videos. (1552016)
turbosquid
$5
Steel solder
... available on turbo squid, the world's leading provider of digital 3d models for visualization, films, television, and games.
Station
3d_export
$5
station
...station
3dexport
station
archibase_planet
free
Station
...station
archibase planet
railroad station railway station bay
railway station n160707 - 3d model for interior 3d visualization.
archibase_planet
free
Station
...station
archibase planet
intercom station equipment
intercom station - 3d model for interior 3d visualization.
archibase_planet
free
Station
...station
archibase planet
station
station n260108 - 3d model (*.gsm+*.3ds) for interior 3d visualization.
3d_export
$5
Station
...station
3dexport
low poly bus station
archibase_planet
free
Station
...station
archibase planet
building station construction
station n170708 - 3d model(*.gsm+*.3ds) for interior 3d visualization.
archibase_planet
free

Station
...station
archibase planet
bus station bus stop
station 1 - 3d model (*.gsm+*.3ds) for interior 3d visualization.
archibase_planet
free

Station
...station
archibase planet
bus station bus stop
station 2 - 3d model (*.gsm+*.3ds) for interior 3d visualization.
archibase_planet
free

Station
...station
archibase planet
bus station bus stop
station 3 - 3d model (*.gsm+*.3ds) for interior 3d visualization.
3d_ocean
$19

Space station
...space station
3docean
space station
space station
Fan
3d_export
$5

fan
...fan
3dexport
fan 3d model, table fan, fan, electric fan, ventilator
archibase_planet
free

Fan
...fan
archibase planet
fan large fan
fan out n260707 - 3d model for interior 3d visualization.
archibase_planet
free

Fan
...fan
archibase planet
fan ceiling fan ventilator
fan stealth n300615 - 3d model (*.gsm+*.3ds) for interior 3d visualization.
3d_export
$15

fan
...fan
3dexport
is an ancient fan
3ddd
$1

Fan-C-Fan by marco gallegos
...n-c-fan by marco gallegos
3ddd
вентилятор , marco gallegos
fan-c-fan by marco gallegos
3d_export
$10

fan
...fan
3dexport
a detailed fan designed for home or space blowing is now available for only 19.99!
turbosquid
$1

Fan
...fan
turbosquid
free 3d model fan for download as on turbosquid: 3d models for games, architecture, videos. (1427865)
turbosquid
$14

Fan
...fan
turbosquid
royalty free 3d model fan for download as on turbosquid: 3d models for games, architecture, videos. (1415642)
3ddd
$1

Светильник Fan
...светильник fan
3ddd
fan , italamp
светильник fan, производитель italamp
turbosquid
$25

Fan
...fan
turbosquid
royalty free 3d model fan for download as c4d on turbosquid: 3d models for games, architecture, videos. (1483246)