Thingiverse
Promega Z Roller Carriage by TheBum
by Thingiverse
Last crawled date: 3 years, 4 months ago
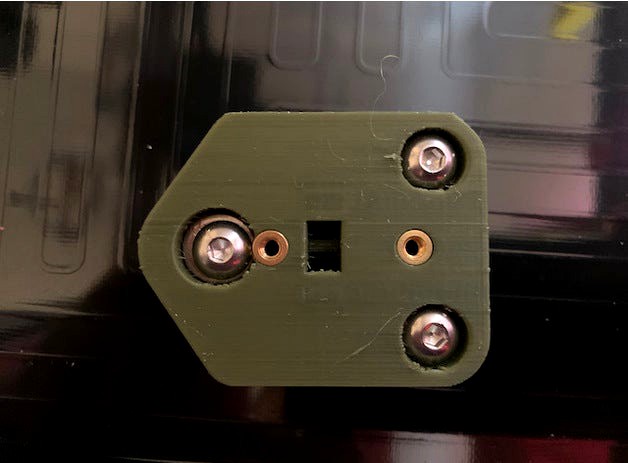
This is a replacement for the M3D Promega factory Z axis slider. It reduces friction considerably and removes slop. It's also a longer-term part than the factory slider due to the relative lack of friction against the Z rail.
There are three versions of the 3D-printed block:
Right rear non-adjustable with fin for for use with an optical Z end stop.
Right rear non-adjustable without fin for use with a microswitch Z end stop.
Adjustable (three required)As a part of this modification, the cap at the top of each of the Z rails will need to be replaced with the version included here. This mod is also designed to use special versions of John Mueller's Bottom Z Belt Clamp V2 (https://www.thingiverse.com/thing:3052677) to make room for the lowermost wheel. STLs are included in the downloads for this Thing.
Post-Print Cleanup
Carefully remove the supports from the blocks. When removing the adjustment gap supports, remove the supports adjacent to the bed mounting holes first to prevent damage to the tabs in the center section that engage the slots in the outer section; then remove the top and bottom supports. I find that using a flat blade screwdriver helps get removal started and then snagging the loose supports with an X-Acto knife allows them to be removed.
Assembly
Each carriage is assembled from the following parts:
3D-printed block
Eccentric spacer w/ 6mm rise
Two (2) 5mm x 11mm x 6.35mm regular spacers
Three (3) Mini Kossel 5mm x 21.5mm x 7mm wheels
M6 x 12mm x 1.6mm washer, with the hole drilled out to 7mm (or 9/32")
Three (3) M5 x 20mm button head socket screws
Three (3) M5 jam nuts
Two (2) M3 x 12mm set screws, flat ended
One (1) M3 x 6mm set screw, flat ended, for an adjustable block
One (1) M5 x 10mm set screw, flat ended, for an adjustable block
Two (2) 3mm x 8mm x 4mm bearings (reused from the factory sliders)
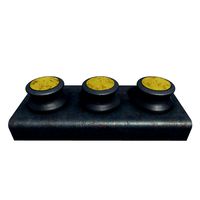
M3 threaded inserts (3 in the adjustable blocks; 2 in the right rear block)A bill of materials with links is included in the Thing files. The photos shown for this Thing are of an older non-adjustable design, but the mounting of the wheel hardware is the same.
Set the threaded inserts into the block. Two go into the side of the block and should be set to be flush or very slightly below flush with the side surface. On the adjustable blocks, one goes in the bottom of the block and should be set as far down in the hole as it can without protruding into the adjustment gap; a popsicle stick jammed into the gap while setting the insert helps with that.
Insert an M5 button head screw into one of the counterbored holes in the side of the block adjacent to the squared off edge, with the head of the screw on the side with the deeper counterbore.
Slide a plain spacer over the screw from the opposite side, followed by a wheel and a jam nut. Use Loctite on the nut. The spacers should fit down into the counterbore.
Repeat steps 2 and 3 for the other hole adjacent to the squared off edge.
Insert the eccentric spacer into the remaining hole from the side with the shallower counterbore. The smaller diameter must go fully into the hole; it'll be a tight fit.
Insert the drilled-out M6 washer into the remaining hole, again in the deeper counterbore. If the threaded insert adjacent to that hole interferes with the washer, file a notch in the washer.
Repeat steps 2 and 3 for the last M5 button head screw in the remaining hole.
Remove the bearing screws from the factory slider and transfer the bearings to the new block.
Use M3 x 12mm set screws to secure the bearings in the new block. Be very careful not to screw it in too far or else you'll damage the block and have to print another one. The socket end of the set screw just needs to be slightly past the near edge of the center section of the block.
For the adjustable block, screw one M5 x 10mm set screw into the threaded hole in the top of the block, but make sure it doesn't extend into the adjustment gap.Installation
Make sure the eccentric spacer is rotated so that the wheel is at its farthest point from the centerline of the rail.
With the top cap removed from the rail, slide the Z roller carriage onto the rail and check for slop.
Remove the carriage from the rail and make a small adjustment to the eccentric spacer to move the wheel closer to the centerline.
Repeat steps 2 and 3 until there is no slop between the wheels and the rail.
If the carriage doesn't fall freely to the bottom of the rail, then the adjustable wheel is too tight, so adjust it and recheck the block on the rail until and the block falls freely to the bottom of the rail and there's no slop where the wheels contact the rail. It may take several iterations to find the sweet spot.
Attach the carriage to the bed with the factory screws and install the belt as you would for the factory slider. It's a good idea to use M3 split lock washers on the screws to make sure they don't back out due to vibration.Leveling
Set up the Maestro for a 5-point bed mesh (machine_bedmesh.g).
Perform the bed mesh procedure and adjust the height by skipping teeth.
Repeat until the right rear corner is at the same level or up to one belt tooth higher than the other corners.
For each corner that's lower than the right rear, turn the adjustment screw clockwise to raise that corner. Then run the bed mesh procedure again.
Repeat the adjustments and bed mesh procedure until the bed is level.
Tighten the bottom screw on each adjustable carriage to lock the adjustment height.
Switch to the desired higher density mesh and run the bed mesh one more time.
There are three versions of the 3D-printed block:
Right rear non-adjustable with fin for for use with an optical Z end stop.
Right rear non-adjustable without fin for use with a microswitch Z end stop.
Adjustable (three required)As a part of this modification, the cap at the top of each of the Z rails will need to be replaced with the version included here. This mod is also designed to use special versions of John Mueller's Bottom Z Belt Clamp V2 (https://www.thingiverse.com/thing:3052677) to make room for the lowermost wheel. STLs are included in the downloads for this Thing.
Post-Print Cleanup
Carefully remove the supports from the blocks. When removing the adjustment gap supports, remove the supports adjacent to the bed mounting holes first to prevent damage to the tabs in the center section that engage the slots in the outer section; then remove the top and bottom supports. I find that using a flat blade screwdriver helps get removal started and then snagging the loose supports with an X-Acto knife allows them to be removed.
Assembly
Each carriage is assembled from the following parts:
3D-printed block
Eccentric spacer w/ 6mm rise
Two (2) 5mm x 11mm x 6.35mm regular spacers
Three (3) Mini Kossel 5mm x 21.5mm x 7mm wheels
M6 x 12mm x 1.6mm washer, with the hole drilled out to 7mm (or 9/32")
Three (3) M5 x 20mm button head socket screws
Three (3) M5 jam nuts
Two (2) M3 x 12mm set screws, flat ended
One (1) M3 x 6mm set screw, flat ended, for an adjustable block
One (1) M5 x 10mm set screw, flat ended, for an adjustable block
Two (2) 3mm x 8mm x 4mm bearings (reused from the factory sliders)
M3 threaded inserts (3 in the adjustable blocks; 2 in the right rear block)A bill of materials with links is included in the Thing files. The photos shown for this Thing are of an older non-adjustable design, but the mounting of the wheel hardware is the same.
Set the threaded inserts into the block. Two go into the side of the block and should be set to be flush or very slightly below flush with the side surface. On the adjustable blocks, one goes in the bottom of the block and should be set as far down in the hole as it can without protruding into the adjustment gap; a popsicle stick jammed into the gap while setting the insert helps with that.
Insert an M5 button head screw into one of the counterbored holes in the side of the block adjacent to the squared off edge, with the head of the screw on the side with the deeper counterbore.
Slide a plain spacer over the screw from the opposite side, followed by a wheel and a jam nut. Use Loctite on the nut. The spacers should fit down into the counterbore.
Repeat steps 2 and 3 for the other hole adjacent to the squared off edge.
Insert the eccentric spacer into the remaining hole from the side with the shallower counterbore. The smaller diameter must go fully into the hole; it'll be a tight fit.
Insert the drilled-out M6 washer into the remaining hole, again in the deeper counterbore. If the threaded insert adjacent to that hole interferes with the washer, file a notch in the washer.
Repeat steps 2 and 3 for the last M5 button head screw in the remaining hole.
Remove the bearing screws from the factory slider and transfer the bearings to the new block.
Use M3 x 12mm set screws to secure the bearings in the new block. Be very careful not to screw it in too far or else you'll damage the block and have to print another one. The socket end of the set screw just needs to be slightly past the near edge of the center section of the block.
For the adjustable block, screw one M5 x 10mm set screw into the threaded hole in the top of the block, but make sure it doesn't extend into the adjustment gap.Installation
Make sure the eccentric spacer is rotated so that the wheel is at its farthest point from the centerline of the rail.
With the top cap removed from the rail, slide the Z roller carriage onto the rail and check for slop.
Remove the carriage from the rail and make a small adjustment to the eccentric spacer to move the wheel closer to the centerline.
Repeat steps 2 and 3 until there is no slop between the wheels and the rail.
If the carriage doesn't fall freely to the bottom of the rail, then the adjustable wheel is too tight, so adjust it and recheck the block on the rail until and the block falls freely to the bottom of the rail and there's no slop where the wheels contact the rail. It may take several iterations to find the sweet spot.
Attach the carriage to the bed with the factory screws and install the belt as you would for the factory slider. It's a good idea to use M3 split lock washers on the screws to make sure they don't back out due to vibration.Leveling
Set up the Maestro for a 5-point bed mesh (machine_bedmesh.g).
Perform the bed mesh procedure and adjust the height by skipping teeth.
Repeat until the right rear corner is at the same level or up to one belt tooth higher than the other corners.
For each corner that's lower than the right rear, turn the adjustment screw clockwise to raise that corner. Then run the bed mesh procedure again.
Repeat the adjustments and bed mesh procedure until the bed is level.
Tighten the bottom screw on each adjustable carriage to lock the adjustment height.
Switch to the desired higher density mesh and run the bed mesh one more time.
Similar models
thingiverse
free

east3D gecko coreXY Z-wheel-carriage by delukart
...slight resistance ) finaly tighten the carriages to the z stage.
(i do advise to relevel and retighten the z belts at this time.)
thingiverse
free

OpenBuilds Eccentric Spacer by TheMadScientist
...eccentric spacer, which has an offset hole to adjust tenson to the contact between the wheel and the rail of an openbuild system.
thingiverse
free

Dual Z Tevo Tornado with rail guide by otto3d
...5 to adjust mount
08 t-nuts m5 for guide support
08 screws m5 x 10mm fo guide support
https://www.youtube.com/watch?v=i41l3zvw0ze
thingiverse
free

D-Bot Rear Print Carriage w/ Eccentric Spacer holes by hejman08
...ed it for myself and it works great, although i had to drill out the eccentric spacer holes just a touch to make them fit snugly.
thingiverse
free

2 x 3 hole join plate for 2020 extrusion by rstarin
...ed for m5 screws and #5 washers in the counterbore. 7mm thick overall, printed this at 50%. the edge filets are for aesthetics.
thingiverse
free

Remix Of Nikodem Bartnik Dremel CNC Z-Carriage for Mini V-Wheel Support
..., wheel (with bearings), second washer and a second eccentric nut.
then through the backing plate, and secured using nylock nuts.
thingiverse
free

Wanhao D9 6mm Alu bed by Angot
...8 x 6mm spacers
6 x 6mm eccentrics
6 x m5 30mm cap screws
i raised the 40mm x 20mm rails with 20mm spacers to avoid the y motor.
thingiverse
free

Reach 3D Hot End Carriage, Fan Mount, and Z Probe Carriage by ngoconwood
... not interfere with the z probe.
materials:
1 x m3x50 bolt
1 x m3 lock nut
1 x #4 screw
2 x m5x30 bolt
4 x m5 washers
2 x m5 nuts
thingiverse
free

Z axis wheel stabilizer by Wolfgard
...luminum profile, and tighten the screws.
mounted the 2 wagons, install the 2040 x.
everything will be perfectly stable and square
thingiverse
free

Openbuilds v-slot X axis for Lulzbot TAZ 6 printers by piercet
...head m5 bolts and nuts 30mm (standard bolts will not fit, need the flat ones. ). longer if you plan to add the cable chain pieces
Thebum
thingiverse
free

Tension nut for 1" PVC pipe by TheBum
...ngiverse
this is simply a scaled-up version of coconnor55's tension nut. this version works on 1" schedule 40 pvc pipe.
thingiverse
free

Protos Max V2 Battery Tray Thumb Pad by TheBum
...ray to its locked position easier on the thumbs. this was designed by helifreak.com user caeguy and uploaded with his permission.
thingiverse
free

Graupner transmitter stand by TheBum
...ched to 85mm for you to customize.
the arm clips are included here for completeness; they did not change from the original thing.
thingiverse
free

AR-15 speed loader_v2 lock by TurkeyTurtle05
...thingiverse lock pins for the latching ar-15 loader_v2 by thebum ...
thingiverse
free

Snapmaker Carver/Laser Plate Alignment Tool by TheBum
...that omits the outermost holes and is printable in one piece on a snapmaker. this one should also play better with debris fences.
thingiverse
free

Latching AR-15 5.56/.223 mag speed loader by TheBum
...ting easier.
the pusher was not changed from the original, so it's not included here; go to the original design to download.
thingiverse
free

180-degree camera mount base and IR camera case for Snapmaker by TheBum
...ting action on the pivot to keep the aiming angle more secure. the pertinent files contain "ratcheting" in their names.
thingiverse
free

Snapmaker Laser CNC Align and Fix jig (v.2) by carl0sim0lina
...microrax rails, in order to last longer. thank you: thebum (https://www.thingiverse.com/thing:2956894), microrax (https://www.thingiverse.com/thing:1130) and mgx (https://www.thingiverse.com/thing:2452870) for sharing your...
Promega
thingiverse
free

Promega Top skirt
...promega top skirt
thingiverse
skirt to limit heat loss when raising top of promega
thingiverse
free

Promega BLTouch Mount
...are setup and pin connections are described in the duet wiki: https://duet3d.dozuki.com/wiki/connecting_a_z_probe#section_bltouch
thingiverse
free

Promega CoreXY Motor Bracket by supinemonkey
...corexy motor bracket by supinemonkey
thingiverse
this is the fusion file for the promega motor bracket. make your own dang mods!
thingiverse
free

M3D Promega Quaden with BLTouch Mount
...ime.
uses the current xy bracket from the promega and bearings.
rev 2: extend the front to solve and interference of a bolt head.
thingiverse
free

ProMega Optical Endstop
...e.com/thing:3474153
there is a document describing how to install the optical endstop as well as how to configure it in the duet.
thingiverse
free

ProMega 1/4" Mirror Clip
...is a clip that can be used to hold a 1/4" mirror on the promega printbed.
print in 0.3mm laying on the side to give it flex.
thingiverse
free

M3D Promega Top Window Clip by eburgess4
...he top of my promega so i created this clip to keep the top window in place without screws. just print 4 and you are ready to go.
thingiverse
free

Promega cable case for Bondtech BMG V6 extruder
... m3d promega with the bmg v6 extruder upgrade:
https://www.thingiverse.com/thing:3611643https://www.thingiverse.com/thing:3624450
thingiverse
free

M3d Promega Compound Insert Mod
...compound insert mod
thingiverse
this is a mod i made to the compound head insert. it adds more of a ramp to the filament guides.
thingiverse
free

Backshield PROMEGA 3D Printer by Eazy75
...printer myself, so i'm not sure if it fits perfectly.
so please upload pictures, make comments if you were succesful or not!!
Roller
turbosquid
$26
Roller A
...urbosquid
royalty free 3d model roller a for download as fbx on turbosquid: 3d models for games, architecture, videos. (1350603)
turbosquid
$3
Roller
...oyalty free 3d model roller for download as 3ds, max, and obj on turbosquid: 3d models for games, architecture, videos. (1460818)
3ddd
$1
edilkamin roller
...edilkamin roller
3ddd
камин
edilkamin roller 360
3ddd
$1
Roller Blinds
...roller blinds
3ddd
рулонная
roller blinds black out finish
turbosquid
$50
Roller
... roller for download as max, max, c4d, max, max, fbx, and obj on turbosquid: 3d models for games, architecture, videos. (1700762)
3d_export
$10
rollers
...lers
3dexport
this is low-poly model of rollers.<br>model:<br>- low-poly<br>- textured<br>- uv unwrapped
3d_export
$28
Roller 3D Model
...roller 3d model
3dexport
roller construction boss evil
roller 3d model adagio15740837 50561 3dexport
3d_export
$6
hopper roller conveyor
...hopper roller conveyor
3dexport
hopper roller conveyor
3d_export
$12

roller skates
...roller skates
3dexport
3d_ocean
$19
roller skate
...can scanned skates skating sport
3d scan of roller skate. the model has been retopologized and made fully compatible with zbrush.
Carriage
archibase_planet
free

Carriage
...arriage
archibase planet
perambulator baby carriage pram
carriage n250908 - 3d model (*.gsm+*.3ds) for interior 3d visualization.
3d_export
free

carriage
...carriage
3dexport
old fashion carriage model, more files here:
turbosquid
$140

Carriage
...urbosquid
royalty free 3d model carriage for download as max on turbosquid: 3d models for games, architecture, videos. (1482052)
turbosquid
$25

Carriage
...urbosquid
royalty free 3d model carriage for download as max on turbosquid: 3d models for games, architecture, videos. (1285944)
3d_export
free

carriage
...carriage
3dexport
game cart
3d_ocean
$15

Barrel Carriage
...ieval oak old transport wheels wine wood
this model contains a barrel and a carriage. it is a medieval type of wood oak carriage.
turbosquid
$40

Carriage
...ty free 3d model carriage for download as obj, fbx, and blend on turbosquid: 3d models for games, architecture, videos. (1290094)
turbosquid
free

Carriage
...yalty free 3d model carriage for download as ma, obj, and fbx on turbosquid: 3d models for games, architecture, videos. (1239157)
3d_export
$5

Medieval carriage
...medieval carriage
3dexport
medieval carriage in fairy style
turbosquid
$58

Carriage
...d model carriage with scene for download as max, obj, and fbx on turbosquid: 3d models for games, architecture, videos. (1276262)
Z
3d_export
$5

nissan z
...nissan z
3dexport
nissan z
3ddd
$1

Vase Z
...vase z
3ddd
vase z
3ddd
$1

полотенцесушить Z
...полотенцесушить z
3ddd
полотенцесушитель
полотенцесушить z
design_connected
free

Z-Chair
...z-chair
designconnected
free 3d model of z-chair designed by karman, aleksei.
design_connected
$11

Z Lamp
...z lamp
designconnected
phillips z lamp computer generated 3d model. designed by kalff, louis.
3d_export
$5

Dragon balls z
...dragon balls z
3dexport
dragon ball z
turbosquid
$20

Fighter Z
...
turbosquid
royalty free 3d model fighter z for download as on turbosquid: 3d models for games, architecture, videos. (1292563)
turbosquid
$9

Pen Z
...pen z
turbosquid
free 3d model pen z for download as obj on turbosquid: 3d models for games, architecture, videos. (1686775)
turbosquid
free

z chair
...z chair
turbosquid
free 3d model z chair for download as max on turbosquid: 3d models for games, architecture, videos. (1410230)
turbosquid
$5

Letter Z
...urbosquid
royalty free 3d model letter z for download as max on turbosquid: 3d models for games, architecture, videos. (1408540)