Thingiverse

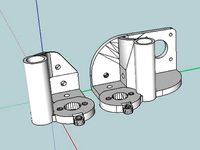
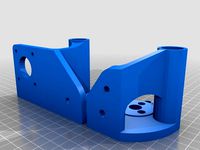
Project FAXE (Full Acrylic X End) by JoeHidden
by Thingiverse
Last crawled date: 3 years ago
Naming: FAXE stands for Full Acrylic X End, FALXE for the left, FARXE for the right end.
Color selection: I use RED Plating on the left side (Port/Backbord) and GREEN on the right (Starboard/Steuerbord) side, so i do not get confused.
Important remark: This X-End is created to exactly cut on my cutter, supporting exactly my Aluminium Slider in exactly my configuration. Please accept that you need to do modifications to exacly fit on your cutter and your slider. Only by chance my files will fit your setup without modification.
Material:
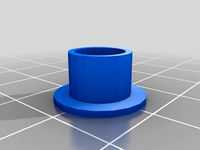
4x Bronce Bushing 8x10x15
1x sheet of 5mm Acrylic
1x sheet of GUTTACRYL 3mm The color you like (from HORNBACH). It is important to mention, that GUTTACRYL varies in thickness between 3,1 and 2,87. The holes in this Project are sized for a 3,05-3,08mm thick sheet. Everywhere you see a Orange Acryl in these pictures or ORANGE is referenced in the Text, this means a 3,08mm sheet. For the other 3mm-class sheets the exact thickness is not so much important. If you do not use explizitly this Acrylic thickness, you have to rework some notches & a lot of rectangular holes.
(optional) more colorfull sheets of Acrylic 3mm (i used GUTTACRYL from HORNBACH in Red and Green).
1x thin superglue
2x Bolts M3 >8mm <13mm in length
6x Bolts M3x20mm+Nuts
Tools:
Laser Cutter
Screwdriver matching your screws
Cutting:
Calibrate your Cutter or zoom the Holes. A 8mm Hole must cut 8mm exactly, the 10mm holes must cut exactly 10mm (we are aiming near H6 tolerance). Otherwise you won't benefit from the FAXE precission. Also get the Rod holes distance right. It took me several tests to find the correct distance. I wasted lots of 1mm cardboard first, not to use too much plastic. Nevertheless it took additional 4 distance tests in plastic to really get it right. So be prepared to waste quiet some plastic. For testing it is sufficant to cut one of the FALXE 5mm parts in 3mm Acrylic. You absolutely need to adjust on FALXE and FARXE rod holes! Outherwise it won't mount or run smooth.
You need to cut every part in in the plan once. Where more than one same part is needed, it exists that often. But maybe you want to cut 2 extra Y Bushing Holders.
Mounting:
Y-Bushing Holders: Take a bushing and push it into the Y Bushing Holder hole, put 3 holders per bushing, make shure the openings are aligend on the same side. If everything is cut perfectly, they fit in with moderate pressure.
FALXE: I decited to glue together 3 Layers (the inner 3 in fact) with extra fluid superglue and screw on the outermost shell. This enables me to change the Y bushing holders, when they brake.
So take the inner plate first, push your rods thru, then prepare the first 5mm part on the rods too, but keep distance to the inner plate to apply glue. When glue is applied (don't use too much) push them together using the rods as position rails. Take care not to accidentally glue the rods. Press firmly together until the glue bound. Repeat for the second 5mm part. When everything bound, remove the rods.
The Y Bushing Holders and the X Wheel holders are just slot in without any glue. Slot them in, use a rod thru the bushings to check alignment.
Now position the outer shell and make the Y Holders slot in. Use the 2 M3 Bolts to bolt together. Dont use extensive force, since the Acryl may break.
FARXE: Take the motor holder, mount the motor and insert inner shell first, then slot in X-Endstop plate. Next insert the outer shell. Now slot in prepared Bushings+Holders from above, Make shure not to use extensive force, take care on alignment instead.
Use the 5mm parts and slot them in from the sides. Use the longer parts on the motor pulley side. When these parts are inplace, mount the 4 bolts+nuts, DO NOT TIGTHEN! When you feel that the Pulley blocks inserting the 5mm parts, loosen the Pulley and slide fully on the Motor Rod. You can re-align it later.
Next turn the X-End upside down and slot in the bottom plate. Now loosly mount the remaining 2 Bolts, do not yet thigthen.
Insert the axes with slider and FALXE mounted. Align rods so that the silder easily slides. NOW tighten all six bolts. The upper four may be tightened pretty strong, Take care on the bottom two.
Now mount the belt and align pulley. Make shure to maintain some space between pully and X-End (for me 0,2mm is sufficent).
Don't forget to mount the X-Endstop switch
Update JAN 23 2017:
Slighty modified FALXE, basicly just adding some screw holes.
First cut on FARXE, first mount, quiet some changes. Now mountable, but issues
Updated Documentation
Update JAN 25 2017:
Finaly got FARXE working. All FARXE Files Updated.
No Updates to FALXE.
Updated Documentation
Update JAN 26 2017
No changes on shapes itself, just reuploaded CDR, files slightly rearranged.
Fixed typos in Documentation
Update FEB 1 2017
Updated 5mm FARXE Motorholder, just added a hole, for a ziptie to hold the X-Cables.
Update APR 5 2017
Updated comments about Acryl thickness
Open issues
Motor holder is still twisting slightly, but it is fully operational in present state. Maybe, or maybe not i will fix that one day. Currently its not perfect but good enough.
Color selection: I use RED Plating on the left side (Port/Backbord) and GREEN on the right (Starboard/Steuerbord) side, so i do not get confused.
Important remark: This X-End is created to exactly cut on my cutter, supporting exactly my Aluminium Slider in exactly my configuration. Please accept that you need to do modifications to exacly fit on your cutter and your slider. Only by chance my files will fit your setup without modification.
Material:
4x Bronce Bushing 8x10x15
1x sheet of 5mm Acrylic
1x sheet of GUTTACRYL 3mm The color you like (from HORNBACH). It is important to mention, that GUTTACRYL varies in thickness between 3,1 and 2,87. The holes in this Project are sized for a 3,05-3,08mm thick sheet. Everywhere you see a Orange Acryl in these pictures or ORANGE is referenced in the Text, this means a 3,08mm sheet. For the other 3mm-class sheets the exact thickness is not so much important. If you do not use explizitly this Acrylic thickness, you have to rework some notches & a lot of rectangular holes.
(optional) more colorfull sheets of Acrylic 3mm (i used GUTTACRYL from HORNBACH in Red and Green).
1x thin superglue
2x Bolts M3 >8mm <13mm in length
6x Bolts M3x20mm+Nuts
Tools:
Laser Cutter
Screwdriver matching your screws
Cutting:
Calibrate your Cutter or zoom the Holes. A 8mm Hole must cut 8mm exactly, the 10mm holes must cut exactly 10mm (we are aiming near H6 tolerance). Otherwise you won't benefit from the FAXE precission. Also get the Rod holes distance right. It took me several tests to find the correct distance. I wasted lots of 1mm cardboard first, not to use too much plastic. Nevertheless it took additional 4 distance tests in plastic to really get it right. So be prepared to waste quiet some plastic. For testing it is sufficant to cut one of the FALXE 5mm parts in 3mm Acrylic. You absolutely need to adjust on FALXE and FARXE rod holes! Outherwise it won't mount or run smooth.
You need to cut every part in in the plan once. Where more than one same part is needed, it exists that often. But maybe you want to cut 2 extra Y Bushing Holders.
Mounting:
Y-Bushing Holders: Take a bushing and push it into the Y Bushing Holder hole, put 3 holders per bushing, make shure the openings are aligend on the same side. If everything is cut perfectly, they fit in with moderate pressure.
FALXE: I decited to glue together 3 Layers (the inner 3 in fact) with extra fluid superglue and screw on the outermost shell. This enables me to change the Y bushing holders, when they brake.
So take the inner plate first, push your rods thru, then prepare the first 5mm part on the rods too, but keep distance to the inner plate to apply glue. When glue is applied (don't use too much) push them together using the rods as position rails. Take care not to accidentally glue the rods. Press firmly together until the glue bound. Repeat for the second 5mm part. When everything bound, remove the rods.
The Y Bushing Holders and the X Wheel holders are just slot in without any glue. Slot them in, use a rod thru the bushings to check alignment.
Now position the outer shell and make the Y Holders slot in. Use the 2 M3 Bolts to bolt together. Dont use extensive force, since the Acryl may break.
FARXE: Take the motor holder, mount the motor and insert inner shell first, then slot in X-Endstop plate. Next insert the outer shell. Now slot in prepared Bushings+Holders from above, Make shure not to use extensive force, take care on alignment instead.
Use the 5mm parts and slot them in from the sides. Use the longer parts on the motor pulley side. When these parts are inplace, mount the 4 bolts+nuts, DO NOT TIGTHEN! When you feel that the Pulley blocks inserting the 5mm parts, loosen the Pulley and slide fully on the Motor Rod. You can re-align it later.
Next turn the X-End upside down and slot in the bottom plate. Now loosly mount the remaining 2 Bolts, do not yet thigthen.
Insert the axes with slider and FALXE mounted. Align rods so that the silder easily slides. NOW tighten all six bolts. The upper four may be tightened pretty strong, Take care on the bottom two.
Now mount the belt and align pulley. Make shure to maintain some space between pully and X-End (for me 0,2mm is sufficent).
Don't forget to mount the X-Endstop switch
Update JAN 23 2017:
Slighty modified FALXE, basicly just adding some screw holes.
First cut on FARXE, first mount, quiet some changes. Now mountable, but issues
Updated Documentation
Update JAN 25 2017:
Finaly got FARXE working. All FARXE Files Updated.
No Updates to FALXE.
Updated Documentation
Update JAN 26 2017
No changes on shapes itself, just reuploaded CDR, files slightly rearranged.
Fixed typos in Documentation
Update FEB 1 2017
Updated 5mm FARXE Motorholder, just added a hole, for a ziptie to hold the X-Cables.
Update APR 5 2017
Updated comments about Acryl thickness
Open issues
Motor holder is still twisting slightly, but it is fully operational in present state. Maybe, or maybe not i will fix that one day. Currently its not perfect but good enough.
Similar models
thingiverse
free
T-slot x ends, compatible with Trinity Labs 4 Hole 2 Mount Delrin Nut Leadscrews by Hewball
...of 605zz bearings for the idler. you'll have to enlarge the hole either before or after printing if you intend to use 608zzs.
thingiverse
free

Nema 17 to M5 idler bolt for Wolfstock by nog3
...les on the wolfstock motor mount bracket and turns it down to a 5mm hole so you can mount a 5mm bolt with the idler pulley on it.
thingiverse
free
X-ends for holding 20x20 extrusion 3 hole delrin nuts/bushings by Simonious
...tended for 605zz idler bearings, you'll have to enlarge the hole either before or after printing if you intend to use 608zzs.
thingiverse
free
Anet A8 Smooth Rod Bushing Remix by reblacklaf
...his from happening in the future.
this thing was made with tinkercad. edit it online https://www.tinkercad.com/things/dxfliiwxula
thingiverse
free
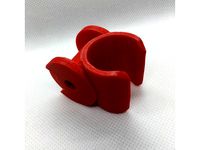
Simple chain by jnaulet
...e the chain as seen in the picture.
work in progress, didn't print it yet. some filing and sanding will probably be required.
thingiverse
free
Customizable Shower Head Holder Mount by ollej
...ailable as stl files, some of them with variations. if
you want to customize the holder further you can do it via the customizer.
thingiverse
free
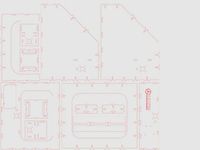
CNC Router: acrylic and 3d printed parts by pedro_boada
...rings
3 608zz bearings
2 8mm x 460mm smooth rod (d x l)
2 8mm x 400mm smooth rod (d x l)
2 8mm x 135mm smooth rod (d x l)
thingiverse
free
Folger Tech Delta Rod Jig by csorrows
...er end and quickly push it into the jig to set up. you will end up with a set of exactly the same rods if done correctly. enjoy!
thingiverse
free

Laser Cut 5 SD Cards Storage Case by bratan
...ng, let it dry a little and wipe it off.
repeat until enough paint filled the engraving. wipe again with slightly moistened rug.
thingiverse
free
![BIQU B1 X-axis belt tensioner remix [STOCK FASTENERS] by Empse](/t/9240686.jpg)
BIQU B1 X-axis belt tensioner remix [STOCK FASTENERS] by Empse
...ing, i recommend taking the pulley off the x-axis motor, while mounting, it can easily be slid back with the belt after mounting.
Faxe
archibase_planet
free
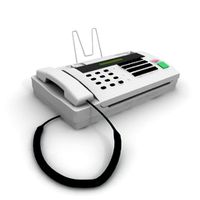
Fax
...fax
archibase planet
technique facsimile telephone
fax - 3d model for interior 3d visualization.
archive3d
free

Fax 3D Model
...odel
archive3d
office equipment fax
fax - 3d model (*.gsm+*.3ds) for interior 3d visualization.
archive3d
free
Fax 3D Model
...hive3d
fax office equipment
fax n160808 - 3d model (*.gsm+*.3ds) for interior 3d visualization.
archive3d
free
Fax 3D Model
...hive3d
fax office equipment
fax n030708 - 3d model (*.gsm+*.3ds) for interior 3d visualization.
archive3d
free
Fax 3D Model
...ive3d
fax office equipment
fax n010308 - 3d model (*.gsm+*.3ds) for interior 3d visualization.
archive3d
free

Fax 3D Model
... 3d model
archive3d
technique facsimile telephone
fax - 3d model for interior 3d visualization.
archive3d
free

Phone Fax 3D Model
... fax 3d model
archive3d
phone fax
fax phone - vista - 3d model for interior 3d visualization.
turbosquid
free
office fax machine
... available on turbo squid, the world's leading provider of digital 3d models for visualization, films, television, and games.
evermotion
$10
fax machine 58 AM87
...ax machine with all textures, shaders and materials. it is ready to use, just put it into your scene.. evermotion 3d models shop.
evermotion
$10

fax machine 57 AM87
...ax machine with all textures, shaders and materials. it is ready to use, just put it into your scene.. evermotion 3d models shop.
Acrylic
turbosquid
$15
Acrylic Lectern For The Chruch - Podium Acrylic
...the chruch - podium acrylic for download as skp, obj, and 3ds on turbosquid: 3d models for games, architecture, videos. (1642137)
3ddd
free
Acrylic bathtub
...acrylic bathtub
3ddd
ванна
acrylic bathtub. size 170x110 cm
turbosquid
$24
Acrylic Stool
...3d model acrylic stool for download as 3ds, max, obj, and fbx on turbosquid: 3d models for games, architecture, videos. (1311388)
turbosquid
$9
Acrylic Tables
... available on turbo squid, the world's leading provider of digital 3d models for visualization, films, television, and games.
turbosquid
$9

Acrylic Chair
... available on turbo squid, the world's leading provider of digital 3d models for visualization, films, television, and games.
turbosquid
$5

Acrylic Chair
... available on turbo squid, the world's leading provider of digital 3d models for visualization, films, television, and games.
turbosquid
$3
Table acrylic
... available on turbo squid, the world's leading provider of digital 3d models for visualization, films, television, and games.
3d_export
$5
Acrylic bath
... empire. originally created in 3ds max 2021 and v-ray next. materials v-ray mtl rubber; chromium; acrylic. modifiers: turbosmooth
3ddd
$1
Acrylic GM
...acrylic gm
3ddd
вентилятор
model is available in retail fanstar
3d_export
$17

Acrylic Chair 3D Model
...acrylic chair 3d model
3dexport
chair furniture acrylic
acrylic chair 3d model shalasaska 7623 3dexport
End
archibase_planet
free

Cigarettes end
...d
archibase planet
cigarettes end cigarette stub cigar-butt
cigarette-end - 3d model (*.gsm+*.3ds) for interior 3d visualization.
3d_export
$5
end table
...end table
3dexport
end table 3d model dimensions:(w)60cm×(d)60cm×(h)56cm
3d_export
$5
end table
...end table
3dexport
end table 3d model dimensions:(w)60cm×(d)60cm×(h)56cm
turbosquid
$10
End Table
...rbosquid
royalty free 3d model end table for download as max on turbosquid: 3d models for games, architecture, videos. (1570610)
turbosquid
$5
End Table
...urbosquid
royalty free 3d model end table for download as ma on turbosquid: 3d models for games, architecture, videos. (1622809)
turbosquid
$3
End Table
...rbosquid
royalty free 3d model end table for download as fbx on turbosquid: 3d models for games, architecture, videos. (1315115)
3d_export
$5

rope end ring
...rope end ring
3dexport
rope end ring
turbosquid
$2

End Tables
...
royalty free 3d model end tables for download as max and obj on turbosquid: 3d models for games, architecture, videos. (1706896)
turbosquid
$14
End Table
...lty free 3d model end table for download as max, obj, and fbx on turbosquid: 3d models for games, architecture, videos. (1403051)
turbosquid
$12

End Table
...lty free 3d model end table for download as max, obj, and fbx on turbosquid: 3d models for games, architecture, videos. (1574707)
Full
3ddd
$1
Full Mobili
...ull mobili , шкаф
группа шкафов, серия мебели "классика" фабрики «full mobili»
turbosquid
$80
full man body+full facials
... available on turbo squid, the world's leading provider of digital 3d models for visualization, films, television, and games.
3ddd
$1
Full Mobili
...сика , стол
стол круглый офисный серия мебели "классика" фабрики «full mobili»
3ddd
$1

FULL MOBILI
... стол
cтол офисный серии мебели "классика" итальянской компании full mobili
design_connected
$16

Full Circle
...full circle
designconnected
atmosphere full circle computer generated 3d model.
3d_export
$5

full office
...full office
3dexport
this is full office cgi model created with maya -detailed -textured -uv mapped
design_connected
$16

Full Moon
...full moon
designconnected
roche bobois full moon computer generated 3d model. designed by ragot, cedric.
turbosquid
$100
FULL KITCHEN
...squid
royalty free 3d model full kitchen for download as skp on turbosquid: 3d models for games, architecture, videos. (1345817)
turbosquid
$15

Full Bedroomset
...id
royalty free 3d model full bedroomset for download as max on turbosquid: 3d models for games, architecture, videos. (1540649)
3d_export
$10
full human body
...full human body
3dexport
it is a full human sculpt
Project
3d_export
$7
project
...project
3dexport
project
3d_export
$20
Project
...project
3dexport
design_connected
$16

Project Chair
...project chair
designconnected
rex kralj project chair computer generated 3d model. designed by žitnik, marjan.
3ddd
$1
lectric Project
...настроены. сетка очень плотная.
доступно только для группы "profi"
про группу "profi" можно прочитать в чаво
3d_ocean
$19

Soon project
...kup. made in 3ds max 2013 1- 3dsmax with vray render included material and light 2- obj file 3- fbx file hope you like it plea...
turbosquid
$49

Joint | Project
...squid
royalty free 3d model joint | project for download as on turbosquid: 3d models for games, architecture, videos. (1297983)
turbosquid
$11

house project
...bosquid
royalty free 3d model house project for download as on turbosquid: 3d models for games, architecture, videos. (1672482)
turbosquid
$450
University project
...
royalty free 3d model university project for download as rvt on turbosquid: 3d models for games, architecture, videos. (1463354)
turbosquid
$30
smart projecter
...lty free 3d model smart projecter for download as max and obj on turbosquid: 3d models for games, architecture, videos. (1236214)
3d_export
$5
project drawing
...project drawing
3dexport
project drawing and 3d model<br>format jpg sldprt dwg<br>by 3d make