Thingiverse

Printrbot Metal Plus ATX power supply mounting bracket by unobtanium
by Thingiverse
Last crawled date: 3 years ago
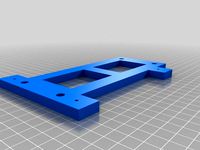
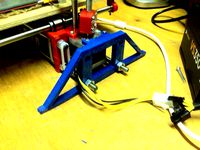
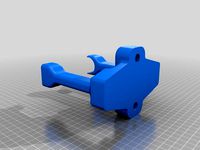
After I upgraded my Printrbot Metal Plus to a Corsair CX430 ATX power supply I had been wanting to find a solution to mounting the power supply, I was trying to save space and any attachment to the sides was out of the question, I decided I wanted to mount it to the top and use existing Printrbot mounting locations.
I did a lot of searching for printable .stl files and everything I found was going to be a 8 hour print or longer, I wanted something that was strong and had a reasonable printing time, so I designed the part myself.
I did a search for ATX power supply dimensions and found the NEMA specifications which is the standard by which its manufactured from.
The bracket was designed in Solidworks and the top pattern is based on the NEMA dimension of 64mm wide using 6-32 SHCS, and the bottom pattern is based on the Printrbot pattern of 19mm wide using M3 SHCS, the vertical dimension between those two dimensions is based on allowing clearance for the button head machine screws that the power supply would sit on in the location I had to use.
I removed the original Printrbot M3-0.5 x 6mm long socket head cap screws and installed M3-0.5 x 10 mm long socket head cap screws through the counterbored holes on the printed bracket (narrow bolt pattern) and then on the top (wide pattern) I installed 6-32 x 3/8" SHCS.
By mounting the power supply on the top of the printer I had to extend the "6-Pin PCI-E" cable with a "6-Pin PCI-E Extension Cable" which is a heavy duty grouping of wires for 12vdc coming from the power supply the one I purchased was 45 cm or approximately 18" long, it is just the right length to hang down on the back of the printer frame and curl under the moving printing plate towards the bottom of the printer and plug into the Printrboard.
Similar models
thingiverse
free

Power Supply ATX Bracket by STEGOBOARD
...quot; long machine screws.
twelve 6-32 nuts.
six 6-32 washers.
for ideas on how to use this 3d printed item, visit:stegoboard.com
thingiverse
free

SKR ATX Mount
... point will increase the hole bores to utilize the proper screws. that will not happen for several months due to priority, sorry.
thingiverse
free

ATX power supply cutout, screw down mounting bracket by DotNetWorker
...allows for fixings to screw into base board or similar ...
thingiverse
free

ATX Power Supply Mount for Anet A6 by ejazucena
...t a6 to be mounted on the right side. use excess screws and nuts to affix to printer. secure 2 6-32 screws to mount power supply.
thingiverse
free

ATX Power Supply Mount for Anet A8 by Eddiebitz
...y use different bolts)
to attach it to the printer use some of the extra m3*18 bolts nuts and washers that came with the printer.
thingiverse
free

Power and Controller mounting for Makerfarm Prusa i3 by moczys
...prusa i3. mounting holes are sized for #6 flat head wood screws. power supply bracket front plate is removable to enable service.
thingiverse
free
Anet A8 Mounting Bracket for a MeanWell NES-350-12 Power Supply by mskressin
...bracket to the power supply. then you can simply put the m3 screws through the existing holes in the frame to attach the bracket.
thingiverse
free

Kossel 2020 Power Supply mounting brackets by KDan
...ws to mount the bracket to the power supply. just use the m4 screw length that matches the version of the bracket that you print.
thingiverse
free

ATX Power Supply mount by Klasniedryg
...fan was hitting it on top. this is a simple mount to mount it on the bottom and then two side screws to hold the supply in place.
thingiverse
free

ATX PSU Holder by mrice
...(four pieces total), mount to deck with m4 x 20mm screws, and attach the corners on the short edges with m3 x 60mm screw and nut.
Unobtanium
thingiverse
free

Campagnolo Ergopower 10s shifter gear by Chnillapoil
...chnillapoil thingiverse replacement gear for ep7-vlxr ergopower 10s shifter. unobtanium without buying a complete shifter. please leave your comments...
thingiverse
free

VW Heater Spotlight mount by celblazer
...to light the heater controls and the mount is unobtanium it seems. so fair warning i suck at designing...
thingiverse
free

Pulsense PS-100 charging cable by christoph194
...cable for a ps-100 tracker is like looking for unobtanium i had to create my own. now i don't...
thingiverse
free

williams space shuttle/comet/sorcerer drop target (03-7773-4) by toyotaboy02
...(03-7773-4) by toyotaboy02 thingiverse seems this part has become unobtanium if you're printing this on a home fdm printer...
thingiverse
free

Shelving coupler
...for my edsal shelving rack. these couplers are freakin' unobtanium so i drew up a replacement in fusion. they're...
thingiverse
free

Golf 1 parcel shelf clip (2004 Citi Golf) by springclip
...this is a frequent item to break. normally an unobtanium part. part screws on with a pan-head self tapping...
thingiverse
free

1988 Dodge Dakota Turn Signal Arm by GGigabiteM
...parts for the 1987-1990 model year dakotas are usually unobtanium this part included, so i had no choice but...
thingiverse
free

Ford Fiesta XR2 Towing Eye Cover by ta5jda
...ta5jda thingiverse work in progress a replacement for the unobtanium towing eye covers that are often missing on mk2...
thingiverse
free

Lane Guide Support Posts by OutpostKodelia
...supports so you can reuse them because they're generally unobtanium well, now you have another option! just be careful...
Atx
turbosquid
$100

Giant Atx 690
... available on turbo squid, the world's leading provider of digital 3d models for visualization, films, television, and games.
3ddd
free

ATX ZALMAN Z9 Plus
...㎜ fan x 1 (120㎜ blue led fan x 1 standard)
сверху 120㎜ /140㎜ fan x 2 (120ԩ
humster3d
$75
3D model of Vetex Sidewinder ATX 3000 Forklift 2011
... vetex sidewinder atx 3000 forklift 2011 in various file formats. all our 3d models were created maximally close to the original.
3d_export
$20

The Computer case 3D Model
...model 3dexport computer case big full super tower htpx atx the computer case 3d model mackandco 34251...
3d_ocean
$17
Computer Case
...computer case 3docean atx case computer corsair full game gaming pc psu full...
3d_export
$8

soporte para gpu
...actualmente instalado en un gabinete corsair spec alpha gabinete atx gaming con una asus turbo rtx 2060 se puede...
3ddd
free

Корпус Asus Vento Chassis TA-883 500W
...сбора компьютеров на базе материнских плат форматов atx и microatx подробнее:http://hard.rozetka.com.ua/asus_vento_chassis_ta883_500w/p161251/ код производителя ta-883 500w тип корпуса miditower материал...
sketchfab
$5

ATX Motherboard
...c block, modelled to scale,
atx form factor,
last update 21/06/21 - atx motherboard - buy royalty free 3d model by cavicom (@asi)
thingiverse
free

motherboard atx by joselcl98
...motherboard atx by joselcl98
thingiverse
motherboard model atx
thingiverse
free

ATX holder by diegocr
...atx holder by diegocr
thingiverse
holder to place an atx power under the table.
Printrbot
thingiverse
free

printrbot gasket by Usernameunavailible
...printrbot gasket by usernameunavailible
thingiverse
a part for printrbots
thingiverse
free
Printrbot Aluminum by Chris_the_Carpenter
...printrbot aluminum by chris_the_carpenter
thingiverse
a redesign of the awesome printrbot, in aluminum.
thingiverse
free
PrintrBot keychain by SuperMaku
...printrbot keychain by supermaku
thingiverse
printrbot keychain. may need to be scaled up.
thingiverse
free
Printrbot foot by aliekens
...printrbot foot by aliekens
thingiverse
add wider feet to a printrbot for improved stability.
thingiverse
free
Printrbot to CNC by mmrrsiam
...printrbot to cnc by mmrrsiam
thingiverse
make your printrbot also a small cnc machine....
thingiverse
free

Printrbot Keychain by jackbivona
...printrbot keychain by jackbivona
thingiverse
printrbot keychain for all you pb customers out there
thingiverse
free

Printrbot+ Nutkeepr by DonaldJ
...printrbot+ nutkeepr by donaldj
thingiverse
clip to retain nut on z-axis threaded rod of printrbot+
thingiverse
free

PrintrBot Tool Caddy by spr_consulting
...printrbot tool caddy by spr_consulting
thingiverse
printrbot tool caddy.
thingiverse
free
Printrbot Sensor Wrench by spr_consulting
...printrbot sensor wrench by spr_consulting
thingiverse
curvaceous printrbot sensor wrench.
thingiverse
free
Spool Holder for Printrbot by doubleAdoubleU
...spool holder for printrbot by doubleadoubleu
thingiverse
spool holder for a printrbot simple metal
Supply
turbosquid
$1

supplies
... available on turbo squid, the world's leading provider of digital 3d models for visualization, films, television, and games.
3d_export
$5

black supply
...black supply
3dexport
black supply size: 57.9 x 29.2 x 34 sm
turbosquid
$20

Office Supplies
...lty free 3d model office supplies for download as max and obj on turbosquid: 3d models for games, architecture, videos. (1273636)
3d_export
free
office supplies
...office supplies
3dexport
turbosquid
$8

Supply Drop
...e 3d model supply drop for download as fbx, obj, dae, and stl on turbosquid: 3d models for games, architecture, videos. (1663721)
turbosquid
$75

Supply Helicopter
... available on turbo squid, the world's leading provider of digital 3d models for visualization, films, television, and games.
turbosquid
$65
Supply Ship
... available on turbo squid, the world's leading provider of digital 3d models for visualization, films, television, and games.
turbosquid
$29
Village Supplies
... available on turbo squid, the world's leading provider of digital 3d models for visualization, films, television, and games.
turbosquid
$19

Power Supply
... available on turbo squid, the world's leading provider of digital 3d models for visualization, films, television, and games.
turbosquid
$5

school supplies
... available on turbo squid, the world's leading provider of digital 3d models for visualization, films, television, and games.
Plus
turbosquid
$2
plus-plus puzzle and lego
...d model plus-plus puzzle and lego for download as stl and obj on turbosquid: 3d models for games, architecture, videos. (1662633)
3ddd
$1
Стенка Plus
...стенка plus
3ddd
plus , модная мебель
фабрика "модная мебель", модель plus
3ddd
$1
Спальня METIS plus
... hulsta , metis , спальня
спальня metis plus
design_connected
$11
be plus B+
...be plus b+
designconnected
blå station be plus b+ chairs computer generated 3d model. designed by börge lindau.
design_connected
$11
Bank Plus
...bank plus
designconnected
röthlisberger kollektion bank plus coffee tables computer generated 3d model. designed by atelier oi.
3ddd
$1
elos Plus
... candela
elos plus — мультифункциональный аппарат для проведения лазерного и ipl лечений
3ddd
$1
Calligaris Even Plus
...calligaris even plus
3ddd
calligaris
calligaris_chair_even plus
design_connected
$29
Basket Plus
...nconnected
photo-realistic 3d models of the basket plus bed from bonaldo for 3d architectural and interior design presentations.
3ddd
free
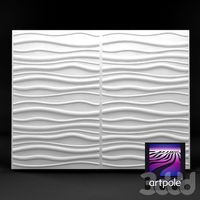
Artpole Faktum Plus
... артполе , панель
artpole faktum plus
размеры:
высота 625мм
ширина 800мм
глубина 17мм
3ddd
$1
Мария / Jazz Plus
...мария / jazz plus
3ddd
мария
кухня фабрики мария модель__jazz plus
Bracket
archibase_planet
free

Bracket
...bracket
archibase planet
bracket corbel holder
bracket 1 - 3d model (*.gsm+*.3ds) for interior 3d visualization.
archibase_planet
free

Bracket
...bracket
archibase planet
bracket corbel console
bracket 5 - 3d model (*.gsm+*.3ds) for interior 3d visualization.
archibase_planet
free

Bracket
...bracket
archibase planet
corbel holder bracket
bracket 6 - 3d model (*.gsm+*.3ds) for interior 3d visualization.
archibase_planet
free

Bracket
...bracket
archibase planet
bracket corbel console
bracket 8 - 3d model (*.gsm+*.3ds) for interior 3d visualization.
archibase_planet
free

Bracket
...bracket
archibase planet
bracket corbel holder
bracket n280911 - 3d model (*.gsm+*.3ds) for interior 3d visualization.
archibase_planet
free

Bracket
...bracket
archibase planet
holder corbel bracket
bracket 9 - 3d model (*.gsm+*.3ds) for interior 3d visualization.
archibase_planet
free

Bracket
...bracket
archibase planet
corbel holder bracket
bracket 10 - 3d model (*.gsm+*.3ds) for interior 3d visualization.
archibase_planet
free

Bracket
...bracket
archibase planet
corbel console bracket
bracket 11 - 3d model (*.gsm+*.3ds) for interior 3d visualization.
archibase_planet
free

Bracket
...bracket
archibase planet
holder console bracket
bracket 12 - 3d model (*.gsm+*.3ds) for interior 3d visualization.
archibase_planet
free

Bracket
...bracket
archibase planet
bracket corbel holder
bracket 13 - 3d model (*.gsm+*.3ds) for interior 3d visualization.
Power
turbosquid
$100

power
...ower
turbosquid
royalty free 3d model power for download as on turbosquid: 3d models for games, architecture, videos. (1421990)
3d_export
$5

Power
...power
3dexport
3d_export
$5

power outlets
...power outlets
3dexport
power outlets
3ddd
$1

lion power
...lion power
3ddd
лев , статуя
lion power gold sculpture
3ddd
$1

Sea Power
...
компас , море , часы
часы с компасом sea power
3ddd
free

Meridiani / Power
...power
3ddd
meridiani , круглый
стол power производитель meridiani, диаметр 120,высота 67
3d_export
$5

Power Surge
...power surge
3dexport
the power surge is a all mesh carnival ride to lower in game part count and lag
turbosquid
$8

Airport Ground Power Unit (AXA Power )
... available on turbo squid, the world's leading provider of digital 3d models for visualization, films, television, and games.
turbosquid
$50

Power Houser
...rbosquid
royalty free 3d model power houser for download as on turbosquid: 3d models for games, architecture, videos. (1333800)
3d_export
$5

power outlet
...power outlet
3dexport
power outlet<br>format file maya 2018, 3d max 2017, obj, fbx
Mounting
3d_export
free

mounting bracket
...mounting plate is the portion of a hinge that attaches to the wood. mounting plates can be used indoors, cabinetry and furniture.
turbosquid
$2

MOUNTING
... available on turbo squid, the world's leading provider of digital 3d models for visualization, films, television, and games.
turbosquid
free

Mounts
... available on turbo squid, the world's leading provider of digital 3d models for visualization, films, television, and games.
turbosquid
free

Mount Fuji
...fuji
turbosquid
free 3d model mount fuji for download as obj on turbosquid: 3d models for games, architecture, videos. (1579977)
3d_export
$5

Headphone mount LR
...headphone mount lr
3dexport
headphone mount l+r
turbosquid
$39

Mount rainier
...quid
royalty free 3d model mount rainier for download as fbx on turbosquid: 3d models for games, architecture, videos. (1492586)
turbosquid
$5

pipe mounting
...quid
royalty free 3d model pipe mounting for download as obj on turbosquid: 3d models for games, architecture, videos. (1293744)
turbosquid
$3

Mounting Tires
...uid
royalty free 3d model mounting tires for download as fbx on turbosquid: 3d models for games, architecture, videos. (1708511)
3d_export
$5

Magnetic GoPro Mount
...pro mount
3dexport
cool magnetic mount for gopro. allows you to mount the camera on flat metal surfaces and get exclusive shots.
turbosquid
$5

Stone Mount
...ty free 3d model stone mount for download as ma, obj, and fbx on turbosquid: 3d models for games, architecture, videos. (1370306)
Metal
3d_ocean
$10

Metal Barrel
...metal barrel
3docean
barrel barrels metal metal barrel wood barrel
metal barrel
turbosquid
$14

Metals
...als
turbosquid
royalty free 3d model metals for download as on turbosquid: 3d models for games, architecture, videos. (1486252)
3d_ocean
$18
Metal Furniture
...metal furniture
3docean
design desk indoor industrial metal metal furniture restoration table
metal furniture 3d model
3d_export
$5
metal table
...metal table
3dexport
metal table.blend
3d_export
$5

Metal Shelf
...metal shelf
3dexport
metal shelf
3d_export
free

metal detector
...metal detector
3dexport
metal detector
3ddd
$1
metal lux
...metal lux
3ddd
dedalo , metal lux
люстра и бра metal lux коллекция dedalo.
3ddd
$1
bonded metal
...bonded metal
3ddd
https://www.forms-surfaces.com/bonded-metal
boded tiled metal
3ddd
$1
Metal
...metal
3ddd
1280-1024 бесшовный 8-)
3d_export
$5

cgaxis metal
...cgaxis metal
3dexport
notebook cgaxis metal