Thingiverse
Portable laser/printer exhaust vent - for use under garage door by SteveW25561
by Thingiverse
Last crawled date: 3 years, 3 months ago
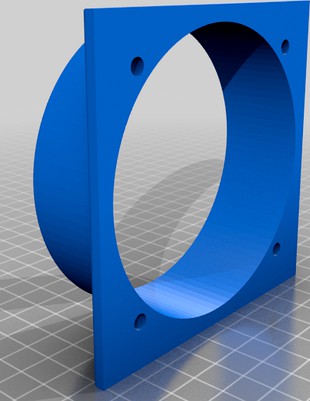
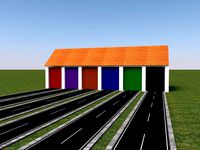
I have my Snapmaker A350 (3d printer/laser cutter/CNC) set up in my garage which serves as a workshop and gym. I wanted to make an exhaust for my Snapmaker A350 laser module and enclosure that didn't require me to cut a 4"+ hole in my wall.
I designed this flattened exhaust that can be attached to standard 4" ventilation ducting and then it can be placed under my garage door. I calculated the area of a 4" circle and made it into a 1 1/2" x 12" rectangle so it would not obstruct airflow appreciably. This made for an exhaust that can be placed under my garage door, with 2x4's laid flat to both fill the full width of the garage door (and to prevent the garage door from crushing the plastic you just printed!). I also made a screen for it so bugs or rodents don't decide to climb up the duct into my printer enclosure!
For the Snapmaker A350 enclosure I made an adapter to fit 4" ventilation ducting to the existing fan output, then I added an inline ventilation fan.
I then cut 2x4's to fill the rest of the width, painted them black to blend better, then closed the garage door onto the setup - I did have to be quick to pull the release cable on the garage door so it wouldn't reverse back up after it sensed the 1 1/2" obstruction on the floor, and it seals up nicely.
Hooking all of this up worked perfectly: no more burnt odor inside the garage, and this is all removable when not doing a laser project!
This large model needed the full size bed of the Snapmaker A350 - and honestly was a pain to print (multiple failed prints which was time consuming and wasted lots of filament due to size -- likely a leveling problem over the big build plate, but it worked after several tries).
It's built into 2 main parts with a lip for easier alignment. I tried doing a full one piece print but it used a ton of support material and it was impossible to remove. I'm totally a noob with Fusion 360 but it seems to have worked out well.
For the bug screen, I didn't know how to make a mesh so I made a frame and a solid rectangle. In Simplify3D I printed the frame as a full 20% infilled solid, and set a different printing profile for the solid rectangle specifying no top or bottom layers and a 25% rectilinear infill. These 2 pieces were aligned overlapping each other and then printed as a single piece.
I used PETG (in case of summer heat blasting the garage door, but it might not be needed). To assemble, I used Gorilla Super Glue.
Although it may not be needed I also taped up the assembly with 2" wide Gorilla tape running along the back edge, folded over the top, to ensure it wouldn't leak much air and not fall apart if dropped (I wasn't sure how well PETG would stay glued).
Fan I used: a nice DC controlled ventilation exhaust fan - it's quiet and moves a lot of air) https://www.amazon.ca/gp/product/B07JB292JC/ref=ppx_yo_dt_b_asin_title_o00_s01?ie=UTF8&psc=1
Ducting: https://www.amazon.ca/gp/product/B071LHCFZ8/ref=ppx_yo_dt_b_asin_title_o00_s00?ie=UTF8&psc=1
Similar models
thingiverse
free

Snapmaker 2 enclosure 4" fan outlet by SteveW25561
...05_s01?ie=utf8&psc=1
ducting:https://www.amazon.ca/gp/product/b071lhcfz8/ref=ppx_yo_dt_b_asin_title_o05_s00?ie=utf8&psc=1
thingiverse
free

Snapmaker Enclosure Exhaust Filter Adapter by cpverne
...u6
i also purchased some 4" thumb screw clamps, but zip-ties would work as well.https://www.amazon.com/gp/product/b07pds9hg3
thingiverse
free

Snapmaker enclosure to vacuum adapter by rgprints
...y not be a standard size, so you may have to modify the design. i used freecad and the fcstd files are included for that purpose.
thingiverse
free

Exhaust elbow for Snapmaker 2.0 enclosure by Northbr00k
...uld imagine most of you have your printers on a desk like mine and attaching a flexible duct for the exhaust fan was a bit tight.
thingiverse
free

Exhaust Duct Adapter and Filter by MandaSim21
...er size to a filter you like.
https://smile.amazon.com/gp/product/b07hmrz4lj/ref=ppx_yo_dt_b_asin_title_o02_s00?ie=utf8&psc=1
thingiverse
free

Enclosure Ventilation / Extractor by alvoeiro
...;duct_left" need "touching buildplate" support.
i can provide a fusion 360 file to anyone who wants to do a remix.
thingiverse
free

Snapmaker 2.0 Corner Block by PliskinAJ
...hese blocks to square out the enclosure. there are 2 ø1/8" holes on each side of the block to aid in bolting items to them.
thingiverse
free

DIY Printer Enclosure Box by rustyskysports
... diameter hole. eliminates open area where air can suck through. idea is to have inlet air come from the front of the enclosure.d
thingiverse
free

Flexible Duct Fan Connections by frostryche
... cover to that instead to prevent excess heat loss in the winter.
both parts can be printed in any resolution without supports.
3dwarehouse
free

Ventilator Project, Exhaust fan Enclosure
...ventilator project, exhaust fan enclosure
3dwarehouse
ventilator project, exhaust fan enclosure
Exhaust
turbosquid
$2

Exhaust
...id
royalty free 3d model exhaust for download as c4d and fbx on turbosquid: 3d models for games, architecture, videos. (1603373)
turbosquid
$1
Exhaust
... available on turbo squid, the world's leading provider of digital 3d models for visualization, films, television, and games.
turbosquid
free
exhaust
... available on turbo squid, the world's leading provider of digital 3d models for visualization, films, television, and games.
turbosquid
free
exhaust
... available on turbo squid, the world's leading provider of digital 3d models for visualization, films, television, and games.
3d_export
$25
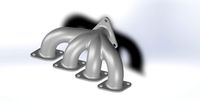
exhaust manifold
...exhaust manifold
3dexport
this is a 3d design of an exhaust manifold used in automobile.
archive3d
free

Exhauster 3D Model
... air exhauster hoover
exhauster n101015 - 3d model (*.gsm+*.3ds) for interior 3d visualization.
3d_export
$13
Exhaust 3D Model
...exhaust 3d model
3dexport
exhaust smoke engine motor bike car detail detailed
exhaust 3d model cesar_vonc 12007 3dexport
turbosquid
free
car exhaust
... available on turbo squid, the world's leading provider of digital 3d models for visualization, films, television, and games.
turbosquid
free

Exhaust system
... available on turbo squid, the world's leading provider of digital 3d models for visualization, films, television, and games.
turbosquid
free
MSX EXHAUSTS
... available on turbo squid, the world's leading provider of digital 3d models for visualization, films, television, and games.
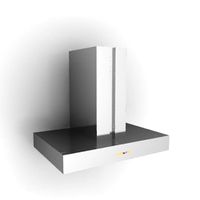
Vent
archibase_planet
free
Vent
...vent
archibase planet
aeration venting home equipment
diffuser vent - 3d model for interior 3d visualization.
archibase_planet
free
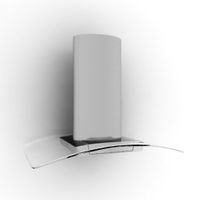
Vent
...vent
archibase planet
cooker hood cooking hood
vent - 3d model for interior 3d visualization.
archibase_planet
free
Vent
...vent
archibase planet
cooker hood cooking hood
vent atlantica - 3d model for interior 3d visualization.
archibase_planet
free

Vent
...vent
archibase planet
cooker hood cooking hood
vent half frame - 3d model for interior 3d visualization.
archibase_planet
free
Vent
...vent
archibase planet
cooker hood cooking hood
vent - 3d model (*.gsm+*.3ds) for interior 3d visualization.
archibase_planet
free
Vent
...vent
archibase planet
cooker hood cooking hood kitchen equipment
vent - 3d model for interior 3d visualization.
archibase_planet
free

Vent
...vent
archibase planet
damper diffuser air gate
vent grate n100807 - 3d model for interior 3d visualization.
archibase_planet
free
Vent
...vent
archibase planet
cooker hood cooking hood
vent - 3d model (*.gsm+*.3ds) for interior 3d visualization.
turbosquid
$10

Vent
...nt
turbosquid
royalty free 3d model vent for download as fbx on turbosquid: 3d models for games, architecture, videos. (1143454)
turbosquid
$2
Vent
...nt
turbosquid
royalty free 3d model vent for download as obj on turbosquid: 3d models for games, architecture, videos. (1323956)
Portable
3d_ocean
$4
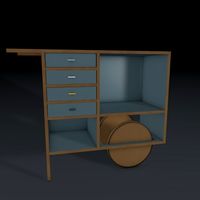
Portable Shelves
...portable shelves
3docean
drawer furniture portable shelves wheel
portable shelves with wheels
3d_export
$5

portable generator
...portable generator
3dexport
3d model portable generator. videogames.
3d_export
$16

Portable Radio
...portable radio
3dexport
turbosquid
$30

Portable Generator
...
royalty free 3d model portable generator for download as obj on turbosquid: 3d models for games, architecture, videos. (1579389)
turbosquid
$5

Portable Radio
...uid
royalty free 3d model portable radio for download as fbx on turbosquid: 3d models for games, architecture, videos. (1402570)
turbosquid
$3

Portable Keyboard
...royalty free 3d model portable keyboard for download as blend on turbosquid: 3d models for games, architecture, videos. (1281917)
turbosquid
$49

Portable Office
...3d model portable office for download as max and unitypackage on turbosquid: 3d models for games, architecture, videos. (1470540)
turbosquid
$15

PORTABLE LIGHTS
...lty free 3d model portable lights for download as max and obj on turbosquid: 3d models for games, architecture, videos. (1679464)
3d_ocean
$12
Portable Sofa
...r table 2. minimalis sofa 3. sofa and mini sofa (can for foot) 4. mini sofa and table tertured with v-ray, and no material needed
turbosquid
$11

Safe portable
...free 3d model safe portable for download as max, obj, and fbx on turbosquid: 3d models for games, architecture, videos. (1410826)
Laser
3d_export
$5
laser
...laser
3dexport
a 3d laser
3d_export
free
cnc 3dp laser nozzle for 2w laser opt lasers
...logy that gave birth to cutting and engraving laser heads this laser nozzle was designed for, read the article in the link below:
3d_export
free
cnc laser mount opt lasers
...eive the engraving and cutting laser heads this cnc machine laser mount was designed for, read the article on the following page:
turbosquid
$20

Laser
... available on turbo squid, the world's leading provider of digital 3d models for visualization, films, television, and games.
turbosquid
$15
Laser
... available on turbo squid, the world's leading provider of digital 3d models for visualization, films, television, and games.
turbosquid
$3
Laser
... available on turbo squid, the world's leading provider of digital 3d models for visualization, films, television, and games.
3d_export
$5

laser sword
...laser sword
3dexport
it is a blue laser sword with a metal frame
3d_ocean
$19
Laser Turret
...be used in any sf type of game, especially in tower defense games. - laser turret: 3025 polygons - props: 270 polygons - textu...
3d_export
free
workbee cnc laser mount for opt lasers
...the specifications of engraving and cutting laser heads this mount was designed for, please take a look at the following website:
3d_export
free

shapeoko cnc laser mount for opt lasers
...ind out the opportunities that adding a cutting and engraving laser head to your cnc can bring, take a look at the website below:
Garage
3d_export
free

garage
...garage
3dexport
garage
3d_export
$10
garage
...garage
3dexport
garage with colored gates
3d_export
$5

garage
...garage
3dexport
old rusty garage with graffiti
archibase_planet
free
Garage
...arage
archibase planet
construction building garage
multistoried garage n011009 - 3d model (*.3ds) for exterior 3d visualization.
archibase_planet
free
Garage
...arage
archibase planet
garage carport awning
garage carport n040915 - 3d model (*.gsm+*.3ds+*.max) for exterior 3d visualization.
3d_export
$9

garage
...garage
3dexport
low poly garage included texture. object: 1 faces: 315 vertices:459
turbosquid
free
Garage
...garage
turbosquid
free 3d model garage for download as skp on turbosquid: 3d models for games, architecture, videos. (1606634)
turbosquid
$39
Garage
...
turbosquid
royalty free 3d model garage for download as fbx on turbosquid: 3d models for games, architecture, videos. (1687250)
turbosquid
$3

Garage
...
turbosquid
royalty free 3d model garage for download as fbx on turbosquid: 3d models for games, architecture, videos. (1705014)
turbosquid
$3

Garage
...
turbosquid
royalty free 3d model garage for download as fbx on turbosquid: 3d models for games, architecture, videos. (1711138)
Printer
archibase_planet
free

Printer
...inter
archibase planet
printer laser printer pc equipment
printer n120614 - 3d model (*.gsm+*.3ds) for interior 3d visualization.
archibase_planet
free

Printer
...rchibase planet
laser printer office equipment computer equipment
printer - 3d model (*.gsm+*.3ds) for interior 3d visualization.
turbosquid
$100

Printer
...er
turbosquid
royalty free 3d model printer for download as on turbosquid: 3d models for games, architecture, videos. (1487819)
turbosquid
$3

Printer
...turbosquid
royalty free 3d model printer for download as max on turbosquid: 3d models for games, architecture, videos. (1670230)
turbosquid
$1

printer
...turbosquid
royalty free 3d model printer for download as max on turbosquid: 3d models for games, architecture, videos. (1595546)
turbosquid
$1

printer
...turbosquid
royalty free 3d model printer for download as max on turbosquid: 3d models for games, architecture, videos. (1595105)
turbosquid
$10

Printer
...id
royalty free 3d model printer for download as max and 3dm on turbosquid: 3d models for games, architecture, videos. (1607146)
turbosquid
$7

Printer
...royalty free 3d model printer for download as ma, ma, and obj on turbosquid: 3d models for games, architecture, videos. (1644580)
turbosquid
$30

Printer
... available on turbo squid, the world's leading provider of digital 3d models for visualization, films, television, and games.
turbosquid
$20

Printer
... available on turbo squid, the world's leading provider of digital 3d models for visualization, films, television, and games.
Door
3d_export
$5
door handle of doors
...door handle of doors
3dexport
door handle of doors
3d_ocean
$4

Door
...3docean
architecture door gate gothic door old style door
door, 3d door, gothic door, architecture, old style door, gate, 3d gate
3d_ocean
$10

Door
...door
3docean
design door doors home house indoor interior opening doors
door design
archibase_planet
free
Door
...r
archibase planet
door sliding door interior door rail door
door n250515 - 3d model (*.gsm+*.3ds) for interior 3d visualization.
archibase_planet
free
Door
...door
archibase planet
door sash door sash-door interior door
door 900 - 3d model (*.gsm+*.3ds) for interior 3d visualization.
archibase_planet
free
Door
...door
archibase planet
door sash door sash-door interior door
door 600 - 3d model (*.gsm+*.3ds) for interior 3d visualization.
archibase_planet
free

Door
...door
archibase planet
door sash door sash-door interior door
door 800 - 3d model (*.gsm+*.3ds) for interior 3d visualization.
archibase_planet
free
Door
...door
archibase planet
door sash door sash-door interior door
door 800 - 3d model (*.gsm+*.3ds) for interior 3d visualization.
archibase_planet
free
Door
...door
archibase planet
door sash door sash-door interior door
door 700 - 3d model (*.gsm+*.3ds) for interior 3d visualization.
archibase_planet
free
Door
...door
archibase planet
door sash door sash-door interior door
door 600 - 3d model (*.gsm+*.3ds) for interior 3d visualization.
Use
3ddd
$1

US flag
...us flag
3ddd
флаг
us flag
3d_export
free

Among us
...among us
3dexport
among us red
3d_export
free

Among Us
...character from the game "among us". it can be use as a toy or...
3d_export
$6

among us
...among us
3dexport
doll from among us in red
3d_export
$5

amoung us
...amoung us
3dexport
amoung us character. was created by cinema 4d 19
3d_export
$5
Humvee us
...humvee us
3dexport
humvee us 3d model good quality for animation
3d_export
$15

among us
...among us 3dexport turbosmooth modifier can be use to increase mesh resolution if...
3d_export
$25

mailbox us
...mailbox us
3dexport
low poly model mailbox us. modeling in the blender, texturing in substance painter
design_connected
$13
Use Me
...use me
designconnected
sitland use me computer generated 3d model. designed by paolo scagnellato.
3d_export
$5

Among Us
...rt
the among us model comes in a variety of colors that can be customized by anyone, and even works with little in the animation