Thingiverse

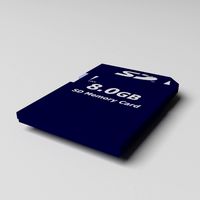
PokeBox SD Card Case v2 by How2Texan
by Thingiverse
Last crawled date: 4 years, 1 month ago
Story:
To start with let me say that i have 3d printed a few different pokeball themed cases from the thingiverse including a hollow round one and a square one which was designed to hold came catridges. I remixed one part of that one to make it hold sd cards instead. The one thing that has been the same for all of the pokeball cases i have printed is the way they handled the middle ring. Basically they slip the middle ring in half so that the button fit halfway between both halfs. Having tried to assemble a few of these i was never satisfied with the ugly cap that always appeared where the two halfs came together. I decided i had a better way to handle this. So thats what i did. I was originally just going to design a new center ring and post it as a remix but i decided i wanted to change other things too and before i knew it i had redesigned the whole case. That being said i did decide to keep the basic dimensions of the originally designed case. That way you can use my improved center ring design on his case. I felt this was a good way to pay homage to the original design, plus i didn't want people asking me or a version to hold game catridges and figures that they could just use his design if i made the parts compatible. My center ring parts will be compatible with his designs but the rest of my parts won't mix with his so don't try. Check the original pokebox here. https://www.thingiverse.com/thing:3474587
Instructions:
Print all parts with as many walls as you want but if you don't have enough you will be able to see through to the infill.
Print the top and bottom with 10% infill.
Print the ring parts with 20% infill.
Print the button, collet, and latch with 100% infill.
If you have the know how to adjust the infill of specific portions of your print separate from the rest of the print then i recommend adjust the hinges on the top and ring parts so that they have 100% in the hinge and where the hinge connects. This will give the hinge allot of extra strength but shouldn't be necessary if you treat the box with care.
You will want to print the button with 100% infill. I know it doesn't look like it needs it but unless you can find the perfect spring you will need to drill and adjust the hole size.
I think assembly of the button and ring is self explanatory just looking at it so i won't go into detail other than recommend you have a clamp handy while the glue is drying.
The latch i am going to explain First of all the back of the latch is the side that is flat. place glue on the lower backside of the latch. There is a slot on the inside of the top towards the front of the box. Place the latch in this slot so that the back of the latch is towards the front of the box.
Glue the ring to the bottom.
Cut a piece of black filament and use it as a hinge pin to connect the top to the ring. Once they are connected and you have verified the box opens and close correctly, glue the filament to the ring on both ends.
Enjoy
Also, if you want to cut down on print times check out the two remixes i have posted. Minimalist and ultra minimalist.
Similar models
thingiverse
free

Box with integrated hinge and latch by jdbrown66
...nded-corners/
update: i just added flipped versions of the .stl and .scad so that you don't have to flip it over to print it.
thingiverse
free

Pokeball container by hobbit1968
...glue button to latch (careful with the glue)
install top using 12 gague wire
changed original stand and added an alternate stand.
thingiverse
free

One Print Hinged Case by AZ_Dude
...e edited, but you are try.
i got the idea from http://www.thingiverse.com/thing:82533 but created my own version of the hinges.
thingiverse
free

ER16 Collet box by nighthawk326
...not compatible with either one of the older parts).
i've included the sketchup file if someone wants too see/modify anything.
thingiverse
free

Luxury Ball, with magnetic clasp by random11
...ll percentage, around 40-50% and then all the other parts at 5-10%. that way it will be bottom heavy and not roll around as much.
thingiverse
free

Pokebox Switch Game Case Bottom Remixed Without Robot by pontocanal
...tocanal
thingiverse
at the base of the case is a drawing of a robot that was having trouble printing, so i decided to remove it.
thingiverse
free

Large Latched Box by MosFett
...anything else that's small i have found 3x4" plastic bags (readily available on amazon) to work well for managing them.
thingiverse
free

Print in Place Customizable Box With Latches by Brodo78
...lid and the rest of the box should be generated/printed separately. the latches do need some supports, as per the attached image.
thingiverse
free

Pokebox cardholder great-ultra-masterball stripes by andytus
...lor required that matches the box to make a great, master, or ultra ball. you will have to glue 2 of these on the top of the box.
thingiverse
free

Spare Nozzle Case with Magnetic Latch
...le and material i had at the time. i'm new to 0.6mm nozzles so the picture probably reflects my need to do a bit more tuning.
How2Texan
thingiverse
free

PokeBox SD Card Case V2 Minimalist by How2Texan
...s the top and bottom down in size. they are still proportional to each other but no longer resemble the proportions of a pokeball
thingiverse
free

MakeSmith CNC Z Axis (Spindle) Mount by How2Texan
... their spindle mount, then i modified it to have only one place for a 1/4-20 nut and put that place in the center of the machine.
thingiverse
free

MakeSmith CNC Y Axis Mount by How2Texan
...form.
i plan on adding to this model. i have an idea for system that will hold parts down to the bed. we shall see how it goes.
thingiverse
free

MakeSmith CNC Sharpie Adapter by How2Texan
...rt four times.
i was thinking that this might also work with an xacto knife if you mounted it in a thrust bearing. we will see.
thingiverse
free

PokeBox SD Card Case V2 Ultra Minimalist by How2Texan
...nd functionality.
if you are very impatient and want your sd card holder as quickly as possible then this might be right for you.
thingiverse
free

MakeSmith CNC Servo Horn Assembly by How2Texan
...this was a requested part that allows a person to use a drill with a philips tip bit to turn the axis without hooking up a motor.
thingiverse
free

MakeSmith CNC gear stack by How2Texan
...ut.
the "gear stack 15_64 hole" file represents the part with a 15/64" hole instead of a space for a 1/4-20 nut.
Pokebox
thingiverse
free

Pokebox
...box for pokemon fans that will hold 7 sd cards, the insert is a tight fit, the black trim and white button were glued into place.
thingiverse
free

pokebox by abbox
...pokebox by abbox
thingiverse
representing a pokebox. now you know where to collect your pokecoins ;)
thingiverse
free

PokeBox by SingSky
...pokebox by singsky
thingiverse
no support
thingiverse
free

Pokebox by Markus96
...; away, here's the pokebox!
use it to hold what you want!
maybe a pokeball would look approximately like this in minecraft...
thingiverse
free

PokeBox - no insert holes by callofmarty
...pokebox - no insert holes by callofmarty
thingiverse
pokebox - no insert holes
original size = 10% xyz
thingiverse
free

Pokebox Micro SD Bottom by tovar2401
...pokebox micro sd bottom by tovar2401
thingiverse
a remix of the pokebox bottom with space for 30 micro sd cards
thingiverse
free

Pokebox by rize0528
...colleague.
spinner body is wider version from https://www.thingiverse.com/thing:2278247
i also made several caps for other usage.
thingiverse
free

Magnetic PokeBox by callofmarty
...f you want to print it at once:
pokebox_magnetic_whole.stl
to fill the pokehole with:
pokeball-half.stl
pokeball-middlebutton.stl
thingiverse
free
Pokebox cardholder great-ultra-masterball stripes by andytus
...lor required that matches the box to make a great, master, or ultra ball. you will have to glue 2 of these on the top of the box.
thingiverse
free

Pokebox Switch/3DS/DS Game Case by naterad
...pokebox switch/3ds/ds game case by naterad
thingiverse
wanted to hold more games so i deleted the sd card portion
Sd
3d_ocean
$4
SD-Card
...sd-card
3docean
camera memory mmc mp3 player ram rom sd card
a sd-card
3ddd
$1

Ravak SDS Evolution
...ravak sds evolution
3ddd
sds , ravak
sds
3d_export
$5
SD Card
...sd card
3dexport
photorealistic sd memory card model. cycles engine. blender 3d v.2.82
3d_export
$10
customizable sd port
...customizable sd port
3dexport
customizable sd port
turbosquid
$1

sd card
...rbosquid
royalty free 3d model sd card for download as sldpr on turbosquid: 3d models for games, architecture, videos. (1198502)
turbosquid
$15
SD-DU107P81P1M.rfa
... available on turbo squid, the world's leading provider of digital 3d models for visualization, films, television, and games.
turbosquid
$15
SD-DU147P81P1M.rfa
... available on turbo squid, the world's leading provider of digital 3d models for visualization, films, television, and games.
turbosquid
$15

SD-DU127P81P1M.rfa
... available on turbo squid, the world's leading provider of digital 3d models for visualization, films, television, and games.
turbosquid
$15

SD-DU117P81P1M.rfa
... available on turbo squid, the world's leading provider of digital 3d models for visualization, films, television, and games.
turbosquid
$15

SD-DU187P81P1M.rfa
... available on turbo squid, the world's leading provider of digital 3d models for visualization, films, television, and games.
Card
3d_export
$5
card
...card
3dexport
low poly style card
3d_ocean
$3
Dice+Cards
...dice+cards
3docean
dice+cards
3d_ocean
$2
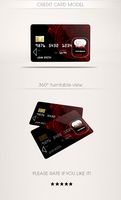
Credit Card
...d is just like a real credit or debit card. there is a material applied that creates the look of a hologram. the file works in...
3d_export
$1

cards
...cards
3dexport
3d_ocean
$4
SD-Card
...sd-card
3docean
camera memory mmc mp3 player ram rom sd card
a sd-card
turbosquid
$1

Cards
... available on turbo squid, the world's leading provider of digital 3d models for visualization, films, television, and games.
3d_ocean
$5
Business Card Box
...business card box
3docean
business card card interior office
business card and box, include psd card design
3d_export
$5
bluetooth card
...bluetooth card
3dexport
this is a simplified bluetooth card with which you can create cases
archive3d
free
Cards 3D Model
...ive3d
playing cards cards
cards n290612 - 3d model (*.gsm+*.3ds) for interior 3d visualization.
3d_export
$5
SD Card
...sd card
3dexport
photorealistic sd memory card model. cycles engine. blender 3d v.2.82
V2
3d_export
free

Lamp v2
...lamp v2
3dexport
lamp v2 with solar panel
3d_export
$5

hammerhead v2
...hammerhead v2
3dexport
razer hammerhead v2 headphones, modeled in cinema 4d, render in corona
3d_export
$5

manometer v2
...manometer v2
3dexport
3d_export
$5

potato v2
...potato v2
3dexport
turbosquid
$52

Lifebuoys v2
...squid
royalty free 3d model lifebuoys v2 for download as fbx on turbosquid: 3d models for games, architecture, videos. (1560870)
turbosquid
$2

Mask v2
...turbosquid
royalty free 3d model mask v2 for download as stl on turbosquid: 3d models for games, architecture, videos. (1527741)
turbosquid
free

Flashlight V2
...d
free 3d model flashlight v2 for download as , obj, and fbx on turbosquid: 3d models for games, architecture, videos. (1663559)
turbosquid
$29

Thanos v2
...
royalty free 3d model thanos v2 for download as ztl and obj on turbosquid: 3d models for games, architecture, videos. (1651077)
turbosquid
$29

Titan v2
...d
royalty free 3d model titan v2 for download as ztl and obj on turbosquid: 3d models for games, architecture, videos. (1540228)
turbosquid
$29

Frieza v2
...
royalty free 3d model frieza v2 for download as ztl and obj on turbosquid: 3d models for games, architecture, videos. (1701238)
Case
3d_export
$1

case
...case
3dexport
case
archibase_planet
free

Case
...case
archibase planet
showcase show-case glass case
glass-case + cakes - 3d model for interior 3d visualization.
archibase_planet
free

Case
...case
archibase planet
showcase show-case glass case
glass-case for chips - 3d model for interior 3d visualization.
archibase_planet
free

Case
...case
archibase planet
case shelving drawer
case - 3d model for interior 3d visualization.
archibase_planet
free

Case
...case
archibase planet
case rack locker
case - 3d model for interior 3d visualization.
archibase_planet
free

Case
...case
archibase planet
case drawer kitchen furniture
case - 3d model for interior 3d visualization.
archibase_planet
free

Case
...case
archibase planet
case cupboard shelving
glass case - 3d model for interior 3d visualization.
archibase_planet
free

Case
...case
archibase planet
case handbag suitcase
case - 3d model (*.gsm+*.3ds) for interior 3d visualization.
archibase_planet
free

Case
...case
archibase planet
case suitcase
case 5 - 3d model (*.gsm+*.3ds) for interior 3d visualization.
archibase_planet
free

Case
...case
archibase planet
locker case dresser
case - 3d model (*.gsm+*.3ds) for interior 3d visualization.