Thingiverse
Pitan (as in printed Titan :-) Geared Extruder by MakinBug
by Thingiverse
Last crawled date: 3 years ago
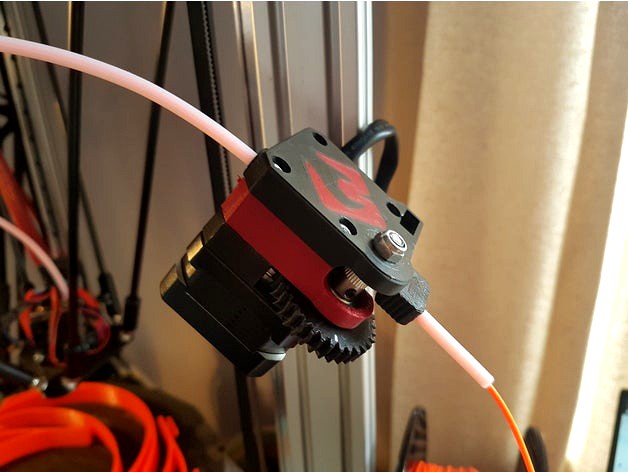
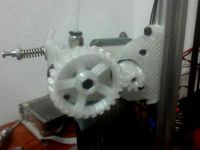
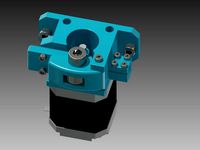
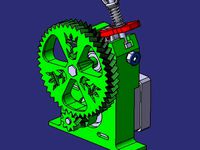
The Pitan Geared Extruder
22 January 2020
_This has become the most popular among the easy to print, lightweight geared extruders on Thingiverse.
_Both my extruders go strong after close to 3 years, printing 18h a week in average.
_The latest version has some small updates, including Tehmillhouse suggestion regarding the small gear (It goes in teeth side first, everything else gets assembled the same way)
06 October 18
_Had both of mine printed in PLA and still going strong after close to 1.5 years of almost daily printing.
_Just make sure the gears are aligned well and that the small one is not the wrong way around (it goes in with the chamfer towards the motor, that means the "arrow" shaped teeth need to point left, clockwise, when the motor is on the table with the axle pointing up).
_Also, don't use a lot of idler tension. If your MK8 skips you most likely trying to squeeze too much plastic for that particular speed/temperature/nozzle combo.
03 June '18
_I've been using two of them for a year now and never had any issues.
_If you are looking for an easy way to source the parts, dbgeorge now has hardware kits for sale. https://www.thingiverse.com/dbgeorge/about
31 Jan '18
_Fusion files included. They are a mess sorry!
_Corrected the spring size to 6mm OD, 12-15mm length and 0.8-1mm wire thickness
11 Jan '18
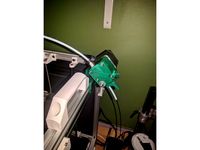
_Updated to v1.1 with smaller 695zz bearings (there are smaller 5mm ID bearings out there but they will not last long), smaller bolts and lighter, more compact body. Using two mirrored Pitans, direct to E3D v6, we can have the nozzles as close as 22.8mm. Mirrored files are included
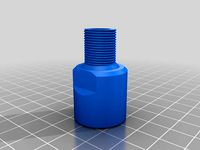
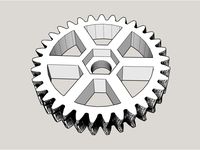
The E3D Titan is arguably the lightest end smaller standalone Geared Extruder you can buy.The Pitan is a cheap and easy to print geared extruder inspired by the Titan.
_With no discernable performance differences between them, the Pitan has the same 3:1 gear reduction, easy to see/clean drive gear, supported path for 1.75mm and 3mm filaments and it can be used with any Titan mount, bowden or direct drive. Filament feed path is on the idler arm and just as easy to load like the original Titan and It has virtually the same number of parts.
Couple of recommendations:
_I strongly recommend the Mk8 Hobb-Goblin sold by E3D https://goo.gl/bJFeka. They are double the price but you will get almost double the pushing force https://www.instructables.com/id/Extruder-Drive-Gear-Shootout
_Also, get a good stainless steel M5 bolt with a part thread. It will all but eliminate the wobbling you get from a cheap out of spec bolt.
BOM:
1x Nema17 12.7N-cm stepper motor
1x M5x35mm Hex Head Bolt
1x M5 Nylon Nut
1x M5 Washer OR a just print one
1x 11mm Mk8 Drive Gear - E3D https://goo.gl/bJFeka
3x M3x30mm Hex Socket Bolts
1x M3x15mm Hex Socket Bolt
1x M3 Nut
1x M3x10mm Bolt OR 1x 3x10mm Screw for the Idler
1x M4x10mm Bolt (Hex Socket or Button Head) OR E3d Thumbscrew
1x M4 Nut
1x 6x15x0.5mm Spring - Ebay - 6mm OD/ 12-15mm length/ 0.5-0.8mm wire thickness
2x 695zz Bearings
1x 623zz Bearing
1x Bowden plastic coupling from https://goo.gl/aJjGJiin UK or in UShttps://goo.gl/Mda5wX
Or
1x Bowden Groove Mount from https://goo.gl/mu18Lo
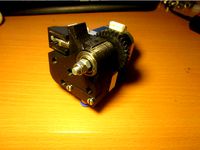
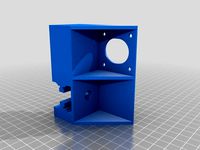
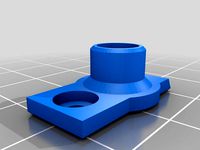
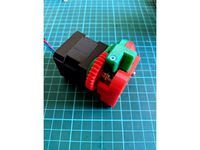
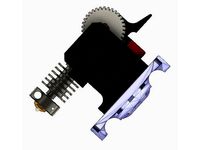
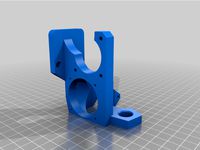
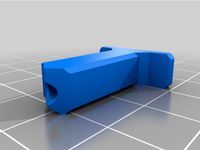
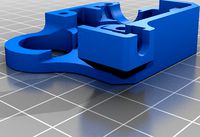
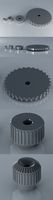
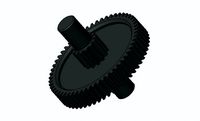
A typical Pitan has the following printed parts:
_Body
_Cover
_Idler Lever
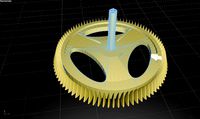
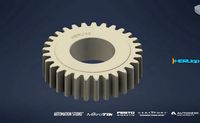
_Gear 1 (small)
_Gear 2 (big)
_1mm Washer
_Filament Guide (1.75 or 3mm)
_Base ( ie "2-3mm Base" for the standard Titan holder, "45deg" for a Delta printer etc)
_Same goes for a Mirrored extruder, except you will obviously need the parts with "Mirror" in the title.
_On my Kossel I'm using the two 2020 45deg mounts on X and Y towers. In the files, you will also find a universal base and one straight mount
_Parts with "Logo" in the title have the Making'Bug logo on them
Printing:
_Supports are needed only for the Idler Lever
_I've printed everything with a 0.4mm nozzle, in PLA (including gears which had lasted for hundreds of hours and counting).
_Print the small gear at 0.4mm extrusion width and 3 perimeters (see the pictures for how it should look in your slicer).
_Print gears and filament guide at 80% infill, 150u layer height and everything else at 250u, 50% infill.
_To check your sizing, test print 5mm of the "Body" first. It should be 42x42mm if you don't measure the bearing hole. There are 0.1mm tolerances on each side where a part touches the other. That means 12.2mm hole for a 12mm E3D V6 and the V6 fits well with a bit of pressure. Step files are included if you need to change sizes to suit your printer.
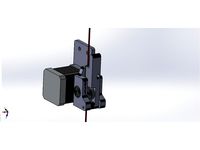
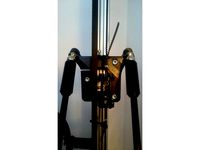
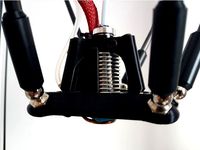
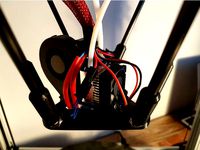
Assembly:
Pictures should make the assembly pretty clear.
1- The small gear goes on the motor shaft teeth side first. It is tight and it needs to be forced on the motor axle down to about 1mm from the bottom. It has to be solid. If you find it is too loose check your printing size.
2- Fit the 623zz bearing on the Idler Lever using the M3x10mm bolt. Then fit the Idler Lever in the Body
3- Fit the spring, M4 nut and M4x10mm button head bolt ( or E3d Thumbscrew) in their place
4- Next the Filament Guide goes in the Body; it has a notch on the tip that has to face up
5- You need to file flat a bit of the M5 bolt thread so that the drive gear grub screw could hold. Then slide it in the Big Gear
6- Then the M5 washer goes on the M5 bolt followed by the first 695zz bearing and after that Mk8 drive gear (grub screw first).
7- Align the grub screw with the flat bit of the M5 bolt and tighten just so it stays put.
8- Fit the other 695zz bearing to the Cover.
9- Fit the M3 nut in its place in the Body
10- Place the Cover over the Body and do the M3x15mm bolt
11- Slide the assembled M5 bolt and Gear in the body and secure it with M5 nut
12- Undo the drive gear grub screw a bit, then tighten the M5 nut and then do the grub screw as tight as it goes. Then loosen the M5 nut until you can move the gear easily by hand. I like to make a mark on the M5 bolt and nut to see if it moves
13- Use the three M3x30 bolts to fix the Pitan to the motor with the Base bracket between them
14- Chamfer a bit the inside of the PTFE tube end and push it all the way in the filament guide. It will help when loading the filament.
15- Fit a small piece of PTFE tube in the Idler Lever.
17- Set the idler tension by turning the bolt (or E3D thumbscrew) CCW until the M4 nut ends up in the middle of the Cover window. This is a good place to start but it will depend on different springs. There is no need for a lot of idler tension. See Troubleshooting if your drive gear skips
16- Set up your extrusion steps. See your printer manual or search online on how that is done for your particular printer.
Troubleshooting
_Mk8 drive gear skips = You most likely trying to squeeze too much plastic for that particular speed/temperature/nozzle combo. Use a printing speed calculator to check your flow speed. Remember that a Genuine E3D V6 has a flow rate of about 12mm/s and a clone hotend less than 10mm/s. Also, expect 45% lower printing speed from a generic Mk8 comparing with a E3D Hobb-Goblin
_Mk8 drive gear wobble = This has no impact on the printing quality and its mostly from a cheap M5 bolt but also from generic Mk8 drive gears than can have a ID of up to 5.4mm.
https://www.facebook.com/MakinBug/
Kudos go to E3D for the Titan https://goo.gl/fcBWLu and to AxMod3DPrint for his Drakon Extruder https://www.thingiverse.com/thing:2172854
https://youtu.be/MrS9Yidganohttps://youtu.be/2xWi5pUNDr8
Enjoy :-)
22 January 2020
_This has become the most popular among the easy to print, lightweight geared extruders on Thingiverse.
_Both my extruders go strong after close to 3 years, printing 18h a week in average.
_The latest version has some small updates, including Tehmillhouse suggestion regarding the small gear (It goes in teeth side first, everything else gets assembled the same way)
06 October 18
_Had both of mine printed in PLA and still going strong after close to 1.5 years of almost daily printing.
_Just make sure the gears are aligned well and that the small one is not the wrong way around (it goes in with the chamfer towards the motor, that means the "arrow" shaped teeth need to point left, clockwise, when the motor is on the table with the axle pointing up).
_Also, don't use a lot of idler tension. If your MK8 skips you most likely trying to squeeze too much plastic for that particular speed/temperature/nozzle combo.
03 June '18
_I've been using two of them for a year now and never had any issues.
_If you are looking for an easy way to source the parts, dbgeorge now has hardware kits for sale. https://www.thingiverse.com/dbgeorge/about
31 Jan '18
_Fusion files included. They are a mess sorry!
_Corrected the spring size to 6mm OD, 12-15mm length and 0.8-1mm wire thickness
11 Jan '18
_Updated to v1.1 with smaller 695zz bearings (there are smaller 5mm ID bearings out there but they will not last long), smaller bolts and lighter, more compact body. Using two mirrored Pitans, direct to E3D v6, we can have the nozzles as close as 22.8mm. Mirrored files are included
The E3D Titan is arguably the lightest end smaller standalone Geared Extruder you can buy.The Pitan is a cheap and easy to print geared extruder inspired by the Titan.
_With no discernable performance differences between them, the Pitan has the same 3:1 gear reduction, easy to see/clean drive gear, supported path for 1.75mm and 3mm filaments and it can be used with any Titan mount, bowden or direct drive. Filament feed path is on the idler arm and just as easy to load like the original Titan and It has virtually the same number of parts.
Couple of recommendations:
_I strongly recommend the Mk8 Hobb-Goblin sold by E3D https://goo.gl/bJFeka. They are double the price but you will get almost double the pushing force https://www.instructables.com/id/Extruder-Drive-Gear-Shootout
_Also, get a good stainless steel M5 bolt with a part thread. It will all but eliminate the wobbling you get from a cheap out of spec bolt.
BOM:
1x Nema17 12.7N-cm stepper motor
1x M5x35mm Hex Head Bolt
1x M5 Nylon Nut
1x M5 Washer OR a just print one
1x 11mm Mk8 Drive Gear - E3D https://goo.gl/bJFeka
3x M3x30mm Hex Socket Bolts
1x M3x15mm Hex Socket Bolt
1x M3 Nut
1x M3x10mm Bolt OR 1x 3x10mm Screw for the Idler
1x M4x10mm Bolt (Hex Socket or Button Head) OR E3d Thumbscrew
1x M4 Nut
1x 6x15x0.5mm Spring - Ebay - 6mm OD/ 12-15mm length/ 0.5-0.8mm wire thickness
2x 695zz Bearings
1x 623zz Bearing
1x Bowden plastic coupling from https://goo.gl/aJjGJiin UK or in UShttps://goo.gl/Mda5wX
Or
1x Bowden Groove Mount from https://goo.gl/mu18Lo
A typical Pitan has the following printed parts:
_Body
_Cover
_Idler Lever
_Gear 1 (small)
_Gear 2 (big)
_1mm Washer
_Filament Guide (1.75 or 3mm)
_Base ( ie "2-3mm Base" for the standard Titan holder, "45deg" for a Delta printer etc)
_Same goes for a Mirrored extruder, except you will obviously need the parts with "Mirror" in the title.
_On my Kossel I'm using the two 2020 45deg mounts on X and Y towers. In the files, you will also find a universal base and one straight mount
_Parts with "Logo" in the title have the Making'Bug logo on them
Printing:
_Supports are needed only for the Idler Lever
_I've printed everything with a 0.4mm nozzle, in PLA (including gears which had lasted for hundreds of hours and counting).
_Print the small gear at 0.4mm extrusion width and 3 perimeters (see the pictures for how it should look in your slicer).
_Print gears and filament guide at 80% infill, 150u layer height and everything else at 250u, 50% infill.
_To check your sizing, test print 5mm of the "Body" first. It should be 42x42mm if you don't measure the bearing hole. There are 0.1mm tolerances on each side where a part touches the other. That means 12.2mm hole for a 12mm E3D V6 and the V6 fits well with a bit of pressure. Step files are included if you need to change sizes to suit your printer.
Assembly:
Pictures should make the assembly pretty clear.
1- The small gear goes on the motor shaft teeth side first. It is tight and it needs to be forced on the motor axle down to about 1mm from the bottom. It has to be solid. If you find it is too loose check your printing size.
2- Fit the 623zz bearing on the Idler Lever using the M3x10mm bolt. Then fit the Idler Lever in the Body
3- Fit the spring, M4 nut and M4x10mm button head bolt ( or E3d Thumbscrew) in their place
4- Next the Filament Guide goes in the Body; it has a notch on the tip that has to face up
5- You need to file flat a bit of the M5 bolt thread so that the drive gear grub screw could hold. Then slide it in the Big Gear
6- Then the M5 washer goes on the M5 bolt followed by the first 695zz bearing and after that Mk8 drive gear (grub screw first).
7- Align the grub screw with the flat bit of the M5 bolt and tighten just so it stays put.
8- Fit the other 695zz bearing to the Cover.
9- Fit the M3 nut in its place in the Body
10- Place the Cover over the Body and do the M3x15mm bolt
11- Slide the assembled M5 bolt and Gear in the body and secure it with M5 nut
12- Undo the drive gear grub screw a bit, then tighten the M5 nut and then do the grub screw as tight as it goes. Then loosen the M5 nut until you can move the gear easily by hand. I like to make a mark on the M5 bolt and nut to see if it moves
13- Use the three M3x30 bolts to fix the Pitan to the motor with the Base bracket between them
14- Chamfer a bit the inside of the PTFE tube end and push it all the way in the filament guide. It will help when loading the filament.
15- Fit a small piece of PTFE tube in the Idler Lever.
17- Set the idler tension by turning the bolt (or E3D thumbscrew) CCW until the M4 nut ends up in the middle of the Cover window. This is a good place to start but it will depend on different springs. There is no need for a lot of idler tension. See Troubleshooting if your drive gear skips
16- Set up your extrusion steps. See your printer manual or search online on how that is done for your particular printer.
Troubleshooting
_Mk8 drive gear skips = You most likely trying to squeeze too much plastic for that particular speed/temperature/nozzle combo. Use a printing speed calculator to check your flow speed. Remember that a Genuine E3D V6 has a flow rate of about 12mm/s and a clone hotend less than 10mm/s. Also, expect 45% lower printing speed from a generic Mk8 comparing with a E3D Hobb-Goblin
_Mk8 drive gear wobble = This has no impact on the printing quality and its mostly from a cheap M5 bolt but also from generic Mk8 drive gears than can have a ID of up to 5.4mm.
https://www.facebook.com/MakinBug/
Kudos go to E3D for the Titan https://goo.gl/fcBWLu and to AxMod3DPrint for his Drakon Extruder https://www.thingiverse.com/thing:2172854
https://youtu.be/MrS9Yidganohttps://youtu.be/2xWi5pUNDr8
Enjoy :-)
Similar models
thingiverse
free
Schematix: Dual Drive Extruder (Fits E3D v6) by Schematix
....d 4mm o.d
springs (some experimentation may be required) however i use the following:
wire diameter: 0.7mm x 6mm o.d x 18mm long
thingiverse
free

Alpha Direct Drive Extruder by engineglue
...upply list; this is a minimal design. you can use m4 bolts and nuts to mount it. it mounts to a standard aluminum mounting plate.
thingiverse
free
7:32 Compact Geared Extruder Nema17 and 14 by ryannining
...haft bearing
1x 624 for idler.
1xm4 nut
to make tensior, i use steel from peg to clamphttps://www.youtube.com/watch?v=-7bpu9pbq18
thingiverse
free
NSTT Extruder by Paciente8159
...gure the e steps/mm to about 440. test it and adjust.
enjoy your new geared extruder. the printing quality on this is worth it!!!
thingiverse
free
MK8 Gear Extruder for Kossel by Velric
...5 bearings
1x m5x45mm screw (hexhead)
1x m5 presure nut
10x m5
1x m3x20mm screw
1x m3 x50mm screw
2x m3 nuts
1x spring (optional)
thingiverse
free
Velleman K8200 MK8 Titan Mount by Middleman
...ou to use a mk8 or e3d titan extruder.
to attach the mount you will need 2 x m5 bolts with m2 large washers and 2 m5 square nuts.
thingiverse
free
Rackprint Bowden Extruder by Alex_RP
...x m3 screw ~20mm and nuts
2x m3 screw 15mm
bearing 608zz
mk8 drive gear
2x spring ~20mm with ~3mm inner diameter
thingiverse
free
MK8-MK7 Bowden Extruder by ziyayildizz3
... performance!
necessary materials;
mk8 extruder gear
625 ball bearings x3
m3x31
m3x50
m3 washer x4
m3 nut
m5 nut x3
m5x 50
spring
grabcad
free

623 ZZ - E3D Titan idler bearing
...623 zz - e3d titan idler bearing
grabcad
623 zz bearing for e3d titan extruder idler.
bearing has no balls.
d=10
d=3
w=4
thingiverse
free
Powerless Nema 17 Upgrading Power With MK8 Gear Extruder by Blueman92
... nema17
m5x55 bolt
m5x40 bolt
m5 nuts
m5 washers
5mm diameter 10mm pin
15mmx6-7 mm diameter tension spring
tfe tube and connector
Makinbug
thingiverse
free
ODIN M12 Speedloader Adapter Nozzle by MakinBug
...d here http://makinbug.dudaone.com
and here https://www.facebook.com/pg/makinbug/shop
and https://www.ebay.co.uk/itm/223602984646
thingiverse
free
Yet Another Spool Holder by MakinBug
... by makinbug
thingiverse
for spools less than 85mm wide
it takes 608zz bearings but it works fine without any
no supports needed
thingiverse
free
Mobius 2 Hat Clip by MakinBug
...p by makinbug
thingiverse
hat clip for mobius 2 action camera
print using just perimeters. petg preferable but pla will work too
thingiverse
free
18mm CWf to 14mm CCWm Adaptor by MakinBug
...14mm ccw male airsoft adapter
print in petg at 200 microns or less, with as many perimeters as you can afford
no supports needed
thingiverse
free
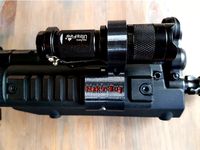
Torch Rail Mount by MakinBug
...r the stronger it will be.
you will need:
-1 x m3x 12-15mm bolt and 1 x m3 nut for each ring
-1 x m3x 30mm bolt
-1 x m3 nut
enjoy
thingiverse
free

16mm CW male to 14mm CW female adapter by MakinBug
...e
29mm wide x 33mm high
print in at 200 microns or less, with as many perimeters and infill as you can afford
no supports needed
thingiverse
free
Kriss Vector Shroud by MakinBug
...g to print in petg please use the files with petg in the title. they have an engraving to help with recycling at the end of life.
thingiverse
free
64mm Magnetic Carriages by MakinBug
...me of robodigg f623zz bearings started being noisy after 6h of use so i've replaced them with some ezo made in japan.
enjoy!
thingiverse
free
64mm 3xPiezo Magnetic Effector by MakinBug
...t a -0.15 z offset in my config file and the trigger value is 500 ( g31 x0 y0 z-0.15 p500 )
any questions please contact me
enjoy
thingiverse
free
64mm Chimera / Cyclops Mag Effector by MakinBug
...with the 64mm mag carriages herehttps://www.thingiverse.com/thing:3140322
andhttps://www.thingiverse.com/thing:2371707
enjoy :-)
Pitan
thingiverse
free
Pitan Dual Drive by lcortese
... the pitan gears and combine with a two cloned bmg gears. the idea is to be able to have a cheap dual drive with a 3:1 reduction.
thingiverse
free

Pitan N1714
....2mm, infill 30% for body and spacer, 50% for clamp and 100% for gears.
spacer is designed for mount to 10x10 aluminum profile...
thingiverse
free
Base Pitan para Hypercube by BorrajosPower
...base pitan para hypercube by borrajospower
thingiverse
es la base para montar el pitan para argento al carro de la hipercubo_ar.
thingiverse
free

Pitan Gear 1 V1.2 4mm
...pitan extruder but the motor has a 4mm shaft instead of the regular 5mm.
this gear has been modified to suit the 4mm shaft motor.
thingiverse
free
Spoked Pitan gear by cobradane
...spoked pitan gear by cobradane
thingiverse
refined gear 2 to make it more material efficient if printing at high infill density
thingiverse
free
Prusa fan ducts and mount for Pitan by moose4621
...had great success with my own machined filament drive wheels.
i use a recycled nema17 sized stepper from an epson inkjet printer.
thingiverse
free
Pitan Extruder 605ZZ Bearing Mod by eadev92
...x22mm
ahoy!!!
check my others things and guides (how to) build fully printed hexacopter on:http://drone-core.com/others/gorhex
;)
thingiverse
free

Anet A8/AM8 E3D Direct drive baseplate for Pitan Extruder by bipsen
...er - to see how everything matches up - so please be patient with printing the parts until i have confirmed that things match up.
thingiverse
free
Pitan Bowden Modified Gear and Mount by shreddedbacon
...e small gear.
use 3x m3x40mm screws instead of the 3x m3x30mm (from the original pitan) screws to secure it to the stepper motor.
thingiverse
free
Pitan 625 Bearing by 50an6xy06r6n
...y cleaning up broken references and unconstrained elements in sketches. only 2 stl files for the basic body and cover components.
Titan
design_connected
$18

Titan
...titan
designconnected
original btc titan computer generated 3d model.
3d_ocean
$25

RMS Titanic
...rms titanic
3docean
ship steamer titanic
3d model of the rms titanic
turbosquid
$49

Titan
...quid
royalty free 3d model titan for download as obj and ztl on turbosquid: 3d models for games, architecture, videos. (1314276)
turbosquid
$8

Titan
...d
royalty free 3d model titan for download as , fbx, and obj on turbosquid: 3d models for games, architecture, videos. (1545505)
3d_export
$15

eren yeager titan from attack on titan
...eren yeager titan from attack on titan
3dexport
3d model of eren titan
3d_export
$5
titanic new
...titanic new
3dexport
titanic 3d model normal quality for animation
3d_export
$100
Titan 3D Model
...titan 3d model
3dexport
silo launcher rocket titan
titan 3d model acquarius 37854 3dexport
3d_ocean
$25
Titan
...nfs nfshs one ps ps1 psone rod speed sports stakes titan transport vehicle
quality exterior and low polygon interior concept car.
3ddd
$1

Titanic Lamp(table)
...titanic lamp(table)
3ddd
titanic lamp(table)
turbosquid
$10

Titan chair
...osquid
royalty free 3d model titan chair for download as max on turbosquid: 3d models for games, architecture, videos. (1301533)
Extruder
3ddd
$1

Extruded Chair
...extruded chair
3ddd
extruded , tom dixon
inspired by tom dixon extruded chair
turbosquid
$15

Extruded Table
... extruded table for download as blend, dae, fbx, obj, and stl on turbosquid: 3d models for games, architecture, videos. (1634137)
turbosquid
$2

3D Printer Extruder
...d
royalty free 3d model 3d printer extruder for download as on turbosquid: 3d models for games, architecture, videos. (1537359)
turbosquid
$1

Zombie extruded text
...oyalty free 3d model zombie extruded text for download as obj on turbosquid: 3d models for games, architecture, videos. (1322198)
turbosquid
$4

Extruder conical screw
...el extruder conical screw for download as sldpr, ige, and stl on turbosquid: 3d models for games, architecture, videos. (1524433)
turbosquid
$50

3d PRINTER - Extruder
... available on turbo squid, the world's leading provider of digital 3d models for visualization, films, television, and games.
turbosquid
$15

Extruded Table 2
...xtruded table 2 for download as blend, dae, fbx, obj, and stl on turbosquid: 3d models for games, architecture, videos. (1621846)
turbosquid
$10

Maya Extrude Tool
... available on turbo squid, the world's leading provider of digital 3d models for visualization, films, television, and games.
3d_export
$5

world earth extrude map
...world earth extrude map
3dexport
3ddd
$1

Simply Elegant Extruded Tree Coffee Table Design
...ble by link studios. the silhouette of a tree is visible at one angle, extruded from the surface to create the support structure.
Geared
3d_ocean
$4
Gears
...gears
3docean
gear gears iron
4 different size of gears
3d_export
$5
gear
...gear
3dexport
gear
3d_export
free
Gears
...gears
3dexport
gears
3d_export
$5
gear
...gear
3dexport
a simple model of gear
3d_export
$5
gear
...gear
3dexport
gear for transmission , case machine
3d_ocean
$3
Gears
...nical parts process steampunk vehicle wheel work
10 different gear models volume 01-10 files: .3ds .c4d .obj note: you need vray
3d_ocean
$1

Spur Gear
...spur gear
3docean
decoration gear
a typical spur gear
3d_ocean
$4
Gear wheels
...gear wheels
3docean
engine engineering gear gears industry machinery mechanical toothwheel wheel
pair of gear wheels : animated.
turbosquid
$9
Gear
...gear
turbosquid
royalty free 3d model gear for download as on turbosquid: 3d models for games, architecture, videos. (1712328)
turbosquid
$2

Gears
...rs
turbosquid
royalty free 3d model gears for download as ma on turbosquid: 3d models for games, architecture, videos. (1166710)
Printed
design_connected
$27

...print
designconnected
moroso print computer generated 3d model. designed by wanders, marcel.
3ddd
free

Eichholtz Prints
...- eichholtz print central station i
13 - eichholtz print central station ii
14 - eichholtz print marisa
15 - eichholtz print tish
3ddd
$1

Eichholtz Prints
...print abstract - set of 2
10 - eichholtz print orange abstract
11 - eichholtz print buddha right
12 - eichholtz print buddha left
turbosquid
$1

... available on turbo squid, the world's leading provider of digital 3d models for visualization, films, television, and games.
3ddd
free

Eichholtz Prints
...of 4
2 - print dunbar 2 set of 4
3 - print guadeloupe 1 set of 4
4 - print guadeloupe 2 set of 4
5 - print giles
6 - print trett
3ddd
$1

Eichholtz Prints
...nt tutti frutti
3 - eichholtz prints watson - set of 2
4 - eichholtz prints antique nautilus - set of 2
5 - eichholtz print tiara
3d_export
$5

Monster for printing
...monster for printing
3dexport
monster 3d model printing
3ddd
free

printed rug
...printed rug
3ddd
ковер
very creative printed rug
3ddd
free

Eichholtz Prints
...иал: бумага
габариты (вхш): 72 x 62 см
описание: print sweetmeat - постер в деревянной раме.
3 - prints varsity set of 2
арти
3ddd
free

Art Print Posters
...art print posters
3ddd
прованс
art print posters by patrician prints