Thingiverse
Picture-Lightpainting by JoHerz
by Thingiverse
Last crawled date: 3 years ago
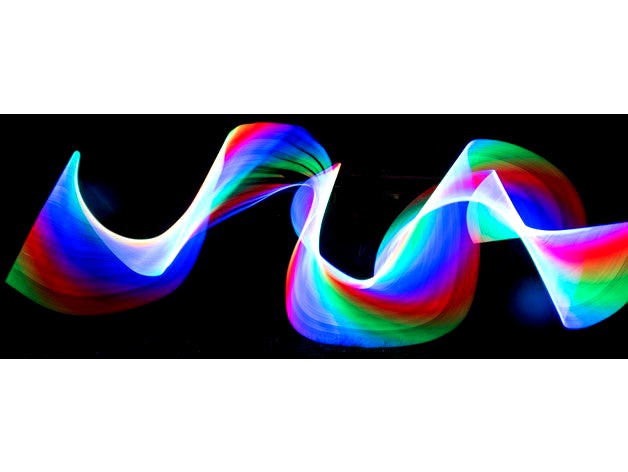
Welcome to Lightpainting!
Lightpainting is fun with your camera on bulb mode in the night
The camera stands on a tripod, fixing to an object in the dark.
in the time the camera is open, you can use any light to move in the picture. Your body will not be visible because its dark and you are moving. So you can paint with light.
This lightstick is much more than a simple light. WIth 120 LEDs in a row it can animate the row through moving while the picture ist taken.
Animations can be internal routines, but for more fun, you can play pictures from SD-card column by column, so any picture can be painted into the air!
Get helper for taking pictures: One starts and moves the lightstick, the second starts and stops the camera. And optionally a third persons can add normal flashes to objects and persons to make them visible in the picture.
How it works:
2 m of Neopixel-Strips are attached to an Arduino nano which is powered by 4 AA batteries.
A SD-Card Reader is attached through the SPI interface.
5 Buttons are allowing to choose the picture-/animation-groups, selecting the files, setting the brightness and other parameters like direction of playing and repeating.
After switching on, all LEDs are shortly shown for starting.
If you press the start-button a intro startanimation is shown in a 4 second animation, so the camera man knows when you can open the shutter in bulb mode (use always a tripod and a remote shutter)
The lightstick can now be moved in a constant way like you wish
At the end of the animation the camera can be closed, but it is possible to move the lightstick out of the picture and to start on or more normal flashes from any angle or spots to add persons to the picture.
You can switch off the startanimation by a button, so you can add more than one animation on one picture.
The possibilities are endless. Have fun with lightpainting !
How to add pictures on SD-card:
Because the memory of an arduino is only 2kb, alle pictures are stored on the SD-card. You can save up to 100 files with animations on it.
Use the file-convention like this:
"1_01_N_V.lp"
The first number is the group number to group your animations like directories. You can use the Number 1 to 9. Dont use 2 as a group, because in group 2 all internal calculated animations like rainbows are automatically added.
The second number is the filenumber inside a group. Start with 1.
The first char can be N für Normal oder U for endless playing until you press the start button again.
The second char can be N für Normal oder R for reverse playing.
Usage of the buttons:
Generally: if you change a parameter, a kind of menu will be displays as colors because we have no display on board. You can see the filenumber, the choosen group, the actual brightness and the flags of direction, repeating and showing the startanimation.
Start-button starts the animation and stops it at endless animations.
Group-Button cycles through the file-groups.
File-button chooses the file in a group. If it is long pressed, you can switch on or off the startanimation
Brightness "+" -button increases the brightness of your stick. If it is long pressed, you can switch between one or endless playing of the file. Note that this parameter is only active until you switch to the next file, because the filename sets this parameter automatically fitting to the filename.
Brightness "-" -button decreases the brightness of your stick. If it is long pressed, you can reverse the direction of playing. Note that this parameter is only active until you switch to the next file, because the filename sets this paramter automatically fitting to the filename.
How to build:
Use aluminium rods to fix the stripes. I used 12*12 millimeters of "U"-rods.
The design allows to divide the project into parts of 1 meter length for better transporting.
The handle bar can be attached by screwing. It allows better moving of the stick and effects like turning the animations for cycling. I am using a round 3 cm aluminium rod.
The rest can be printed.
All the software for the arduino is attached.
I have also writ ten a windows software für importing, creating and editing paintings. The best way is to choose any picture you want, size it with "Paint" to a height of 120 pixel und import it with this program. Save ist as an *.lp file and copy it to the sd card.
This windows editor is also attached here.
All software or parts are free for personal use. The commercial use is not allowed without my permission!
Similar models
thingiverse
free

Color pistol for lighpainting by JoHerz
...ed the switches an rgb leds direct on the board.
the sourcecode for the arduino comes with this thing!
have fun on lightpainting!
thingiverse
free

LightPainting LED Light Pen by RyusLightworks
...t in some cases a switch might be nice to have too in case you tape it to a rotating rod to create an orb or something like that.
thingiverse
free

SD Card Holder by chansheunglong
...ecause i only got 2 sd card
remix from "sd card holder" by mandy2tom
cut in half using netfabb and combine using slic3r
thingiverse
free

Refresh SD Card Gcode by carterlewellyn
...e cura or simplify3d first.
● sometimes sd cards can go bad. try another if you have one.
● any other issues, leave a comment! :)
thingiverse
free

SD Card holder / extender by cmidgley
...only be built for the short edges on the end. infill can be light as this doesn't need to be strong, and no need for a raft.
cg_trader
$14

Spiderweb with water droplets animated dynamic
...and position spiderweb to any place of your own scene. remember always press the play button before you want to move the locator.
3dwarehouse
free

Digital Camera- Uniden
...s #cord #delete #digital #input #lcd #lense #micro #mini #not #ok #play #postan #round #rounded #screen #sd #silver #slot #uniden
thingiverse
free

Hanger by vadikutey
...sion 360 file is attached
you can customize the hanger using changeable parameters in fusion 360 (parameter names in the picture)
thingiverse
free

Staircase SD & USB holder (MINI) by majda107
... printer and you are using microsd card + reduction to print!
if you like my design, consider clicking on "tip" button!
thingiverse
free

Duet 2 Wifi 7I 7" screen enclosure
...uses actual buttons, sd card access, and 2 holes for 6mm shaft switches if you'd like.
quad cells model used for measurements
Lightpainting
thingiverse
free

Lightpainting sphere by Meteor42
...and 2 layers on top an botton.
if it works right you get a hollow sphere with a flat wall to the flashlight to diffuse the light.
thingiverse
free
LightPainting LED Light Pen by RyusLightworks
...t in some cases a switch might be nice to have too in case you tape it to a rotating rod to create an orb or something like that.
thingiverse
free

LightPainting LED Glowstick by RyusLightworks
...mination. you could also use the ones with guides to get a slightly uneven illumination with normal leds if you want that effect.
thingiverse
free

LightPainting Lightsaber Handle by RyusLightworks
...ere are questions or anything is unclear.
p.s.: cad program i use has different coordination system so models have to be rotated.
thingiverse
free

LightPainting Lightbar for Universal Connector by RyusLightworks
...pposed to be printed on the back like you can see in the fist photo. the flat diffuser is supposed to be printed flat on the bed.
thingiverse
free

Lightpainting Interval Exposure Tool by RyusLightworks
...h instructions can be found here:http://lightpaintingphotography.com/light-painting-photography/light-painting-interval-exposure/
thingiverse
free

LightPainting Conic Diffuser Cap by RyusLightworks
...e tool)http://www.thingiverse.com/thing:1316926 (flashlight adapter)
all parts are designed to be printable without any supports.
thingiverse
free

LightPainting Flanged Mace Diffuser by RyusLightworks
...e tool)http://www.thingiverse.com/thing:1316926 (flashlight adapter)
all parts are designed to be printable without any supports.
thingiverse
free

LightPainting Flower/Star Diffuser by RyusLightworks
...e tool)http://www.thingiverse.com/thing:1316926 (flashlight adapter)
all parts are designed to be printable without any supports.
Joherz
thingiverse
free

Stand for Multi Flashes by JoHerz
...stand for multi flashes by joherz
thingiverse
add your flashes on one tripod: landscape, portrait, mixed... have fun!
thingiverse
free

USB Cabletubes by JoHerz
... them all into the tube. see what tube contains the right cable und pull/push it outside.
the original 123design-file is included
thingiverse
free

Universal mount for head phones by JoHerz
...or head phones by joherz
thingiverse
stylish mount for my keyboard-headphones
just print it.
2 holes for 3mm screws are prepared
thingiverse
free

Simple POI-sigh with stand by JoHerz
...with stand by joherz
thingiverse
i have printed it with pla in one piece from bottom to top.
you may enable support for the hole
thingiverse
free

Spice shelf for EMSA or other spice jars by JoHerz
...spice shelf for emsa or other spice jars by joherz
thingiverse
made for screwing on walls or in cupboards in your kitchen
thingiverse
free

Stand Sony Smartwatch3 by JoHerz
...(version 3 !)
i recommand to glue a mat onto the bottom, so the stand can still be touched without moving on the table.
have fun!
thingiverse
free

Battery Holders for AA and AAA by JoHerz
...ketchpunk, closed the sides for better printing, added wholes for the screws.
nice thing, so i builded a second für aaa batteries
thingiverse
free

Aquarium window cleaner by JoHerz
...ze and move it into the end.
this takes not as much room for cleaning as you need if you clean it with your hand.
happy aquarium!
thingiverse
free

Filament adapter for wide coils on Vellemann K8400 by JoHerz
...simple installation on existing coils. just move them over the delivered coils. it is not necessary to remove the existing ones !
thingiverse
free

KAP for Qumox SJ4000 Action Cam by JoHerz
...e of the camera for horizon- or top-shots.
i have no gopro but it shouldn't be difficult to adapt this solution for gopros!
Picture
3d_export
$5

picture picture picture
...picture picture picture
3dexport
picturepicturepicturepicturepicture
archibase_planet
free

Picture
...icture
archibase planet
picture frame picture frame
picture frame n140114 - 3d model (*.gsm+*.3ds) for interior 3d visualization.
archibase_planet
free

Picture
...picture
archibase planet
picture picturesque element
picture - 3d model (*.gsm+*.3ds) for interior 3d visualization.
archibase_planet
free

Picture
...picture
archibase planet
picture picturesque element decoration
picture - 3d model (*.gsm+*.3ds) for interior 3d visualization.
archibase_planet
free

Picture
...picture
archibase planet
picture picturesque element decoration
picture - 3d model (*.gsm+*.3ds) for interior 3d visualization.
archibase_planet
free

Picture
...ure
archibase planet
picture ornament picturesque element
picture n010412 - 3d model (*.gsm+*.3ds) for interior 3d visualization.
archibase_planet
free

Picture
...picture
archibase planet
picture painting drawing
picture n160713 - 3d model (*.gsm+*.3ds+*.max) for interior 3d visualization.
archibase_planet
free

Picture
...ure
archibase planet
picture painting picturesque element
picture n141013 - 3d model (*.gsm+*.3ds) for interior 3d visualization.
archibase_planet
free

Picture
...picture
archibase planet
picture picturesque element decoration
picture 3 - 3d model (*.gsm+*.3ds) for interior 3d visualization.
archibase_planet
free

Picture
...picture
archibase planet
picture picturesque element decoration
picture 4 - 3d model (*.gsm+*.3ds) for interior 3d visualization.