Thingiverse

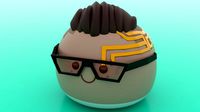
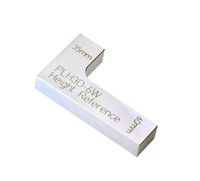
Picasso Squish Ingot Lite Bed Level Calibration Test by p17blo
by Thingiverse
Last crawled date: 3 years, 1 month ago
Be sure to check out my other calibration items:https://www.thingiverse.com/thing:4769286 - Calibration Cubehttps://www.thingiverse.com/thing:4769155 - Calibration Coin (Test for filament change)https://www.thingiverse.com/thing:4825773 - Full Size Squish Ingot
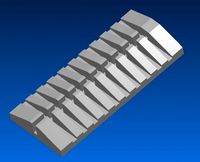
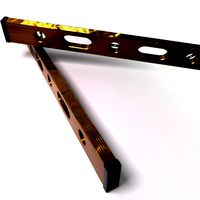
Don't waste time waiting for a complete cube or Benchy Boat to print to find out if you need to adjust and calibrate your bed. This LITE test will print in <12 Minutes at 0.12 resolution on an Ender 3v2 with standard settings
Bed Leveling (or to give it the correct title, TRAMMING) - One of the most important, not to mention time consuming things we do to our 3D Printers. Especially if you get it wrong. Lost time, spoiled spaghetti like filament, 'elephants foot' - These are all soul destroying. And I couldn't find a quick test to run through the printer once I'd thought I had the perfect level, so I created one.
Introducing the squish ingot - It's a really simple concept. Print the 1.5mm x 50mm x 25mm ingot and see the results. It's designed to fail if you bed is outside of tolerances, but also designed to help identify quickly if there are minor adjustments you still need to deal with.
I firmly believe that if you have a level and clean bed*, you don't need additives, such as glue, hairspray, etc of any kind.
So what should you expect? Well there are 5 rows of small text on the underside of the ingot.
If your hot end is too close to the bed, the text will appear super thin, or perhaps not even be visible at all. Start moving your hotend further away from the bed. If you are using Z offset, the start to reduce the - number you start with (ie, if you test print with -2.50 and the text is too thin or not there at all, reduce that number to -2.45 and try again. It may take a few goes, but once you have it, you have it).
If your hot end is too far away to the bed, the print may fail. If it fails, level the bed and/or increase the z offset (-2.50 becomes -2.60) and try again
If your hot end is a little too far away from the bed, but it is not failing, the text will appear overly bold and/or not recognisable as a letter. If this is the case, increase the z offset a little (-2.50 becomes -2.55) and try again
You may never get a perfect print, but this is about being good enough. Stopping prints from failing.
You can also check the dimension with a set of calipers to check for other calibration. The print should be exactly 25mm wide, 50mm long and 1.5mm deep
The ingot is designed with rounded edges on the underside to make removal from your bed, even when too close, easy.
PRINT at 0.20 (0.12 advised) quality or better (I have tested this up to 0.34 but it's not as accurate) with 100% infill. it should be solid - It's only 1.5mm thick.
*CLEAN YOUR BED - A lot of prints fail because the bed is not clean. Even if you are wiping down with IPA between prints, oily residue from your fingures can remain and this is a sure fire way for the filament not to adhere and the print to fail. Remove your bed and wash it like a dinner plate, with soapy water. Dry it thoroughly and keep your hands off the bed when you reinstall it.
Similar models
thingiverse
free

Picasso Squish Ingot Bed Level Calibration Test by p17blo
... bed and wash it like a dinner plate, with soapy water. dry it thoroughly and keep your hands off the bed when you reinstall it.
thingiverse
free

Bed Calibration level and Z-offset by fhogphil
...st for checking your bed settings. level? z-offset? first layer height?
print at 0.2 layer height as this is just a single layer.
thingiverse
free

Ender 3 Refined Bed Level Test & Calibration by cyron52
... ender 3 level test
maxwellhau5caffy - bed level ender 3 / ender 3 pro
adamsiem - ender 3 pro bed level test + calibration wizard
thingiverse
free

Bed Level Calibration Objetcs by zumili
...closer to the nozzle, if the nozzle makes only a really thin line of filament level the bed little bit more away from the nozzle.
thingiverse
free

One Line Bed Level Test
...one line bed level test
thingiverse
simple test to check z-offset calibration
thingiverse
free

150m Printer Bed Leveling Test Print
... a drvax video about calibrating the z offset for your printer.
this is a link to the youtube video.
https://youtu.be/toxurp2woja
thingiverse
free

CR-10 Bed Leveling Test by Spotkiller
...quares look almost the same .
maybe you have to rotate it 90° because i made it on the wrong level. im sorry thats my first try.
thingiverse
free

Level check Da vinci Junior by Giet
... same all around the part
if this is not the case all around: calibrate x-axis
if it is not sticking in general: correct z-offset
thingiverse
free

Rostock Max bed level and calibration test pattern by TheMakerRob
...alies out to the edges. if you can print this uniformly across the whole of your bed, you should be in pretty good calibration.
thingiverse
free

Bed Level - Z Offset by Veshraine
...print then allow the printer to print the 5 discs. take measurements of each disc to ensure each corner of your printer is level.
P17Blo
thingiverse
free

Picasso Cube - Calibration Cube by p17blo
...l, 0.28 print quality. want to really look for issues, go with a 20% infill with 0.16 print quality
there are no supports needed
thingiverse
free

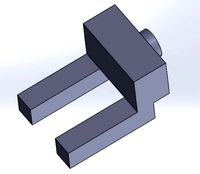
PC4-10 Pneumatic Coupler Filament Adjustment Collar by p17blo
... maximum accuracy. no support needed and i've been printing in pla which has been fine.
it'll print in less than 10 mins
thingiverse
free

Picasso Coin - Simple Filament Change Test by p17blo
...h dynamic 0.16mm. there's no real infill to speak of so those settings shouldn't matter and there are no supports needed
thingiverse
free
Picasso Squish Ingot Bed Level Calibration Test by p17blo
... bed and wash it like a dinner plate, with soapy water. dry it thoroughly and keep your hands off the bed when you reinstall it.
Picasso
3ddd
$1

Angelo Cappellini Picasso
...llini picasso
3ddd
angelo cappellini , picasso
импортируйте вместе со скрытой геометрией
3ddd
$1

Angelo Cappellini Picasso
...angelo cappellini picasso
3ddd
angelo cappellini
стол со стульями angelo cappellini picasso
3d_export
$7

Picasso triggerfish 3D Model
...picasso triggerfish 3d model
3dexport
picasso triggerfish tropical fish
picasso triggerfish 3d model aleksandr 24417 3dexport
3ddd
$1

Pablo Picasso
...pablo picasso
3ddd
картина
картины пабло диего пикассо
6шт.
turbosquid
$20

Picasso sideboard - Riflessi
...odel picasso sideboard - riflessi for download as max and obj on turbosquid: 3d models for games, architecture, videos. (1391887)
turbosquid
$24

House villa Picasso
... available on turbo squid, the world's leading provider of digital 3d models for visualization, films, television, and games.
turbosquid
$9

Picasso surgeonfish(1)
...so surgeonfish(1) for download as c4d, 3ds, dxf, fbx, and obj on turbosquid: 3d models for games, architecture, videos. (1581390)
3d_export
$99

Citroen C3 Picasso 2009 3D Model
... 3d model
3dexport
citroen c3 picasso 2009 2010 2011 mpv mini france french
citroen c3 picasso 2009 3d model squir 11374 3dexport
3d_ocean
$89

Citroen C3 Picasso 2009
...ube.com/watch?v=yzyxgskgqz8 the 3d model was created on real car base. model is created accurately, in real units of measureme...
3d_export
$99

Citroen C4 Picasso 2014 3D Model
...c4 picasso 2013 2014 2015 2016 5-door mpv van minivan bus france french
citroen c4 picasso 2014 3d model humster3d 78619 3dexport
Ingot
3d_export
$8

ores and ingots
...8.<br>added a folder with fbx. files and unity and unreal textures.<br>total polys: 1.140.<br>total verts:1.178
3d_export
$20

stylized ingots pack
...ic -normal -color -roughness -ao verts: 8 edges: 12 faces: 6 tris: 12 file formats: -fbx(binary) 2019 -fbx(ascii) 2019 -maya 2019
3d_export
$5

silver ingot
...ic -normal -color -roughness -ao verts: 8 edges: 12 faces: 6 tris: 12 file formats: -fbx(binary) 2019 -fbx(ascii) 2019 -maya 2019
3d_export
$5

obsidian ingot
...ic -normal -color -roughness -ao verts: 8 edges: 12 faces: 6 tris: 12 file formats: -fbx(binary) 2019 -fbx(ascii) 2019 -maya 2019
3d_export
$5

golden ingot
...ic -normal -color -roughness -ao verts: 8 edges: 12 faces: 6 tris: 12 file formats: -fbx(binary) 2019 -fbx(ascii) 2019 -maya 2019
3d_export
$5

copper ingot
...ic -normal -color -roughness -ao verts: 8 edges: 12 faces: 6 tris: 12 file formats: -fbx(binary) 2019 -fbx(ascii) 2019 -maya 2019
3d_export
$5

bronze ingot
...ic -normal -color -roughness -ao verts: 8 edges: 12 faces: 6 tris: 12 file formats: -fbx(binary) 2019 -fbx(ascii) 2019 -maya 2019
3d_export
$8

ores and ingots 2
...ts. ingot: 182 polys , 200 verts.<br>the rar. files contains all the fbx's obj's and textures , all well organized.
turbosquid
$100

Gold ingot
... available on turbo squid, the world's leading provider of digital 3d models for visualization, films, television, and games.
turbosquid
$40

Gold Ingots
... available on turbo squid, the world's leading provider of digital 3d models for visualization, films, television, and games.
Squish
3d_export
$6

Astra
...astra 3dexport squish dumpling avatars of the valorant...
3d_export
$6

Yoru
...yoru 3dexport squish dumpling avatars of the valorant...
3d_export
$6

Neon
...neon 3dexport squish dumpling avatars of the valorant...
3d_export
$6
Chamber
...chamber 3dexport squish dumpling avatars of the valorant...
3d_export
$6

Skye
...skye 3dexport squish dumpling avatars of the valorant...
3d_export
$6

Reyna
...reyna 3dexport squish dumpling avatars of the valorant...
3d_export
$6

Killjoy
...killjoy 3dexport squish dumpling avatars of the valorant...
3d_export
$6

Omen
...omen 3dexport squish dumpling avatars of the valorant...
3d_export
$6

Sova
...sova 3dexport squish dumpling avatars of the valorant...
3d_export
$6

Viper
...viper 3dexport squish dumpling avatars of the valorant...
Lite
design_connected
$11

Lite
...lite
designconnected
sphaus lite coffee tables computer generated 3d model. designed by eero saarinen.
3ddd
$1

Foscarini_Giga-Lite
... giga-lite , лампы , light
foscarini_giga-lite
turbosquid
free

LegendarySwords - Lite
...odel legendaryswords - lite for download as dae, fbx, and obj on turbosquid: 3d models for games, architecture, videos. (1559781)
turbosquid
$85

DS Lite
... available on turbo squid, the world's leading provider of digital 3d models for visualization, films, television, and games.
turbosquid
$5

Jet Lite
... model jet lite for download as 3ds, obj, fbx, blend, and stl on turbosquid: 3d models for games, architecture, videos. (1476173)
turbosquid
$1

Mod-Lite
... available on turbo squid, the world's leading provider of digital 3d models for visualization, films, television, and games.
turbosquid
free

lite on.max
... available on turbo squid, the world's leading provider of digital 3d models for visualization, films, television, and games.
design_connected
$13

Multi-Lite Pendant
...multi-lite pendant
designconnected
gubi multi-lite pendant computer generated 3d model. designed by weisdorf, louis .
turbosquid
$120

Cartoon Pack Lite
...
royalty free 3d model cartoon pack lite for download as fbx on turbosquid: 3d models for games, architecture, videos. (1255320)
turbosquid
$100

HUAWEI P3 Lite
...id
royalty free 3d model huawei p30 lite for download as c4d on turbosquid: 3d models for games, architecture, videos. (1515805)
Calibration
turbosquid
$15
DEFIBRILLATOR CALIBRATORS
... available on turbo squid, the world's leading provider of digital 3d models for visualization, films, television, and games.
turbosquid
$3
Calibration Test Benches
...libration test benches for download as 3ds, obj, c4d, and fbx on turbosquid: 3d models for games, architecture, videos. (1355804)
turbosquid
$79
Tag Heuer Monaco Calibre 11
...free 3d model tag heuer monaco calibre 11 for download as max on turbosquid: 3d models for games, architecture, videos. (1634427)
turbosquid
$50

Smith & Wesson 50 Calibre Magnum
... available on turbo squid, the world's leading provider of digital 3d models for visualization, films, television, and games.
3d_export
$10
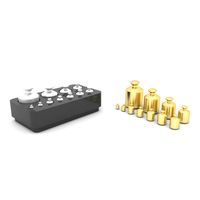
Laboratory Calibration Weight Set 1 3D Model
... 3d model
3dexport
laboratory lab science equipment weight set
laboratory calibration weight set 1 3d model bessoo 88084 3dexport
3d_export
$15
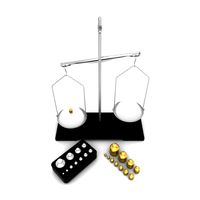
Laboratory Scale and Calibration Weight Set 3D Model
...port
laboratory lab science equipment weight set scale
laboratory scale and calibration weight set 3d model bessoo 88203 3dexport
3d_export
$5
3D printer filament calibration tool 3D Model
...ernier
3d printer filament calibration tool 3d model download .c4d .max .obj .fbx .ma .lwo .3ds .3dm .stl locoman 107942 3dexport
3d_export
$59
tag heuer link calibre 16 watch
...built to real-world scale. units used: centimeters. model is 18 centimeters tall.<br>scene objects are organized by groups.
3d_export
free
laser height reference calibration tool opt lasers
...ind out more about the engraving and cutting laser heads, this item was designed to work with, take a look at the following page:
3d_export
$99
Patek Philippe White Gold Calibre 89
...br>please note: this 3d model like all my other models cannot be used as nft, as is or modified<br>thank you for reading
Level
design_connected
$11

Levels
...levels
designconnected
one nordic levels computer generated 3d model. designed by form us with love.
design_connected
$7
Level
...level
designconnected
zanotta level shelves and storage computer generated 3d model. designed by arik levy.
turbosquid
$29
level
...ty free 3d model level for download as 3ds, obj, c4d, and fbx on turbosquid: 3d models for games, architecture, videos. (1272856)
turbosquid
$1
level
... available on turbo squid, the world's leading provider of digital 3d models for visualization, films, television, and games.
3d_export
$5
Mario level
...mario level
3dexport
mario level low quality for fun videos
3ddd
$1
LEVELS OF DISCOVERY
...етская мебель "levels of discovery". rab10003 princess mini rocker
кресло-качалка (мини) "принцесса навсегда"
3d_export
$19

level design
...level design
3dexport
you can use this design (level design) in your own game.
turbosquid
$60
Desert level
...squid
royalty free 3d model desert level for download as fbx on turbosquid: 3d models for games, architecture, videos. (1208131)
turbosquid
$15
Transit Level
...quid
royalty free 3d model transit level for download as max on turbosquid: 3d models for games, architecture, videos. (1158112)
turbosquid
$14

Districts Level
...id
royalty free 3d model districts level for download as max on turbosquid: 3d models for games, architecture, videos. (1408410)
Bed
3ddd
$1

bed
...bed
3ddd
bed , постельное белье
bed
3ddd
$1

bed
...bed
3ddd
bed , постельное белье
bed
3ddd
$1

bed
...bed
3ddd
bed , постельное белье
bed
3ddd
$1

bed
...bed
3ddd
bed , постельное белье
bed
3ddd
$1

bed
...bed
3ddd
bed , постельное белье
bed
3ddd
$1

bed
...bed
3ddd
bed , постельное белье
bed
3ddd
free

bed
...bed
3ddd
bed , постельное белье
bed
3ddd
free

bed
...bed
3ddd
bed , постельное белье
bed
3ddd
$1

Bed
...bed
3ddd
bed , постельное белье , постель
bed
3d_export
$7

bed adairs bed
...rs bed
3dexport
bed adairs bed in modern style. if you want a smoother surface, please turn on turbosmooth in the modifier list.
Test
turbosquid
$99

test
...st
turbosquid
royalty free 3d model test for download as max on turbosquid: 3d models for games, architecture, videos. (1251637)
turbosquid
$63
TEST
...st
turbosquid
royalty free 3d model test for download as max on turbosquid: 3d models for games, architecture, videos. (1446233)
turbosquid
$1
test
...st
turbosquid
royalty free 3d model test for download as fbx on turbosquid: 3d models for games, architecture, videos. (1360941)
3d_export
free

johnny test
...johnny test
3dexport
johnny test 3d
turbosquid
$15
Test
... available on turbo squid, the world's leading provider of digital 3d models for visualization, films, television, and games.
turbosquid
$2

test
... available on turbo squid, the world's leading provider of digital 3d models for visualization, films, television, and games.
turbosquid
free

test
... available on turbo squid, the world's leading provider of digital 3d models for visualization, films, television, and games.
turbosquid
free

Test
... available on turbo squid, the world's leading provider of digital 3d models for visualization, films, television, and games.
turbosquid
free

Test
... available on turbo squid, the world's leading provider of digital 3d models for visualization, films, television, and games.
3d_export
$5
gripper test
...gripper test
3dexport
robot gripper test model