Thingiverse
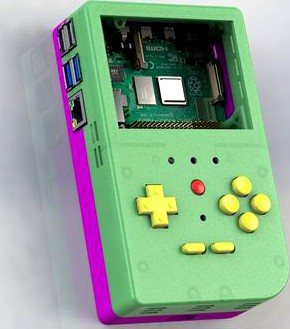
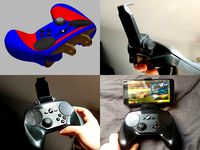
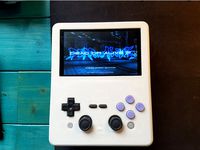
Pi4 Super Retropiepod by morganlowe
by Thingiverse
Last crawled date: 3 years, 3 months ago
The Official Pi4 Version of the Super Retropiepod
Otherwise it's all the same as the older version, so here's the instructions:
Gerber Files For Button Boards Included!
You can send the two RAR archives to your favorite PCB maker to get them made, or make them yourself!
I use https://jlcpcb.com/ because it's cheap and fast, but the minimum order is 10pcs. I will be listing my spares on Ebay and will link it here.
I spent a lot of money developing this. Just under $400 with parts and services. Please consider tips!
See my attempt to play Pepsiman here on the Super Retropiepod: https://youtu.be/-517g8r_IGU
Instructions Below!
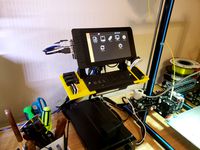
I wanted to make a portable Pi gaming thing for my dad for christmas. I downloaded, printed and checked out a few but.... I dunno, I'm too picky.
What can it do?
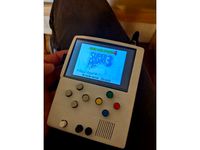
This is a Raspberry Pi based gaming emulation handheld. It's up to you how it goes together and the software it runs however RetroPie is what is recommended.
Check out Retropie here: https://retropie.org.uk/
See what games it can play here: https://retropie.org.uk/about/systems/
The 3.5" color TFT LCD is backlit and has a 4:3 aspect ratio matching many old games.
It has a mono speaker but is capable of stereo output via HDMI and Analog Headphone out. You could also hook it to an analog TV with a special adapter cable like this: https://www.amazon.com/TV-Out-Philips-Portable-Player-PET1002/dp/B00PCELGSY
The Ethernet and 4 USB ports on the Raspberry Pi are accessible with no special adapters needed.
Wifi and Bluetooth are included on the Raspberry Pi 4, I highly recommend the Pi4 4GB for the extra power for those more intense games.
The controls are simple but there's enough buttons for most games.
D pad for direction control and 4 front buttons provide your basic SNES type controller setup. On the back there's two triggers and two bumpers to complete the package and make even Playstation 1 games easy to play.
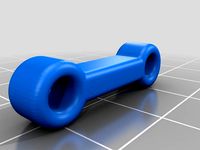
The D-pad Center Spire gets superglued to the circuit board between the D-pad buttons to give the pad something to rock on for that classic feel.
Front center is a flush button that will return you to the main menu in Retropie from the game. This button is flush so you do not accidentally press it and leave your game.
Under the screen are 3 small buttons, these come with the screen for Menu, Up and Down. I left these in because the little cheap screens I use offer contrast, brightness and other useful controls right on screen!
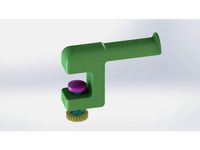
Modify the screen
Here's the stock wiring. You can remove all of it to get started. The points we need are marked.
The 5v + needs to go on the second pin from the left on the top of the small chip in the bottom right of the board.
Here's the screen all wired for 5v and video. You only need the 3 wires. I plan on running these to the GPIO on the Pi but the video wire needs to be soldered to pad PP24 on the back of the pi.
Here's the composite video out pad on my test pi for example.
Setup Retropie
Using something like Win32 Disk Imager on windows you can easily setup Retropie.
Download Retropie for your pi https://retropie.org.uk/download/
Win32 Disk Imager download https://sourceforge.net/projects/win32diskimager/files/latest/download
Burn the files to your SD card and edit the config.txt adding the following lines to the end of the file:
sdtv_mode=0
hdmi_ignore_edid_audio=1
framebuffer_width=480
framebuffer_height=320
avoid_warnings=1
This sets the output and screen resolution as well as turning off low voltage warnings [Since the powerboost will cause them sometimes but it hurts nothing.]
Setup Controls
The controls are based off the Adafruit sccript here: https://github.com/adafruit/Adafruit-Retrogame
I have included a custom config file. The easiest way to get this working is use SSH and the above script to install the PiGRRL 2 controls. Once done shutdown the machine and remove the SD card then copy my custom config to it overwriting the current retrogame.cfg in the /boot/ partition. Now you can setup the keys in RetroPie.
The config file also shows what pins to hook the buttons too. These buttons work by grounding the pin to send the signal and the Raspberry Pi has internal pull-ups so no additional components are needed. The pin numbers are the GPIO or BCM numbers.
The switch is wired so it goes from Off to On with no sounds to On with sounds.
There's a 3mm hole and space for LED to indicate low battery. This is attached to +5v with a resistor and grounded to the LBO pin on the Powerboost1000c.
Use Themes to make it easier to see!
If you plug into an HDMI TV it will switch to that on boot automatically. Connect it to the internet and go to Retropie - Themes. Scroll down and find "TFT". This is a theme meant for these small, low res screens that makes it much easier to use!
Features & BOM:
18650 battery https://www.amazon.com/gp/product/B01C4GFVN8
or
2500 MAH Lipo - use the cover without 18650 holder https://www.amazon.com/YDL-2500mAh-battery-Rechargeable-Connector/dp/B07BTY599F
or
5000mah battery and the 3mm extra front cover with no 18650 back cover: https://www.amazon.com/uxcell-5000mAh-Rechargeable-Lithium-Polymer/dp/B0798DP98L/
Adafruit Powerboost 1000c https://www.adafruit.com/product/2465
Inexpensive 3.5" LCD https://www.amazon.com/gp/product/B0045IIZKU
2 Way Slide Switch for Power and Audio On/Off https://www.amazon.com/gp/product/B008DFYHV2
Small speaker https://www.amazon.com/gp/product/B0177ABRQ6
2.5 watt amp https://www.amazon.com/gp/product/B01MZYYGSK
M2.3x8mm screws for mounting the boards inside https://www.amazon.com/gp/product/B01LXFTOAU/
Uses "standard" tactile buttons https://www.amazon.com/CO-RODE-Tact-Button-Switch-6x6x5mm/dp/B00W0YUV1W
Some foam tape can help control wires and prevent issues with the pins coming through the button boards: https://www.amazon.com/gp/product/B01G382DX4
Uses the screen's buttons for brightness
Better cooling with vents
Larger overall size 150mm tall 32m thick
305 grams or 10.75OZ with the 3400mah 18650 inside.
I am making PCB files
You could send off and have PCBs made for the buttons easily and cheaply with these files once completed.
Steam Link!?
Yes, that's right, you can install Steam Link on this and play it.
Check out me playing Bioschock here: https://youtu.be/Izp32G-ZzLY
Steam Link Setup
SSH into the device, you can get your IP address from your router easiest in most cases.
Get Steam Link and install using the first post here: https://steamcommunity.com/app/353380/discussions/0/1743353164093954254/
Once that is done in your terminal type or copy these lines exactly:
touch ./RetroPie/roms/ports/Steam.sh
nano ./RetroPie/roms/ports/Steam.sh
Copy these lines into Nano
'#!/bin/bash' [remove ' marks]
steamlink
Save and exit with CRTL+O and CRTL+X
Back in terminal type these lines:
chmod +x ./RetroPie/roms/ports/Steam.sh
sudo reboot
That's it! Steam will be listed under PORTS. You will need to be plugged in or on with. The D-pad should work like arrow keys and start = enter, select = escape.
This is not listed as a remix however it is inspired from the following Things:
Pigrrl2 https://www.thingiverse.com/thing:1277483
Larger Screen Pigrrl2 https://www.thingiverse.com/thing:1635368
All the others out there!
Click Watch for updates!!
Thank you! Like, share and enjoy!
Otherwise it's all the same as the older version, so here's the instructions:
Gerber Files For Button Boards Included!
You can send the two RAR archives to your favorite PCB maker to get them made, or make them yourself!
I use https://jlcpcb.com/ because it's cheap and fast, but the minimum order is 10pcs. I will be listing my spares on Ebay and will link it here.
I spent a lot of money developing this. Just under $400 with parts and services. Please consider tips!
See my attempt to play Pepsiman here on the Super Retropiepod: https://youtu.be/-517g8r_IGU
Instructions Below!
I wanted to make a portable Pi gaming thing for my dad for christmas. I downloaded, printed and checked out a few but.... I dunno, I'm too picky.
What can it do?
This is a Raspberry Pi based gaming emulation handheld. It's up to you how it goes together and the software it runs however RetroPie is what is recommended.
Check out Retropie here: https://retropie.org.uk/
See what games it can play here: https://retropie.org.uk/about/systems/
The 3.5" color TFT LCD is backlit and has a 4:3 aspect ratio matching many old games.
It has a mono speaker but is capable of stereo output via HDMI and Analog Headphone out. You could also hook it to an analog TV with a special adapter cable like this: https://www.amazon.com/TV-Out-Philips-Portable-Player-PET1002/dp/B00PCELGSY
The Ethernet and 4 USB ports on the Raspberry Pi are accessible with no special adapters needed.
Wifi and Bluetooth are included on the Raspberry Pi 4, I highly recommend the Pi4 4GB for the extra power for those more intense games.
The controls are simple but there's enough buttons for most games.
D pad for direction control and 4 front buttons provide your basic SNES type controller setup. On the back there's two triggers and two bumpers to complete the package and make even Playstation 1 games easy to play.
The D-pad Center Spire gets superglued to the circuit board between the D-pad buttons to give the pad something to rock on for that classic feel.
Front center is a flush button that will return you to the main menu in Retropie from the game. This button is flush so you do not accidentally press it and leave your game.
Under the screen are 3 small buttons, these come with the screen for Menu, Up and Down. I left these in because the little cheap screens I use offer contrast, brightness and other useful controls right on screen!
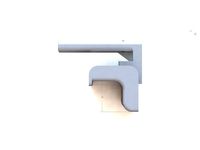
Modify the screen
Here's the stock wiring. You can remove all of it to get started. The points we need are marked.
The 5v + needs to go on the second pin from the left on the top of the small chip in the bottom right of the board.
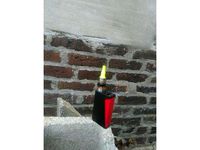
Here's the screen all wired for 5v and video. You only need the 3 wires. I plan on running these to the GPIO on the Pi but the video wire needs to be soldered to pad PP24 on the back of the pi.
Here's the composite video out pad on my test pi for example.
Setup Retropie
Using something like Win32 Disk Imager on windows you can easily setup Retropie.
Download Retropie for your pi https://retropie.org.uk/download/
Win32 Disk Imager download https://sourceforge.net/projects/win32diskimager/files/latest/download
Burn the files to your SD card and edit the config.txt adding the following lines to the end of the file:
sdtv_mode=0
hdmi_ignore_edid_audio=1
framebuffer_width=480
framebuffer_height=320
avoid_warnings=1
This sets the output and screen resolution as well as turning off low voltage warnings [Since the powerboost will cause them sometimes but it hurts nothing.]
Setup Controls
The controls are based off the Adafruit sccript here: https://github.com/adafruit/Adafruit-Retrogame
I have included a custom config file. The easiest way to get this working is use SSH and the above script to install the PiGRRL 2 controls. Once done shutdown the machine and remove the SD card then copy my custom config to it overwriting the current retrogame.cfg in the /boot/ partition. Now you can setup the keys in RetroPie.
The config file also shows what pins to hook the buttons too. These buttons work by grounding the pin to send the signal and the Raspberry Pi has internal pull-ups so no additional components are needed. The pin numbers are the GPIO or BCM numbers.
The switch is wired so it goes from Off to On with no sounds to On with sounds.
There's a 3mm hole and space for LED to indicate low battery. This is attached to +5v with a resistor and grounded to the LBO pin on the Powerboost1000c.
Use Themes to make it easier to see!
If you plug into an HDMI TV it will switch to that on boot automatically. Connect it to the internet and go to Retropie - Themes. Scroll down and find "TFT". This is a theme meant for these small, low res screens that makes it much easier to use!
Features & BOM:
18650 battery https://www.amazon.com/gp/product/B01C4GFVN8
or
2500 MAH Lipo - use the cover without 18650 holder https://www.amazon.com/YDL-2500mAh-battery-Rechargeable-Connector/dp/B07BTY599F
or
5000mah battery and the 3mm extra front cover with no 18650 back cover: https://www.amazon.com/uxcell-5000mAh-Rechargeable-Lithium-Polymer/dp/B0798DP98L/
Adafruit Powerboost 1000c https://www.adafruit.com/product/2465
Inexpensive 3.5" LCD https://www.amazon.com/gp/product/B0045IIZKU
2 Way Slide Switch for Power and Audio On/Off https://www.amazon.com/gp/product/B008DFYHV2
Small speaker https://www.amazon.com/gp/product/B0177ABRQ6
2.5 watt amp https://www.amazon.com/gp/product/B01MZYYGSK
M2.3x8mm screws for mounting the boards inside https://www.amazon.com/gp/product/B01LXFTOAU/
Uses "standard" tactile buttons https://www.amazon.com/CO-RODE-Tact-Button-Switch-6x6x5mm/dp/B00W0YUV1W
Some foam tape can help control wires and prevent issues with the pins coming through the button boards: https://www.amazon.com/gp/product/B01G382DX4
Uses the screen's buttons for brightness
Better cooling with vents
Larger overall size 150mm tall 32m thick
305 grams or 10.75OZ with the 3400mah 18650 inside.
I am making PCB files
You could send off and have PCBs made for the buttons easily and cheaply with these files once completed.
Steam Link!?
Yes, that's right, you can install Steam Link on this and play it.
Check out me playing Bioschock here: https://youtu.be/Izp32G-ZzLY
Steam Link Setup
SSH into the device, you can get your IP address from your router easiest in most cases.
Get Steam Link and install using the first post here: https://steamcommunity.com/app/353380/discussions/0/1743353164093954254/
Once that is done in your terminal type or copy these lines exactly:
touch ./RetroPie/roms/ports/Steam.sh
nano ./RetroPie/roms/ports/Steam.sh
Copy these lines into Nano
'#!/bin/bash' [remove ' marks]
steamlink
Save and exit with CRTL+O and CRTL+X
Back in terminal type these lines:
chmod +x ./RetroPie/roms/ports/Steam.sh
sudo reboot
That's it! Steam will be listed under PORTS. You will need to be plugged in or on with. The D-pad should work like arrow keys and start = enter, select = escape.
This is not listed as a remix however it is inspired from the following Things:
Pigrrl2 https://www.thingiverse.com/thing:1277483
Larger Screen Pigrrl2 https://www.thingiverse.com/thing:1635368
All the others out there!
Click Watch for updates!!
Thank you! Like, share and enjoy!
Similar models
thingiverse
free
Raspberry PI 3 case with LCD & Battery by katascope
...ww.amazon.com/gp/product/b01n7andlc
keyboard : https://www.amazon.com/iclever-portable-keyboard-bluetooth-wireless/dp/b00ywljnpq/
thingiverse
free
Raspberry Pi Retrogaming Case by Eguin
...for use in future projects, and if you have similar things already can be used in their place. in...
cults
free
Arcade Bonnet Controller for RetroPie
... also dedicated pins for wiring up an analog joystick and an 8-way switch joystick.
https://www.youtube.com/watch?v=ndnbltzojcg
thingiverse
free
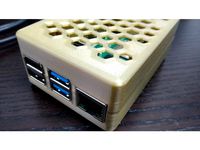
Pocket for Pi4 w/Heatsink by DataDink
...nter.
the raspberry pi 4: https://www.amazon.com/gp/product/b07td42s27
the heatsink: https://www.amazon.com/gp/product/b07tzqhxz6
thingiverse
free

PI4 Server Rack
...5bto
pi - https://a360.co/2q7vsxi
rack - https://a360.co/2f4n4j5
power - https://a360.co/2u5fybj
switch - https://a360.co/2szdwcd
thingiverse
free

Retropie portable console gameboy
...ze it
link for the screen: https://www.amazon.com/-/es/gp/product/b009cylj5k/ref=ppx_yo_dt_b_asin_title_o00_s00?ie=utf8&psc=1
thingiverse
free
Raspberry PI Charging Station (running repetier)
...ing ports:
https://www.amazon.com/gp/product/b07srzy9xh
the screen is shown running repetier, which i use to control my printers.
thingiverse
free
Dual Stage Temperature Controller by brendonbuilds
...te shapes.
you can ignore the microsd card, as the data is now being stored on the cloud.
i'll share the code on github soon.
thingiverse
free
Ergonomic RetroPie Arcade Controller 28mm lid remix by speedycat
...ed the lid to change the 2, 24mm, into 28mm holes to accept all buttons in this kit:
https://www.amazon.com/gp/product/b07jfxqsm5
thingiverse
free
Steam Controller Smartphone Mount by metin_celik
...jks1h4/
to install it, the only tool you need is a torx 6 screwdriver. disassembly video here: https://youtu.be/yczpav0p-hu?t=30s
Morganlowe
thingiverse
free

AM8 - 3DLS Gantry Position Tool by morganlowe
...am8 - 3dls gantry position tool by morganlowe
thingiverse
just a simple thing to set where the gantry should go!
thingiverse
free
Edge Clamp Spool Holder by morganlowe
...ng. a spool holder to clamp on the edge of a desk or table. all 3d printed. fits all the spools i have ever encountered.
thanks!
thingiverse
free
Filler Jig for KING Joints by morganlowe
... joints for the larger king pre-rolls.
print upright with support everywhere on the funnel side, no support needed on the poker.
thingiverse
free
Bolt Shaped Drip Tip! by morganlowe
...eaded bolt with m12x1.25 threads for your e-cig!
see it printed here: https://youtu.be/poxalukhzve
enjoy, don't get screwed!
thingiverse
free

Drawing stand for Surface Pro by morganlowe
...ng. made it for my artist friend and he's loving it. uses 14 6mmx2mm round rubber feet. 10 on top 4 on the bottom.
thank you
thingiverse
free
Panasonic Toughbook CF-U1 HDD Cover by morganlowe
...s is a cover without a caddy for the cf-u1 ssd mod
just made and tested it with my mk2 cf-u1. fits and seals properly.
thank you!
thingiverse
free
Bowden Tube Bone by morganlowe
...ides snug over the tubes and just keeps them from going nuts. i might be the only person ever to need this but here it is!
enjoy!
thingiverse
free
Trowel for 50mm Concrete Curb by morganlowe
...ts in 2 parts with 3.8mm plastite screws. kinda niche but who knows, maybe you can use it! source files included, solidworks 2017
thingiverse
free

Spark Plug Inspired Drip Tip by morganlowe
...y universal. the outside hex is 19mm and it's 20mm tall without the tank nipple. it uses a 1x7mm o ring. print with support!
thingiverse
free
Spark Plug Inspired Drip Tip Tall Version by morganlowe
...:3013945
i found these print really well upside down with no support and a nice brim to stick it down. they are very thin walled.
Pi4
thingiverse
free
pi4 Portable
...ion cable
-pi4...with good heatsink for overclocking...
-usb c to micro usb extension cable with angle plug
-soft tactile buttons
thingiverse
free
Raspberry Pi4 Case
...he case with screws, or slide it into a rail system.
if you hang it up in a standing position the convection will cooling the pi.
thingiverse
free
Raspberry Pi4 Case
...raspberry pi4 case
thingiverse
a minimal case for raspberry pi4.
design based on raspberry pi3 case from adamwdraper
thingiverse
free

Pi4 base with fans by BachTheGoldfish
...pi4 base with fans by bachthegoldfish
thingiverse
added 3 mm to the height for pi4 with dual fans
3dfindit
free
SES-PI4-6
...ses-pi4-6
3dfind.it
catalog: mader
thingiverse
free
Raspberry Pi4 Spacer for Pi4+Hifiberry DAC+ Pro by barancek7
...iverse.com/thing:4208854)
just used this way to fit it in and glue it with hot glue. maybe it fits also other board combinations.
thingiverse
free
Pi4 Case
...pi4 case
thingiverse
a simple pi 4 case. screws needed to attach. m2x10 works good for me.
thingiverse
free

RASPBERRY PI4 by dragonder
...raspberry pi4 by dragonder
thingiverse
you can use pla+ and abs
thingiverse
free

Tray for PI4 and TV hat by jimmyeao
...ay for pi4 and tv hat by jimmyeao
thingiverse
i needed a mount for a pi4 with a tv hat for the pirack, here is my modded holder.
thingiverse
free

Pi4 "block" Model - Dimensionally Accurate
...- dimensionally accurate
thingiverse
dimensionally accurate (reasonably) pi4 board to use for modelling cases and accessories...
Super
3ddd
free

super impossible
...super impossible
3ddd
kartell , super impossible
cтул super impossible фирмы kartell
3d_ocean
$19

Super market
...ean
chain shop large super market 3d model low poly market low poly super market shop super market
low poly model of supermarket.
3d_export
$15

super mario
...r mario.<br>superstar, super mario superhero.<br>сheerful and courageous.<br>new exciting adventures await him.
3d_ocean
$30
Super Hero
...hero mask ninja super hero sword zbrush
super hero created in zbrush 4.0 hero body—6 division levels 1.668 poly to 1.705mil poly.
3d_export
$25

super promotion
...super promotion
3dexport
3d_export
$5
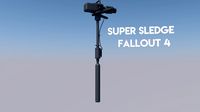
super sledge
...super sledge
3dexport
...
3ddd
$1
Longboard Super Sonic
...longboard super sonic
3ddd
лонгборд
longboard super sonic
turbosquid
$60
Super Soldier
...quid
royalty free 3d model super soldier for download as fbx on turbosquid: 3d models for games, architecture, videos. (1211725)
turbosquid
$60
Super Soldier
...quid
royalty free 3d model super soldier for download as fbx on turbosquid: 3d models for games, architecture, videos. (1207493)
turbosquid
$55
Super Hero
...squid
royalty free 3d model super hero for download as blend on turbosquid: 3d models for games, architecture, videos. (1387035)