Thingiverse

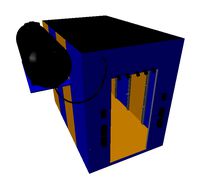
Photon-inspired resin print curing chamber
by Thingiverse
Last crawled date: 4 years, 3 months ago
Been thinking of building your own UV-curing chamber? This is a project for those who are into electronics and know how to work with Arduino for example. Don't print this if you are new to electronics and expect a step-by-step project, this is for those who are already planning to build their own curing chamber and just need something to put the gear in.
I have included a STEP-file of the top if you want to adapt it for other displays and/or buttons.
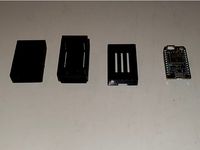
This is a DIY-project where I used leftover components, therefor I will not offer a circuit diagram here because you should not use the components I used. If I would buy components for this I would buy an Arduino nano or similar, a dual-channel motor controller board to control the LED-strip and the rotation motor. The board should be able to handle at least 1,5A because the LED-strip (at least the one I have) uses a bit over 1A continuously on 100% duty. In mine I used some left-over MOSFET's, a 5V regulator that keeps getting too hot, so will need to replace that, and I used a NodeMCU (ESP8266) which is way overkill for this, but I had a bunch of boards laying around so could just as well use them. The annoying thing is that NodeMCU can just handle up to 10V so I could not power it directly on my 12V power supply, which is why I'm using an external 5V regulator.
However, I developed the code in the Arduino IDE so you can re-use my code if you are using any Arduino-board, just make sure to change the pins to the ones you are using. You might also need to change display library to whatever display you choose.
Display I used: Luxorparts 1,3" OLED https://www.kjell.com/se/produkter/el-verktyg/elektronik/optokomponenter/led-lcd-displayer/luxorparts-oled-display-for-arduino-13-p87946
Button: 5-way tactile joystick from a scrapped computer monitor. Even though the board I've used is not available for purchase, if you search for "5-way tactile" you will find the component and there are multiple breakout boards. Or you could replace it with just a button to start the curing process.
UV-LED strip: https://www.ebay.com/itm/UV-Ultraviolet-Black-Lights-LED-Strip-300-LEDs-16-4Ft-5M-3528-Flexible/192926297864
Motor: 12mm DC-motor with planetary gearbox. Mine are not available for sale online from what I can find, but if you search for "12mm DC-motor with planetary gearbox" there are many available variants. Also try to choose a motor with a winding already for 12V so you won't run in to the issues I have with a too fast motor as mine has a 4,5V winding.
Ballbearings: OD=15mm ID=10mm T=4mm https://www.ebay.com/sch/i.html?_from=R40&_trksid=m570.l1313&_nkw=ballbearing+15x10x4&_sacat=0
Door is kept shut using round magnets, 4mm long and 4mm diameter. For hinges I used M3 nylon screws mounted on the top and bottom of the door and with their heads cut off so that roughly 3mm sticks out from the door. that works well as a hinge mechanism.
Screws needed are M2 and M3.
I mounted the LED strip on a pre-cut piece of paper that was then glued in place. Almost the entire LED strip fit in the box, so rougly 300 LED's.
A few words about the parts:
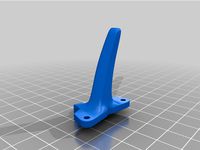
Foot - print 4pcs, preferribly in TPU or other flex
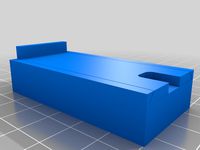
Platform-bearing-plug - you need 3pcs of these for the ball bearings that supports the rotating platform.
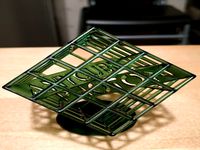
Chamber - This massive piece can be printed without support! There will be a few sagging lines here and there but it worked beyond expectation to print without any support.
I have included a STEP-file of the top if you want to adapt it for other displays and/or buttons.
This is a DIY-project where I used leftover components, therefor I will not offer a circuit diagram here because you should not use the components I used. If I would buy components for this I would buy an Arduino nano or similar, a dual-channel motor controller board to control the LED-strip and the rotation motor. The board should be able to handle at least 1,5A because the LED-strip (at least the one I have) uses a bit over 1A continuously on 100% duty. In mine I used some left-over MOSFET's, a 5V regulator that keeps getting too hot, so will need to replace that, and I used a NodeMCU (ESP8266) which is way overkill for this, but I had a bunch of boards laying around so could just as well use them. The annoying thing is that NodeMCU can just handle up to 10V so I could not power it directly on my 12V power supply, which is why I'm using an external 5V regulator.
However, I developed the code in the Arduino IDE so you can re-use my code if you are using any Arduino-board, just make sure to change the pins to the ones you are using. You might also need to change display library to whatever display you choose.
Display I used: Luxorparts 1,3" OLED https://www.kjell.com/se/produkter/el-verktyg/elektronik/optokomponenter/led-lcd-displayer/luxorparts-oled-display-for-arduino-13-p87946
Button: 5-way tactile joystick from a scrapped computer monitor. Even though the board I've used is not available for purchase, if you search for "5-way tactile" you will find the component and there are multiple breakout boards. Or you could replace it with just a button to start the curing process.
UV-LED strip: https://www.ebay.com/itm/UV-Ultraviolet-Black-Lights-LED-Strip-300-LEDs-16-4Ft-5M-3528-Flexible/192926297864
Motor: 12mm DC-motor with planetary gearbox. Mine are not available for sale online from what I can find, but if you search for "12mm DC-motor with planetary gearbox" there are many available variants. Also try to choose a motor with a winding already for 12V so you won't run in to the issues I have with a too fast motor as mine has a 4,5V winding.
Ballbearings: OD=15mm ID=10mm T=4mm https://www.ebay.com/sch/i.html?_from=R40&_trksid=m570.l1313&_nkw=ballbearing+15x10x4&_sacat=0
Door is kept shut using round magnets, 4mm long and 4mm diameter. For hinges I used M3 nylon screws mounted on the top and bottom of the door and with their heads cut off so that roughly 3mm sticks out from the door. that works well as a hinge mechanism.
Screws needed are M2 and M3.
I mounted the LED strip on a pre-cut piece of paper that was then glued in place. Almost the entire LED strip fit in the box, so rougly 300 LED's.
A few words about the parts:
Foot - print 4pcs, preferribly in TPU or other flex
Platform-bearing-plug - you need 3pcs of these for the ball bearings that supports the rotating platform.
Chamber - This massive piece can be printed without support! There will be a few sagging lines here and there but it worked beyond expectation to print without any support.
Similar models
thingiverse
free

Nodemcu motor board to 5.25" bay by tapsa
...s two holes for buttons and one hole for oled display. very useful if you want make diy water cooling or fan control unit for pc.
thingiverse
free

Lighted Tactile Button by awdark
...lwh) electronically two is not needed but i liked the way they click and these switches are cheap. in the middle is a ws2812 led.
thingiverse
free

UV Resin Curing Chamber
...ith aluminum foil to make them reflective.
i'm also uploading the f3d file if you want to edit something ;)
hope you like it!
grabcad
free

MakerHawk ESP32 Development Board WiFi with 0.96inch OLED Display WIFI Kit32 Arduino Compatible CP2012 for Arduino Nodemcu
...oducts/makerhawk-esp32-development-board-wifi-with-0-96inch-oled-display-wifi-kit32-arduino-compatible-cp2012-for-arduino-nodemcu
thingiverse
free

tactile button box by scott1988
...;m not bothered about visual appearance.
the switches go to my arduino which control 8 lighting circuits via a 8 ch relay module.
thingiverse
free

Haptic outline for Nikon Z 50's tactile buttons
...300lse" double sided tape to stick it on the camera.
if you try it, feel free to give your feedback or suggest improvements.
thingiverse
free

Cryptodisplay by Mariuskrog
...ngiverse. he used a 1.3" oled, i only had 0.96" so i made a new case
credit to witnessmenow for the code over at github
thingiverse
free

NodeMcu Adaptor by Shoogon
...screws a little bit bigger so they will not break, you might need to sand them.
i printed it using nylon so it was strong enough.
thingiverse
free

Simple Crypto Currency Display by Witnessmenow
...nd printing the front first to make sure the scale is correct, my printer prints a tiny bit small so i needed to scale it to 102%
thingiverse
free

Case for NodeMCU Motor Driver from doit.am by piglet_74
...omeone else's assembly.
light pipes seem hard to find so i may just make a hole for the power light too and leave it at that.
Photon
3d_export
$7

swimming pool waterfall
...caustics<br>-disable the vraymtl's affect shadows parameter when using caustics.<br>-set photon emit radius (v-ray sun)<br>-increase caustics subvids (vray properties >...
3d_sky
$8
PHOTON
...photon
3dsky
wall lamp table lamp floor lamp
photon
3d_sky
free
PHOTON
...photon
3dsky
wall lamp table lamp floor lamp
photon factory
thingiverse
free
Photons
...photons
thingiverse
my last test before i print real things.
files come with the anycubic photon s
thingiverse
free
knocker for photon by Mckymn2000
...hoton by mckymn2000
thingiverse
was redon for photon you wont the 4kcnoker for photon
https://www.thingiverse.com/thing:1458545
thingiverse
free
Antimatter Photon Fin
...antimatter photon fin
thingiverse
antimatter photon fin, dieborr fpv style.
3d_sky
free
PHOTON
...photon
3dsky
chandelier lamp light floor lamp
chandelier table lamp and floor lamp from the factory "foton"
thingiverse
free

Photon Torpedoes by Mike1701
...photon torpedoes by mike1701
thingiverse
star trek's primary means of blowing the crap out of something, the photon torpedo.
thingiverse
free
Anycubic Photon Door Holder
...anycubic photon door holder
thingiverse
anycubic photon door holder
thingiverse
free
Particle Photon Case by mpleander
...particle photon case by mpleander
thingiverse
case for particle photon iot device.
Curing
turbosquid
$80

UV curing oven
...uring oven for download as sldas, max, ige, 3ds, fbx, and obj on turbosquid: 3d models for games, architecture, videos. (1656005)
3d_export
$10

Automatic circuit board UV curing machine
.... the uv curing device consists of five parts: light source system, ventilation system, control system, conveying system and box.
3d_export
$7

display automatic dispensing uv curing line
...display automatic dispensing uv curing line
3dexport
display automatic dispensing, uv curing line
3d_export
$69

plate curing press rubber curing press plate curing press
...pment operation and less maintenance. the temperature is provided by the heating medium (usually steam, heat transfer oil, etc.).
3d_export
$80

uv curing oven
... you can email to me.<br>designed with solidworks 2017, render with keyshot<br>**************************************
3d_export
$15

potion cure life
...nown as the "potions master" ("potions master"). he is one of the main characters in the books in the series.
3ddd
$1
Стул
...ir by rossetto
base available in a range of options
made in italy
steel framework, entirely moulded in cold-cure polyurethane.
3d_export
$35

Madicaments 3D Model
...port
medicines tablets capsules pill physic doctor's stuff cure drug medicaments
madicaments 3d model 3d.dasha 87130 3dexport
3d_export
$26

Salame 3D Model
...xport
salami salame cured sausage meat food antipasto dried texture material italian italy
salame 3d model tartino 35279 3dexport
3d_export
$7

Injection 3D Model
...ort
aid cure equipment drug flu health help injection hospital medical pharmacy science
injection 3d model petrosg 22506 3dexport
Chamber
turbosquid
$15
Chamber
...rbosquid
royalty free 3d model chamber for download as blend on turbosquid: 3d models for games, architecture, videos. (1240986)
3d_export
$6

Chamber
...chamber
3dexport
squish dumpling avatars of the valorant agents.
turbosquid
$53
Alveolus Chamber
... available on turbo squid, the world's leading provider of digital 3d models for visualization, films, television, and games.
turbosquid
free

Underground chamber
... available on turbo squid, the world's leading provider of digital 3d models for visualization, films, television, and games.
turbosquid
free
Vacuum chamber
... available on turbo squid, the world's leading provider of digital 3d models for visualization, films, television, and games.
turbosquid
$10
disinfection chamber
...on chamber for download as blend, 3ds, dae, fbx, obj, and stl on turbosquid: 3d models for games, architecture, videos. (1671962)
3d_export
$25
Hypersleep Chamber
..., the users are usually clad in either sleepwear or underwear to prevent clothes and/or armor to become frozen to the users body.
turbosquid
$2

Xenomorph Incubation Chamber
...y free 3d model xenomorph incubation chamber for download as on turbosquid: 3d models for games, architecture, videos. (1705895)
3d_export
$7

chambers bar stools
...chambers bar stools
3dexport
name:
turbosquid
$59

Chamber Pendant Light
...yalty free 3d model chamber pendant light for download as max on turbosquid: 3d models for games, architecture, videos. (1291559)
Resin
turbosquid
$5

Resin table
...royalty free 3d model resin table for download as max and fbx on turbosquid: 3d models for games, architecture, videos. (1433351)
turbosquid
free
Resin Stone Free
...urbosquid
free 3d model resin stone free for download as max on turbosquid: 3d models for games, architecture, videos. (1521898)
turbosquid
$6

Epoxy Resin Table
...
royalty free 3d model epoxy resin table for download as max on turbosquid: 3d models for games, architecture, videos. (1425329)
turbosquid
$9

RESIN CHATEAU CHAIR
...sin chateau chair for download as max, max, 3ds, fbx, and obj on turbosquid: 3d models for games, architecture, videos. (1640415)
3d_export
$39

waraji resin statue sculpture
... sculpture
3dexport
waraji resin statue sculpture file 3dsmax 2014 max - fbx - stl - obj - 3ds polys : 163098 vertices : 85396
turbosquid
$10

Decorative Resin Decorative Box
...ree 3d model decorative resin decorative box for download as on turbosquid: 3d models for games, architecture, videos. (1341022)
turbosquid
$2

Resin Table LOW POLY
...oyalty free 3d model resin table-low poly for download as fbx on turbosquid: 3d models for games, architecture, videos. (1568798)
turbosquid
$1

Doll eye resin and molding
...ree 3d model doll eye (resin and molding) for download as stl on turbosquid: 3d models for games, architecture, videos. (1461887)
turbosquid
$1

Resin Ring - Epoxy Accessory
...odel resin ring - epoxy accessory for download as max and fbx on turbosquid: 3d models for games, architecture, videos. (1422041)
turbosquid
$7

Resin Wicker Dining Set
... available on turbo squid, the world's leading provider of digital 3d models for visualization, films, television, and games.
Inspired
turbosquid
$10

Inspiration?
... available on turbo squid, the world's leading provider of digital 3d models for visualization, films, television, and games.
3ddd
free

INSPIRATION tecni nova
... tecni , письменный
моделился по каталогу inspiration tecni nova.
3ddd
$1

Inspire Christina Aguilera
...inspire christina aguilera
3ddd
парфюм
inspire christina aguilera
3d_export
$15

Starkiller Inspired Lightsaber
...starkiller inspired lightsaber
3dexport
this lightsaber is inspired by starkiller's lightsaber
3ddd
$1

Creative Inspire T6160
...creative inspire t6160
3ddd
колонка
колонки 5.1 creative inspire t6160
polys: 912452
verts: 475911
3d_export
$15

razer inspired keyboard
...xport
i made this highly detailed keyboard inspired by the . it's high poly, highly detailed. available for commercial use.
turbosquid
$39

Maul inspired lightsaber
... model maul inspired lightsaber for download as blend and obj on turbosquid: 3d models for games, architecture, videos. (1630272)
turbosquid
$499

Pretty Lady Inspiration
... available on turbo squid, the world's leading provider of digital 3d models for visualization, films, television, and games.
turbosquid
$249

Anime Inspired Male
... available on turbo squid, the world's leading provider of digital 3d models for visualization, films, television, and games.
turbosquid
$98
DJI Inspire 1
... available on turbo squid, the world's leading provider of digital 3d models for visualization, films, television, and games.
design_connected
$27

...print
designconnected
moroso print computer generated 3d model. designed by wanders, marcel.
3ddd
free

Eichholtz Prints
...- eichholtz print central station i
13 - eichholtz print central station ii
14 - eichholtz print marisa
15 - eichholtz print tish
3ddd
$1

Eichholtz Prints
...print abstract - set of 2
10 - eichholtz print orange abstract
11 - eichholtz print buddha right
12 - eichholtz print buddha left
turbosquid
$1

... available on turbo squid, the world's leading provider of digital 3d models for visualization, films, television, and games.
3ddd
free

Eichholtz Prints
...of 4
2 - print dunbar 2 set of 4
3 - print guadeloupe 1 set of 4
4 - print guadeloupe 2 set of 4
5 - print giles
6 - print trett
3ddd
$1

Eichholtz Prints
...nt tutti frutti
3 - eichholtz prints watson - set of 2
4 - eichholtz prints antique nautilus - set of 2
5 - eichholtz print tiara
3d_export
$5

Monster for printing
...monster for printing
3dexport
monster 3d model printing
3ddd
free

printed rug
...printed rug
3ddd
ковер
very creative printed rug
3ddd
free

Eichholtz Prints
...иал: бумага
габариты (вхш): 72 x 62 см
описание: print sweetmeat - постер в деревянной раме.
3 - prints varsity set of 2
арти
3ddd
free

Art Print Posters
...art print posters
3ddd
прованс
art print posters by patrician prints