Thingiverse
Pergo VER 2 Robo3D R1 (and plus) true 370 mm Y rails upgrade by Pergo
by Thingiverse
Last crawled date: 3 years ago
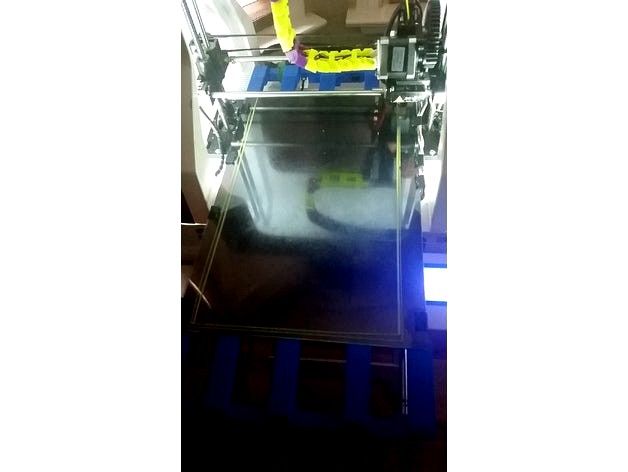
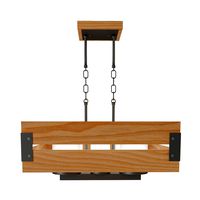
You got a bed that is 15" long but can't print more than 9" !!! Not anymore!!!
With my mod, you can truly print on every square mm of the 15" x 10" glass.
But you say wait you can really do that because PLA and ABS will peal off the bed once you get past the heater. Right you are but with my 600 Watt bed heater upgrade,http://www.thingiverse.com/thing:1300095
I can truly print a 360 mm long object that won't warp off the glass.
Some extras about this version:
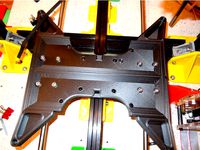
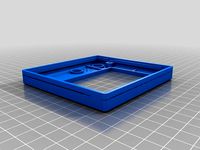
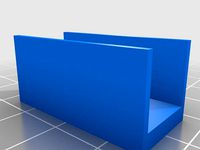
This part is more accurate, durable, and a much better fit than the Version 1. This says a lot because I printed with my version 1's for about 2 years. This is a quality part with a lot of experience behind it. I really feel a difference with the smoothness of the glide down the full length of the Y axis. With the below print settings these ends are even lighter than the version 1's. This is due to the ribs I used on each of the glass supports. Another benefit is that the glass is now centered between the housing of the white case. I shifted the entire bed 6 mm to the right to accomplish this.
Print settings
Use 6 shells and a 12% infill and print at .31 mm layer height if you can.
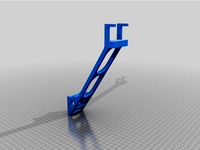
Print the model as is for the Front piece and MIRROR the part Z axis for the back part.
Position part on it's back with the legs sicking up, then rotate to 45 degrees to make it fit on your bed.
Print the Front (part)...
Then to Print the Back (part)......
Cura:
Select Part, Mirror, Y, Print it
Matter Control Users:
Select EDIT, then Click Mirror Y, Print it
Simplify3D:
Menu item [Mesh][Mirror Mesh][Mirror Z] , Print it
Others:
Buy Simplify3D! :P really, its awesome!
Install:
Now you have the part and a mirrored version of the part printed.
Get a drill that is the closest you have to 8 mm but a tad less and drill out the spots where the 8 mm rods go. leave at least 4-5mm. Don't drill all the way through!
Lay your glass and the ends on the floor facing the floor and measure the rod length you need based on how far you drilled your 8mm into the ends holes. (I made them 7.9mm, a bit tight so you could get a tight fit when you install it) measure the length of rod you need based on how far you drilled. For me it was 20" long.
https://www.amazon.com/gp/product/B00WJFRIIQ
Cut 2 of the 8mm bars to a length of about 20 inches based on what you found above, It's better to be a bit long than short. you can cut again. I used a Dremel Sawmax with he metal cutter grinding wheel and wow cut like butter!
DON'T JAM THE 8MM RODS INTO THE ENDS YET!!! You might not get them out with the tight fit and then you will break the ends getting the rods out!
Put the rods in the Pillow blocks (the rectangles that hold the 8 mm bars on the printer)
do a test fit with the length of your rods.
Happy with test fit??
Now you can put the rods into the Mirrored BACK end you printed. you may have to use a hammer get them the seat all the way.
Then with the rods on still in the pillow blocks, put the printed FRONT end on the 8mm rods too. Make sure it glides easy.
1x 525mm (approx.) GT2 Belts : http://www.amazon.com/gp/product/B00FM5SC2Q/ref=oh_aui_detailpage_o06_s02?ie=UTF8&psc=1 (comes with 1150mm of belt and 2 pulleys.)
If all is good, Now install the new GT2 belt, test fit in making sure your belt teeth are to the left as you look at the front of the printer. Put the belt ends into the retainer blocks from your old bed. make sure that your belt has a bit of slack. Best to be long and cut it down when you see how much you need. Tighten the front and back screws taking up the slack until you have good tension on the belt. Rock your bed back and forth making sure you have a good "glide". At this point your ready to see if your printer likes the new bed. Keep in mind that we did NOT flash the printer firmware yet still giving you a way back if something is not right.
Tell your printer to Auto-Home. If you like everything you see. Go ahead and flash the printer with either the firmware I provided that will specify 0-370mm Y max length. I also already have the Graphic Controller in this firmware. Here are the values I have in this version for max limits. Note there is a (pound) sign if from of each "define" line but the editor here hides it.
// Travel limits after homing
define X_MAX_POS 214
define X_MIN_POS 0
define Y_MAX_POS 370 <------ Max Y limit
define Y_MIN_POS 0
define Z_MAX_POS 201
define Z_MIN_POS 0
Comment here or Private message me if you need help.
-Pergo !
ps..
YES that is a piece of everyday, standard, window glass, from the Home Depot 1/16" glass (16 x 20") that I cut to 15" x 10" to use as a build surface on top of my Neoceram. I chipped my NeoCeram a few times not waiting for a part to cool down after a print. I've got no less than 100+ prints off this regular glass with no problems. The yellow print I did around the extreme outer perimeter was ABS and didn't stick too good but that's a 370 mm print. My heat only extends to the 355 mm mark. but I can stretch it to 360 with short objects.
With my mod, you can truly print on every square mm of the 15" x 10" glass.
But you say wait you can really do that because PLA and ABS will peal off the bed once you get past the heater. Right you are but with my 600 Watt bed heater upgrade,http://www.thingiverse.com/thing:1300095
I can truly print a 360 mm long object that won't warp off the glass.
Some extras about this version:
This part is more accurate, durable, and a much better fit than the Version 1. This says a lot because I printed with my version 1's for about 2 years. This is a quality part with a lot of experience behind it. I really feel a difference with the smoothness of the glide down the full length of the Y axis. With the below print settings these ends are even lighter than the version 1's. This is due to the ribs I used on each of the glass supports. Another benefit is that the glass is now centered between the housing of the white case. I shifted the entire bed 6 mm to the right to accomplish this.
Print settings
Use 6 shells and a 12% infill and print at .31 mm layer height if you can.
Print the model as is for the Front piece and MIRROR the part Z axis for the back part.
Position part on it's back with the legs sicking up, then rotate to 45 degrees to make it fit on your bed.
Print the Front (part)...
Then to Print the Back (part)......
Cura:
Select Part, Mirror, Y, Print it
Matter Control Users:
Select EDIT, then Click Mirror Y, Print it
Simplify3D:
Menu item [Mesh][Mirror Mesh][Mirror Z] , Print it
Others:
Buy Simplify3D! :P really, its awesome!
Install:
Now you have the part and a mirrored version of the part printed.
Get a drill that is the closest you have to 8 mm but a tad less and drill out the spots where the 8 mm rods go. leave at least 4-5mm. Don't drill all the way through!
Lay your glass and the ends on the floor facing the floor and measure the rod length you need based on how far you drilled your 8mm into the ends holes. (I made them 7.9mm, a bit tight so you could get a tight fit when you install it) measure the length of rod you need based on how far you drilled. For me it was 20" long.
https://www.amazon.com/gp/product/B00WJFRIIQ
Cut 2 of the 8mm bars to a length of about 20 inches based on what you found above, It's better to be a bit long than short. you can cut again. I used a Dremel Sawmax with he metal cutter grinding wheel and wow cut like butter!
DON'T JAM THE 8MM RODS INTO THE ENDS YET!!! You might not get them out with the tight fit and then you will break the ends getting the rods out!
Put the rods in the Pillow blocks (the rectangles that hold the 8 mm bars on the printer)
do a test fit with the length of your rods.
Happy with test fit??
Now you can put the rods into the Mirrored BACK end you printed. you may have to use a hammer get them the seat all the way.
Then with the rods on still in the pillow blocks, put the printed FRONT end on the 8mm rods too. Make sure it glides easy.
1x 525mm (approx.) GT2 Belts : http://www.amazon.com/gp/product/B00FM5SC2Q/ref=oh_aui_detailpage_o06_s02?ie=UTF8&psc=1 (comes with 1150mm of belt and 2 pulleys.)
If all is good, Now install the new GT2 belt, test fit in making sure your belt teeth are to the left as you look at the front of the printer. Put the belt ends into the retainer blocks from your old bed. make sure that your belt has a bit of slack. Best to be long and cut it down when you see how much you need. Tighten the front and back screws taking up the slack until you have good tension on the belt. Rock your bed back and forth making sure you have a good "glide". At this point your ready to see if your printer likes the new bed. Keep in mind that we did NOT flash the printer firmware yet still giving you a way back if something is not right.
Tell your printer to Auto-Home. If you like everything you see. Go ahead and flash the printer with either the firmware I provided that will specify 0-370mm Y max length. I also already have the Graphic Controller in this firmware. Here are the values I have in this version for max limits. Note there is a (pound) sign if from of each "define" line but the editor here hides it.
// Travel limits after homing
define X_MAX_POS 214
define X_MIN_POS 0
define Y_MAX_POS 370 <------ Max Y limit
define Y_MIN_POS 0
define Z_MAX_POS 201
define Z_MIN_POS 0
Comment here or Private message me if you need help.
-Pergo !
ps..
YES that is a piece of everyday, standard, window glass, from the Home Depot 1/16" glass (16 x 20") that I cut to 15" x 10" to use as a build surface on top of my Neoceram. I chipped my NeoCeram a few times not waiting for a part to cool down after a print. I've got no less than 100+ prints off this regular glass with no problems. The yellow print I did around the extreme outer perimeter was ABS and didn't stick too good but that's a 370 mm print. My heat only extends to the 355 mm mark. but I can stretch it to 360 with short objects.
Similar models
thingiverse
free

Printrbot Simple X upgrade. by iamjonlawrence
... on the ends of the rods and not bind the bed leveling screws.
design inspired by ahaer http://www.thingiverse.com/thing:215294
thingiverse
free

Pergo Robo3D R1 (and plus) true 330mm Y rails upgrade by Pergo
...will be printing with nozzle jammed against the bed.
here's a possibility for a heated bedhttp://www.amazon.com/dp/b011u7ayx4
thingiverse
free

A4-3D-Printer (PepRap/Prusa i3) by Choose
...ce the bed in front before locking the right front stop and place the bed in back position before locking the right back stopper.
thingiverse
free

Pergo Bed Stiffeners by Pergo
... block sits. if you upgraded to a 300 mm length bed heater, you had better use abs or nylon which has a higher glass temperature.
thingiverse
free

Pergo Embroidery Rack by Pergo
...f you have a robo 3d you can do it too! just replace the belt, rods and print 2 of thesehttps://www.thingiverse.com/thing:2216671
thingiverse
free

Vision Printer Y Belt Tensioner by psutex
... it may be insignificant,but i believe that this belt line of action is what we want.
updates and pictures as needed will follow.
thingiverse
free

OneUp Bed Replacement by kmenigoz
...rts on my oneup at a 45 degree angle to make them fit on the print bed. these parts are currently being used on my oneup printer.
thingiverse
free

A602 Y axis smooth rod 8mm end guide by titi974
...to the front and/or back plate of the a602 printer, it guides the y axis smooth rod to keep it stable.
hope you guys enjoy it !
thingiverse
free
Tevo Tarantula 8mm Rod Y-Axis and Printed Bed Support by evil_k
....thingiverse.com/thing:1580899
other brackets on bottom of tevo tarantula by thingirob: https://www.thingiverse.com/thing:1457449
thingiverse
free

Rigidbot spool holder cap- fits 8mm rod - adapted for mounting on back by guysoft
...ach end of the rod)
this is a remix that lets you mount the spool on the back or the front of the ridigbot using the original rod
Pergo
thingiverse
free

Pergo Stylis by Pergo
...pergo stylis by pergo
thingiverse
nothing more than a pergo stylis
thingiverse
free

Pergo Med Jars by Pergo
...pergo med jars by pergo
thingiverse
these are great for travel. sealed containers for meds.
thingiverse
free
Pergo Plunge Earrings by Pergo
...pergo plunge earrings by pergo
thingiverse
just a simple earring design i made for the wife.
thingiverse
free

Pergo Snuggle Path Earring by Pergo
...pergo snuggle path earring by pergo
thingiverse
just another earing
thingiverse
free

Pergo B-Mine Earring by Pergo
...pergo b-mine earring by pergo
thingiverse
a little valentines day earring
thingiverse
free
Pergo Mini Scoop by Pergo
..., you need a scoop for that.. well when you can, you make even the silliest of items. ta dah.. i present pergo's mini scooper
thingiverse
free
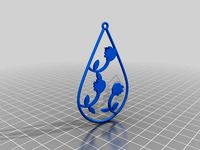
Pergo Flower Plunge Earring by Pergo
...pergo flower plunge earring by pergo
thingiverse
earring i call it the "flower plunge"
thingiverse
free

Pergo Night Light Shade by Pergo
...pergo night light shade by pergo
thingiverse
print with .4mm nozzle
no supports
no infill (tee hee)
thingiverse
free
Pergo CoverTopNoTextSolderedDisplay by Pergo
... and can't be removed.
do not print the "base" piece this replaces the "top" and "base" pieces.
thingiverse
free

Pergo Cel Tilter by Pergo
...r by pergo
thingiverse
my pole holder was popular where the wife works, but they don't use the pole with it. so i made this.
Robo3D
turbosquid
$2

Robo3D Feet
... available on turbo squid, the world's leading provider of digital 3d models for visualization, films, television, and games.
thingiverse
free

Robo3d Filament Guide by sjreggel
...robo3d filament guide by sjreggel
thingiverse
robo3d filament guide, to be used with the default robo3d spool holder
thingiverse
free
Robo3D USB Support by GipsyEureka
...robo3d usb support by gipsyeureka
thingiverse
robo3d usb support.
thingiverse
free
Robo3D Camera Mount by robro
...robo3d camera mount by robro
thingiverse
mount for a logitech c270 webcamto a robo3d printer
thingiverse
free
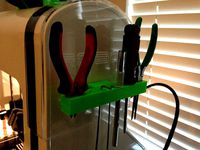
Robo3D Tool Holder by huntergrayson
...robo3d tool holder by huntergrayson
thingiverse
an out of the way place for your tools on the robo3d printer
thingiverse
free
Robo3D Top Mount by ThorMJ
...o the robo3d.
added a version with longer posts so it clears the robo3d handle from the http://www.thingiverse.com/thing:234939
thingiverse
free

Screws' holder Robo3D by GalloEnricoDesign
...screws' holder robo3d by galloenricodesign
thingiverse
a easy support used as holder for screws' extruder
for robo3d.
thingiverse
free
ROBO3D Spool Cap by portdog77
...robo3d spool cap by portdog77
thingiverse
this is a cap i made for my robo3d to hold the filliment next to the machine.
thingiverse
free

ROBO3D OILER HOLDER by Prefab
...robo3d oiler holder by prefab
thingiverse
holds your robo3d oilers so you can always find them
thingiverse
free

robo3d feet simple version by Windpower
...robo3d feet simple version by windpower
thingiverse
robo3d feet remember to print 4.
370
turbosquid
$20

Lab_Tap_TOF_1000-370
... available on turbo squid, the world's leading provider of digital 3d models for visualization, films, television, and games.
design_connected
$22

Dehors Fauteuil 370
...uteuil 370
designconnected
alias dehors fauteuil 370 seating objects computer generated 3d model. designed by michele de lucchi.
3d_export
$50

Nissan 370 z 3D Model
...nissan 370 z 3d model
3dexport
nissan 370 350 sport racing sedan car gtr skyline
nissan 370 z 3d model undrenic 29550 3dexport
cg_studio
$70

nissan 370 Z3d model
...nissan 370 z3d model
cgstudio
.max - nissan 370 z 3d model, royalty free license available, instant download after purchase.
3ddd
$1

DVD-плеер Pioneer DV-370
...dvd-плеер pioneer dv-370
3ddd
dvd , pioneer
dvd-плеер pioneer dv-370. моделил по фото!
turbosquid
$19

Campania Bench 370-508
...odel campania bench 370-508 for download as max, obj, and fbx on turbosquid: 3d models for games, architecture, videos. (1368988)
turbosquid
$9

Sartory Rugs Nc-370
... available on turbo squid, the world's leading provider of digital 3d models for visualization, films, television, and games.
3ddd
$1

LUXIT Arki Tek 370
...luxit arki tek 370
3ddd
luxit
выполнен по чертежам
3d_export
$55

Condo 370 3D Model
...iture accessories complete full detailed photorealistic textures materials render ready
condo 370 3d model barmoon 42613 3dexport
3d_export
$155

Building 370 3D Model
...terior resort hotel bank office center university college campus street landscape
building 370 3d model rosestudio 54874 3dexport
R1
turbosquid
$10
R1
... available on turbo squid, the world's leading provider of digital 3d models for visualization, films, television, and games.
turbosquid
$10

R1
... available on turbo squid, the world's leading provider of digital 3d models for visualization, films, television, and games.
turbosquid
$15

chair r1
...urbosquid
royalty free 3d model chair r1 for download as max on turbosquid: 3d models for games, architecture, videos. (1282574)
3ddd
free
r1
...r1
3ddd
кольцо , ювелирное украшение
кольцо, сделано в свободное от работы время )
3d_ocean
$5

R1 rim
... tire tuner tuning tyre vehicle wheel
a r1 rim modeled to specs. for more car-related objects, please do visit my profile. enjoy!
turbosquid
$5
R1 Rocket
... available on turbo squid, the world's leading provider of digital 3d models for visualization, films, television, and games.
3d_export
$59

praga r1
...s for the minimum operational crew, the praga r1 offers the ultimate race-winning motorsport technology in an affordable package.
turbosquid
$80
R1 Astromech Droid
... free 3d model r1 astromech droid for download as obj and lxo on turbosquid: 3d models for games, architecture, videos. (1180592)
turbosquid
$49

Yamaha R1 2006
... available on turbo squid, the world's leading provider of digital 3d models for visualization, films, television, and games.
3d_export
$10

R1 Rim 3D Model
...wheel chrome spoke hub vehicle nut obj import addon tuner star tuning special tyre r1
r1 rim 3d model dragosburian 81316 3dexport
Ver
3ddd
$1
VER DESIGN
...ver design
3ddd
ver design
кресло ver design
3ddd
$1
VER DESIGN
...ver design
3ddd
ver design
диван ver design
3ddd
free
VER DESIGN
...ver design
3ddd
ver design , стеллаж
полка ver design
3ddd
$1
VER DESIGN
...ver design , лежак , шезлонг
шезлонг ver design
3ddd
$1

Ver Design стол
...ver design стол
3ddd
ver design
...
3ddd
$1

Ver Design / NOTTURNA
...ver design / notturna
3ddd
ver design
http://www.verdesign.it
3d_export
$6

Old book ver 2
...old book ver 2
3dexport
old book ver. 2 pbr unwrap
3d_export
$6

Old book ver 3
...old book ver 3
3dexport
old book ver. 3 pbr unwrap
3d_export
$6

Old book ver 5
...old book ver 5
3dexport
old book ver. 5 pbr unwrap
turbosquid
free

plant ver 02
...2
turbosquid
free 3d model plant ver 0.2 for download as fbx on turbosquid: 3d models for games, architecture, videos. (1491580)
True
3ddd
$1

True Slight
...менный стул от итальянской фабрики true, модель slight .
подробнее на сайтеhttp://www.truedesign.it/product.php?id=69
3ddd
$1

True design MILLEPIEDI
...true design millepiedi
3ddd
true design , millepiedi
true design millepiedi
3ddd
$1

Bonaldo true bed
...bonaldo true bed
3ddd
bonaldo , true
кровать bonaldo true bed
3ddd
free

True Design ARCA
...true design arca
3ddd
true desig , arca
true design arca.
3ddd
$1

True Design DNA
...3ddd
true design , dna , скамья
true design dna
3ddd
$1

True Design DNA
... design , dna , скамья
true design, dna скамья,
turbosquid
$39

True Mass
... available on turbo squid, the world's leading provider of digital 3d models for visualization, films, television, and games.
turbosquid
$1

Refrigerator by TRUE
... available on turbo squid, the world's leading provider of digital 3d models for visualization, films, television, and games.
3d_export
$25

Ring Be true to the one Who is true to you 3D Model
...ver cnc prototyping printable jewellery gem obj women
ring be true to the one who is true to you 3d model ganesha 93468 3dexport
3ddd
$1

True’s air curtain merchandisers
...’s air curtain merchandisers
3ddd
холодильник , витрина
true’s air curtain merchandisers
Upgrade
turbosquid
$15

Upgraded Glock
...e 3d model upgraded glock for download as obj, fbx, and blend on turbosquid: 3d models for games, architecture, videos. (1185950)
3ddd
$1

Calligaris / UPGRADE
...calligaris / upgrade
3ddd
calligaris
c материалом
3d_export
free

cz upgrade
...cz upgrade
3dexport
https://www.buymeacoffee.com/mestrezen3d https://linktr.ee/mestrezen3
turbosquid
$80

Custer Tank upgrade
... available on turbo squid, the world's leading provider of digital 3d models for visualization, films, television, and games.
turbosquid
$39

Domestos 1 upgrade
... available on turbo squid, the world's leading provider of digital 3d models for visualization, films, television, and games.
3d_export
$10

Upgraded tea cup
...upgraded tea cup
3dexport
a cup with an unusual design and a unique shape for a more enjoyable tea experience
3d_export
$8

dixy outlander classic style upgraded poplar wood lounge chair
...utlander classic style upgraded poplar wood lounge chair
3dexport
dixy outlander classic style upgraded poplar wood lounge chair
turbosquid
free

AK-12 + Upgrades low-poly 3D model
...ow-poly 3d model for download as fbx, blend, and unitypackage on turbosquid: 3d models for games, architecture, videos. (1501145)
evermotion
$700

Upgrade from V-ray 1.5 to 3.5 for 3ds max
...here is no need to purchase a new dongle - your current dongles will be reprogrammed to carry v-ray 3. evermotion 3d models shop.
evermotion
$300

Upgrade from V-Ray 2.0 to V-ray 3.5 for 3ds Max
... interface (gui) for editing settings on one machine and one render node for rendering on one machine. evermotion 3d models shop.
Plus
turbosquid
$2
plus-plus puzzle and lego
...d model plus-plus puzzle and lego for download as stl and obj on turbosquid: 3d models for games, architecture, videos. (1662633)
3ddd
$1
Стенка Plus
...стенка plus
3ddd
plus , модная мебель
фабрика "модная мебель", модель plus
3ddd
$1
Спальня METIS plus
... hulsta , metis , спальня
спальня metis plus
design_connected
$11
be plus B+
...be plus b+
designconnected
blå station be plus b+ chairs computer generated 3d model. designed by börge lindau.
design_connected
$11
Bank Plus
...bank plus
designconnected
röthlisberger kollektion bank plus coffee tables computer generated 3d model. designed by atelier oi.
3ddd
$1

elos Plus
... candela
elos plus — мультифункциональный аппарат для проведения лазерного и ipl лечений
3ddd
$1
Calligaris Even Plus
...calligaris even plus
3ddd
calligaris
calligaris_chair_even plus
design_connected
$29
Basket Plus
...nconnected
photo-realistic 3d models of the basket plus bed from bonaldo for 3d architectural and interior design presentations.
3ddd
free
Artpole Faktum Plus
... артполе , панель
artpole faktum plus
размеры:
высота 625мм
ширина 800мм
глубина 17мм
3ddd
$1
Мария / Jazz Plus
...мария / jazz plus
3ddd
мария
кухня фабрики мария модель__jazz plus
Rails
3d_ocean
$5

rails
...rails
3docean
old rails rails sleepers
old rails
archibase_planet
free
Rail
...chibase planet
rail railing handrail guard-rail
rail forged fence n310814 - 3d model (*.gsm+*.3ds) for exterior 3d visualization.
archibase_planet
free
Rail
...rail
archibase planet
handrail railing guard-rail
rail n220914 - 3d model (*.gsm+*.3ds) for interior 3d visualization.
archibase_planet
free
Rail
...rail
archibase planet
railing hand-rail banisters
rail n130309 - 3d model (*.gsm+*.3ds) for interior 3d visualization.
archibase_planet
free
Rail
...rail
archibase planet
railing hand-rail banisters
rail n270510 - 3d model (*.gsm+*.3ds) for interior 3d visualization.
archibase_planet
free
Railing
...
archibase planet
railing handrail fence guard-rail
railing n140314 - 3d model (*.gsm+*.3ds+*.max) for exterior 3d visualization.
archibase_planet
free

Railing
...railing
archibase planet
railing
railing- 3d model (*.gsm+*.3ds) for interior 3d visualization.
archibase_planet
free
Railing
...railing
archibase planet
railing enclosure barrier
light railing - 3d model for interior 3d visualization.
archibase_planet
free
Rail
...rail
archibase planet
metal railing
rail n280608 - 3d model (*.gsm+*.3ds) for interior 3d visualization.
archibase_planet
free
Railing
...railing
archibase planet
railing kitchen ware
railing 1 - 3d model (*.gsm+*.3ds) for interior 3d visualization.
Y
turbosquid
$1

Tetera y Galletas y Caf
... available on turbo squid, the world's leading provider of digital 3d models for visualization, films, television, and games.
3ddd
$1

Смеситель Y-CON
...смеситель y-con
3ddd
смеситель , y-con
смеситель y-con
3ddd
$1

Y-Chair
...y-chair
3ddd
tom dixon
y-chair designed by tom dixon,
3ds max + obj, corona
3ddd
$1

Y Chair compilation
....net/products/us/y-chair-sled-base
y chair swivel basehttp://www.tomdixon.net/products/us/y-chair-swivel-base
turbosquid
$7

Bench Y
...turbosquid
royalty free 3d model bench y for download as obj on turbosquid: 3d models for games, architecture, videos. (1488746)
turbosquid
$15

bonePile Y
...oyalty free 3d model bonepile y for download as blend and obj on turbosquid: 3d models for games, architecture, videos. (1546374)
turbosquid
$7

Y for Yarn
...d
royalty free 3d model y for yarn model for download as max on turbosquid: 3d models for games, architecture, videos. (1699732)
turbosquid
$2

FONT Y
...quid
royalty free 3d model font y for download as ma and obj on turbosquid: 3d models for games, architecture, videos. (1549457)
3ddd
$1

WOOD-y
...wood-y
3ddd
wooden guy
turbosquid
$150

Alien Y
... available on turbo squid, the world's leading provider of digital 3d models for visualization, films, television, and games.
Mm
3ddd
$1

MM Lampadari
...mm lampadari
3ddd
mm lampadari
mm lampadari
бра
люстра
3ddd
$1

MM lampadari
...mm lampadari
3ddd
mm lampadari
lampa mm lampadari,art.
3ddd
$1

MM lampadari
...mm lampadari
3ddd
mm lampadari
lustra mm lampadari,art.
3ddd
free

MM lampadari
...mm lampadari
3ddd
mm lampadari
bra mm lampadari,art.
3ddd
$1

MM Lampadari
...mm lampadari
3ddd
mm lampadari
люстра от фабрики mm lamparadi.арт:7032/8 размеры:а (d 72 x h37 см)
3ddd
$1

MM Lampadari
...mm lampadari
3ddd
lampadari
mm lampadari, 5972/12+6 1700x1800h
3ddd
$1

MM Lampadari
...mm lampadari
3ddd
mm lampadari
настольная лампа (высота - 52 см)
3ddd
$1

MM Lampadari
...mm lampadari
3ddd
mm lampadari
бра от фабрики mm lamparadi.арт:. 7032/a1 размеры:(l 16 x h 27 x sp 27 см)
3ddd
$1

MM Lampadari
...mm lampadari
3ddd
mm lampadari
люстра с рассеивателем из стекла
и позолоты и металлической арматурой
3ddd
$1

MM LAMPADARI 6578
...mm lampadari 6578
3ddd
mm lampadari
торшер mm lampadari 6578/lt3+1 v2172
2
design_connected
$11

No 2
...no 2
designconnected
sibast no 2 computer generated 3d model. designed by sibast, helge.
turbosquid
$99

Smilodon 2 Pose 2
... available on turbo squid, the world's leading provider of digital 3d models for visualization, films, television, and games.
turbosquid
$20

Barrel Barricade 2-2
... available on turbo squid, the world's leading provider of digital 3d models for visualization, films, television, and games.
turbosquid
$6

Wall Trophy (2) (2)
... available on turbo squid, the world's leading provider of digital 3d models for visualization, films, television, and games.
turbosquid
free

Tire label 2 of 2
... available on turbo squid, the world's leading provider of digital 3d models for visualization, films, television, and games.
3ddd
$1

Кровать, 2 тумбочки, 2 светильника
...кровать, 2 тумбочки, 2 светильника
3ddd
кровать, 2 тумбочки, 2 светильника
нормальное качество
формат 3ds max
без текстур
3ddd
free

Кровать, 2 тумбочки, 2 светильника
...кровать, 2 тумбочки, 2 светильника
3ddd
кровать, 2 тумбочки, 2 светильника
нормальное качество
формат 3ds max
без текстур
turbosquid
$19
Loft wooden square box chandelier (2) (2) (2)
... available on turbo squid, the world's leading provider of digital 3d models for visualization, films, television, and games.
3ddd
$1
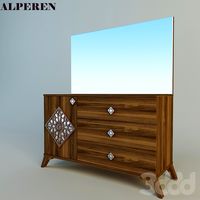
ALPEREN-2
...alperen-2
3ddd
комод , alperen-2
комод с зеркалом alperen-2
design_connected
$27
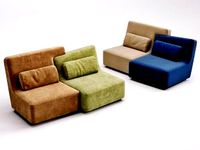
Confluences 2 2-Seater Sofa
... 2-seater sofa
designconnected
ligne roset confluences 2 2-seater sofa computer generated 3d model. designed by nigro, philippe.